Rollers for decorative plaster
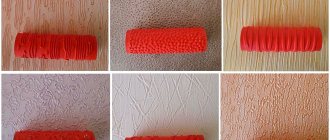
This construction tool consists of a handle, a metal bracket and a cylindrical roller rotating on it. The surface of the roller has a coating with a certain texture, thanks to which, by running the roller over fresh plaster, you can get an original relief.
Depending on the working material and the pattern that needs to be obtained, the surface of the roller may differ. This was the reason for the creation of a wide variety of finishing tools.
In a general sense, they are divided into the following types:
- A tool that differs in material;
- A tool that differs in the design applied.
Types of tools by type of material
The result obtained largely depends on the surface of the tool, and therefore modern manufacturers produce rollers from a variety of materials. For example:
Rubber
The surface of such a roller is made of hard rubber. It may have various indentations, protrusions or ornaments that allow you to obtain a certain pattern - an interesting abstraction or an imitation of natural stone, wood or brick.
In this case, a rubber roller is used in cases where it is necessary to obtain a pronounced textured relief. Without work experience, achieving an acceptable result will be extremely problematic, and therefore most often a rubber roller is preferred by experienced craftsmen who have been working in this field for many years.
Plastic
Tools made from this material are the most affordable. In fact, these are cheap analogues of rubber rollers, and therefore you should not be surprised that a plastic tool breaks down quite quickly. According to reviews, after 2-3 uses, cracks or areas of deformation appear on such a roller. This instrument should be carefully inspected before purchase and immediately before use.
Pile
Such instruments can be made from both artificial and natural materials. The natural product is of higher quality, although it costs more. But the artificial pile can crumble, which will ruin the entire original idea. In this regard, we advise you not to save money and choose only a natural, and therefore high-quality product for your purposes.
By the way, the length of the pile determines what kind of texture you will get. If you want to get a more textured wall, choose a roller with long pile, and if you want a virtually smooth wall, the pile should be short.
Foam rubber
Treating the surface with a foam roller creates the effect of small craters and bubbles on the wall.
Leather
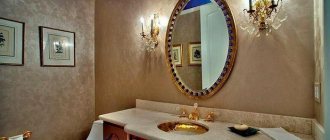
Like any product made of genuine leather, this tool is not cheap. But it is worth the money, because it is thanks to it that you can get the effect of Venetian plaster on the wall. Depending on the roller you choose, you can create a marble wall or finish that imitates another noble mineral, which will have an incredibly realistic look.
The advantages of this material include its durability. In general, practice shows that instruments made from natural materials last longer than their synthetic “brothers.”
Important! In addition to tools made from the materials described, rollers made of foam, polyethylene, fabric or foam rubber can be found on sale. They are used to achieve a bubble effect or to get a textured wall dotted with small craters.
Roll instead of wallpaper
Knurling with patterned rollers.
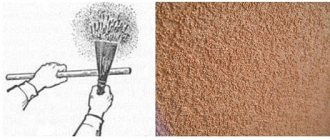
I can saw, drill and much more, I can’t cross stitch by the way, but I can’t glue wallpaper without seams and even with two people I’ll ruin everything, quarrel and send it away. And it never turned out beautifully. That's why my best friends are paint and plaster. Although there was an experience with something seamless. One roller with glue passes along the wall, the other, like a sower, throws polymer mica.
And then again Buy HERE
and on Etsy at affordable prices.
And easier. The main thing is not to forget to keep the roller in an upright position. Or
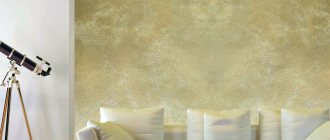
Decorative painting techniques allow you to achieve special effects on the surface of walls. Here you can show not only skill, but also imagination. In some cases, through the use of various techniques, a second color is applied to the main coating. In others, paint is used to give the surface the appearance of another material, such as wood or marble.
The design can be applied to the painted wall surface using embossed rubber rollers.
Types of tools by type of pattern applied
Depending on the chosen tool, you can get a structural or textured pattern on the wall. Let us explain the fundamental difference.
Textured rollers
Using a textured roller you can create an imitation of a certain material, for example, wood or stone, textiles or fur, stone chips, or even bamboo fiber. As a rule, tools made of soft rubber, leather, lint and sponge are produced for these purposes, depending on what kind of structure you want to achieve.
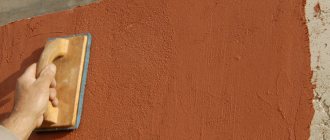
For example, to get a wall with a fur coat effect, you need to work with a fleecy roller.
Experts advise doing this type of finishing on a primed wall. It should be remembered that:
- The solution for such finishing should not be too liquid so that the resulting effect does not “float”;
- The wider the roller, the easier it is to obtain the desired texture;
- The more evenly and longer you move the tool along the wall, without leaving the surface, the better results you will achieve.
Structural rollers
This tool is used to create repeating patterns that are found on the surface of the tool. Obviously, such a process can only begin after the wall has been properly finished and treated with a primer. Hard rubber products are most often used to apply ornaments.
The process of applying the ornament also involves some nuances:
- It is important to let the plaster dry for 15-20 minutes, and only then run the roller along the wall from top to bottom, watching the direction and force of pressure on the tool;
- It is important that during each application the tool passes next to the previous layer. If there are gaps or overlaps in the design, it can ruin the entire look.
The width and length of the roller also plays a role in choosing a tool. Their classification is as follows:
- up to 300 mm – short;
- 300-500 mm – average;
- more than 500 mm – long.
Rolling technique
Painting walls with a roller with a pattern is as follows: 1.
Pour such an amount into the paint container so that the lower roller is half immersed in it. 2. If there is excess paint in the container and, accordingly, on the roller, the roll will be uniform, but the intensity of the pattern will steadily decrease. 3. Do not tilt the device so as not to spill paint on the wall. 4. When using a roller system, rolling is very difficult. Here you need to carefully monitor the amount of paint on the sponge, otherwise the intensity of the print will not be uniform.
Making your own roller
If desired, you can prepare a real roller to create a decorative pattern on the wall yourself. You don't need to be a folk craftsman to do this. There are four options for making rollers that will not only surprise and delight you, but will also allow you to seriously save on the purchase of working tools.
Option #1. To make it, you will need a rope, as well as a roller with a well-rotating roller. Simply wrap the rope tightly around the roller, tie tightly, and hide the ends. The indentations left by the rope will create an interesting and original pattern that you will not find in others. By the way, by changing the frequency of winding the rope, you will change the resulting pattern.
Option #2. Taking an old foam roller, simply cut it crosswise into several pieces with scissors. The resulting texture will pleasantly surprise you, and what’s interesting is that no one will guess how exactly you got it!
Option #3. Wrap the working surface of the roller with polyethylene and securely fix the ends. Alternatively, to create a structural roller, simply screw regular tape onto the roller.
Option number 4. If you need a structural cushion, you will have to work harder. Take a thick fabric and, using the origami principle, form it into 5-7 figures, a print of which you would like to see on your wall. Once the figures are ready, attach them to the foam roller using a stapler. With a little perseverance and patience, you will create not just an original roller, but a tool with a claim to exclusivity!
How to work with a pattern roller
Attention! Before applying, be sure to test the roller on paper or newspaper. Try not to press too hard to prevent the design from smearing. Once you determine the optimal pressure force and trajectory of movement, you can begin applying to the wall.
You will need the following:
- patterned rollers;
- foam rollers;
- paint (or decorative plaster);
- putty;
- spatulas;
- paint ditch;
- rags;
- gloves and protective apron.
Since paint always has a strong and unpleasant smell, work in a respirator and in a well-ventilated area!
Procedure:
- Clean the wall from dirt, dust and grease. If necessary, repair chips, potholes and cracks. The surface must be smooth, level and clean.
- Pour paint into the cuvette. Dip a foam roller into it. Roll back and forth several times. The paint should not drip; if necessary, squeeze out the excess into the ditch. Now attach the pattern roller to the frame.
- Start working from the top left corner. Roll the roller slowly, pressing lightly on it and without making sudden jerks. Try to apply the pattern in one continuous motion from top to bottom.
- Perform each subsequent pass with a roller strictly in conjunction with the previous one, avoiding noticeable gaps.
- Wait for the paint to dry completely.
Now let's look at how to apply patterns with decorative plaster. There is nothing complicated here either.
- Thoroughly clean the wall of dirt and remnants of old wallpaper and coat it with a primer.
- Apply the putty, try to press it into the surface of the wall, but do not press too hard.
- Apply a second layer, leveling it with spatulas of different sizes. Let dry.
- Dilute dry plaster with water according to the manufacturer's instructions.
- Apply the resulting mixture in an even, dense layer on the wall and level it out.
- Wait a few minutes for the plaster to thicken a little.
- Take a patterned roller (foam rubber is not needed, it needs to be removed from the frame).
- Slowly, without lifting the tool, make the first pass with the roller. It is more convenient to start from the upper left corner.
- Perform each subsequent pass with a roller in conjunction with the previous one, avoiding the formation of voids.
- Let the plaster dry for two days and then proceed to finishing the wall.
A little secret: it is most convenient to do this work together. For example, you apply plaster, and your assistant immediately behind you creates a relief pattern with a roller.
Ready-made decorative effects
Those who do not want to bother making this construction device themselves, but would like to get an original decorative effect, should visit the relevant departments of construction supermarkets. On sale you can find ready-made textured design rollers that will help you obtain exclusive decorative effects.
Here are some models:
"Blots" . The effect of a water spot, with drops of liquid spreading on the sides;
"Diagonal". A pattern with inclined lines of different directions for lovers of abstract art and clear lines;
"Rain". The effect of streams and raindrops flowing down the wall.
"Rhinestones". A glamorous effect that imitates precious stones arranged in rows on the wall;
"Frosty morning". A stylish effect imitating frosty lace that appears on glass during frost;
"Blooming Meadow" This is a fantasy effect that leaves a fancy floral pattern on the wall.
But the wall on which the textured roller finish is combined with other finishing works, for example, with the application of stencils, looks especially impressive. By the way, an excellent decorative effect is obtained by imprinting your own palms on the wall.
How to “roll” patterns onto walls as bookmarks 30
In order to paint the walls in your home in an original way, you don’t have to have a lot of money or time. Sometimes it is enough to know a few tricks to make your home shine in new splendor. Pay attention to these 7 techniques that will help you tidy up your walls and make your interior more original and unusual. No one will have such repairs!
1. Patterned Rollers If you want a nice pattern on your wall, you can do it with a textured roller. This decoration method is very simple and affordable. Before you start, practice on cardboard.
Rules for choosing a roller for decoration
To avoid mistakes when purchasing and purchase high-quality construction tools, follow the advice of professionals who have extensive experience in decorative finishing.
- When choosing a roller, first of all, evaluate its reliability and absence of deformation. The tool should not be fragile, and it should have a strong handle. Evaluate the rotation of the roller. It should spin easily in one direction and the other. Any shortcomings are a reason to refuse the purchase.
- Make sure the bracket that connects the roller handle to the roller is secure. If the bracket is too thin or made of soft metal, it may bend during operation, which will quickly render the roller unusable, and will also seriously affect the quality of the created surface.
- When choosing a roller with fur, run your hand against the fur to make sure that no lint is falling out of the surface coating of the roller. Sticking to the wall during the process of applying plaster, the lint can ruin the result.
- If in addition to the walls you have to decorate the ceiling, choose a roller not with a simple one, but with a telescopic handle. Otherwise, you will have to work under the ceiling from a stepladder, which is not very convenient for this type of finishing.
- When choosing a structured rubber roller, make sure that the rubber roller rotates well and does not vibrate. Ideally, you should purchase a model that has an additional lubricating cylinder and a mixture hopper. With this tool you can stretch the pattern from floor to ceiling without interrupting to saturate the roller with a new portion of paint.
- When choosing a foam roller, make sure the sponge has quality pores and elevations to create bubbles or craters.
- If you are going to purchase a leather roller, thanks to which you can achieve the effect of Venetian plaster, do not spare money on natural leather. The synthetic work surface does not leave a mark on the plastered wall, and besides, it can dissolve under the influence of paints and other chemicals.
- When choosing a lint roller, proceed from the result you plan to get. Remember, for the wall to be “shaggy” with pronounced lint marks, their length on the roller should be maximum.
Classification of rollers according to the texture of the finished pattern
The tools have a wide variety of structures, thanks to which the final ornament is obtained. Some imitate natural materials, others simply create a random design. All rollers can be divided into 2 groups:
- Textured devices are capable of transferring materials such as fur, wood, textiles and natural stone chips onto the plaster surface. Using a textured roller, a relief is created, which is achieved thanks to the material used to make the tool. For the effect of uneven fibers, a fur roller is used; to create an imitation of natural stone, a rubber product with a special pattern in the form of loops is suitable. This device is used on a primed wall without the use of preliminary finishing.
- Structural products. Plastering with a roller of this type involves applying a complex repeating pattern. This effect is achieved using the curly cutout on the roller. The peculiarity of their use is that the coating should be applied to a prepared wall with finishing. For example, when a plane is finished with paint or plaster without relief, then it is dried and decorated. To achieve a more beautiful ornament, processing is carried out using a figured roller, which has a specific pattern.
In addition, products are classified by roller width. They come in sizes from 30 cm and above. The wider the tool, the faster the composition of the textured paint will lay down, but by choosing a narrow tool, the chances of getting an attractive, clear structure are higher.
Roller care
In order for a decorative roller to last as long as possible, it needs to be looked after. If you work with water-dispersed paints, after work it is enough to rinse such construction tools with water, removing paint particles stuck between the bristles. For better washing, you should remove the fur coat from the roller and wash it. And to clean the handle and bracket from any remaining material, simply wipe them with a damp cloth.
After washing the roller, shake it off the water and dry it well. In this case, it should be dried in a suspended state, because in contact with a hard surface, the fibers of the roller can break when drying.
Alternatively, make sure your roller has removable covers. This way you can save on construction tools.