Typically, during construction and renovation, decorating walls with decorative coatings is the final stage of finishing work. However, you can often find additional surface treatment with varnish, paint, wax and other materials. This stage is the final or final finishing of the walls. Such compositions belong to the group of glazing materials; they are used to give a special effect to plaster.
To choose the appropriate composition, as well as learn how to use it correctly, you should study the main types of glazing materials, as well as become familiar with the features of their application.
What is a glazing composition and why is it needed?
Often, a glaze composition for decorative plaster acts as a finishing coating. The presented coating option serves as an additional protective layer that improves the quality of the decorative coating on the wall.
However, in addition to increasing strength and wear resistance, glazing materials give additional expressiveness to decorative plaster.
Finishing mixtures allow you to emphasize the color design of the walls, as well as highlight the relief of decorative plaster. There is a wide variety of glazing materials that have different properties and are used to achieve different purposes.
Main types: characteristics
There are many types of decorative plaster. There is a huge selection on the market.
Thanks to some, you can get a certain relief, while others require a masterful approach and the ability to create the desired type of surface.
This type of material can be either liquid or dry. Beauty is provided by various additives in the composition.
So, according to the binder they distinguish:
- Acrylic mixtures. Here the binding component is acrylic resin. The release form of such material is presented in a ready-made mixture. But, unfortunately, the acrylic mixture is very vulnerable to ultraviolet rays, which makes it limited in use.
- Mineral mixtures. In mineral plaster, the binding component is cement. The release form is presented as a dry powder, which must be diluted with water. Unlike the acrylic mixture, it is resistant to ultraviolet rays, however, it is less durable in terms of mechanical stress.
- Silicone mixture. The binder is synthetic resins. This material is considered the easiest to use. Widely used for exterior decoration due to its high resistance to ultraviolet rays and moisture-repellent properties. Release form: ready-made mixture.
- Silicate mixture. The binder is liquid glass. It has moisture-repellent properties and is also extremely resistant to external influences. The service life of such a mixture is more than 40 years. It is used both for external decoration and for indoor work. The release form is most often in the form of a ready-made mixture.
By type of filler there are:
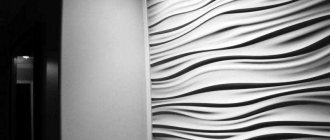
- Modeling or otherwise textured.
- Structural.
- Venetian.
In turn, modeling and structural plaster belongs to the relief type, and Venetian plaster belongs to the smooth type, due to the fact that it forms a perfectly flat surface.
Now about each in more detail.
Modeling and its features
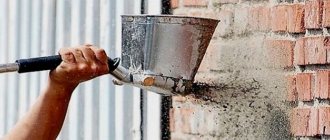
This type of plaster is widely used for wooden and brick surfaces. Due to its composition, it perfectly masks unevenness, cracks and other defects on the walls. The question of how to apply decorative plaster usually does not arise, since this type of material is easy to use. To apply it, you just need to clean and dry the surface thoroughly.
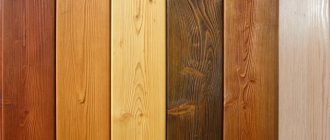
Modeling plaster is famous for its high strength and water resistance. This type of plaster does not lose its qualities with temperature changes, and can also imitate various surfaces, for example, create the effect of a wooden or stone coating.
Modeling plaster has its own subtypes:
- Lamb. Due to its composition, the surface becomes similar to the hair of a young lamb.
- Fur coat. This is cement plaster. On the surface it gives the effect as if short-haired fur fibers were applied to the wall.
- Bark beetle A material that, after application, creates an effect similar to the structure of wood eaten away by a beetle.
Nuances of structural plaster
In the production of this type, liquid glass and acrylic are used. It is used both for indoor work and for exterior finishing. The texture of the wall pattern is given by small shells, pebbles and quartz chips. Structural plaster is resistant to moisture, mechanical stress and temperature changes. It can be applied using a sprayer, spatula or roller.
Venetian: material composition
The basis of this material is slaked lime and marble chips. The structure of the mixture is homogeneous. When applied to the surface, it imitates natural marble and precious metals. This type of finishing is considered the most difficult to use and requires special skills and abilities. If the rules for applying this material are not followed, cracks and other defects may appear on the surface. The mixture is used only for interior decoration.
Useful properties and disadvantages
Finishing walls has a number of advantages compared to conventional coating without a protective layer. Among the main advantages it is worth noting:
- The composition gives the surface additional shine and shine.
- A wall with a glaze coating has increased strength and wear resistance.
- Varnish, paint and wax can solve the problem of fading of the plaster mixture.
- Additional coating allows you to highlight the relief of decorative plaster.
- Application of a protective film allows for wet cleaning of walls.
However, treatment with a glazing composition has several disadvantages, among which the following were identified:
- When using varnish, paint or wax, replacing decorative plaster will be much more difficult, since in this case you will have to completely remove sections of the coating.
- Carrying out work with a glazing composition requires additional financial costs.
Types of coatings
It is customary to distinguish paints and varnishes by type of additive and purpose. They are combined into several groups.
Paints
The most extensive type of glaze compositions. Paints are used for plaster and wood, presented for interior and exterior use. Exist:
- acrylic compounds;
- oil paints.
There are also synthetic mixtures with alkyd-urethane or polyurethane additives. They are used for exterior decoration. For interior work, VGT paints without a synthetic odor are used. They are less durable, but absolutely safe, while polyurethane compounds contain high-strength additives that are not recommended for indoor use.
Lucky
Glazing varnish strengthens the surface and gives it shine or dullness. There is a type of varnish - azure. It costs more, but allows you to create a radiant effect. Varnishes are more often used outdoors.
Antiseptics
Most often, antiseptics are used to treat wood, giving it a semi-gloss shine and enhancing the shade. They are applied in several layers. The composition may include alkyd resins and oils. There are also antiseptics for plaster that protect it in wet rooms.
Waxes
Wax gives maximum gloss to plasters and protects them from damage and ultraviolet radiation. However, this product cannot be tinted when used on plaster. When applying, you need to act as carefully as possible, using a rag or a special brush and sponge.
Criterias of choice
When purchasing a product, the main criterion is to take into account the type of material and the location of the work. You need to be guided by information from the manufacturer of the glazing composition: for wood or decorative plaster, for interior or exterior work.
Antiseptic compounds can be used for wet rooms, wood, and plaster that has been in use for a long time and needs to be refreshed. Wax is used mainly to give a glossy shine and create the effect of artificial stone.
Paint is the most difficult surface to treat. But it allows you to change shades over a wide range. Varnishes also have a tone-changing effect and reliably protect wood and plaster.
Which glaze composition to choose
The plaster layer of decorative material can be covered with various glazing materials. On the shelves of construction stores you can find a wide range of finishing compounds.
Depending on the goals that the designer or builder sets for himself, paint, varnish, wax or an antiseptic may be needed.
It is worth taking a closer look at the presented protective coating options.
Paints
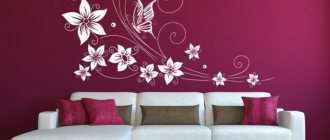
Glazing paint will allow you to change the color of the plaster, as well as emphasize the shade of the base coating. Usually, for finishing, paint of the same color as the decorative plaster is selected. However, if you wish, you can try changing the color scheme of the room. To do this, you can use the game of contrast when combining two opposite colors.
Glaze varnish and glaze
On the shelves of stores for construction and repair you can find various types of varnishes. Glazing varnish is used as the final stage of finishing work. The application technology is no different from other processing methods. It is enough to cover the surface with the selected mixture and then wait until the material dries completely.
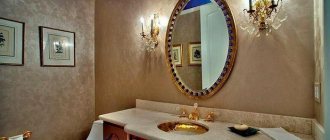
Glaze for decorative plaster is a more expensive coating option that allows you to give the walls additional shine and shine. If desired, you can create decorative azure at home.
Antiseptics
Over time, the wall can become covered with mold and mildew. To eliminate unpleasant stains and odors, the wall should be treated with an antiseptic. There are various mixtures that contain disinfectants. You should clarify the properties of the purchased material in advance, and also read the instructions for use.
Wax
You can apply wax to the surface using brushes, sponges or brushes. The wax coating allows you to give the plaster a glossy shine. Most often, this option is used for the final finishing of walls with imitation of decorative stone.
A special feature of wax is the ability to change the shade of the coating. To do this, just add a suitable color to the material.
Varnish
Wood varnish is needed to get a beautiful finish. Varnishes always contain solvents, and there is no need to talk about environmental friendliness. Therefore, if you care about your health, use varnish only for exterior decoration. Treating the wooden facade of a house, bathhouse or gazebo will provide reliable protection against all the problems inherent in wood.
Not only the protective, but also the decorative properties of glaze varnish are widely known; this helps highlight the natural beauty of the wood. The surface does not darken over time and does not change color. It can acquire a pleasant shine due to the fact that varnishes are available in three varieties: matte, semi-gloss and glossy.
Source spbparket.ru
How to make it yourself
You can buy a ready-made mixture in a store, but modern formulations from leading manufacturers are quite expensive. In this regard, to save money, you can prepare the mixture yourself; to do this, you will need to follow the instructions below:
- It is necessary to prepare water-based paint, acrylic varnish and wallpaper glue in a ratio of 1:2:4. Instead of paint, you can use color, in which case you will need half as much as regular paint.
- First, wallpaper glue is prepared, after which paint and varnish are added to the mixture.
- The solution is thoroughly mixed, and then sparkles or glitter are added.
How to prepare the surface for applying varnish
Before you begin glazing, you should make sure that the plastered surface is completely dry and has gained strength. Dust and adhering lumps of construction mixture should be carefully removed from it.
It is necessary to prime the base only if the surface is too porous and there is a fear that the varnish will roll off it. The primer is applied in 2 layers.
If you have to varnish plaster that already has an old varnish coating, you need to remove the old varnish coating. If the plaster was coated with alkyd paint, it can be easily scraped off with sandpaper and the dust wiped off before glazing.
The plaster must be completely dry before glazing.
Required materials and tools
The selection of materials and tools is a mandatory step when performing the final processing of walls. To complete the work you will need the following set:
- The desired type of coating can be paint, varnish, glaze or wax.
- Several types of brushes for ease of application. You will need wide and narrow brushes to evenly distribute the mixture in hard-to-reach places.
- Roller, sponges and pieces of cloth for surface treatment during the distribution of the composition.
- Spray gun for quick application of material.
- To limit the treatment areas, you should prepare masking tape.
- Personal protective equipment to avoid staining clothing and skin.
General information
So, glaze is the treatment of wood with compounds that slightly give the surface a tint, shine and slightly muffle its texture.
As mentioned above, glaze paints for wood protect it from various adverse effects, such as:
- Atmospheric phenomena (if we are talking about exterior decoration).
- Exposure to direct sunlight.
- Temperature changes.
- Fungal or bacterial damage.
In addition, glazing gives the wood a more attractive appearance.
Glaze paint for exterior use
Surface preparation
Application of the glazing composition can only be carried out after careful preparation of the walls for working. The preparation process consists of several stages:
- First, you should carefully inspect the walls, identify major defects, and then eliminate them.
- Small defects can be removed with a hard-bristled brush, and then thoroughly clean the surface with a sanding disc and a damp cloth.
- Areas with mold and fungal colonies should be treated with disinfectant solutions.
- Plaster can be applied to the prepared wall, and after the decorative coating has completely dried, you can begin glazing.
- Before glazing, you should wait until the decorative plaster has completely dried. For better adhesion, you can use a primer, but this is not a prerequisite when performing work.
Painting with glaze paints
Surface preparation
Before applying the glazing composition, the surface must be prepared:
1. Thoroughly remove accumulated dirt and old paint. To do this, use a spatula and a hair dryer. If the old coating is difficult to remove, use coarse sandpaper or an abrasive wheel.
2. If there are unevenness or cracks on the surface, apply a thin layer of putty to level the area and apply the paint more evenly.
3. Treat the base with a degreaser or solvent to remove grease stains and remaining dirt. As a result, you should have a smooth, clean surface.
Coating
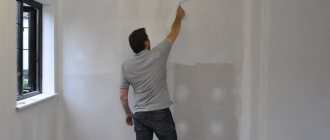
Before painting, the surface must be divided into several equal parts with an area of no more than one square meter. The paint should be applied using a soft sponge, brush or special mitten, which can be purchased at the same store as the composition itself. The strokes are applied broadly in different directions, and the movements should be smooth.
It is prohibited to carry out painting work at high air humidity, as well as at temperatures above 30 and below 10 degrees Celsius.
Review of glazing compounds (3 videos)
Various products (32 photos)
Glazing technology - application
Glazing is carried out only after the decorative plaster on the wall has completely dried. When the mixture has hardened, you can begin the final stage of covering the walls with a glaze composition. In this case, wall processing is performed in several stages, each of which is important to achieve the desired result.
Wall decoration
Glazing begins from opposite corners in the room. In this case, the walls are conventionally divided into squares, the area of which is no more than 1 m^2. For convenience, you can use masking tape to limit the working surface. Each square is covered with a pre-prepared mixture.
It is worth considering that the application of the glazing composition to the next square must be done before the previous section has completely dried. This will create a smooth transition of colors. P
If you want to create additional shine, you can cover the walls with glazing materials in several layers.
Painting corners
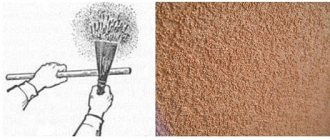
Particularly difficult is the finishing of the corner parts of the room. Especially for processing joints, a small brush or shaving brush is used, which is used for shaving. In this case, the composition is applied to a brush and then distributed evenly over the entire surface of the wall. When processing corners, apply the material using dashed or circular movements.
Cleaning stubble
During the final finishing process, a large amount of glaze material may get into the bristles of brushes or other working tools. If the composition remains in the pile for a long time, it will harden, which will lead to damage to the working tool. In this regard, every 3-4 strokes you should clean the bristles from accumulated material. This will allow you to evenly distribute the material over the surface without additional effort or difficulty.
Finished surface painting technology
It is recommended to apply the next layer of paint to decorative walls after the previous one has completely dried. At normal temperatures, the drying of the glaze composition is completed after 4 hours, sometimes the process extends for 24 hours. If the temperature is close to zero and the humidity is high, the drying time of the varnish can be 48 hours.
Surface preparation
It is much easier to complete the job if painting is done over decorative plaster, which makes the wall as smooth as possible, which prevents damage to the finishing layer. Before glazing, it is important to make sure that the plastered wall has completely dried and the surface has hardened well. After this, dust from the grout is wiped off with a damp cloth and construction debris is removed. Additional priming of the walls is not necessary, but some specialists do this work as well.
The most suitable indicators for coating plaster with glaze varnish are considered to be a temperature of +5...+35°C and a humidity within 75%.
If these conditions do not exist, it is recommended to postpone painting. Before covering the walls with azure, the room is ventilated and waited until the optimal temperature is established.
Coloring
Before starting to glaze the walls with the prepared composition, it is advisable to protect adjacent surfaces by sticking masking tape on them along the entire perimeter. If the master accidentally goes over the edge, the wall will no longer get dirty, and the tape will be removed upon completion of the work. The result is an even paint job that does not affect adjacent walls. It is necessary to protect the floor covering from varnish by laying a film on it.
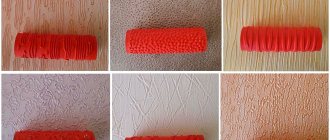
Processing a decorative wall with a roller is no different from working with simple plaster. To do this, paint is diluted in a tray to the desired consistency, a roller is immersed in it, excess substance is removed using the grooved section of the tray, after which the wall is painted. First, movements should be carried out from top to bottom, and then change direction to the opposite.
When using one roller, the application of the decorative glaze composition is uniform, which is clearly visible on the surface of the walls. With simple texture solutions, this approach is not excluded, but when it comes to complex, sophisticated reliefs, then it is necessary to use other techniques. To do this, you will need a brush that is convenient for making strokes of different directions and lengths. This will help eliminate the monotony of glazing, especially if the surface already has a decorative pattern.
It would be more correct if the movements of the brush when first applied to the wall are directed in different directions, after which you can level the surface by using a vertical roller. Together, these 2 tools are often used to cover the terrain using the “rain” technique. The brush easily penetrates into any hard-to-reach places, corners and grooves. Then, using light pressure from a roller and a minimal amount of glazing compound, the relief areas are painted over. The result of this technique is a two-color coating.
If the texture is shallow, then use a sponge and a mitten, thus enhancing the depth of the relief and emphasizing the effect of antiquity. In some cases, they resort to using a spatula, which applies an additional layer of decorative glaze. But more often this tool is used to remove excess paint from the wall. It is advisable to work joints only when they are wet, for which there is a special two-handed technique, when the work is performed by 2 craftsmen.
Despite the environmental friendliness and safety of compositions for coating decorative plaster, it is recommended to wear rubber gloves and special clothing when applying them to walls. If it is necessary to create a blurry effect, use a sponge moistened with water, which is carefully passed along the wall, soaking the composition in the right place.
Beginners may encounter a number of difficulties with the finishing process and develop defects that will have to be corrected. In this case, the damaged area is sanded and the layer is renewed.
Flow calculation
The amount of glaze varnish for decorative plaster should be calculated depending on the final goal. If protection and light coverage is required, then 1 layer is enough. The next one is used to enhance the brightness of the color scheme. You can do it in the same tone or choose a different color scheme. For 1 sq. m, approximately 100 g of composition is consumed. The amount of varnish is slightly reduced if you use a spray gun instead of a brush.
Correction of application errors
To create an even protective layer on top of decorative plaster, you should pay attention to all stages of the work. At the final stage, defects and shortcomings that were made during decoration should be eliminated:
- It is necessary to evenly distribute the composition over the entire surface of the wall, while all areas must have the same thickness of the protective film.
- If the color in certain areas is very different from the main part, it is necessary to additionally cover the wall with a glazing compound. In this regard, you should buy material with a reserve.
- Before correcting mistakes, you should wait a few days for the mixture on the wall to acquire its final shade. If the color is very different, the area should be cleaned and then reapplied. To complete the work, it is better to use a small brush.
- In case of significant defects, it will be necessary to remove a section of the decorative coating along with the glaze material. After this, the finishing will have to be repeated.
- Minor differences in the angle of inclination can be disguised using a play of color. It is worth using paint, the shade of which smoothly turns into a darker one from bottom to top.
Waxing for protection and shine
Wax is necessary to protect the coating from moisture, giving it smoothness and gloss. The method of application to the plaster does not matter. Depending on the thickness of the composition, use soft material, a sponge or a spatula. The main thing is to thoroughly rub in the wax, making glazing circular movements until a shine forms on the surface. Before doing this, it is recommended to make sure that there are no defects on the wall, which will then be almost impossible to correct.
It is also important to carefully remove dust and crumbs that could scratch the surface when used with a trowel. Craftsmen who love to work with this tool achieve exceptional shine, which is not possible when using a mitten or sponge. You need to work from corner to corner, without using the layering method. Despite the speed of drying of the composition, any defects that appear can be corrected within 3-6 hours.
It is worth considering that the edges of the glaze dry out earlier. The next day, polishing is done using a cloth or a grinding machine.
Why does wood need protection?
- The main disadvantages of wood are its low moisture resistance, as well as its susceptibility to harmful microorganisms and insects. These shortcomings lead to rapid rotting and destruction of the material.
- It should be borne in mind that mold and other pathogenic organisms can significantly harm human health. They cause allergies, diseases of the respiratory tract and organs, etc.
Note! To eliminate the mentioned defects of wood, paint and varnish and antiseptic compositions are used. They protect the material from and also have decorative properties.
Manufacturers produce a variety of coatings and impregnations for wood, but the most interesting of them are glaze compounds.
Features of glaze coatings
- Glazing (German Lasierung - “glaze”) means the technology of creating deep iridescent tones by applying translucent coatings on top of primary colors. This concept also includes special translucent dyes used in construction.
- In essence, glazing substances mean a type of paint and varnish that is used to give the base additional decorativeness. Their dry residue is usually 10% and is similar in composition to very
- Both water and organic solvents can be used as a diluent.
- Glazing impregnation for wood is usually used, because emphasizes its texture and texture. Protective modifiers - bactericides, fungicides, insecticides - are often introduced into such materials.
Care of the treated surface
Despite the fact that the varnish or paint is completely fixed on the plaster after 2 weeks, it can only be washed a month after treatment. To do this, use a warm water solution and a soft sponge. Do not allow oil, solvents or other aggressive chemicals to come into contact with the surface as they may change the color of the paint or compromise its integrity.
A wooden surface on which a glazing antiseptic is applied is quite resistant to adverse factors. The paint allows you to maintain its structure and does not lose its color for a long time.
By using a glaze coating applied to plaster and wooden surfaces to create an original room design, you can reliably protect them from moisture, mold and destruction. A wide selection of colors makes it possible to choose the appropriate option, allowing you to implement all your ideas.
Glazing is a finishing option for materials in which surfaces are coated with transparent glossy paint. As a result of this processing, the materials receive textured depth and, of course, attractive decorativeness. Using this technique you can decorate walls, ceilings and even pieces of furniture in your apartment. Our article will tell you how to do this.