Rollers for decorative plaster
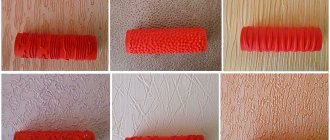
This construction tool consists of a handle, a metal bracket and a cylindrical roller rotating on it. The surface of the roller has a coating with a certain texture, thanks to which, by running the roller over fresh plaster, you can get an original relief.
Depending on the working material and the pattern that needs to be obtained, the surface of the roller may differ. This was the reason for the creation of a wide variety of finishing tools.
In a general sense, they are divided into the following types:
- A tool that differs in material;
- A tool that differs in the design applied.
How to use a roller correctly?
The features of applying plaster with your own hands depend on the tool itself, since each of its varieties requires special handling. General recommendations for all types of rollers are the absence of strong pressure on the tool and smooth movements with easy gliding.
It is highly advisable not to tear the tool away from the surface of the wall being finished while working, because the “joints” will be very noticeable.
Rollers are available in various widths - they can be either short (up to 30 cm) or long (more than 50 cm). Obviously, the size affects the speed of work - the larger the width, the faster you can “roll up” the wall, but you cannot get into hard-to-reach places with a bulky tool.
- The large width of the roller helps to obtain a good result.
- The convexity or recess of the future pattern on the wall is opposite to the convexity or recesses of the working surface of the roller.
- The plaster on which the textured tool is used must first dry out a little, otherwise the relief surface of the roller will simply “scatter” the future pattern.
Working with a structural roller has fairly similar recommendations, but there are also differences - for example, the layer of plaster to which the pattern is given should be thinner and applied on top of a ready-made surface of paint or plaster.
When applying plaster with such a tool, it is extremely important to monitor the evenness of the passes; it is extremely undesirable to be distracted and abandon the strict geometry of the work.
In any case, applying plaster with your own hands is done strictly from top to bottom, without overlaps, in an even layer.
Types of tools by type of material
The result obtained largely depends on the surface of the tool, and therefore modern manufacturers produce rollers from a variety of materials. For example:
Rubber
The surface of such a roller is made of hard rubber. It may have various indentations, protrusions or ornaments that allow you to obtain a certain pattern - an interesting abstraction or an imitation of natural stone, wood or brick.
In this case, a rubber roller is used in cases where it is necessary to obtain a pronounced textured relief. Without work experience, achieving an acceptable result will be extremely problematic, and therefore most often a rubber roller is preferred by experienced craftsmen who have been working in this field for many years.
Plastic
Tools made from this material are the most affordable. In fact, these are cheap analogues of rubber rollers, and therefore you should not be surprised that a plastic tool breaks down quite quickly. According to reviews, after 2-3 uses, cracks or areas of deformation appear on such a roller. This instrument should be carefully inspected before purchase and immediately before use.
Pile
Such instruments can be made from both artificial and natural materials. The natural product is of higher quality, although it costs more. But the artificial pile can crumble, which will ruin the entire original idea. In this regard, we advise you not to save money and choose only a natural, and therefore high-quality product for your purposes.
By the way, the length of the pile determines what kind of texture you will get. If you want to get a more textured wall, choose a roller with long pile, and if you want a virtually smooth wall, the pile should be short.
Foam rubber
Treating the surface with a foam roller creates the effect of small craters and bubbles on the wall.
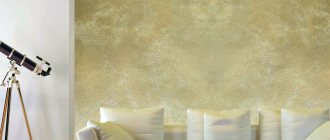
Leather
Like any product made of genuine leather, this tool is not cheap. But it is worth the money, because it is thanks to it that you can get the effect of Venetian plaster on the wall. Depending on the roller you choose, you can create a marble wall or finish that imitates another noble mineral, which will have an incredibly realistic look.
The advantages of this material include its durability. In general, practice shows that instruments made from natural materials last longer than their synthetic “brothers.”
Important! In addition to tools made from the materials described, rollers made of foam, polyethylene, fabric or foam rubber can be found on sale. They are used to achieve a bubble effect or to get a textured wall dotted with small craters.
Step-by-step instructions for applying decorative plaster with a roller to the facade
Using roller tools you can apply textured layers from the finished solution. Facade plaster is applied with a roller in the same way as paint and primer. First comes the preparation stage. If a room or façade needs to be plastered, you must first prime the surface to remove dust. A binder base with additives and fillers is suitable for the procedure.
Step-by-step instructions for applying plaster to the facade using any roller are as follows:
- Dip the roller into the solution;
- Transfer the roller to a special tray to remove excess composition;
- Apply the bead to the surface and roll it up and down to evenly distribute the material over the wall.
When forming a pattern, the sequence of work will be slightly changed. First, you will need to apply the solution to the wall using a regular spatula. Next, level the layer with a roller and roll the pattern using the technology described above.
Note! You should not miss the point that decorative plaster must be applied under certain conditions. Air humidity should be no more than 60 degrees, and temperature no higher than 30 degrees.
To apply the composition correctly, you need to eliminate possible errors. You should not skip the primer; you must distribute the plaster composition evenly. There should be no interruptions while performing the noise effect. It is also not recommended to leave the roller without cleaning. In the latter case, the dried solution will need to be subjected to harsh cleaning and this will ruin its surface. In addition, scratches on the instrument should be avoided. The solution may stick to them, which will interfere with further work.
To create a beautiful drawing, you should work according to specific standards. Thus, the rollers should not be pressed excessively onto the treated area. Hand movements should have a smooth, free structure. The second tracks should be laid without overlapping with the first strip. It is recommended to press the tool at the very top.
It is also worth pointing out that excessively bulky relief, which differs from the general image, must be removed using a moistened sanding mesh. Wall painting should be done no earlier than two days after the coat. Decorative plaster must be applied in only one layer; it is important that this layer has the same thickness over the entire area to be coated.
It is important that when using a structural roller, it is recommended to wait a little until the surface dries. But the longer the plaster dries, the more it will lose its plasticity.
It is recommended to wait 10 minutes after the first stage. At the next stage, work should be done from top to bottom. If you change the degree of pressure on the roller, you can achieve different effects. A similar technique can be used to emphasize individual decorative elements.
It is also worth paying attention to the fact that decorative rollers, which have an extensive relief appearance, can visually reduce and narrow the space. This must be taken into account when choosing a pattern for finishing a small facade.
Types of tools by type of pattern applied
Depending on the chosen tool, you can get a structural or textured pattern on the wall. Let us explain the fundamental difference.
Textured rollers
Using a textured roller you can create an imitation of a certain material, for example, wood or stone, textiles or fur, stone chips, or even bamboo fiber. As a rule, tools made of soft rubber, leather, lint and sponge are produced for these purposes, depending on what kind of structure you want to achieve.
For example, to get a wall with a fur coat effect, you need to work with a fleecy roller.
Experts advise doing this type of finishing on a primed wall. It should be remembered that:
- The solution for such finishing should not be too liquid so that the resulting effect does not “float”;
- The wider the roller, the easier it is to obtain the desired texture;
- The more evenly and longer you move the tool along the wall, without leaving the surface, the better results you will achieve.
Structural rollers
This tool is used to create repeating patterns that are found on the surface of the tool. Obviously, such a process can only begin after the wall has been properly finished and treated with a primer. Hard rubber products are most often used to apply ornaments.
The process of applying the ornament also involves some nuances:
- It is important to let the plaster dry for 15-20 minutes, and only then run the roller along the wall from top to bottom, watching the direction and force of pressure on the tool;
- It is important that during each application the tool passes next to the previous layer. If there are gaps or overlaps in the design, it can ruin the entire look.
The width and length of the roller also plays a role in choosing a tool. Their classification is as follows:
- up to 300 mm – short;
- 300-500 mm – average;
- more than 500 mm – long.
Patterning techniques
There is a technique for applying a pattern using a textured roller.
Before starting work with decorative plaster, you should prepare the wall surface. This is necessary so that the plaster material holds well and does not crack. The entire surface of the wall for repair is cleaned of dirt, remnants of old wallpaper, and treated with a primer.
To level the walls, putty is used using spatulas of different sizes. Apply the putty, pressing it into the walls as much as possible without pressing. Then a second layer is applied and smoothed. After drying, they begin to decorate the walls in stages.
- Dry plaster is mixed with water until smooth.
- The mass is applied to the surface in a dense layer before proceeding to decoration and smoothed.
- Next, you need to pause the painting work for a few minutes and wait for the mixture to thicken.
- Using a textured roller, perform the selected pattern.
- In this case, it is advisable to work together, so that one applies the plaster, and the second creates the relief.
- The final finishing of the walls with a painting composition is done 48 hours after the plaster has completely dried.
Important. Finishing with a textured roller can be done using a ready-made mixture from the store, which is packaged in a special sealed container.
If you use rollers in combination with other decorating tools, you can get original designs. For example, to decorate a wall with a cute, eye-catching polka dot pattern, a roller together with a stencil made by yourself from thin plastic is suitable.
The relief design depicting “bamboo shoots” turns out to be exquisite. First, the surface is coated with a white decorative mortar. With the base layer still wet, a trowel is used to draw the shoots of the bamboo plant. The wall is then treated with wax using a paint roller. At the finish, dotted accents are made with silver-colored decorative varnish, which adds even more expressiveness to the design.
Important. In small rooms with low ceilings, rollers with a large pattern visually reduce the space.
Using decorative facade plaster, you can imitate granite chips and brick.
Making your own roller
If desired, you can prepare a real roller to create a decorative pattern on the wall yourself. You don't need to be a folk craftsman to do this. There are four options for making rollers that will not only surprise and delight you, but will also allow you to seriously save on the purchase of working tools.
Option #1. To make it, you will need a rope, as well as a roller with a well-rotating roller. Simply wrap the rope tightly around the roller, tie tightly, and hide the ends. The indentations left by the rope will create an interesting and original pattern that you will not find in others. By the way, by changing the frequency of winding the rope, you will change the resulting pattern.
Option #2. Taking an old foam roller, simply cut it crosswise into several pieces with scissors. The resulting texture will pleasantly surprise you, and what’s interesting is that no one will guess how exactly you got it!
Option #3. Wrap the working surface of the roller with polyethylene and securely fix the ends. Alternatively, to create a structural roller, simply screw regular tape onto the roller.
Option number 4. If you need a structural cushion, you will have to work harder. Take a thick fabric and, using the origami principle, form it into 5-7 figures, a print of which you would like to see on your wall. Once the figures are ready, attach them to the foam roller using a stapler. With a little perseverance and patience, you will create not just an original roller, but a tool with a claim to exclusivity!
Making a textured roller with your own hands
It’s easy to make a textured roller with your own hands using old tools.
First you need to make the base - its cylinder. There are several options for blanks for the cylinder:
From an old wooden rolling pin. It should be smooth without handles. A hole is drilled in the center, a rigid metal rod or wire is inserted there and bent.
Glue the cut parts of the clothesline onto a rolling pin in any order - the textured roller is ready.
If you wrap a rolling pin with rubber wire, you can also create a decorating tool.
The toilet paper rolls remain; they will serve as the basis for a roller for textured plaster. Several parts cut out of foam plastic or cardboard are glued with a super “moment” onto the sleeve. Then you can create.
You can make a textured roller with your own hands from thin rubber.
First, clean the rubber and thoroughly degrease its surface. Then the desired design is applied with a marker to decorate the wall or ceiling. Next, load the gun with sealant, then carefully apply it along the markings. If you have no experience working with a textured roller, you should choose simple patterns without subtle curls and weaves. Textured designs in the form of simple geometric shapes and leaves are suitable.
You can use a foam roller to create decoration, wrapping it with rope in large steps.
Ready-made decorative effects
Those who do not want to bother making this construction device themselves, but would like to get an original decorative effect, should visit the relevant departments of construction supermarkets. On sale you can find ready-made textured design rollers that will help you obtain exclusive decorative effects.
Here are some models:
"Blots" . The effect of a water spot, with drops of liquid spreading on the sides;
"Diagonal". A pattern with inclined lines of different directions for lovers of abstract art and clear lines;
"Rain". The effect of streams and raindrops flowing down the wall.
"Rhinestones". A glamorous effect that imitates precious stones arranged in rows on the wall;
"Frosty morning". A stylish effect imitating frosty lace that appears on glass during frost;
"Blooming Meadow" This is a fantasy effect that leaves a fancy floral pattern on the wall.
But the wall on which the textured roller finish is combined with other finishing works, for example, with the application of stencils, looks especially impressive. By the way, an excellent decorative effect is obtained by imprinting your own palms on the wall.
Classification of rollers by contact surface material
The attachments of rollers for decorative plaster differ in the material from which they are made. Differences in the properties of contact surfaces ultimately affect the final result. A detailed classification according to this criterion is presented in the table.
| № | Tool attachment groups | Description, characteristics |
| 1 | rubber | They are mainly worked by experienced craftsmen, because they require certain dexterity and skills |
| 2 | wooden | requires drying and cleaning after use, otherwise it swells and deforms, and then, once dry, may crack |
| 3 | made of plastic | cheaper substitute for rubber nozzles |
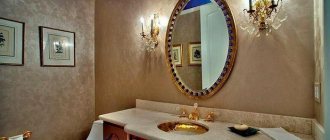
| 4 | leather | rollers with these attachments create marble-like final coatings, Venetian plaster is made |
There is a wide variety of bait textures. Some can be seen in this photo.
Types of attachments for rollers
A large selection of rollers for applying decorative coatings helps realize a wide range of design solutions. You can quite easily select a tool for a specific case.
Rules for choosing a roller for decoration
To avoid mistakes when purchasing and purchase high-quality construction tools, follow the advice of professionals who have extensive experience in decorative finishing.
- When choosing a roller, first of all, evaluate its reliability and absence of deformation. The tool should not be fragile, and it should have a strong handle. Evaluate the rotation of the roller. It should spin easily in one direction and the other. Any shortcomings are a reason to refuse the purchase.
- Make sure the bracket that connects the roller handle to the roller is secure. If the bracket is too thin or made of soft metal, it may bend during operation, which will quickly render the roller unusable, and will also seriously affect the quality of the created surface.
- When choosing a roller with fur, run your hand against the fur to make sure that no lint is falling out of the surface coating of the roller. Sticking to the wall during the process of applying plaster, the lint can ruin the result.
- If in addition to the walls you have to decorate the ceiling, choose a roller not with a simple one, but with a telescopic handle. Otherwise, you will have to work under the ceiling from a stepladder, which is not very convenient for this type of finishing.
- When choosing a structured rubber roller, make sure that the rubber roller rotates well and does not vibrate. Ideally, you should purchase a model that has an additional lubricating cylinder and a mixture hopper. With this tool you can stretch the pattern from floor to ceiling without interrupting to saturate the roller with a new portion of paint.
- When choosing a foam roller, make sure the sponge has quality pores and elevations to create bubbles or craters.
- If you are going to purchase a leather roller, thanks to which you can achieve the effect of Venetian plaster, do not spare money on natural leather. The synthetic work surface does not leave a mark on the plastered wall, and besides, it can dissolve under the influence of paints and other chemicals.
- When choosing a lint roller, proceed from the result you plan to get. Remember, for the wall to be “shaggy” with pronounced lint marks, their length on the roller should be maximum.
How to choose a roller for textured plaster
When choosing a roller for decorative plaster (if you plan to apply it yourself), you should think about what effect you want to see in the final result. If the pattern should be blurry, you should choose a tool with a soft working surface. But for a clear relief, perhaps with geometric shapes, hard rollers are suitable. They even allow you to recreate something like frescoes.
Attention! To paint walls with your own hands, it is better not to choose a design with a telescopic handle, since the intensity of pressure will be uneven.
The price will depend on the material of the working surface. The most budget options are made of plastic and foam rubber. But if the consumer is not limited by budget, it is better for him to choose a silicone analogue - it is more functional and will be ready to serve for a long time.
Roller care
In order for a decorative roller to last as long as possible, it needs to be looked after. If you work with water-dispersed paints, after work it is enough to rinse such construction tools with water, removing paint particles stuck between the bristles. For better washing, you should remove the fur coat from the roller and wash it. And to clean the handle and bracket from any remaining material, simply wipe them with a damp cloth.
After washing the roller, shake it off the water and dry it well. In this case, it should be dried in a suspended state, because in contact with a hard surface, the fibers of the roller can break when drying.
Alternatively, make sure your roller has removable covers. This way you can save on construction tools.
Choosing a “fur coat”
There are nozzles for rollers on sale that vary in structure. Each of them is used in accordance with the desired result and the characteristics of the surface to be painted.
To ensure that the finishing of the walls with your own hands is of high quality, and the repair process itself proceeds without difficulty, close attention should be paid to choosing the right coat. Let's look at different examples.
Fur coats
This option is suitable for painting any surfaces, and you can work with completely different materials, even with organic-based dyes. Pros:
- the fur absorbs paint well, so the roller does not have to be dipped into the composition too often;
- the risk of material splashing is practically eliminated, which guarantees the accuracy of the work;
- a fur coat can completely paint over even a textured coating (decorative plaster or imitation brickwork);
Types of fur
The material can be used both natural and synthetic. Accordingly, there are also differences between them.
- The polyamidite coat has high wear resistance. The fur does not react even with aggressive components of the coloring composition, does not break off and is easy to clean and wash.
- Polyacrylic fur nozzle is the most budget option, similar in properties to natural material. When working with it, the paint lays down very smoothly, the surface is well saturated with the solution. The only drawback is the ability to contact only water-based compounds.
- A fur coat made of natural fur is distinguished by excellent absorbent properties and uniform “dispensing” of the material, that is, drips and splashes will not threaten your wall if you give preference to such a nozzle. However, when buying a “natural fur coat” you should not save money. Cheap copies tend to lose hairs, which will remain on the surface along with fresh paint.
Attention: a fur coat with long fur is suitable for working on rough and uneven surfaces, and a fur coat with short fur is suitable for painting smooth walls or ceilings. At the same time, using a long-haired coat over a completely flat base will give an unusual effect: the coating will appear “shaggy.”
If you used a water-based dye solution when finishing, then at the end of the process, thoroughly rinse the fur under a strong stream of water and dry it. After painting with organic compounds, you will have to soak the roller in turpentine and then transfer it to a container with water.
Fur coats: made of sheepskin, polyamide, foam rubber and velor.
Velor coats
A structural roller with a velor attachment is usually used to finish perfectly smooth, glossy surfaces. The material is able to absorb only a small amount of paint, but the layer of applied coating is as thin and even as possible. Such a roller for painting walls will have to be dipped into a tray with a paint composition quite often, and it must be used with extreme care, since on a glossy surface the slightest flaws in the work are always very noticeable.
Foam fur coats
Such nozzles are in great demand due to their more than affordable price. Most often they are used when renovating bathrooms or finishing kitchens. Foam rubber with different textures can be used: with large holes or small ones, and sometimes with both.
A pattern is formed on the painted surface that resembles many burst bubbles. Such fur coats do not last very long (they tear and wrinkle). It is almost impossible to paint a textured surface with their help, and if handled improperly, a large amount of splashes can occur. They work with foam nozzles mainly with aqueous dispersions.
Smooth fur coats
Nozzles made of flock and polyester differ in price (the latter are at least twice as expensive). They are used when painting smooth walls or ceilings; they absorb paint well and leave a high-quality, uniform layer of coating on the wall. Polyester items have high wear resistance and a long service life.
Tree
Textured plaster can also be applied using a wooden roller. This tool can perfectly replace the most popular and durable rubber one. It leaves a high-quality pattern when used correctly. Moreover, wood is a rather inert material and does not interact with the chemicals of the plaster.
Its disadvantage is considered to be hygroscopicity. During operation, it can absorb water from the solution and, as a result, swell. This changes the size of the picture. To eliminate this drawback, you need to pause work and thoroughly dry the instrument.
Choosing a structural roller
There are a few things you need to pay attention to when choosing rollers for wall decor:
- The first thing you need to pay attention to when choosing a roller is its design. There should be no peeling or cracks on the surface of the roller itself. The roller should not be loose. The handle for the roller should also be of high quality. It is also desirable that the thickness of the handle be 8mm, since when working with a roller you have to put pressure on it. A thin handle may simply bend.
- It is best to buy a roller with a rubberized handle, because... When working, the plastic handle may slip and your hands will become more tired.
- The price of the issue is also important. When choosing a roller, you need to understand how long you want to use it. Although foam rollers are cheap, they are enough for a maximum of one room. Hard rubber rollers cost 500-600 rubles, but they will last a long time.
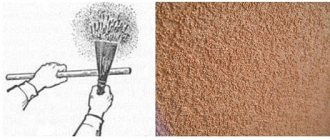
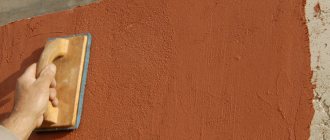
How to create a “fur coat” surface
A “coated” wall means that plaster is sprayed onto the surface using a broom, brush or a special machine. “Fur coat” is especially popular for facade surfaces, but it will also look interesting indoors. A modern option for creating a fur coat includes the use of a textured roller, which allows you to make the layer uniform and presentable.
Facade treatment under a “fur coat” is carried out in the same way as in a room. First, putty is applied, plastered and applied over the plastered layer with a lint roller. If a mistake occurs or you see that the plaster is uneven, you should remove the excess with a spatula. It is impossible to take breaks in the process of creating a “fur coat”, otherwise the composition will have time to dry, and the joint will be too noticeable at the edges.
The use of structural rollers will allow you to decorate the wall as well as any repair specialist. Decorative plaster has long outgrown its main purpose (lining walls) and is an excellent way to create exclusive interiors, and even in an ethnic style.