What is plaster wax
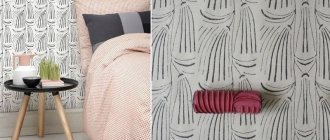
Wall wax improves the external qualities of decorative plaster and increases its service life. Processing is needed in order to create an antique effect, decorate the wall with different patterns or make it darker. A mirror shine appears on the surface, and the design looks clearer. Wax repels moisture and protects against damage that may occur after light impacts.
Compound:
- alkanes – from 11 to 13%;
- alcohol – from 1 to 1.25%;
- fatty acids – 14%;
- main component – up to 75%.
Properties:
- The dense substance is created from natural components or their synthetic substitutes.
- The coating does not dissolve under the influence of acids, alcohol or ordinary liquids.
- Wax melts at 68 degrees.
- The mixture becomes plastic and easier to apply after heating.
After applying a protective coating, the plaster will remain in its original form for many years.
Wax, when applied to plaster, creates a very interesting effect.
Types of compositions
Wax for plaster can be natural or synthetic. We are talking about its base: in natural materials, its role is played by beeswax or palm wax, which gives the finish a unique shine. Such compositions are hypoallergenic, but have a shorter service life than artificial ones. The latter are produced industrially from safe components. Synthetic products are practically impervious to moisture, temperature changes, wear-resistant and do not require frequent renewal of the layer.
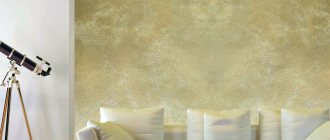
Art Wax Optimist for Venetian plaster
Depending on the structure, all waxes can be divided into:
- liquid - easy to apply with a brush, quickly fills even the smallest pores of the base, ideal for highly porous, rough surfaces;
- thick - more suitable for smooth materials, for example, plaster with imitation marble, granite.
Depending on the color scheme, wax for Venetian plaster can also be chosen from a variety of options. Here are their main types:
- Transparent. They provide the finish with shine, a beautiful gloss, or give a soft silky effect. Usually used on plaster that has already been complexly painted or “stone”.
- Colored. They help change the tone of the base itself or color a colorless coating. Compositions of different brands are available in rich color variations.
- With decorative admixtures. The most popular are waxes with gold or silver dust. They are used to imitate gilding, silvering, and to give the coating a beautiful metallic sheen.
Colorless wax composition for walls
Types of material
Plaster wax can be colorless or mixed with dye. The choice of material depends on the type of finish. Liquid wax is used for a porous base. The dense and hard coating is treated with a mixture that resembles a gel.
Based on the origin of the main component, wax is divided into:
- Natural, prepared on the basis of real wax.
- Synthetic, which contains stearin and various polymers.
A wall coated with natural wax shines better than a surface treated with synthetics. You can choose the color and degree of transparency of the material.
Let's look at the types of wax coatings available on the domestic market:
- Wax gel is suitable for durable and dense substrates.
- The porous gypsum-based finish is treated with a liquid mixture. This wax is better absorbed
- and increases strength.
- Water-based wax has a glossy shine.
- A mixture based on acrylic with polymer additives is highly durable and durable. After this treatment, the wall becomes matte.
Attention!
Clear wax creates a visually appealing surface, which is why it is used much more often. The colored mixture helps to imitate silk fabric and changes the shade of the plaster.
Wax for plaster can be natural or synthetic
Types of wax
The choice of wax requires special attention. It is based on the quality of the plaster surface: whether the decorative plaster is porous, or whether it has a dense texture. In the first case, you will need liquid wax, in the second - a gel wax mass. In addition to consistency, there is another parameter by which wax compositions differ - the origin of the product:
- natural (more precisely, a composition containing a natural bee product),
- synthetic (may contain polymers and stearin).
In fact, both materials are solutions in water or another solvent. The natural composition gives the coating a beautiful mirror shine. Synthetic - the material is more durable and has better protective properties, but the shine of the coating is muted, semi-matte.
Wax compositions are:
- transparent (colorless),
- colored.
The peculiarity of colored wax is that it can achieve different degrees of toning from translucent to very rich. You can buy the material already tinted, or you can paint it in the desired color yourself.
Wax tinting
Colorless wax is used when you need to highlight the color of the plaster itself and make it more saturated. To create an antique effect, you can add golden yellow dye to the mixture. The shade is changed in cases where the plaster does not look impressive. For mixtures with acrylic components, water-based paint is used.
Often the coating becomes lighter after drying. Therefore, experts recommend waxing a small section of the wall first to see what it will look like when it dries.
Venetian plaster does not require tinting, so a transparent material is used. The golden mixture can be used to cover yellow walls or Moroccan-style trim. Decorative wax with the addition of a special pigment paste is suitable for cladding under natural stone.
Coloring in mass (tinting)
Transparent wax material, when applied to decorative plasters, has its own area of application. For example, applying wax to Venetian plaster is usually done for protection. Therefore, tinted wax is not required for Venetian plaster.
It is worth paying attention - according to technology, Venetian plaster is coated with wax, not varnish!!!
Sometimes, if the walls are yellow or to give the effect of “palace gilding”, you can use a golden composition for the Venetian. Very often, yellow, also called “golden,” wall wax is used in Moroccan-style interiors. To make the finish more similar to natural stone (onyx, malachite, etc.) and to achieve an antique effect, decorative wax is used. It can be obtained by adding universal pigment pastes and glitters.
Computer or manual tinting of transparent material is possible. You can add a little gold, bronze or silver powder to it. The volume of glitter added is determined at will, but cannot be more than 15% of the weight of the wax material. After the wax film has cured, a metallic sheen will appear on the walls.
To obtain an aging effect, tinted bitumen wax is used. To do this, add bitumen varnish to the natural composition melted in a water bath ( made according to the recipe given below). This homemade composition can also be used to highlight cracks in craquelure.
Choosing wax for different surfaces
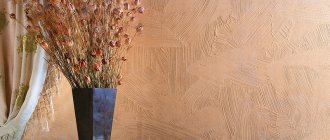
Venetian marble plaster is covered with 2-3 layers of a transparent mixture without a glossy sheen. The drawing becomes more expressive. This is especially important when imitating stone finishing. With the help of wax, the beauty of the walls will be emphasized.
A mixture with a high moisture resistance is suitable for the kitchen and bathroom. Vintage-style finishes are protected by wax, which will crack after curing. You can add a little bronze shine or gilding to a plain matte base. This effect is often used to cover Moroccan style plaster.
Mixtures from foreign manufacturers are of the highest quality. The walls look expensive after treatment. All shades stand out and become saturated. A pearlescent sheen appears. To save money, you can use wax made in Russia. This coating will look worse, but moisture resistance and strength will remain.
You should pay attention to the suitability of the wax for the specific type of plaster.
We select for different surfaces (which one is better suited, consumption)
The type of wax applied to the wall depends entirely on the method and type of plaster. For example, the coating for plaster will be different from that for the Moroccan version.
Nowadays Venetian plaster is very popular. It has a smooth glossy structure. The drawing in this case should be translucent. This effect can only be achieved if several layers are applied. If the work is done correctly, the walls will convey the structure of granite or marble. Thanks to wax, the necessary shimmer and shine appear on the surface. With rare exceptions, Venetian wax should be transparent.
How to make wax for decorative plaster yourself - 3 recipes
When applying plaster yourself, you can save money by making your own wax. The ingredients for such a mixture are easy to find. You can create a coating from cheap or expensive material. Such mixtures are ideal for beginners or people doing their own home renovations.
Soap based
The cheapest mixture is not inferior in quality to natural wax.
Ingredients:
- regular soap – 150 g;
- baking soda – 2 tsp;
- boiling water – 7 l.
Preparation:
- The soap is grated on a coarse grater and poured with boiling water.
- The liquid is stirred until the chips are completely dissolved.
- The soda is dissolved and added to the soapy liquid.
- All components must be thoroughly mixed while the water is hot.
The cooled mixture is checked for viscosity. If it is too sticky, you need to heat it in a water bath and add soda.
The easiest and most economical way is a soap-based composition.
Based on natural wax
The following components are used for preparation:
- beeswax – 200 g;
- pure turpentine – 100 g;
- linseed oil – 100 g;
- color pigments are added if necessary.
Instead of real wax, you can use regular paraffin. It is grated, melted, mixed with other ingredients until a homogeneous mass is obtained. The mixture can be used after cooling.
A recipe based on natural wax is more expensive
Based on wallpaper glue
The glue is stirred according to the instructions on the package, then left for 30 minutes and passed through a sieve to separate lumps. For 2 liters of glue you will need 1 liter of acrylic varnish and 0.5 liters of color pigment as desired, the mixture is thoroughly stirred and immediately applied to the wall.
For the third option, you need to purchase non-woven glue
Material properties
Wax is combined with different types of plaster. The main purpose of application is to form a waterproof film, because plaster tends to absorb moisture and deteriorate.
The composition plays other important roles:
- extension of operating time;
- improvement of appearance;
- creating matte, gloss;
- change in shade of the base.
Wax makes decorative plaster look better, helps to complement the finish with beautiful transitions, create a pattern, and add texture.
Typically, the composition is created on the basis of acrylic copolymers, natural wax, modifiers, and other additives. It contains no harmful components, so it can be used even in children's rooms. The product is vapor permeable and does not affect natural air exchange, maintaining a normal microclimate.
How to apply wax
You can only wax dry plaster; after finishing you will have to wait at least 3 days. During this time, you need to remove all defects on the surface and remove dust.
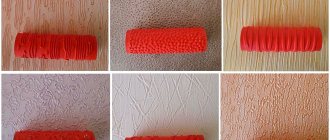
Recommendations for working with the material:
- Liquid wax is applied using a flange cloth, for thick wax you need to use an elastic spatula.
- You can use a wide brush, but this method of application will take longer and is suitable for surfaces with relief patterns.
- The quality of the tool must be very good; fibers from the brush should not be allowed to remain on the wall.
- You need to prepare the required volume of the mixture to apply everything at once, the surface must dry at the same time, the approximate wax consumption is 50-80 g per square meter. m.
- A mixture that is too thick can be heated and diluted with water; the amount of liquid should not be more than 3% of the total mass.
- The mixture should sit for at least 7 days; to improve the adhesion of the surface to the wax, the plaster can be pre-coated with a primer and wait until the wall is completely dry.
Attention!
The wax must be applied carefully so that no excess remains on the surface. The application method depends on the quality of the plaster; a base that is too porous may absorb wax. If the surface is covered with cracks, do not touch the applied mixture.
Experienced craftsmen advise first treating the wall with colorless wax; the mixture must be diluted with plenty of water in a 4:1 ratio.
Rules for processing the applied mixture:
- After application, the wax is smoothed with a damp sponge to make the surface texture look clearer.
- The coating dries in approximately 30 minutes. After this, you need to wipe it again with a damp, clean cloth so that the surface does not become stained.
- Then the wall is rubbed down with a grinding wheel. For this, a grinder or grinder is used.
The wax will dry completely after 5 hours, and the protective film will become stronger after 13 hours. You cannot touch the wall for 3 days; in a week it will be completely dry.
Before treating the surface with wax, you must wait until the layer dries.
Applying and polishing wax surfaces
Not all beginners who are starting repairs for the first time know how to apply wax to plaster correctly. Before processing it, you must wait until the layer dries. After applying it to the wall, at least 3 days must pass. This time should be spent usefully and all identified defects should be eliminated, because After applying the mixture, this will no longer be possible.
In some cases, the wax for walls turns out to be too dense, so it is diluted with water and stirred well again. The mixture needs to be warmed up a little. This is best done in a water bath.
When diluting, you should adhere to the rule that the amount of added water should not exceed 3% of the total volume of the mixture. The liquid poured into the solution must be warm. It is advisable that the prepared mixture stand for at least a week before use.
Special requirements are imposed on the condition of the surface on which work will be carried out. It should be dry, free of dust, particles of which can be removed with a vacuum cleaner. Experts advise before applying the base layer to carry out additional treatment with colorless wax, which can be purchased in specialized stores. It is diluted in the following ratio: 1 part of the substance is taken to 4 parts water.
If the layer of plaster on the wall has a shallow relief, then a rubber spatula will be suitable for the job, provided that the initial composition is thick enough. Otherwise, it is more convenient to use special sponges and rollers. You can apply it with a brush, but in this case it will take much longer to process.
Wax for plaster should be placed on the wall in such a way that it completely fills all the recesses on it and rises above the surface. The consumption of the composition will increase greatly if the surface structure is heterogeneous, with grooves. In some cases, the substance will have to be reapplied to achieve a better effect.
The wall should be covered with the product very carefully, and in such a way that there is no excess, and the time period during which the film is applied is approximately the same. This is necessary so that the areas are painted evenly.
The method of applying the wax layer largely depends on the plaster itself. In most cases, the plaster additionally absorbs the applied composition. If the cracks on the surface are deep enough, the tinting composition is not removed, even if excess is formed.
After application is completed, the wax for decorative plaster must be ground. A damp sponge is suitable for this, which will give the plaster a clearer texture. After applying wax to Venetian plaster, it is recommended to process the surface using a grinding wheel. The formation time of the protective film is approximately 13 hours. But it is not recommended to touch the wall for 3 days, and the surface will completely harden in 1 week.
Possible errors and their correction
Inexperienced craftsmen often make mistakes when applying wax. Irregularities or stains appear on the surface. Success depends on when the defects are discovered.
Tips for fixing errors:
- It is better to correct flaws within 4 hours after applying wax. Excess mixture can be removed with a damp cloth. Only a special solvent is suitable for synthetic materials. To remove excess, apply cleaner to a rag and gently wipe off the wax.
- Frozen defects can be melted with a hair dryer and washed off with hot water. After which you need to re-treat the problem area with wax. Sometimes a solvent is used for wood primer. If the wall loses its shine after correcting defects, you need to treat it with a sander with a fluffy attachment.
- After such treatment, the problem area may stand out on the wall. Therefore, it is better to carefully inspect the surface while it is still wet.
- To avoid the appearance of defects, it is better to apply the mixture in small portions, carefully rubbing it over the surface.
Wax with acrylic additives should not be touched after drying. It is difficult to melt or wash off with solvent. Such mixtures create a very strong film. Therefore, it is not advisable for beginners to use them. It is better to start with simple mixtures or treat small areas.
If the work is performed by an inexperienced craftsman, then the likelihood of defects occurring is quite high.
Error correction
Sometimes mistakes are made when performing any work.
When waxing, there can be two options when an error is noticed:
- the applied layer has not hardened,
- the layer has time to harden (usually 5-7 hours from the moment of application).
In the first case, the error can be corrected relatively easily. For example, if you notice that the layer of wax coating is applied unevenly, then with a clean cloth moistened with water (if the composition is natural) or solvent (in the case of a synthetic substance) you can remove the excess, and where the wax material is missing, you can add it.
If the wax layer has hardened, you can try to heat the problem area with a hairdryer, wet the cloth with hot water and try to wipe off the excess. Another way is to use a solvent.
If the layer of wax somewhere is not shiny enough, you can try to bring it to a shine with a sander with a fur disc. After the wax layer has hardened, it is difficult to correct the error so that it is unnoticeable.
How to remove the wax layer
Wax is removed when complex defects appear or to renew the coating.
If the layer is too thick, you can remove it with a clean damp cloth while it is still wet. The hardened coating is removed with an alcohol solution. Hot water can also melt hardened wax. It is better to melt a hard surface with a hair dryer.
Do not remove the topcoat from a large area. First you need to see how the decorative plaster will look after removing the wax. To do this, you can choose a place that is least noticeable, for example, in the bottom corner. Then remove the coating and watch how the color of the plaster changes.
A special wax solvent is suitable for removing old layers of finish. The material effectively cleans the surface of resins. Apply the product to a clean cloth. It is advisable to wear rubber gloves before handling. The rag should be well moistened and the surface should be washed. For better effect, you can leave the solvent on the wall for 1-2 minutes.
Note!
To remove wax from Venetian plaster, use fine-grit sandpaper. The coating is removed evenly from the entire area. After this, dust and small fragments of wax are removed.
It is possible to remove the wax layer using warm water or solvent
Features and purpose of wax
The finishing coating allows you to create interiors in different styles, from modern - high-tech or avant-garde, to luxurious and elaborate - baroque or empire.
Decorative wax can be tinted, giving the surface any shades and creating tonal transitions, creating a matte or glossy structure, highlighting the design or being invisible.
Coating walls with wax imparts moisture-repellent properties to porous plastered surfaces. This plaster can be used to decorate rooms with high humidity.
The great advantage of the coating is its vapor permeability, due to which natural moisture and air exchange occurs in the room, ensuring a healthy and comfortable microclimate.
The treated surface can be wiped with a damp cloth and washed without the use of alcohol-containing products or solvents.
To maintain the appearance, waxing must be repeated approximately once every 5 years.
Cost and quality of wax
Mixtures from different brands vary in price. Their composition also affects the cost. The price for a package of wax ranges from 400 to 4,000 rubles.
Let's look at the most popular types of mixtures:
- 1 kg of domestically produced VGT brand mixture costs 440 rubles. This mixture is made on the basis of synthetics.
- Swedish color mixture costs approximately 700-800 rubles.
- The Russian-made product of the Cera di Veneziano company costs 3,900 rubles per 1 liter. It is made on the basis of natural wax.
- Mixtures from the Italian manufacturer Cebos-Ecocera are created on the basis of white beeswax. The cost of packaging is 2329 rubles. These products differ from other brands in terms of the largest number of sales and the best quality indicator. The bright glossy coating lasts for many years, shimmers, and perfectly reveals all shades of plaster.
- Decorative gel DESSA DECOR “Silver” costs 2,600 rubles. for 2.5 kg. It has a protective effect and is used to create an expressive relief. Before use, you need to stir the contents.
- Protective wax for Venetian plaster VGT costs 806 rubles. for 0.9 kg. A ready-to-use translucent wax-based mixture emphasizes the texture of the surface, makes it stronger, and protects it from scratches, dust and liquids. The composition is suitable for wet cleaning and can be used in the bathroom and kitchen.
- Vincent Decor Cera Realta costs RUB 1,749. for 1 liter. Natural wax creates a glossy finish. Used to treat lime-based finishes. Does not create a protective film. Increases moisture resistance and is easy to clean from stains.
- JOBI BOCK costs 2450 rubles. for 0.5 kg. Suitable for rooms with high humidity levels. Used to treat walls with imitation Venetian marble. Enhances shine and depth of shades.
- VINCENT DECOR CERA RELATA for Venetian marble finishing costs RUB 1,750. for 1 l. The environmentally friendly mixture creates a protective coating.
- DALI-DÉCOR costs 760 rubles. for 1 kg. It is made on a wax basis and contains an aqueous polymer dispersion and functional additives. Suitable for any type of premises, has no color.
- Decorazza Cera Di Veneciano RUR 5,538 for 1 l. The coating for expensive Venetian marble plaster creates a glossy shine and pearlescent effect, revealing the depth of shades. Moisture-proof properties allow the mixture to be used in the kitchen and bathroom. The environmentally friendly material is odorless, does not burn, and does not emit harmful components when heated.
The quality of the coating is checked for several years. During this time, synthetic-based mixtures may change color and lose strength. Therefore, experts advise using only natural remedies. Venetian plaster must be treated with real wax. It has different external qualities and does not emit harmful substances. This mixture is more convenient to apply and is better distributed over the wall.
The price of ready-to-use wax depends on a number of factors.
Features of the material
The wax has a jelly-like consistency. The mass is used to give the plaster smoothness, shine, and emphasize the texture. The material acts as a protective film, preserves external characteristics, and extends service life.
Different types of Venetian plaster wax contain either natural or synthetic ingredients. The effect of application depends on this. The surface is matte or soft and shiny, has differences in color, so the walls can be given the desired shade.
The choice of wax type should depend on the characteristics of the coating. A porous surface requires a thicker gel-like mass. It should fill the pores and give uniformity. Venetian plaster is coated with a liquid material to create a different effect.
The peculiarity and main advantage of the coating is vapor permeability. This allows natural processes to occur - moisture exchange, air exchange, which ensures a normal microclimate. Wax care consists of wiping with a simple damp cloth.
To maintain its appearance, it is recommended to renew the surface every 5 years and keep it clean. In conditions of high humidity, service life is reduced.
Application area
The wax is intended for the final finishing of walls, ceilings, columns, small and large architectural details. It is especially useful to know how to make wax for decorative Venetian plaster yourself for those who use it in rooms with high humidity levels, such as the bathroom or kitchen. But other rooms also need surface treatment to maintain their appearance.
Varieties
Wax is divided into groups according to composition and color. Each of them is suitable for different coatings and performs different functions.
Classification by consistency:
- Liquid. Suitable for porous, textured coatings. It fills voids and any unevenness.
- Thick, jelly-like finish complements smooth plaster. Adds shine and creates a polishing effect. It is used to process Venetian plaster. The material is more complex in application.
Differences by components:
- Natural wax – consists of natural components. It is a beekeeping product. It is applied carefully, in a thin layer, as protection from external influences. It adds shine. It is hypoallergenic, safe for health, and moisture resistant.
- Synthetic – consists of non-natural components. The advantage of this material is durability and resistance. It's harder to damage. Creates a matte effect and looks good on textured surfaces.
Wax color range:
- The transparent mass will add shine and softness. Therefore it is suitable for Venetian plaster.
- Colored wax gives a certain shade. Suitable if it needs to be adjusted a little. This material is often used to cover bright Moroccan plaster. The choice of colors is large.
- To make the coating shimmer in the light, use a composition with the addition of golden or silver colored construction powder.
What to replace
The external qualities of decorative plaster depend only on wax. Without this processing it will not be possible to achieve the desired effect. However, the material can be replaced with varnish. This substance can protect the coating, add the desired shine and effectively highlight the color. After a few days, such a coating will not be affected by moisture.
Varnishes are divided into several types. For processing decorative plaster, odorless, water-based mixtures that do not contain components harmful to health are suitable. The coating can be matte or have a glossy sheen. Mixtures of different types differ in drying time.
Moisture resistance and breathability are the main properties of varnish for decorative plaster. The most commonly used acrylic mixture is water-based. This varnish does not smell and does not contain toxins. The white liquid becomes transparent after drying, adds shine to the surface, and creates a more saturated shade. You can add dye to acrylic varnish or use it to create an antique effect.
This material is easily applied to the wall and dries within 3 hours. However, before varnishing, the wall must be primed to inhibit the development of mold and mildew. For application, you can use a spray gun, brush, roller or regular sponge.
After hardening, the varnish will perform the same functions as wax.
Plaster looks elegant after waxing. With the right choice of color, you can create a magnificent interior. Walls after waxing do not deteriorate due to high humidity or direct contact with water. It is very easy to care for such a surface. When cleaning, you can use regular window cleaner.
Was this information useful to you? Share in the comments!
Kinds
When using wax on Venetian plaster, the basic scale of finishing is specified. The finishing layer is:
- transparent;
- colored;
- with different inclusions.
The transparent composition helps to emphasize the texture of the finish. After processing, a glossy shine appears and looks good on a natural stone surface.
Colored wax gives the treated base an additional shade. You can adjust the main color when it turns out not to be as successful as expected. Golden, silvery shades are used for gilding, metallic effect - suitable for medieval styles. You can add construction gold, bronze, or silver powder to regular wax to give the surface original highlights.
There are two types of compositions for walls in accordance with the criteria - thickness and composition:
- Gel or liquid consistency. Liquid mixtures are used for more porous materials. They are well distributed over uneven surfaces, fill voids, and create protection. Gel wax is thicker and is used for smooth walls, for example under stone. It is not so easy to apply, but the stone finish begins to shine like a mirror, like polished marble.
- Natural or synthetic composition. Wax with natural ingredients is usually a beekeeping product with good properties - safety, absence of harmful impurities, beautiful shine. Synthetic masses are produced industrially; compared to natural ones, they are more resistant to moisture and temperature fluctuations, the service life is longer, and a dense impermeable layer with a matte effect is formed on the surface. The synthetic composition is better combined with structural surfaces.
We recommend: Volma layer - gypsum plaster: instructions, consumption
The varnish must be moisture resistant and vapor permeable. Drying time – 3 hours. Varnishes can be matte, glossy, colored, or with a metallic sheen.
Natural wax
What to replace
The plaster should not be left completely without a final coating, especially in a room with high humidity. The finish will not have the necessary protection.
When wax has to be abandoned, it is replaced with varnish. It plays a similar role - it preserves the attractiveness of the finish longer and adds shine. Acrylic or water-based compositions are suitable for plaster. They are environmentally friendly and are used for work inside buildings.
Wax for Venetian plaster: types and differences
There are many treatment compounds on the market. Some of them require professional application skills, others are quite simple and economical. To choose the best option, consider the types of wax for protecting Venetian plaster:
• gel-wax: has a covering power suitable for hard coatings and dense layers of plaster;
• liquid solution: suitable for fragile, porous surfaces, creates a thin protective layer and is quickly absorbed;
• for a glossy shine, you can pay attention to natural compositions based on beeswax; such mixtures contain a large amount of water and natural ingredients;
• a matte and discreet shine to the surface is given by synthetic solutions consisting of polymer compounds that are more resistant to indoor use and dirt;
• based on style considerations, you can use both transparent and colored wax for plaster if the surface needs tinting or color correction.
The cost of a protective coating depends not only on the volume of material, but also on the components included in the composition, the name of the manufacturer, the equipment and raw materials used by him.
Important note! It is better to purchase products from European manufacturers; their quality is beyond praise, although the cost is quite high.
You should not skimp on the finishing solution, since it determines the overall impression of the repair and how practical and durable the coating will be.
What is the material
Beeswax is an originally natural substance for which humanity has found many areas and uses. It smells good, does not allow moisture to pass through and can add shine to the surface. It is used in finishing works as a coating for decorative plaster.
In fact, everything is not as simple as it might seem. Wax for plaster should not be separate from it and simply lie on it, repeating its shape. It is applied to emphasize the texture, give the plaster an antique effect, tint or decorate the surface with various patterns. It should become a protective film of the plaster composition, and after its application no changes will be made. Therefore, you need to approach the choice of wax materials with special responsibility.
Tinting
Craftsmen prefer transparent compositions; they reveal the texture of the plaster. Golden yellow tones with an aging effect are less often chosen.
If the base does not have pronounced decorative qualities, you can change the color tone of the wax layer. They use water-based colors - suitable for all acrylic compositions.
Painting
The volume of the coloring component differs in color. To create veins, silver and gold leaf are added. But after drying, the wax becomes lighter, so first it is applied to an inconspicuous part of the wall to evaluate the result.
Decorative plaster: by hand
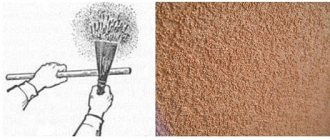
How to create a "Bark Beetle"
All walls must be treated with putty and sanded beforehand. Then apply 2 layers of primer mixture. After drying, apply bark beetle plaster. The coating will dry completely in about an hour.
The bark beetle is available for sale in 2 variations. The first is presented in the form of a powder, the second is a finished mass. When using powder, it is mixed with water and results in a thick consistency. The relief will depend on the filler. For small rooms you can use 1 mm granules, for larger rooms - from 1 mm.
This type should be applied using a steel spatula, evenly distributing the mass over the surface. It is imperative to align the thickness of the layer to the size of the grains present in the plaster. Thus, a coating having 1mm granules will be applied with a 1mm ball. To apply the plaster, you need to carefully move the spatula along the wall until the granules included in the mixture leave marks. After this, the surface is polished using a plastic grater. In those places where the plaster will stick to the trowel, you need to remove it. In those parts where the image is visible you need to add it.
Application of bark beetle plaster
After ten minutes have passed since the first coating, the surface is sanded again. The picture will gradually begin to appear more clearly. The relief will be visible depending on how you use the spatula and in which direction you direct the movement. Do all the work carefully, you need to ensure that the image is clearly visible, but do not overdo it, otherwise the drawing may be erased.
The coating can also be colored. This can be done before application or after. When using structural plaster, painting is done before application; for painting, acrylic varnish or silicate paint is usually used. Finished walls can be painted after 2 weeks, and silicate walls - on the 3rd day after plastering. Glazing is possible the next day, but before using the varnish you need to coat the surface with an acrylic primer.
To get the “bark beetle” effect, you can use small grains. First, it is applied in one layer, after drying, go over with a damp sponge. The effect of this technique will be an aged effect, with small pores in the surface. For beginners, we recommend using textured plaster, which anyone can handle.
Wall decoration: tips
Before you start treating the surface with plaster, try practicing on fiberboard. Before work, the walls are treated with a primer mixture; we choose the manufacturer recommended by the creator of the decorative coating.
The primer is applied using a roller with short bristles. After this, you need to wait one day and start applying plaster. Not all types of plaster require additional treatment. The coating must be applied using a sponge or spatula. Depending on the tool you choose, the effect will be different.
To get texture you need to use a trowel, brush or a special mitten. You also need to read all the tips on the plaster container. Using cross-shaped movements, apply the mixture along the wall. After fifteen minutes, using the tools, we give the effects we need.
To secure it, you need to use wax, which will protect the image and relief, and also add shine.
Textured plaster: we create it ourselves
Using a plastic spatula we get the effect of veins. We apply the coating to 2 layers that have already dried with a brush, after ten minutes we run the spatula over the surface, pressing it slightly.
The aging effect can be created when diluted with water from 70 percent or more. You need to use it in a circular motion.
You can achieve smooth lines with a brush or brush with hard bristles. To get a textile effect, you need to apply the mixture first in one direction, then in another. To produce a certain relief, use various tools: rollers with images, applicators, specialized brushes. The type of drawing will depend on the chosen tool.
Color tints are achieved using a sponge. The mixture is applied to her in a circle. Then the plaster had to be applied in this way. An excellent result can be obtained using this method on a metal coating.
To decorate your walls with textured images, stencils will come to your aid. It is necessary that the surface is completely dry after basic plastering, and only then, using the stencil of your choice, apply another layer, the color of which should be different from the main one. The image will need to be polished after the plaster has completely dried.
The glossy or matte effect is achieved by using a trowel. After fifteen minutes from the moment the basic decorative plaster was applied, use a trowel. After which the color will become muted and calm, this type can be used in any room. You can achieve brightness and emphasis like this: cover the surface with one layer, then after twelve hours have passed, cover it with a second one. Polish the walls using a trowel.
Venetian plaster: what do you need to know in detail?
To get the perfect result using the Venetian plaster technique, you need to thoroughly master the technique of covering walls. The main requirement of this technique is to achieve a smooth surface. To eliminate all surface imperfections, putty is used, which are applied one after another until the wall becomes perfectly smooth. Each subsequent layer is applied to a dried base. The degree of evenness is checked with a building level, if there is none, then with a lamp. The light needs to be directed at the wall and in places of flaws, a shadow will be visible. This technique also checks for the presence of all kinds of errors in the surface. Before using marble plaster, the wall must be treated twice with a primer mixture.
Venetian plaster is applied using a spatula or steel trowel. To make the marble effect more noticeable, all layers need to be made different in color.
The first word is applied in small layers until the entire surface is covered. If the work is done poorly, then all the unevenness will be visible at the end. To begin the next stage, you need the layer to dry completely. We begin applying the second layer no earlier than twelve hours later. The walls are leveled using a trowel and also polished with sandpaper. Layers of finishing are then applied to the wall, which must be completed in sections.
After twelve hours, we level and polish the walls again. Usually three layers are enough to achieve the marble effect. Then the surface is polished again. To make the wall glossy, beeswax is used; for a matte finish, synthetic wax is used. After twelve hours from the moment of applying the last layer, the finishing layer is applied. In order for the Venetian plaster to dry completely, you will need to wait two days.
When creating decor with your own hands, you can achieve a unique design! Each person will choose what he likes.
Decorative plaster: modifications
- Structural
After application it becomes grainy. This type of coating is considered the lightest. The composition includes: potassium silicate, latex and lime. The grainy effect is achieved through special additives, including particles of mica, quartz, and small stones. The degree of image depth is directly proportional to the diameter of the constituent additives.
Using this type you can achieve the effect of antique stone, leather, silk, etc. It all depends on the tools and techniques used to create the image. The coating contains resin inclusions and wax, and it is from their presence that the pattern is fixed.
After application, the walls take on the appearance of marble. This type of plaster has existed since the ancient times of Ancient Rome. To achieve the marble effect, slaked lime, marble flour, and an emulsifier were added to the composition. The last component makes the mixture thick.
Pieces of colored acrylic were added to it, thanks to it you can achieve the effect of suede, metal, velor. Before work, you need to treat the wall with an acrylic base.
Using this type, you can achieve a similar effect as when working with your own hands, however, in this case, all the boundaries will look more concise. The composition includes paints with which the image is created, small particles. Each modification of plaster has a specific application method. The simplest, as mentioned above, is structural plaster.
laguna protective and decorative varnish wax
White protective and decorative varnish-wax PARADE LAGUNA in 0.9 liter buckets is used to achieve two effects. Firstly, it makes the surface of the plaster more beautiful, rich, and emphasizes its texture. Secondly, it gives the wall covering water-repellent properties.
Reviews for laguna protective decorative varnish wax:
- Igor: wax is only present in the product name. If you want to tone down the paint color, this product is ideal. It is impossible to polish and dry for much more than 2 hours;
- Alexander: the wax was normal, covered Venice. I applied the wax in the thinnest layer. For those who say that wax is bad, don’t listen. The main thing is to iron the last layer (I used a trowel to bring it almost to a shine). And I covered it with wax, just like the coating in the kitchen. I polished the wax with a shaggy fur circle on a support plate with small turns after about an hour after application. The wax hardens completely on the third day. It becomes like stone. It does not introduce any yellowing or color changes into Venice;
- Oleg: used for Venice in white. The wax has dried in yellow spots on all the walls, ruining all the work; they cannot be removed by polishing, there is no gloss;
- Evgeniy: well suited for Venetian plaster. Gives excellent gloss and does not kill depth, not very liquid - easy to apply. Polished with a napkin and by machine - no streaks remain.
Sources:
- https://leroymerlin.kz/product/lak-vosk-zashchitno-dekorativnyy-parade-ice-laguna-0-9-l-cvet-belyy-15076913/
- https://dsc.by/lak_po_derevu_s_voskom_zerwood_ld_0_9_kg-183449-p
- https://rostov-na-donu.diyvitrina.com/kraski/pokritiya-dlya-dereva/masla-i-voski-dd/lak-vosk-zashchitno-dekorativniy-parade-ice-laguna-09-l-tsvet- beliy/
- https://stroycity.kz/lak-vosk-raduga-231-dlia-dekorativnyh-pokrytii
- https://vmtrade.com.ua/p1103083781-vosk-lak-dlya.html
- https://torgzdes.ru/moskva/search/dom-i-dacha/remont-i-stroitelstvo/lakokrasochnyje-materialy/maslo-i-patina/lak-vosk-zashchitno-dekorativnyy-parade-ice-laguna-09- l-cvet-belyy-1725760.html
- https://ekaterinburg.leroymerlin.ru/product/vosk-zashchitnyy-parade-ice-venezia-wax-0-9-l-15076817/?partners=blizko2020&utm_source=blizkoru_id12973860