The walls are decorated in various ways: you can wallpaper them, or you can simply paint them. You can not just paint, but use stencils; as a result, a graphic pattern is formed on the walls, quite bright and clear. Thanks to the use of this fairly simple and cheap method, wall decoration can be integrated into any design. It should be noted that the work does not take a lot of time and money, although preparatory operations can take a lot of time.
What materials are stencils made from?
There are two categories of stencils that are intended for decorative wall decoration - disposable and reusable. In this regard, various materials are used to make stencils. As a rule, disposable stencils are made of paper, although it is quite thick. As for reusable stencils, the main materials for their manufacture are:
Vinyl film
Vinyl film stencil
At the same time, for the manufacture of such an auxiliary tool, vinyl film is used, of varying thickness, density, transparency, as well as various shades. If you learn how to use a stencil correctly and carefully, then this is a very convenient device, since the paint spreads perfectly over a flat and smooth surface. If you don’t have the skills to do the work, then it’s quite easy to stain both the drawing itself and the adjacent wall. During operation, the stencil must be regularly cleaned of accumulated paint.
Polyvinyl chloride
PVC stencil
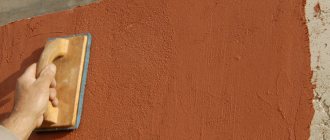
The original material is used, several millimeters thick. Such stencils are perfect for applying designs on walls using plaster, which fills the free space of the stencils. After the mortar has set, which usually takes a few minutes, the fixture is removed from the wall.
Cardboard
Disposable paper stencil
The use of such source material allows you to make a stencil at home with your own hands. This is the most accessible and cheapest material that can be easily processed at home.
Vinyl stencils for creating patterns on walls can be in rolls or in the form of individual sheets. When decorating large areas, it is better to take several identical templates and fasten them together. Using this approach, you can process a significantly larger area of walls at a time.
Recommendations and common mistakes
When decorating a room, it is important to avoid mistakes, so you need to familiarize yourself with some tips. Recommendations for using stencils for decorative plaster:
- The working tool must be held perpendicular to the wall.
- To prevent lint from getting into the picture, apply the plaster in a circular motion.
- For volumetric drawings, take a sufficient amount of plaster. It is recommended to remove its remains immediately.
- Immediately after completing decorative work, reusable templates are washed well with warm water.
- To protect the ornament from the influence of external factors, after drying it is coated with varnish.
The layout is usually a printed picture, which is transferred to the material for making stencils
In order for the image on the wall to be of high quality, it is important to observe the following points:
- The surface must be clean and free of grease.
- Using a building level and a pencil, it is important to mark the location of the image on the wall.
- In order not to spoil the wall with an incorrectly applied mixture, it is recommended to first display the drawings according to the template on ordinary Whatman paper.
- To ensure good bonding of the stencil to the wall, you need to use a special stencil adhesive.
- It is better to apply drawings on walls using acrylic paints; plaster is used to display three-dimensional patterns.
If you follow the tips listed above, you will be able to avoid mistakes when decorating walls.
Photos of stencils for decorative plaster will help with choosing a design:
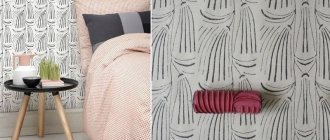
- Simple curls will decorate a living room or bedroom.
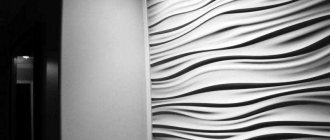
- A geometric pattern will allow you to separate part of the wall.
- The honeycomb pattern is suitable for the kitchen, living room.
- An ornate ornament will make the room worthy of admiration.
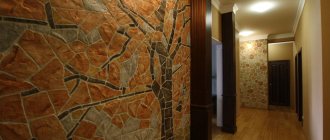
- Using a stone stencil you can successfully transform your kitchen space.
Types of stencils
As a rule, stencils differ from each other, both in the material of manufacture, which is related to their purpose, and in the design, which is quite natural. In this regard, stencils are:
- Simple and single. As a rule, this allows you to make drawings on the wall of one shade, although experts manage to form drawings when the colors slowly change from one shade to another. Drawing in different colors is not possible in such stencils.
Simple stencil - Combined, using several colors. As a rule, such stencils are made based on several templates, each of which is designed to use paint of different colors. To get the correct drawing, marks are made on the templates. As a result, it is possible to correctly position the templates on the wall to obtain the desired pattern.
Combined stencil for several colors - Anti-stencils, with reverse effect. This refers to a visual effect that is created according to the principle of photography: first a negative of the image is made (where there was black, there is white and vice versa). After appropriately decorating the wall, you can see a pattern that has a negative effect, while maintaining the basic pattern. In other words, if this is a drawing of a tiger, then an image of a tiger will appear on the wall, but not in the usual, original design.
Anti-stencil - To obtain three-dimensional drawings . They are designed to form an image on the wall using putty or plaster. The three-dimensionality of the design is achieved due to the fact that the stencils are made of thick material, up to 4 mm thick, which creates a three-dimensional effect.
Naturally, there is no difficulty in working with simple stencils, on which you should improve your skills. Gradually, you can move on to more complex patterns, which are formed due to a variety of colors, as well as working with three-dimensional patterns.
What are stencils for decorative plaster
You can create a beautiful pattern using special forms with removed parts that form the outline of the future bas-relief.
The use of stencils allows you to create almost any decorative pattern on a flat or slightly curved surface.
And the simplicity of this method allows you to not involve either designers or plasterers in the work.
The advantage of using stencils
- You can either buy stencils or make your own.
- If template solutions are not suitable, then you can come up with a design yourself.
- Despite the fact that many patterns seem difficult to make, they can be made using the stencil method by a person who has no experience in this matter.
- Stencils allow you to create almost any ornament.
- Bas-relief can be created on almost any surface.
- This method will help hide imperfections on the surface.
The bas-relief can be made even more beautiful if you choose the right lighting. This will also provide the ornament with elegant spatial depth.
Template purchasing options
Templates that are intended for wall decoration are sold at any hardware store that sells building materials and tools. Typically, they are all made from vinyl film, making them flexible, lightweight and durable. Despite this, the choice of drawings is not so large, especially since not everyone may like them. In this case, there are two ways to solve the problem:
- Contact a company that produces outdoor advertising or produces printed booklets. It is possible that the stencils were made by the same company. They have the appropriate equipment, so they can easily make any stencil to order, even from a photograph.
Simple store-bought stencils
- Make a stencil with your own hands if you have a penchant for drawing. Even if you don’t have such inclinations, you can turn to the Internet for help, where you can find any drawing you like. After this, the drawing can be downloaded and enlarged in size, after which it is transferred to thick paper (copied). It is then taken and cut with a sharp knife. To ensure smooth edges, the entire process requires attention, care and precise movements. In addition, it is necessary to control the sharpness of the tool. If the drawing is not cut out carefully, then all the flaws will appear on the wall.
Making a stencil with your own hands
Still, it’s worth noting that making stencils yourself can take a lot of free time. If there are no problems with this factor, then you can try. First of all, it is better to practice on paper, and then you can move on to film. The main thing is to have a sharp knife, as well as desire and perseverance, since this is also a painstaking task.
Working with stencils
Stencils are used quite widely, so they can be used not only for applying graphic designs on walls, but also in other cases, for example, for decorating wooden facades, for decorating furniture, etc. The scope of application of stencils is very extensive. The only problem with their use is the relief of surfaces, when problems with applying paint or other materials are possible, and all surfaces where the stencil fits tightly to the base are suitable for using these devices. Good results can be obtained if you create designs with acrylic paints, which are available both in traditional containers and in the form of aerosols.
Using spray paints
Acrylic paints have many advantages: they fit perfectly on any type of surface, dry quickly, practically do not fade and have virtually no unpleasant odors, much less toxic ones. In this regard, almost everyone nowadays uses acrylic paints, since they are also considered environmentally friendly.
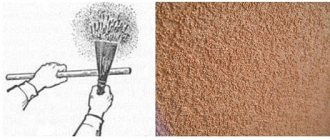
Which application methods should be preferred?
In the case of using an anti-stencil, it is better to apply paint produced in cans, because it will not be possible to achieve the corresponding effect in other ways. Before applying paint, it is advisable to carefully read the instructions. Many people don’t do this, so the quality of the coating is quite questionable. It is very important to maintain a distance from the can to the surface to be painted, which is about 30 cm. If there is no practice in using such paints, then first you can practice on an unnecessary surface (on a piece of wallpaper). In this case, you need to feel how the paint lays down if you place the can at different distances. This way you can choose the optimal distance.
It is very important to ensure that the paint does not get on other objects located near the stencil. In other words, practice is also important here, otherwise you can paint even something that was not included in the plans.
Painting with an aerosol can
If other types of templates are used, then you can use:
- Not a large piece of foam rubber.
- A brush with short but thick bristles.
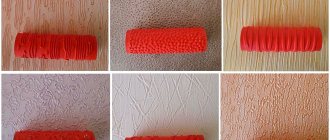
- Roller with sponge.
Any method of applying paint to a stencil involves using small doses of paint, since excess paint will leak and can ruin the whole job. After dipping the brush or roller into the paint, squeeze out the excess paint. Excessive paint can be removed by running a roller or brush over a piece of wallpaper or other unnecessary surface before applying the stencil.
Methods for attaching stencils to the wall
In any case, wherever the design is formed, and especially on the walls, the stencils must be secured, otherwise the design may move and the entire work will be ruined. You can use a special glue that is applied to the back of the stencil. After this, the device can be mounted on the wall, and after finishing the work, when the paint has dried, the stencil can be easily removed. In this case, the glue does not adhere to the surface and the stencil is removed without damaging the base.
Working with stencils
Another option is the possible use of double-sided tape. What should you pay attention to? The tape should be masking tape, but not ordinary tape, which is “tightly” attached to the base. Therefore, using such tape, rather than masking tape, can lead to serious problems. Masking tape, although it holds firmly, does not leave any marks behind.
Scotch tape is a simple and cheap solution to the problem, so it is preferable to use it. It can be cut into pieces, and before attaching the stencil, you need to remove the protective film. It is very important to secure the stencil so that all its parts are securely adjacent to the surface. In this regard, we can safely say that the more attachment points, the better, which can guarantee the reliability of the attachment.
Procedure for working with stencils
Working with stencils requires a certain sequence. For example:
- The surface is being prepared. Firstly, it must be clean and dry. It’s good if the walls were painted quite recently. If necessary, the walls are cleaned, especially from grease stains, as well as other contaminants. If the wall had to be washed, then after that it should dry well. If you just need to remove dust, you can use a vacuum cleaner or a brush with long bristles. After this, you can remove any remaining dust using a damp cloth. In any case, the surface should dry well.
- A stencil is applied to the wall, and control points of attachment are marked to fix the position of the stencil.
- The protective film is removed from the tape, after which the stencil is glued to the surface so that the control points align.
- After this, you can start painting the stencil. To do this, take a brush, roller or sponge and dip it into the paint, followed by squeezing.
- After applying the paint, you need to wait a few minutes for the paint to dry. Finally, the stencil is carefully removed from the wall.
If it is necessary to form several drawings on the wall, then the procedure is repeated as many times as it is necessary to have drawings. Before each subsequent procedure, it would be a good idea to check whether the paint remaining on the stencil has completely dried, otherwise you can easily ruin the wall. After several uses of the stencil, it should be cleaned of the layered paint, otherwise the drawings will turn out to be of poor quality.
Stencils for walls
Volumetric stencils: features of work
In fact, there is not much difference in the use of conventional stencils and volumetric ones. The only difference is that textured paint, putty, decorative plaster, liquid wallpaper, etc. are used to create geometric and other types of patterns. There are also special formulations, but they are quite expensive. In any case, the choice of materials falls on the shoulders of the owner himself.
It is easy to work with such finishing materials due to the fact that they have a paste-like consistency. However, they are not intended for application with a roller or brush. In such cases, use a small spatula, preferably plastic or rubber. For these purposes, a regular piece of plastic panel is suitable.
Application of the solution
Before applying the composition, it should first be scooped up with a spatula, after which the voids in the stencil are filled with this mixture. Excess finishing material should be removed immediately. It is very important that the applied layer is even and thoroughly filled to avoid the appearance of air bubbles. If you have the skills to work with putty or plaster, then there should not be any special problems.
Before removing the stencil, you need to wait some time for the composition to “set” and be strong enough, but you should not expect complete drying. After removing the stencil, you may find that the edges of the design are uneven. In this case, you should not be upset, but you just need to wait until the drawing hardens completely. After this, you need to pick up sandpaper of a suitable grain size and smooth out all the irregularities. Finally, the resulting and perfected design can be painted or colored as desired in any color or colors.
Stencil for the wall or... The secret is how to use it
How to use a stencil for bas-relief - step-by-step diagram
Step 1: Preparing the base
We make markings on the wall so that the repeating images are evenly distributed over the entire plane if you want to get a repeat effect, like on wallpaper. However, there may be another option - each stencil for the bas-relief is used once, after which the three-dimensional image is enclosed in a molded or drawn frame. The first method involves the use of either one small repeating pattern or two alternating ones. In the latter case, you will need several different templates, with a pattern of as large an area as possible.
Step 2: Fixing the stencil
To secure the template sheet, use masking tape or spray adhesive, depending on how strong the coating you previously applied and how far along the drying process has gone. Of course, glue is more convenient, but it is not always available. So, a sticky element is applied to the back of the stencil, after which the template is applied to the desired location on the wall and held until it is completely fixed. Try to orient the sheet as evenly as possible on the plane when working with each successive bas-relief.
Step 3: Primer
In fact, the process is optional, but such surface preparation will not be superfluous, especially if you consider that when working with putty, it is recommended to constantly use a primer between layers. Therefore, we take a brush, dip it in the desired composition and carefully, but quite generously cover the area that will be hidden under the bas-relief. We wait for it to dry and move on to the next stage.
Step 4: Applying the Stencil Layer
We use fine-grained plaster, whose consistency should resemble a viscous paste; only such mixtures are suitable for producing bas-reliefs, without the risk of spoiling their contours during the process of removing the template. Ready-made formulations are sold, but the dry mixture can also be diluted with water. We fill the container with the solution, pick up small portions with a spatula and apply directly to the stencil, gradually covering it entirely. We apply force at the locations of the slots, compacting the layer as much as possible. We do not cover the edges of the sheet.
Step 5: Removing the Template
We wait until our plaster hardens slightly, after which, until complete hardening occurs, we take the edges of the sheet and smoothly pull it towards ourselves, and then, when cracks appear along the contour of the design, we remove the stencil with a decisive movement. If the bas-relief turns out to be slightly blurry around the edges, it’s okay, wait for the mixture to dry and carefully sand the contours of the three-dimensional pattern with sandpaper. If you feel like a carver, you can try using a construction knife to add volume to the stencil, the surface of which, after removing the template, will look like a flat area.
How to choose the right place for a picture on the wall
An empty or semi-empty wall is an ideal place to place some kind of drawing on it in order to place all the accents. In this case, it is necessary to choose a pattern so that it is in harmony with the design of the entire apartment.
You will get a good design if you use tall but narrow designs, placing them near windows or near doors. As a rule, designs that represent different plants with leaves always win. It is very important to follow the general design style, and it is better to select colors to match the furniture.
Small-sized drawings look great if you need to pay attention to some interior detail, especially sockets and switches. In this case, one of the decoration techniques is used when it is impossible to hide something, but you need to shift attention to another object. This approach always works, and without fail.
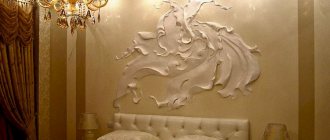
Options for beautiful designs for different rooms
There are a huge number of both popular “classic” and more extravagant solutions for decorating rooms with bas-relief. Therefore, if you already have a clear idea of how and with what patterns you want to decorate the interior space of the room, you can draw them yourself or find them on the Internet. And in order to understand how and what combinations of patterns go together best, we bring to your attention a small selection of ready-made design solutions.
Tyutyunnikov Dmitry
Article verified by a decorative finishing specialist
Various purposes of stencils
Naturally, the choice of stencils depends on the purpose of the premises and for this you can pay attention to universal designs representing geometric patterns, landscapes, as well as flora and fauna. There are drawings that can fit into the interior of any room decorated in the style of romantic Provence, minimalism or chic classics. In this case, you should pay attention to the selection of colors. It is very important that it harmonizes and complements the overall design of the room.
Complementing the design with a pattern
Images of a neutral nature go well with other rooms, such as a corridor, living room, dining room, etc. Such images will appeal to owners of any age. The most suitable are drawings representing elements of nature.
There are also specific types of stencils designed for decorating bedrooms and children’s rooms. There are stencils on various themes, which allows you to tastefully decorate your office, men's or women's bedrooms, children's rooms, and kitchens. As a rule, when decorating a kitchen, preference should be given to drawings that represent products or food.
To decorate children's rooms, pictures with images of characters from various cartoons, fairy tales or stories are often used. In other words, there are all possibilities for decorating premises of any purpose, according to the spirit of the times and wishes.