Often used furniture loses its attractive appearance. At the same time, its design and fittings remain strong and reliable. Therefore, owners of furniture, kitchen sets, cabinets, and chipboard have a logical question: is there a way to improve their appearance, extend their useful life, giving them “new life.” It's really possible to do it yourself. It is enough to paint chipboard furniture at home. In this article we will tell you how to do this correctly with minimal effort.
How to paint a pine bed
A bed made of solid pine is chosen by lovers of eco-friendly, natural materials. Pine has a pleasant appearance, relatively low cost, and products made from this type of wood will suit almost any interior. Another advantage of pine products is that you can paint them yourself to give the desired look to your bedroom. When purchasing a new smooth sanded pine bed, you can increase the durability of the surface yourself by simply coating it with oil, varnish or wax. There are a number of general rules and steps on how to paint a pine bed, which are presented below.
If the bed has complex elements and difficult-to-paint areas, disassemble it and paint the parts separately. It is allowed to paint the entire product if the design of the bed is quite simple. Lay newspapers, film or any other protective covering on the floor, provide access to fresh air and ventilate the room during the process.
If you want to preserve the texture of the wood, you will need stain and/or varnishes. They will give the desired shade, and the natural grain of the wood will remain. To repaint a bed a different color, you will need paints that will hide the natural grain of the wood. The tools you will need are gloves, a roller, a brush for painting small parts and corners, a paint tray and sanding paper.
2. Surface cleaning
Before painting, the old surface must be prepared, cleaned of the previous coating, grease or dust, putty on uneven surfaces and sanded. It is advisable to deresin surfaces made of coniferous wood with a special solution; the resin may interfere with further absorption of the coatings. Since we're looking at the process of painting a new pine bed with a smooth sanded surface, we're omitting these steps, but otherwise they're required. To prepare our bed, just wipe the surface with a damp cloth.
Stain (stain), in addition to giving the wood tone and expressiveness, protects against rotting and pests, improves the moisture resistance of the material and the service life of the product as a whole. There are alcohol, water, acrylic, wax and oil stains. They all differ in their properties and have application features, so carefully read the characteristics of the substance before purchasing.
The stain is applied along the wood fibers; it can be used as a base before further painting the bed, or as an independent coating if you want to preserve the natural pattern of pine. After application, the stain must dry completely. If you are using stain as a stand-alone coating, you can add a layer of varnish on top to add shine.
In the case where the stain is used as a basis for further painting and if there are recommendations from the bed manufacturer, the next step is to apply a primer. It will reduce paint consumption and improve surface adhesion. When choosing a primer, check with your paint retailer to see if it is suitable for pine. Wait until the primer is completely dry before applying the next coat. The dried primer can be lightly sanded with sandpaper.
It is important to consider the compatibility of all coating layers, so it is recommended to choose a primer, paint, and varnish from the same manufacturer that match each other
When choosing paints and varnishes, give preference to safe, environmentally friendly compositions, use odorless paint. Acrylic paints are the most popular and health-friendly option, convenient for home use. Alkyd paints can emit toxic compounds, oil paints take a long time to dry and are more suitable for painting in a professional environment than at home. Do not try to apply one thick layer of paint; it is much more effective to apply the composition in thin layers on top of each other, allowing each to dry.
Varnishes are used to fix the result over paint or on their own to add shine and tint over a previously prepared product. Varnishes can be made on a water-based, polyurethane, acrylic, or alkyd base. There are also resin, oil, alcohol and other varnishes. Choose a varnish that matches the other layers of the coating and the type of wood of the bed, carefully read the information on the packaging and consult with the seller of paint and varnish products.
Painting an old dark cabinet a light color
This is what the cabinet looks like, which we will paint and give it a completely new look.
We decided to paint the cabinet in rich light shades: ivory and light green. But first you need to clean the surfaces well. First of all, we disassemble the cabinet as much as possible, removing from it everything that can be removed: doors, handles, pulling out and disconnecting drawers, etc. To do this, we will need various screwdrivers and other tools.
Preparing for painting furniture, cleaning surfaces
Now you can start cleaning the surfaces. The most important thing is to remove the varnish layer, paint residues, wax, grease and other contaminants. The easiest way to do this is with coarse sandpaper. We take the sandpaper and go over each part with sweeping, wide movements along the fibers. Just don't put in too much effort. Otherwise you can wipe through thin veneer! If this suddenly happens, you will have to putty the surface to heal the “wounds” inflicted on the tree. And this is extra work that we don’t need at all.
After treating the surface with coarse sandpaper, you need to sweep it with a wide brush. It is important! Be sure to use a brush, not a rag or rag. Why? Yes, because with a rag you will drive some of the dust back into the microholes on the surface of the furniture.
Now we go over the surface of the part again, but with fine sandpaper. Particular care must be taken in hard-to-reach areas that were difficult to reach with coarse sandpaper. Again we fan the surface with a brush.
Another important point. Before painting parts, you need to thoroughly clean the room. This is done to prevent small dust particles and specks from getting onto the surface of the furniture during painting or immediately after the process is completed.
We wipe the surface of the parts with a damp, freshly wrung out clean cloth. Then we wipe it again, this time dry.
Selecting paint, primer and brushes
In this case, we decided to use acrylic paint and the same primer. This paint is odorless, easily diluted with water when thickened, and can be mixed to obtain the desired shades.
We will paint with brushes. This makes it easier to get a uniform color over the entire surface, including in hard-to-reach places. Don't use cheap brushes, because the result may be completely unsuccessful.
With the primer everything is simple - since we take acrylic paint, then the primer is the same. In this case, the paint will stick much better.
Parts painting process
First, apply a thin layer of primer. There is nothing complicated here, but it is better to first read the instructions on the can of material. The primer can be carefully applied with a roller. You can use a brush to cover some areas.
Initially, it was planned to paint the cabinet in two colors. I was able to buy ivory paint at the store, but to get the desired light green shade I had to mix white and green paint.
First we paint all the parts with a lighter paint. In our case - ivory. You can paint in one layer, or in two. Before applying each layer, you need to wait until the previous one is completely dry.
After painting the furniture in the first color, you need to seal the parts that you will not paint with the second color. You can not seal them completely, but only along the contour. And after that, we paint the necessary surfaces in a light green color. If we want, we then apply a second layer. After drying, remove the paper stickers.
After the paint has dried, carefully apply acrylic varnish on top. We will apply it with a foam sponge. It is advisable to apply 2-3 layers of varnish. Before applying each one, wait for the previous one to dry.
After the varnish has dried, screw all the handles on. We assemble the furniture completely. And now you can gild individual elements. As a result, we get this wonderful view in the Provence style:
What paint is better to paint?
An important condition for high-quality painting of furniture with your own hands is the choice of a suitable composition. Currently, several varieties are used for work.
Acrylic water emulsion
This option is becoming increasingly popular, due to many advantages:
- Environmentally friendly. This is an important parameter, since the products to be painted will be located in a residential area.
- Fire safety. The film formed does not contribute to the spread of flame and does not support combustion.
- Good adhesion. The solution applies to almost any surface.
- Moisture resistance. Due to special additives, the resulting coating can be wet cleaned.
- Decorative. Although the traditional color is white, the use of color gives the opportunity to show imagination.
But the use of this product has its own peculiarity. Since most of the solution is water, and the furniture is made primarily of wood or its derivatives, which absorb moisture well, this can lead to damage to the parts. Therefore, the base needs to be treated with primers.
Silicone water-based paint
The silicone variety is used primarily outside, but can also be used inside the home to coat furniture that is in direct contact with moisture. Thanks to the composition based on acrylic copolymer and silicone, the mixture acquires the following properties:
- Elasticity. This avoids cracking as the wood expands.
- Wear resistance. There are no abrasions on the surface, so the attractiveness of the products is not reduced.
- Durability. The applied layer, if the technology is followed, does not need to be replaced for decades.
A significant disadvantage is the high cost.
Alkyd enamels
This option is inferior in quality to the acrylic variety, but is quite popular due to its advantages:
- Availability. The cost of the material is very affordable, and the choice of colors is wide.
- Easy to apply. The presence of an organic solvent does not require the use of deeply penetrating soil, but it will not be superfluous either.
- Prevalence. The products are available even in remote areas, which cannot be said about water-based options.
The disadvantages of this variety are quite significant: flammability and an unpleasant odor, which is also toxic, so it is better not to use an alkyd composition at home.
Auto enamels
The convenience of this type of paint is that it is sold in spray cans. This significantly simplifies the work process, but increases the final cost. The products are great for touching up a small area or completely decorating the façade of furniture. But for large-scale work the expense will be too significant.
The peculiarity of these compositions is that they form a reliable coating, which, when choosing the right variety, can shine.
Nitro paints
This option allows you to paint furniture very well, but the home environment is not suitable for the process. To work with this composition, you must have appropriate experience and more professional equipment.
Varnish
Such products are actively used as coatings for interior items. Well suited for restoring old wooden furniture. There are many varieties on sale that tint the surface in the desired color or emphasize the natural texture (colorless).
How to repaint furniture from dark to light at home
If you have an old cabinet, sideboard or wall at home, do not rush to throw it away and buy new furniture.
Old things can sometimes be very stylish and will look great in the interior if they are updated just a little. To do this, you will need to clean the surfaces from the remnants of old paint and varnish, and then cover them with a new layer of paint. At the same time, we always have the opportunity to experiment and choose some completely new shade. Today we will conduct a small master class on painting furniture at home. First, we’ll tell you in detail and show you how to update and paint an old, shabby cabinet. And then we will give a number of other examples of painting a variety of interior items.
Applying paint
The main stage - coloring - is the most enjoyable process that even Tom Sawyer enjoyed. It's nice to watch how furniture is transformed.
If the structure is painted disassembled, the walls are laid horizontally so that the paint is distributed evenly, without drips. Furniture as a whole is painted more slowly, carefully monitoring the uniformity of the resulting layer.
First, they make the background, then let it dry for half an hour, after which they paint twice more, pausing for drying.
If you wish, you can play with color to enhance the decorative impression, for example by painting the tabletop in a light color and the side walls in dark tones. To enhance the effect, furniture is varnished, making from one to several coatings on different parts. With great desire and careful attention, the effect will exceed expectations.
Painting technology
After all the measures to prepare the surface of the furniture have been completed, the main process of transforming the product begins. It is recommended to place the part to be painted horizontally so that the enamel is distributed evenly. If the process occurs without disassembling the structure, then the procedure is slower. The first thing you need to do is the background. Then it is allowed to dry for 40-50 minutes. Then two more stainings are carried out. Between these steps, pause for better paint absorption. The enamel is applied only with even pressure and long strokes. It must not be assumed that the dye was distributed unevenly in different places of the wooden part. To level the last layer, you can go over it with the edge of a brush. The part to be painted should be positioned at an angle so that scratches and dents can be seen. Enameling the valves begins at the ends of the product, and then gradually moves to the center (base).
Furniture painting
How to choose the right paint
When old, but strong furniture has lost its former luster, it is not necessary to think about purchasing a new set; it is better to think about buying paint and restoring the old one. Thus, you kill two birds with one stone - you give a second life to your favorite furniture and save money.
Buying new paint is easier than buying new furniture. What you need to know when choosing wood paint:
- where and under what conditions the furniture was used;
- wood type of furniture element;
- Possibility of re-painting;
- type of paint of the original coating.
Since we are talking about furniture that is usually located in residential premises, when choosing a dye, give preference to odorless products.
Give preference to paint without a strong odor.
Type of material and furniture
If you decide to paint furniture, update its appearance, first decide what, ultimately, you plan to achieve. For example, to give furniture a vintage look, latex-based paint is suitable. This material is best suited for artificially aging the surface; it will highlight abrasions and small cracks.
Latex-based paint can give furniture a vintage look. For the treatment of smooth surfaces exposed to external loads - oil paints. This type of paint is quite durable and can be used to paint tables, chairs, bedside tables and other similar pieces of furniture.
For chairs and tables, it is better to choose oil paints. Acrylic composition is most suitable for covering small areas, it makes the surface shiny and smooth. Acrylic paint is quite resistant to temperature fluctuations, has high wear resistance and moisture-repellent properties. Therefore, it can be used for painting bathroom cabinets, kitchen furniture, and wardrobes.
Acrylic paints are durable and suitable for almost any furniture.
Re-dyeing
When repainting, be sure to use the same type of paint that was previously applied to the surface. How to determine without special examination if information on this issue is hopelessly lost. Go over the old layer with sandpaper; if there are traces of paint on the paper, most likely it is one of the water-soluble emulsions. If the old coating crumbles after exposure to an abrasive, then we are dealing with alkyd or oil paint.
A conclusion about old material can also be made based on how long ago it was applied. If more than ten years have passed since the last painting, then without a doubt, this is oil-alkyd paint. The surface for re-painting must be clean, grease-free and dry. To re-paint, the prepared surface must be dry and thoroughly cleaned of grease, dust and soot, and dirt. To return the furniture to its former appearance, take the time to properly prepare its surface for applying paint.
Compatible with other coatings
In order for your wooden furniture to sparkle again with its former freshness and shine, and for its painting to be completed successfully, you should take into account one important aspect. It is possible that repainting will be carried out on a surface containing other materials: putties, enamels, primers. They will most likely have a different color and composition, that is, they may not be compatible with the chosen paint.
To varnish or not
The varnish coating fixes the color, protects the surface of the furniture, and the product looks antique and well-groomed. Be sure to protect with varnish the furniture that is often opened and closed.
For varnishing, use specialized furniture (not parquet) matte or transparent varnishes. The second layer is applied 24 hours after the first coating.
Varnish choice:
Alcohol varnish is used when restoring antique objects.
New, popular acrylic varnish, odorless, suitable for indoor and outdoor use. Economical product - water is used for dilution.
More: Review of the best marble manufacturers
Durable alkyd varnish film withstands abrasion. A solvent is used for dilution.
Little oil varnish is used; it is often used to cover the floor. For dilution you need drying oil that dries for at least a day.
Polyurethane (ship) varnish has increased wear resistance due to the appearance of a protective, quick-drying film.
Nitrovarnishes are inexpensive and form a durable protective film. No special primer is required before coating. When applied, it is diluted with a solvent.
How to paint children's furniture: possible options
The reason for repainting old wooden furniture may be not only the need to update the coating, but also the desire to change its appearance. Even an old, out-of-fashion Soviet or Romanian wall can fit into a modern room and become a functional and stylish part of the interior if it is properly redesigned. First you need to decide what the new interior of the room will be like and what style it will be in.
Look at examples of furniture arrangement using an old wall. Here it not only fits into the overall color scheme of the room, but also looks quite modern and relevant. By the way, both wooden walls from the examples in the photo were repainted.
Look for inspiration in examples and choose new colors and decor to update old wooden furniture.
Painting wooden furniture, like any other job, has its own specifics and tricks. The tips below will help you not only paint furniture faster, but also save paint while achieving high-quality results.
Buy products - varnishes, paints, putties, primers - from the same manufacturer. This guarantees their compatibility, since manufacturers of finishing materials usually specialize in certain types of surfaces and take into account their operating conditions. This will simplify the selection of suitable paint and other products. Experiment with shades and color combinations. A well-chosen color scheme refreshes the room and visually enlarges it. In interiors of different styles, contrast is a very popular technique: furniture is painted in a color that contrasts with the walls. Before you start applying paint to wooden furniture, prepare a roller and several brushes of varying thicknesses. A roller is useful for painting large flat surfaces, but small relief parts - furniture ends, trim, convex decor - are best painted with brushes. Use masking tape to protect areas that have already been painted and dried from paint splatter. The solvent will not help in this case, but will only ruin the base layer of paint. While painting, wear a respirator mask or ensure that the room is well ventilated
Many of today's wood furniture paints are odorless and non-toxic, but it is always best to be careful when working with construction chemicals.
How to repaint wooden furniture?
Is your wooden furniture getting old or are you tired of the color? An easy way to change the appearance of a piece of furniture is by painting it. Paint and varnish will breathe new life into furniture, eliminate existing scratches, and give a sophisticated look. Varnishing will help hide wood imperfections, such as knots or cracks.
In addition to a decorative function, paints and varnishes also perform a protective function. They maintain the smoothness of the surface and protect furniture from exposure to ultraviolet radiation, dampness, and insects.
Features of painting various types of furniture
Each material has its own subtleties and nuances that should be taken into account when working.
Painting MDF furniture
The surfaces are freed from the old coating, cleaned and degreased. Next, apply a layer of acrylic primer. It will help level the surfaces, close all pores and provide an even layer of paint. The coloring composition can be applied in various ways:
- spray can;
- spray gun;
- roller;
- with a brush.
If, when painting MDF furniture at home, it is necessary to obtain a rich, deep tone, several layers are made, each of which is dried. The final stage is varnishing. It will add shine and protect against adverse external factors.
Painting chipboard furniture
The first steps in this option of painting furniture are standard - the surfaces are freed from the old coating, sanded, covered with a layer of primer, and, if necessary, putty. The peculiarity of working with such a surface is that the material is covered with veneer or varnish, laminated, or laminated. Pre-treatment depends on the type of surface.
Painted chipboards are subjected to heat treatment (for example, with a construction hair dryer). Soft paint can be easily removed with a spatula. If you don't have a hairdryer, you can use an iron. The surfaces are ironed through the foil, after which the paint can be removed very easily. The veneer or laminated layer is removed with sandpaper. Dust is swept away with a brush; you should not wipe the surface with a rag or sponge - the dust will get into the pores of the wood.
To paint chipboard furniture, you can use alkyd, oil or acrylic paints. The choice depends on the characteristics of the room. In the kitchen and bathroom, alkyd compounds that are resistant to moisture and microorganisms are best suited. For bedrooms and children's rooms, choose acrylic that does not have an unpleasant odor.
Features of painting furniture made of chipboard with your own hands:
After applying and drying the first layer, you should carefully smooth out all the unevenness and roughness with fine-grain sandpaper. Then apply a second layer.
Varnishes are also used for chipboard; they will protect the surfaces from moisture and mold.
Alkyd, alcohol, and epoxy compounds are suitable.
If you have to paint a cabinet in an unassembled state, you need to work very slowly and in small layers, this will help to avoid drips.
Painting natural wood furniture
Most often, instead of painting furniture, it is treated with varnish. But if the surfaces previously had a coloring composition, it should be renewed. Preliminary preparation is standard, the only caveat is that natural material will require so-called “lint removal.” To do this, the surfaces are covered with a layer of stain or other wet composition, such as varnish.
After preparation, a layer of paint is applied. You can use any type of furniture painting (tinting, staining, varnishing).
Stain is used for tinting; it perfectly emphasizes the beautiful texture of natural wood. Can be wax, alcohol, water or oil.
Technology for painting solid wood furniture with stain:
- The composition is applied with a flute brush.
- If you need to make two layers, dry each thoroughly.
It is important to distribute the composition evenly over the surface, otherwise stains will appear. Paint options for painting wood furniture:
Paint options for painting wood furniture:
- If the item is located in a room with high humidity, a water-based one is suitable.
- The best option for painting children's furniture is acrylic. It is environmentally friendly, odorless, and dries quickly.
- Furniture compositions must be labeled with the “Eco Label” designation, this indicates safety.
- Latex and acrylic compositions are suitable for the bathroom. For the kitchen - water-based, odorless.
- Previously, painting wooden furniture with oil was considered the most successful option, but this composition takes a long time to dry and has an unpleasant odor. It has been replaced by modern silicone paints.
The type of wood affects how much compound is needed. Cedar, pine and fir absorb paint best. Birch, maple, and beech are much more economical.
When should you paint furniture?
Often cabinets, chests of drawers, and furniture sets, when they lose their appearance, are transported to the dacha and eventually thrown away. People don’t think that furniture can be transformed by spending minimal money and effort. In 90% of cases you can achieve excellent results. It doesn’t matter how old the chest of drawers or set is. We recommend painting chipboard furniture in the following cases:
- the structure still has a significant margin of safety;
- items need aesthetic and major repairs;
- Products are damaged but function perfectly.
The preparatory work and the process of applying enamel is not too complicated. You should choose the right paint, convenient tools, and develop a design. It is important to follow the advice and be careful.
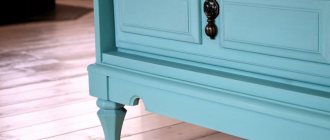
Over time, furniture loses its attractiveness
Optimal materials
Crib-house with a frame made of natural wood
Before you paint the furniture in the nursery, you should study all the options for paints and varnishes that are acceptable for use in such an important room. Of course, there are many varieties of modern paints with a variety of bases, but the best option is classic water-based:
Latex and acrylic water-dispersion products are quite often used, since they are distinguished by the excellent quality of the finished coating, durable elastic film, complete absence of harmful substances in the composition, and, of course, a large selection of different shades and colors. At the same time, the resulting coating has an incredibly rich color and pleasant texture; An excellent option would be acrylic-polyurethane furniture varnishes
The key features of this material include incredible wear resistance, which is so important for each surface in a children's room. In addition, such paints are absolutely resistant to moisture and mechanical stress.
It should also be noted the large color spectrum and rich colors of acrylic-polyurethane products; Acrylic-based enamels are used mainly for finishing the most worn surfaces and objects. Thus, toys, window sills, various table tops and all children's furniture are treated with this product. The material is resistant to mechanical stress and does not contain various harmful impurities; Aqualaks are also perfect for decorating a children's room. They are made on the basis of polymer dispersions and water. There are various external characteristics, so each parent can choose the most suitable varnish - colored, matte, semi-matte, transparent. With all this, the material is absolutely harmless and resistant to all negative influences from the outside; The composition of oil-waxes includes only natural oils and waxes, which is very important for finishing a children's room. When this substance is applied to the surface of wood, the oil is absorbed into the material, and the wax remains on the surface, thereby forming a stable protective film. It is not susceptible to mechanical, chemical or any other influences, prevents dust and dirt from penetrating into the object, and is easy to clean. Today, this material is recommended by most European manufacturers.
Walls in a children's room painted with special paint
Each of the materials described above is absolutely hypoallergenic, does not contain harmful or toxic impurities, and also has a large selection of colors, shades and textures. However, with all this, each material from the list has a rather high price, which is due to the large number of tests, certifications and other checks carried out.
Each of these high-quality materials is absolutely safe, and in the store the seller must provide documents describing the composition of solvents and fillers, upon the buyer’s first request.
Selection of paint and additional materials
Painting lacquered furniture should be done with high-quality materials intended for wood. To process metal products, you need to purchase paint for metal products.
The material for painting must be durable and stable:
- to exposure to moisture and dirt;
- to wear and abrasion;
- to mechanical stress;
- to low temperatures;
- to chemicals.
The base, stripped of obsolete varnish, can be coated with any paint depending on the owner’s preferences. If desired, you can get a semi-matte, matte, glossy or completely transparent finish. To make furniture white, you will need translucent paint. If you choose a matte option, the products will look outdated.
Paints for working with wood that you can choose from:
- acrylic - a water-based solution designed for working with wood, plywood, MDF, veneer, laminate;
- varnish - it is used to renew old coatings;
- enamel with a metallic effect - this paint is used to cover fittings and is also applied to wood to get a new shade.
If the surface to be treated is located in rooms with high temperatures or interacts with hot objects, then you should choose a paint that has a fire-retardant effect. The wood is first coated with a primer.
In addition to paint, you need to purchase auxiliary tools and materials:
- brush, roller - for applying paints and varnishes;
- spray gun - for processing large areas;
- emery sheet or sander - for sanding;
- scraper or metal brush - to remove old varnish;
- construction hair dryer - will be needed if you plan to heat an outdated coating;
- primer, varnish, putty, detergent, antiseptic, varnish thinner, and, if necessary, insect repellent.
Choosing a wash
The remover is used to remove old varnish. The chemical composition of the remover softens the outdated varnish coating and allows it to be completely removed.
Which shade is better to choose?
The choice of color depends on the wishes of the owners. However, you can listen to some tips:
- If the bedroom is small, it is advisable to choose light and cool shades.
- If there is insufficient lighting in the room, it is better to avoid painting in too dark colors.
- You need to choose a color to match the interior design of the bedroom.
- It is better to choose shades that will help you relax and get ready for sleep.
How to repaint it white?
The procedure for repainting furniture white is simple. Painting is carried out in several stages:
- Remove dust and dirty stains from the surface with water and any detergent.
- Dry and disassemble the furniture into its component parts.
- Remove the old coating with sandpaper, treat uneven areas and small cracks.
- Apply two coats of primer, allowing each coat to dry completely.
- Apply a thin layer of the white compound with a brush or roller, leave until completely dry, then repeat the procedure two more times.
- When the coating has dried, the surface can be coated with matte or glossy varnish. This will provide the product with a more attractive appearance and additional protection against wear.
Necessary tool
The first step will be to develop a design for “updated furniture.” The range of work, selection of paint, varnish and other components will depend on this. It is not recommended to improvise if the procedure is being performed for the first time. We will need the following tools:
- short-haired rollers or brushes of different widths;
- screwdriver (screwdrivers);
- coarse, fine-grained sandpaper;
- putty knife;
- gloves;
- rags;
- hair dryer;
- knives.
When using aerosol cans of paint, there is no need to buy brushes.
Attention! When purchasing rollers, it is recommended to check them for sticking of hairs to the surface and the strength of the lining.
Screwdriver
Putty knife
Varnish layer renewal technology
The process of restoring wooden furniture with your own hands consists of several stages. As an example, the restoration of a crib will be given:
1. Preliminary preparation. Before refinishing polished furniture, it must be disassembled. Next, apply a cleaning solution to the surface, then rinse thoroughly with warm water. This procedure will soften the old polish, the varnish will crack and peel off in some places. Its remains must be removed using a scraper. Next, sanding is carried out with sandpaper. You need to start with a coarser abrasive and finish with a fine one. The surface should become matte and uniform. Next, remove the dust with a brush or damp cloth.
Related article: What is the best way to paint wooden products?
2. Application of paint and varnish composition. Depending on the chosen varnish material for the furniture being restored, the number of layers to be applied is determined. Each subsequent layer is applied after the previous one has completely dried (drying for at least 8 hours). If acrylic varnish is used, then to apply the first layer the composition must be diluted with white spirit. Further restoration of the furniture is accompanied by sanding the surface, after which another 2-3 layers of undiluted varnish are applied.
3. Stage of grinding the restored layer. Sanding of the restored areas is carried out carefully with sandpaper with the finest grit until a uniform matte surface is obtained. Next, everything is thoroughly wiped with a rag. Repairing an old item allowed us to get a completely new bed.
On video: restoration of a crib.