Cement-lime plaster has been used by mankind for centuries, but is still in demand in modern construction. It consists of two main binding elements - cement and lime. The use of the composition is not limited to finishing only indoors; the mixture is successfully used for outdoor work. At the same time, the building material is sold in ready-mixed form; you just need to dilute it with water. Also, if you wish, you can prepare the mixture yourself without much hassle.
Classification of lime compositions
The characteristics of a lime-based mixture can be changed by adding other components to it.
Lime plaster mortar
Lime-based plaster is used to level surfaces in dry rooms. The main component is a binder. It is obtained through the process of burning limestone. The resulting material is crushed.
When the powder is mixed with water, a lime paste is formed. The process is accompanied by the release of a large amount of heat. The dough is used to make plaster mixtures.
Lime-based plaster is used for interior finishing work in residential buildings.
The presented composition is intended for internal use, as it is not exposed to moisture.
To finish the facade, cement-lime mortars for plaster are used.
The mixture fits well on surfaces that absorb water: concrete, brick. The finished composition can be stored for about 3 days, but its quality and plasticity gradually deteriorate.
Lime-cement plaster
Cement-lime mortar for plaster is used if decorative plaster or tiles will be used for finishing cladding. It adheres well to the surface of the base. After kneading, it can be used within 3 hours.
The cement component makes the layer durable. Thanks to lime, the composition has good plasticity.
Lime-cement plaster has increased elasticity, has excellent adhesion, and adheres reliably to the base
Dried plaster is resistant to mechanical damage and cracking. It can withstand up to 50 freezing cycles, so it is suitable for outdoor use.
While ensuring good vapor permeability, the coating is resistant to moisture, fungal development, and temperature changes. The mixture is applied at air temperature +5-30 °C. The layer gains strength after 28 days. The solution is granular, but after hardening it forms a smooth surface.
Lime-gypsum plaster
Gypsum-lime mortar for plaster allows finishing work to be carried out in the shortest possible time. The mixture sets in 10 minutes. Complete hardening of the layer occurs after 45-90 minutes. The solution is suitable for finishing stone, cement, wood and fiberboard substrates.
Lime-gypsum mortar can be used to plaster any substrate
Due to the rapid hardening of the solution, it is not recommended to prepare it in large portions.
The coating is ready for further finishing in 10-15 days. This mixture is not suitable for beginners who have no experience in plastering: you need to work with it quickly. Gypsum is added to the lime mortar and mixed thoroughly until a homogeneous mass is obtained.
Do not use a solution that is too thick. If it has already begun to set, then you should not add water: the strength of the finished layer will suffer.
Lime-clay plaster
This type of lime mortar is suitable only for interior work, and it is not used for finishing residential premises. The clay mixture is difficult to prepare: it should not be made too thin or oily. In addition, the clay must be soaked for 24 hours. Otherwise, the finished coating will crack and crumble.
The clay-lime composition has low strength after complete drying, so it is not used as a separate layer. It is suitable for commercial buildings. The material is environmentally friendly.
Clay-lime plaster solution is used mainly in dry rooms
Additional Additives
The following components can be added to the main composition:
- Plasticizers. They improve the mobility of the solution and its homogeneity. However, the ratio of components must be selected independently. Too much surfactant will cause the finish to deteriorate quickly. At home, washing powder and liquid soap are used as plasticizers. They reduce mixture consumption and make application more convenient.
- Fiber fiber. This component increases the strength of the finished layer. It is used if the solution is applied to the facade. In addition to fiberglass, marble chips are added to the composition for the purpose of strengthening.
- Elements that improve the resistance of plaster to negative temperatures. These additives allow finishing work to be carried out even in winter. At the same time, the finished coating does not lose strength.
- Water repellents. They increase the resistance of the plaster layer to moisture. Such solutions are used for finishing swimming pools and bathrooms.
- To enhance the decorative finish, quartz sand is added to the mixture. Usually its fraction is 1 mm, but in some cases components up to 6 mm in size are used. This additive increases the chemical inertness of the layer. Expanded polystyrene granules increase the heat-retaining properties of the plaster.
Additional additives that can be added to the plaster composition
To protect the finish from exposure to sunlight, crushed mica is used. Metal dust increases the plaster's resistance to mechanical damage.
Any additives are introduced into the main composition after calculations.
Step-by-step application instructions (5 steps)
All finishing work is carried out using technology in accordance with SNiP 3.04.01-87. Engineers studied all operating conditions for plastering work. Using an experimental method, a methodology was developed that must be strictly adhered to. Otherwise there may be a severe reduction in performance.
Step 1. Preparatory work before applying the solution
Before applying lime mortar, it is necessary to prepare the base. To do this, you need to test it for strength by lightly tapping it with a hammer. All crumbling, peeling, cracking parts of the surface must be dismantled.
After dismantling, the surface is dust-free and degreased. The end of the preparation is priming the base using a roller and mat. The primer is applied in one layer, after which the water absorption of the wall or ceiling is checked. If water is excessively absorbed, then priming the surface must be repeated. In this case, it is advisable to dilute the primer with water 1:1.
If you plan to plaster concrete or other surfaces that do not absorb moisture, a contact primer is applied.
Typically the primer dries within 2-4 hours. After this period, the beacons are installed and you can move on to the next stage of work.
Preparing the wall
Step 2. Spray
To improve adhesion to the mineral base, the surface is sprayed. It is carried out with a lime mixture, which is diluted to a semi-liquid state and resembles kefir in consistency.
The building material is picked up with a trowel and thrown onto the wall. After this, use a spatula to spread the mixture tightly onto the wall. The next layer is applied the next day.
Step 3: Base Layer
The base layer or primer can be plastered with a thick layer of up to 5 cm. The composition is prepared to such a consistency that it resembles thick sour cream. The material is picked up with a spatula and thrown between the beacons until their level is reached from top to bottom. After which the layer is tightened from bottom to top using zigzag movements. And so on at every stage. In this case, it is necessary to strictly monitor compliance with the level of beacons. If as a result a hole is formed on the surface, then it should be filled in with light movements with a spatula. After this, the rule is used again.
Applying plaster
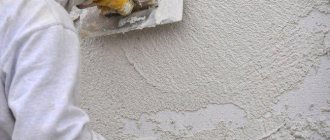
Step 4. Grinding
This stage of work involves creating a finishing surface and leveling out minor irregularities. Grinding is done with an abrasive mesh when the top layer of plaster has hardened sufficiently.
To do this, the mesh is pressed tightly onto the surface by hand. Processing is carried out using horizontal, vertical or circular movements until a completely smooth surface is achieved.
Step 5. Dismantling the beacons
After 24-48 hours, the beacons are removed. At this point, the mixture has already set, but has not fully gained its strength. If the beacons were installed on plaster, then they must be carefully pryed off with a spatula and removed. When attaching strips to self-tapping screws, you first need to unscrew them.
After removing the beacons, the remaining recesses are sealed with the mixture flush with the rest of the surface.
Removing beacons after applying the solution
Where is it used?
Of all types of plaster, cement-lime plaster is universal. It is used for rough finishing of residential, office premises, utility buildings, balconies, loggias. Moreover, the mixture is suitable for both indoor and outdoor use. Applying plaster in damp rooms requires additional reinforcement.
Cement-lime plaster is used for interior and facade work.
Most often, the solution is used to level walls and ceilings in new buildings. It fits well on brick and concrete bases. The composition does not stick well to wooden surfaces.
Lime-gypsum plaster is used to finish those areas of the walls where cabinets or household appliances will not be attached.
Additional components
In some cases, there is a need to improve the quality of the coating or give it certain characteristics. For this, it is permissible to use the following materials:
- Expanded polystyrene crumbs. Sheets of this material are used for thermal insulation, so it is only necessary to add it to the plaster when finishing internal surfaces.
- Crushed mica. The mineral protects walls from exposure to ultraviolet rays.
- Marble dust, flour or crumbs. This material increases the mechanical strength of cement-lime plaster, as well as its decorative properties.
- Ground barite. This mineral is practically not used for residential premises, since it protects coatings from radio waves.
- Quartz. The fraction of this mineral can range from 0.1 to 6 mm. It has the same effect as marble, but additionally protects against acids.
Additional components of cement-lime plaster
Pros and cons of the mixture
The solution has the following advantages:
- low price (a self-made composition will cost 2 times less than a production one);
- good level of thermal insulation (additional insulation is required in cold latitudes);
- optimal vapor permeability, ensuring normal ventilation of the base;
- plasticity (thanks to this quality, the finish remains intact even when the house shrinks);
- environmental Safety;
- good adhesion;
- resistance to temperature fluctuations;
- fire resistance of the coating;
- minimizing the use of finishing compounds;
- inertness to the influence of biological factors.
Cement-lime plaster has high adhesion strength to various substrates
However, the mixture has disadvantages:
- low mechanical strength without additional reinforcement;
- the need to use water-repellent additives;
- carrying out work in several stages.
After the plaster has dried, you can see small irregularities on it. This can be avoided if the finish is applied in layers.
Cement-lime mixture has reduced resistance to moisture
Material requirements
In order for the finished layer to last as long as possible and not lose strength for a long time, when purchasing or making your own solution, you need to take into account the following features:
- the strength grade of the mortar should not be less than M50;
- resistance to negative temperatures is 35 cycles of freezing and thawing;
- adhesion of the solution is at least 4 kg per 1 m²;
- temperature range for plastering work: from +5 to +30 ºС.
Plastering work should be carried out in the temperature range from +5 ºС to +30 ºС
In addition, all components of the mixture are pre-cleaned of debris. A sieve is used for this. It is better to strain the finished solution. For spraying, more cement and water are added to the composition. Additional components are used if necessary.
If the solution breaks during application, it must be diluted with water. A mixture that is too liquid is enriched with dry ingredients.
How to properly slake lime
To prepare your own plaster, it is better to buy ready-made burnt lime. For proper extinguishing, the following actions are necessary:
- combine the main component with water in a 1:1 ratio (the substances are mixed in a metal container);
- add liquid: the lime must be completely covered (water is introduced after the violent reaction has ended);
- mix the solution, add liquid and cover the container.
Lime slaking technology
It will take 2 weeks to infuse the lime.
The result is a homogeneous dough without air bubbles. Otherwise, the extinguishing process will continue and lead to destruction of the plaster layer.
Making your own quicklime
It should be said right away that it is easier and faster to purchase burnt lime, but if you want to carry out the entire process from start to finish, then you need to buy ordinary lime. The material is used in many industries, so if there are factories nearby that produce building mixtures or bricks, you can find out there. Otherwise, you will have to look for a supplier online.
Construction quicklime
The next operation will require a furnace. It needs to be melted with coal, after the temperature rises, add a little more coal and spread it in an even layer in the oven. Lime is spread on it as quickly as possible, a small amount of coal dust is sprinkled on top, the stove is closed and left overnight. In the morning, the lime is removed from the kiln into a metal container. The temperature of the material will still be high, so pliers, protective gloves and goggles must be used. After the lime has cooled, you need to crush it with a hammer and begin slaking.
What components are needed to prepare cement-lime plaster?
To prepare plaster, the following components are required;
- cement;
- lime;
- water;
- sand.
Components required for preparing cement-lime plaster
The brand of cement is selected in accordance with what the finishing will be. For painting and wallpaper, substance M150 is required. For a brick facade, it is better to take cement grade M400-500. If the component has been left in the open air for a long time, it should not be used, as the strength of the finished layer will suffer.
Sand is taken from quarry, sifted. For cleaning, use a sieve with a mesh size of 1.5 mm.
Features of terrasite plaster
Terrasite plaster is a building mixture for finishing, which is used primarily on the outside of buildings and performs protective and decorative functions. This is a rough mixture consisting of the following components:
- lime in powder form;
- cement;
- limestone chips with a fraction of 1.5 mm;
- coarse quartz sand;
- mica;
- pigment.
Marble or granite chips can be used as filler.
A special feature of the mixture is the possibility of coloring it with pigment. This allows it to be used as a finishing coating without subsequent application of paints and varnishes.
The mixture is prepared in a factory, so it is difficult to comply with all the parameters and conditions at home. The dry mixture is supplied in bags and sealed immediately before finishing work.
Terrasite variety Runit
The mixture has the following advantages:
- service life more than 15-20 years;
- resistance to any type of precipitation;
- creating a beautiful facade design;
- frost resistance;
- long-term color retention;
- moisture resistance.
This type of decorative finishing is the best in terms of price and quality ratio.
Terrasite plaster surface
How to prepare cement-lime mortar
To properly prepare a solution based on a store-bought dry mixture, you must follow the manufacturer's instructions. In this case, follow the following sequence of actions:
| 1. Purified water is poured into a large container. | |
| 2. The dry mixture is poured into the liquid. | |
| 3. Mix the components using a drill with a special attachment or a construction mixer. | |
| 4. Let the solution sit for 5 minutes, then stir again. |
During operation, the plaster may lose mobility. To restore it, just stir the solution, but there is no need to add water.
Preparing the mixture yourself involves maintaining the proportions of the main components:
| Solution | Compound | Ingredient ratio | ||
| Spray | Priming | Cover layer | ||
| Lime | Lime dough: sand | 1:2,5-4 | 1:2-3 | 1:1-2 |
| Cement-lime | Cement: lime paste: sand | 1:0,3-0,5:3-5 | 1:0,7-1 | 1:1-1,5:1,5-2 |
| Lime-clay | Lime paste: clay: sand | 0,2:1:3-5 | 0,2:1:3-5 | 0,2:1:3-5 |
| Lime-gypsum | Gypsum: lime paste: sand | 0,3-1:1:2-3 | 0,5-1,5:1:1,5-2 | 1-1,5:1:0 |
It is also necessary to consider what grades of cement are used to prepare the solution and their ratio:
| Cement brand | Volumetric dosage (cement: lime/clay: sand) for plastering grades | |||||||
| 10 | 25 | 30 | 50 | 75 | 100 | 150 | 200 | |
| M200 | 1:0,8:7 | 1:0,8:7 | 1:0,3:4 | – | 1:0,1:2,5 | – | – | – |
| M300 | – | 1:1:10 | 1:0,6:6 | – | 1:0,3:4 | 1:0,2:3,5 | 1:0,1:2,5 | – |
| M400 | – | – | 1:0,9:8 | – | 1:0,5:5,5 | 1:0,4:4,5 | 1:0,2:3 | – |
| M500 | – | – | – | – | 1:0,8:7 | 1:0,5:5,5 | 1:0,3:4 | 1:0,2:3 |
| M600 | – | – | – | – | 1:0,7:6 | 1:0,4:4,5 | – | – |
Sand and water are essential elements of the solution, regardless of the binder. All components must be clean.
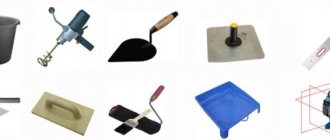
Required Tools
To manually apply plaster to brick or concrete walls, you will need the following equipment:
- drill with a special attachment (for mixing the solution);
- trowel (main working tool);
- spatula: narrow and wide (allows you to evenly distribute the mixture over the base);
- metal scrapers, brushes for cleaning surfaces;
- roller or paint brush for applying primer;
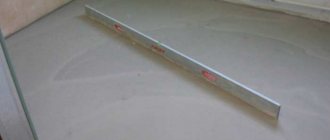
- rule;
- metal profiles for lighthouses;
- building level, cords and marker for marking walls;
- grinding machine with wheels or sandpaper;
- hammer for tapping the base;
- hammer drill, hair dryer, chisel (to remove the old finishing coating);
- stepladder (when working with ceilings or high walls).
Working tools for applying lime plaster
You will also need plastic sheeting to cover the floor and remaining furniture.
Application technology
You need to know not only the procedure and rules for applying the mixture, but also the features of preparing the base.
Preparing the base
All actions depend on the surface structure:
| 1. First you need to remove the old coating. The paint is removed using a spatula. If necessary, it is heated with a hair dryer; a solvent can be used. The wallpaper needs to be dampened and removed. | |
| 2. Next, the walls are tapped with a hammer to identify peeled fragments. It is important to remove grease stains as the plaster will not stick to them. | |
| 3. The brickwork is cleaned of excess mortar over the entire surface. Cracks are sealed with polyurethane foam. The concrete surface is dust-free. |
All types of bases are primed with a deep penetration compound. It improves the adhesion of the solution to the wall and prevents water from being absorbed from it too quickly.
When finishing wooden surfaces, the use of fine-mesh metal mesh is required.
Installation of beacons
Beacons are vertically installed metal profiles that help to apply plaster according to the level. Installation instructions:
| 1. Work begins on opposite sides of the base. It is necessary to retreat 30 cm from adjacent walls. Next, vertical lines are drawn on the surface using a building level. | |
| 2. The solution is applied pointwise according to the markings. The first beacons are attached to it. The correct fixation is checked with a level. | |
| 3. Screws are screwed into the upper and lower edges of the first beacons, and the thread is pulled between them. The distance between it and the profile does not exceed 1 m. | |
| 4. According to the markings, install the remaining beacons in the same way. The step between them is 1.5 m. |
All profiles are pressed into the solution to the required depth. The finished structure is checked with a level.
Splash
For the first layer of plaster, a thinner consistency of the solution is required. Its thickness does not exceed 1 cm. The mixture is thrown between the structural elements by hand. It is not necessary to level it, but you can slightly stretch it over the surface with a spatula.
Before spraying, moisten the wall with a spray bottle. The layer should dry within 2-3 hours.
Technology of applying plaster to the wall using the spray method
Base layer
In this case, a thicker solution is required. It is picked up with a trowel and applied on top of the first layer. Its total thickness does not exceed 2 cm, but the profiles must be closed.
The plaster is leveled along the beacons. A rule is used for this. The instrument is carried from the bottom up, performing wave-like movements. Excess mortar is removed from the rule and thrown onto the top of the wall. To obtain a smooth surface, use a wide spatula.
The plaster is leveled using wave-like movements from bottom to top.
Removing beacons
2-3 hours after the mixture has set, you can remove the beacons. The resulting grooves are filled with plaster of the same consistency as the base layer. If finishing is planned in a room with high humidity, the beacons can be left.
Longitudinal grooves from beacons are filled with solution
Grinding
After the rough soil has set, the surface is smoothed with a trowel. Movements should be careful and rotational. If you grout counterclockwise, the solution becomes denser.
Finish coating
The finishing layer has a thickness of 3 mm. It needs to be applied as evenly as possible. After drying, the surface is sanded. Further finishing work is carried out after 14 days. Until this time, the coating fully gains strength.
The permissible deviation in level is 3-4 mm.
After the finishing coat has dried, the surface is sanded
Invoices
You can save on decorative materials if you use a cement-lime mixture to form a textured layer. The following methods are used for this:
| 1.Through the mesh. The cell size in this case is 2.5 cm. The mixture is poured over the falcon in even portions. | |
| 2. Spray with a broom. The rods must be cut, because their fragments can fly out along with the solution. Next, the broom is dipped into the plaster mixture, brought to the wall, and then hit with a stick. | |
| 3. Spray with a brush. The tool is dipped into the plaster and brought to the wall so that the bristles are located at the top. Next, they pass along it with a stick. | |
| 4. Processing with a textured roller or stamp. The tool needs to be walked along the still wet surface of the base. As a result, a relief pattern is formed. |
To obtain the texture, use a scraper, the peel-off method (using a spatula).
Installation of plaster beacons
Plaster beacons are needed to simplify the process of leveling walls. These are perforated metal strips of different thicknesses that are easily installed on walls. Installation begins from the edge of the wall (approximately 30 cm from the corner). Using a level, draw a vertical line, apply several portions of the mixture along it and place the first beacon.
They act in a similar way at the other end of the wall. The beacons are screwed into the beacons from top and bottom using self-tapping screws, and nylon threads are pulled between them. Below them, the remaining beacons are placed on the solution every 1-1.5 meters.
Safety precautions
You need to be careful when working with lime-based plaster solutions. Alkali can corrode skin, so do not allow it to come into contact with exposed areas. You need to work in protective clothing, gloves and goggles. If the mixture gets on the skin, it should be washed off with soapy water. Additionally, you can protect your hands with Vaseline.
The plasterer must work in special clothing and use personal protective equipment
In addition, the following safety rules must be observed:
- Before plastering, remove all elements from the surface of the base that could cause injury;
- strictly follow the instructions for use and storage of the components used to prepare the mixture;
- when diluting dry plaster, do not allow it to come into contact with the eyes or respiratory tract;
- clean the tool immediately after completing repair work;
- do not use devices without handles;
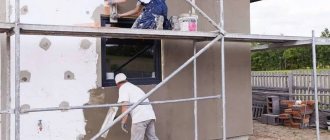
- when finishing the facade, use scaffolding (it is important to ensure the strength and stability of the structure);
- Do not load the work floors too much; they must be moved carefully and smoothly.
The safety of the plasterer during work depends on the strength of the scaffolding and decking.
If you have no experience, you should not plaster yourself.
The lime-cement mixture is selected depending on the required characteristics. The same solution cannot be used for external and internal work. However, vapor permeability, low price and biological resistance are characteristics that are inherent in all types of lime-based solutions.
Have you ever worked with cement-lime plaster? What nuances would you pay attention to for beginners? Share your experience in the comments.
Coating textures
Construction stores sell decorative lime plaster, which has different textures:
- bark beetle;
- lamb;
- Venetian;
- under a stone;
- marbled
Depending on the manufacturer, you can find other texture options. Decorative plasters are sold in buckets and are made from gypsum, lime, limestone and coarse grains of natural stone or sand. Used for finishing interior walls.
Lime mortar is a universal building material that is low in cost. The best part is that it is easy to prepare and apply yourself. At the same time, it stands out for its advantages compared to today’s usual cement-sand mixtures.
Was the information useful to you? Share in the comments!