Light antique painting is a fairly popular operation when creating various interiors. It is traditionally believed that antique items add an element of sophistication and luxury, emphasizing the style and wealth of the owner of the room. However, genuine antiques are highly expensive and often require restoration and special care.
It is much easier to simulate the aging of an object. And today this art is mastered not only by artists, but also by painters and simply amateurs. So, it will be quite possible for you to paint antique furniture if you set yourself such a task. But before you tackle your great-grandmother's chest of drawers, practice on something less valuable.
Methods for aging wood and other materials
There are several ways to age furniture and other types of materials:
- application of special compounds that change the appearance and properties of the top layer of coating (available for wood and metal work);
- painting with several paints of different colors so that the lower layers show through the upper ones;
- processing with sandpaper and other abrasive materials;
- the use of pigments that create the illusion of aging and some dirt.
What paint is suitable and is varnish needed?
There is no need to buy expensive paints to age furniture. An inexpensive water-based emulsion for ceilings is quite suitable. It dries quickly, does not cause difficulties during work and is easily mixed with colors (dyes). Choose pastel colors, giving preference to gray, blue, cream, and white shades.
Inexpensive water-based paint is quite suitable for aging furniture.
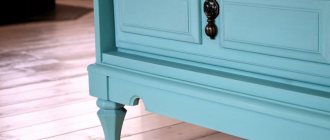
Before painting Provence style furniture, coat the surface with an acrylic wood primer. It will increase the adhesion of paint to the surface and reduce its consumption. Any pigment lies smoothly on the primer. To create an artificial patina, use bitumen varnish and silver. The first option is suitable for aging light surfaces, and the second - for dark ones. When choosing a topcoat for furniture in the Provence style, it is preferable to use matte rather than glossy varnish. It emphasizes the effect of antiquity, preserves color and texture without highlighting smudges or unevenness.
Painting wooden elements
The most ordinary things can be turned into decorative furniture or accessories that are not inferior to antique items in terms of sophistication and the ability to create a special atmosphere in the room.
The question of how to paint antique wood arises when you want to make original and sophisticated-looking details using existing interior elements.
Antique painting of wood is quite possible at home; all you need is the most common tools. Before painting, it is necessary to carry out preliminary preparation of the object to be decorated.
Before aging a product, several stages of work are carried out:
- The surface of the object being processed is cleaned. Varnish, old paint, and any other coating are removed from wood. Those parts and fittings that are not planned to be painted are dismantled.
- The surface is polished and then cleaned from dirt and dust.
- The surface is primed with antiseptic compounds to avoid subsequent rotting or mold damage. The primer will also ensure the paint adheres better.
It is not recommended to use putty when preparing to age wood. With this design solution, the emphasis is on the presence of small defects in the wood, so you should not completely mask the flaws.
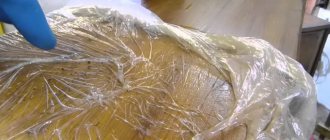
Aging using wet paper
This method of giving wood an aged texture is similar to the previous one with candles, only now instead of wax there will be wet paper (if you suddenly don’t have a candle at home, then everyone certainly has paper).
Necessary materials:
- dye,
- brush, paper,
- bowl of water.
Step-by-step instruction:
- Step 1: Attach wet paper. No base paint was applied here so that the natural color of the wood could be seen. Therefore, we immediately take a sheet of paper and tear it into uneven pieces of different shapes and sizes. After this, dip each piece into a bowl of water and place it on the wood you are going to paint.
- Step 2: Apply paint. Having laid out all the pieces of paper, immediately start painting in the chosen color, that is, you do not need to wait until the paper dries.
- Step 3: Peeling off the paint Next, carefully lift each piece of paper from the surface. You can do this while the paint is still a little damp, or after it has completely dried.
You can make several layers, for example, as in the previous method. To do this, follow the step-by-step instructions described there, replacing the wax with damp paper.
Creating the effect of dilapidation and wear
Artificially giving wood a shabby and dilapidated look is called brushing. The production uses sandblasting, during which soft fibers are removed from the top layer, causing the structure of the wood to become more pronounced.
When processing antique wood in a similar way with your own hands, the surface is first covered with matte acrylic paint. After it dries, abrasions are formed using a metal sponge or sandpaper, while individual areas can be affected more intensely to obtain a more natural look. The product is cleaned and a second coat of paint is applied.
At the end of the processing, it makes sense to go over the wood with a fine-grained abrasive tool.
Without using paint, you can achieve the effect of antiquity by painting wood with stain. This special material stains the wood by penetrating into its outer layer.
During absorption, the stain colors the wood in its natural color, while emphasizing the texture. There are also colorless compositions that perform exclusively protective functions.
The stain is applied with a cotton-gauze swab - a piece of cotton wool is wrapped in folded gauze. The composition is poured into the cotton wool so that it saturates it, but does not leak out when you press the tampon. Then the stain is rubbed over the entire surface. The process is repeated several times.
Sandpaper creates abrasions on the treated surface. The result is a natural wooden plane with pronounced texture and wear, characteristic of antique interior items.
Furniture painting process
At this stage we are simply painting our furniture, and the rules are the same:
- It is worth starting coloring from the wrong side, which will not be visible during use. This way you can understand how much paint is needed and how best to apply it;
- Do not allow smudges to appear. If they still form, clean the area with fine sandpaper and repeat painting;
- It is best to work not only with brushes, but also with a roller. The latter can be used in the case of large surfaces, so as not to leave brush strokes on them;
- The next layer should be applied only after the previous one has completely dried.
Using a special varnish coating
To create a surface cracked by time, craquelure compositions are used, forming a coating on the product with a characteristic pattern in the form of uneven violations of the integrity of the paint layer.
This technique is called crackle; the “aging” of the product is carried out as follows:
- The product is cleaned and the surface is covered with a layer of paint. Please note that cracks in the final coating will have the same color as the first coat of paint.
- The dried paint is covered with craquelure varnish, which must be applied in one direction. A transparent film will appear on the surface.
- A base layer of paint of the desired color is applied over the craquelure varnish. This layer cracks under the influence of the craquelure composition, and the entire surface takes on a characteristic appearance with small cracks.
- To protect the aged surface, it should be coated with a transparent varnish.
Dry brush texture "Loft"
This technique is great for creating an old and scratched look. The key to success here is simply to use a very dry brush. For example, old brushes with stiff bristles work well.
Necessary materials:
- brush with stiff bristles,
- water based paint.
Instructions:
This is what the process looks like:
- Dip the brush into the paint of your choice and leave as little paint on it as possible.
- Apply the paint in quick strokes in different directions. Be careful not to get carried away and cover the entire surface.
This technique is also suitable for painting with a loft metal effect, for example, for creating such artificial zinc letters.
You can also combine this method with using sandpaper to remove some of the paint after each coat.
Patina coating
To imitate the oxidation process characteristic of products made from certain metals, patina paint is used. This creates a rather interesting and unusual image of wood with the effect of antiquity and the color of bronze.
In order for a wooden object to acquire a specific antique look, its surface is first varnished to increase strength and wear resistance. When the varnish is dry, a thin layer of patina paint is applied to the surface.
After 30–40 minutes, the treatment is carried out with an abrasive tool, sandpaper or metal sponge. The effect increases with increasing intensity of such treatment.
Using a cloth, the resulting dust is removed, and the product is treated with transparent varnish.
Shelves and racks
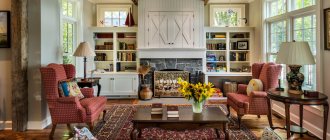
Shelves and cabinets made from such wood create a harmonious home interior and give the room a special style.
Photo: architectureartdesigns.com
Aged wood shelving looks expensive and unusual.
Photo: decoist.com
Painting in several layers
With the help of multi-layer coloring, the effect of an aged object, which was previously often repainted, is achieved. This antique painting of furniture is based on the factorial characteristics of wood and color differences.
The selected primary color is applied to the surface. This layer should be thin, so that the wood pattern is clearly visible. An abrasive tool creates abrasions and the product is painted with a second color. This layer is applied with light, careless strokes.
For additional realism of the color, in some places the second layer of paint is shaded so that the main background appears.
Painting furniture yourself: choosing paint, step-by-step instructions
No matter how much you strive to transform already boring furniture, the main thing is to carefully prepare it for finishing work. If you treat this stage negligently, you will most likely have to do it all over again later.
You need to start working on furniture with an inspection. The furniture is disassembled, carefully inspected, and pronounced defects are removed. Now you can remove the old coating - with chemicals, using a hair dryer, or sanding. Fine-grained sandpaper is useful, working in the direction of the wood pattern, so as not to damage the structure and primer. The surface is primed, defects are puttied, degreased using acrylic impregnating material. They cover the product evenly and wait until the material dries, puttying and sanding, removing debris, priming, painting furniture. Use brushes, rollers, aerosols, and spray guns.
Choose the paint carefully - read the instructions. Remember - it does not protect furniture from humidity and the negative effects of solar flow and temperature changes. Therefore, select an appropriate protective coating for the coloring composition.
Antique painting of furniture occurs according to certain rules, depending on the chosen style, the effect of a shabby surface. When the product is already painted, sandpaper is used to rub the fastest wearing areas - ribbed areas, corners. And then they clean the entire surface a little to the extent that the owner of the furniture likes it, the effect of a surface contaminated with time. Areas of frequent hand touch are unevenly treated with dark-colored wax, creating a patina effect. The beauty of relief patterns can really be emphasized by applying gold or silver. Patina looks especially impressive on matte furniture. For metal objects, patina is a blue-green coating formed over time, a coloring effect. The main goal is to achieve a special impression from aged wood, based on a unique combination of color and texture, the crackle technique. A special composition of varnish allows you to create a pattern formed by small cracks. After this, the furniture looks as if it was sunburned and began to crack and peel.
Aging of metal
New metal parts do not always fit into a sophisticated and thoughtful interior, primarily due to the presence of a characteristic shine. The use of antique metal objects is not available to everyone, so it is more advisable to artificially create the effect of antiquity using imitation paints or special surface treatment.
You can paint antique metal with your own hands sequentially as follows:
- The surface of the product is degreased and treated with a primer to improve the quality of subsequent painting.
- After the primer has dried, the product is painted over with metallic paint.
- When the paint is completely dry, it is evenly treated with a craquelure primer, which forms a transparent polymer film during the fixing process.
- The surface treated with this primer is covered with a craquelure composition, which adds characteristic cracks and gives the metal product the appearance of an antique item slightly touched by corrosion.
In addition, to give metal an antique effect when painting, you can use various pigmenting compounds. For these purposes, umber is often used, a mineral pigment that is resistant to light and alkalis.
Burnt umber is applied in a small amount to a piece of fabric and rubbed into the painted surface. The pigment remaining in the cracks of the coating completes the look of the antique item.
Vintage effect: paint for aging furniture
Antique or specially antique furnishings fit into rooms decorated in a variety of styles.
First of all, Victorian and Provencal interiors come to mind, of course. Provence style is the spirit of the old French province, a combination of sophistication and rustic simplicity. Characteristic features of the furnishings of a Provençal house are natural materials, calm pastel colors, a lot of light and space. The surfaces and furniture seemed to be slightly faded in the sun, aged over time, but did not lose their former beauty.
Vintage products fit harmoniously into both the Mediterranean style setting and the original loft. Chalk and mineral paints are suitable for creating artificial aging of furniture.
- First, remove the hardware and cover the parts that do not need to be painted.
- Before applying each new coat of paint, the previous one must be completely dry.
- The easiest way to give furniture a vintage look is to paint it with matte chalk paint, coat it with dark wax, and lightly sand it to create scuff marks.
- You can use contrasting colors: first coat the product with a darker shade, and then a light one on top. Use sandpaper, a dry brush or a damp sponge to make abrasions. They look natural where they would appear from old age: around handles, on corners and curves of furniture.
- The final stage of painting furniture with chalk paint: wax or varnish is used as a finishing coat to protect the surface.
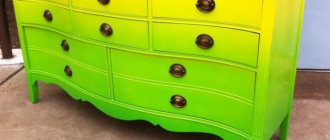
Ombre
Ombre or gradient coloring is a smooth transition from one shade to another without sharp boundaries between tones. Looks impressive on the front of a chest of drawers or a shelf with drawers.
A bright kitchen or an eclectic living room, colorful furniture in the nursery or bedside tables that lift your spirits in the morning - the ombre technique can be used in any part of the house.
- You can tint and mix paints yourself or take several (for example, three) different colors of the same range.
- Remove the fittings and prepare the product for painting. If there is no coating on it, then you only need to clean and degrease the surface. Treat varnished and glossy furniture with sandpaper to remove shine.
- The base shade will be the lightest. Apply it evenly over the entire surface.
- Visually divide the surface into four parts, let the gradient go from bottom to top, that is, the most saturated part will be at the bottom.
- Take the darkest paint and cover the selected area with it, the borders should not be even.
- Mix the lightest paint with the darkest one and apply it to the second quarter of the surface from the bottom, slightly overshadowing the dark area.
- Cover the third quarter with color and smooth out the transitions between the lighter parts with a roller.
Blackboard
Chalkboard paint creates a surface on which you can write with chalk. For example, you can paint the kitchen door with it and leave messages for each other, or cover the cabinet in the nursery so that the child stops drawing on the wallpaper.
- Remove the fittings and prepare the product for painting. If there is no coating on it, then you only need to clean and degrease the surface. Treat varnished and glossy furniture with sandpaper to remove shine.
- Apply paint evenly to the surface.
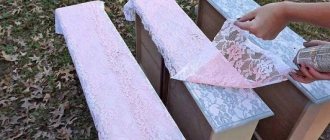
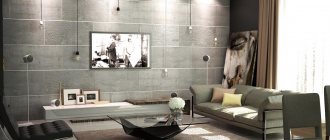
Ornaments and patterns
A variety of repeating images are used to create different styles. A laconic geometric pattern complements a minimalist or Scandinavian design. Oriental patterns are suitable for furnishings in an exotic Moroccan style, and ethnic motifs are in harmony with a boho-style interior.
Simple designs, such as stripes, diamonds or zigzag, are made using masking tape. More complex patterns can be drawn and made yourself, or you can use ready-made stencils.
- Remove the fittings and prepare the product for painting. If there is no coating on it, then you only need to clean and degrease the surface. Treat varnished and glossy furniture with sandpaper to remove shine.
- Apply a base coat of paint and wait until it dries completely.
- Attach tape or stencil to the surface.
- Paint the selected area.
- While the paint is still wet, remove the stencil or tape.
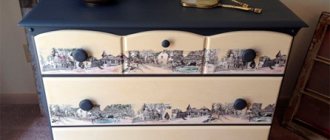
Elements of decoupage
This decorative art has been developing for several centuries and captivates people all over the world. In a nutshell, the technique involves transferring a picture from one surface to another; you can imitate different materials and inlays. Furniture with decoupage elements will suit both a Provençal setting and an eclectic boho style. It all depends on the image.
- Remove the fittings and prepare the product for painting. If there is no coating on it, then you only need to clean and degrease the surface. Treat varnished and glossy furniture with sandpaper to remove shine.
- Apply the paint evenly in the manner you like.
- Wait for the paint to dry.
- Glue the design onto the surface; special decoupage cards are usually used.
- Coat the product with varnish for durability.
Painting brick walls
Brick itself often has a rather retrograde look, so painting such antique walls seems to be the simplest and is done by covering it with acrylic paints in the desired colors. Antique brick painting differs from conventional painting by a special method of applying acrylic.
Acrylic paints are applied with a sponge, which is dipped in the desired color. The bricks are painted one by one with light and gentle touches of a sponge. To enhance the effect, the space between the bricks is painted with a different color or the seams are darkened before painting.
Antique painting will allow you to breathe new life into ordinary and boring objects. Experimenting with various coloring compositions and technologies for treating the surfaces of walls, furniture and various decorative elements will allow you to get an impressive result without significant financial costs.
Preparatory work
Genuine antique furniture often looks decent, but cannot be used due to its disrepair. It is carefully preserved to be passed on to the heirs. Antique furniture has many admirers. Today, many designers, artists, decorators and handmade craftsmen are keen on restoring vintage items with the effect of aging the wood structure using acrylic paints. Often antiques are in such a condition that they cannot be restored. Then they make a “replica” (an exact copy) of a small object or an entire set, trying to give it an “antique” look. This is interesting: aging of metal. Before starting woodworking for antique painting, it is necessary to prepare the product:
- cover metal fittings with masking tape, cover areas with furniture textiles, leather, and dermantine with polyethylene;
- treat wooden parts with a special compound to remove old paint or varnish, thoroughly clean the surface;
- lightly sand the surface, remove wood dust and other contaminants;
- soak with a fungicide or antiseptic (protection against rotting and fungus);
- open with a primer (if painting is intended).
Attention! There is no need to putty on minor wood defects; their presence is an additional sign of the naturalness of the antique product.
Aging wood by painting
Paint filling method
This is a one-step method suitable for any type of wood with a lot of texture on the surface.
Materials needed: paint, scraper (or plastic card).
Instructions: You just need to pour a little paint onto the surface of the wood and spread it with a scraper. Wait for it to dry and you're done!
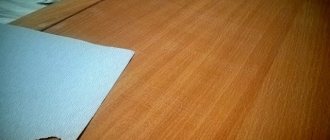
Brushing technology
Brushed wood
Tools and materials for processing
During the work you will need:
- hand plane;
- chisel or small hatchet;
- steel brush;
- Angle grinder with brush attachments;
- sandpaper, coarse and fine;
- paint brushes;
- dense sponge;
- tinting antiseptic for wood (for example, Pinotex);
- white azure;
- soft bristle brush.
Wood brushing machine with two support rollers
Brushes for three-stage wood processing
Necessary materials
Prices for cordless drill/driver
Cordless drill/driver
Rough cleaning should be done with a steel bristled nozzle, but for finishing, nylon and copper are better suited. There is a special attachment called “Piranha”. It is a polymer-abrasive brush that can effectively remove soft fibers from the surface and leave hard ones. The grinder can be replaced with a drill; such attachments are also available for it. As a last resort, you can get by with hand tools, but this is time-consuming and tedious.
Piranha brush
The wood should be dense, strong, not damp. Resinous boards should also not be taken, as the resin makes processing difficult. The presence of knots is welcome, as they make the design more pronounced and decorative. If you have no experience in such work, take a small piece of unplaned board or timber, up to half a meter long.
Wood processing
During such work, a lot of fine dust is always generated, so it is best to do it in the fresh air. If the weather does not allow it, take care of the possibility of ventilating the room and be sure to prepare a protective mask or at least goggles.
Step 1. The workpiece is laid on a flat surface and processed with a hand plane. It is better not to use an electric tool, as it leaves small transverse stripes, which reduces the naturalness of the design.
Wood processing with a plane
Step 2. Using a chisel or the corner of an ax, you need to make chaotic chips across the entire surface, shallow and shapeless, to give the material a rougher appearance.
Step 3. Now you need to remove the soft fibers with a wire brush. The brush should only be moved along the grain, pressing the tool firmly against the board.
Brushing
This is what wood looks like after brushing with a wire brush.
Advice. To reduce dust formation, it is recommended to slightly moisten the surface of the workpiece with water. But before sanding and impregnation, the wood must be dried.
This is what it looks like after intermediate sanding with a polymer brush.
And this is how it looks after final sanding and polishing with a sisal brush
Step 4. When the relief begins to appear, the hand brush is replaced with an angle grinder with a metal brush, and work continues. The nozzle should be positioned perpendicular to the surface being treated, movements should be made strictly along the fibers. If you don’t need too rough a texture, immediately take a Piranha brush or a nylon-bristle attachment and do not press too hard on the tool while working. Go around the perimeter of wormholes and knots in the tree to emphasize the contours.
Wood processing
Process the ends of the board
Step 5. Use a soft brush to sweep away the resulting dust, and then begin sanding. You can sand the wood manually or using a grinder, the main thing is to remove protruding fibers and sharp protrusions. Finally, clean the workpiece from dust again.
Step 6. Now the material needs to be given color. To do this, the surface is first coated with Pinotex primer, which is applied with a brush along the grain. You can use both stain and dark azure - any coating with color that will not hide the texture.
The photo shows an example of the coloring composition used
Step 7. Having applied the composition to the workpiece, give it a few minutes to absorb, and then carefully wipe off the top layer with a sponge. There is no need to rub hard, just smoothly move it 2-3 times along the fibers. After this, all the recesses will remain darker than the protruding edges, and the relief will appear more clearly.
Avoid drips
A distinctive feature of good quality stains is that they reveal the texture of wood
Rub the composition into the workpiece
After drying, the painted surface looks like this:
Then there are two options: leave this color and cover the wood with a transparent varnish, or add another layer and give the material the appearance of old bleached wood. The second option is suitable for processing elements in the Provence style. To do this, you need to wait until the impregnation is completely dry and apply a very thin layer of white glaze with a brush. After it has dried, the wood is lightly sanded with the finest sandpaper, cleaned of dust and coated with colorless varnish.
Do-it-yourself aging of wood
This method is also used: after brushing, the workpiece is covered with a dense layer of white glaze, dried and brushed again with a metal brush, but now not so intensively. Finally, a layer of clear varnish is applied.
Applying white paint
Brush sanding
Brush sanding
To make dark wood rather than bleached wood, instead of white glaze, the surface is thickly covered with stain or Pinotex, and the layer is made uneven. Next, use a brush or sandpaper, depending on the finish you want. Sanding produces light, blurry abrasions, but after brushing, rough grooves remain and the wood looks more brutal.
Aged wood, well-emphasized ax grooves
Prices for different types of stains
Stains
Decoration
You can decorate old furniture with decor; this process is not at all difficult. This approach will be considered radical and fashionable at the same time. The main thing is to know what paint to apply the decor with, and which one to use to consistently carry out the decorating process. You can use anything as decoration: a drawing, make contrasting inserts, treat parts of the facade with fabric, and so on. Here are the easiest ways to restore old interior items:
- Vinyl stickers. Not everyone is eager to first sand old furniture, then putty and prime it. If it looks very boring, despite the fact that it is new, you can decorate it with vinyl stickers. With their help, you can stylishly and efficiently revive your interior in a very short time. You will still have to degrease the surface before gluing;
- Replacement of accessories. Sometimes simply replacing handles with more creative and stylish ones can change the appearance of furniture almost beyond recognition. Especially if they have unusual shapes, for example, animals or are made in vintage style;
- Decorating with simple wallpaper. No special effort or knowledge is required to wallpaper furniture. The adhesive here should be PVA glue. It is applied in an even layer to the canvas and pressed tightly with a roller. After drying, the wallpaper can be coated with transparent acrylic varnish in one or several layers;
- Furniture painted in the same style, all at once, will look colorful and unique. It is better to paint the children's room in light shades, decorating it with delicate patterns or flowers;
- It’s easy to liven up a room if you paint all the furniture in shades contrasting with brown, for example, brown and yellow, brown and blue, brown and green go well together, red is also suitable;
- Painting old furniture with patina or craquelure varnish is also a good option. This way it will acquire a completely new, vintage look;
- As an alternative to painting, you can cover worn interior items with self-adhesive film, matched to fashionable valuable wood species. But this method is not considered reliable and durable. Painting in this regard is more reliable and durable.
Nuances and secrets of coloring particle boards in a new way:
- All materials that will be used in the work (primer, putty, paint or varnish) must be purchased from the same manufacturer. This way you can achieve maximum compatibility of products with each other;
- There is no need to be afraid of playing with colors and shades. With the right choice of color palette, you can visually increase or, conversely, decrease the space;
- Painting old furniture should be done with brushes of different thicknesses and shapes; large areas are best painted with a roller;
- To prevent paint from accidentally getting onto those areas that are not planned to be repainted, you need to seal it with masking tape.
To preserve the appearance and protect furniture made from very old solid wood from drying out, it should be primed before painting.
There is no need to immediately discard your old furniture. An exclusive approach, a little imagination and a few hours of time will radically change your attitude towards her. Knowing how to paint antique furniture can extend its life for several more years.
Self-adhesive wood-look film
Replacement of accessories
Vinyl sticker
Wallpaper for decoration
Contrast of coatingsPatina