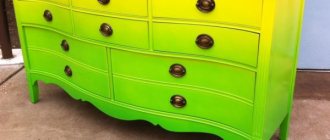
Often used furniture loses its attractive appearance. At the same time, its design and fittings remain strong and reliable. Therefore, owners of furniture, kitchen sets, cabinets, and chipboard have a logical question: is there a way to improve their appearance, extend their useful life, giving them “new life.” It's really possible to do it yourself. It is enough to paint chipboard furniture at home. In this article we will tell you how to do this correctly with minimal effort.
When should you paint furniture?
Often cabinets, chests of drawers, and furniture sets, when they lose their appearance, are transported to the dacha and eventually thrown away. People don’t think that furniture can be transformed by spending minimal money and effort. In 90% of cases you can achieve excellent results. It doesn’t matter how old the chest of drawers or set is. We recommend painting chipboard furniture in the following cases:
- the structure still has a significant margin of safety;
- items need aesthetic and major repairs;
- Products are damaged but function perfectly.
The preparatory work and the process of applying enamel is not too complicated. You should choose the right paint, convenient tools, and develop a design. It is important to follow the advice and be careful.
Over time, furniture loses its attractiveness
What is chipboard
It is a product made from sawdust and phenol-formaldehyde resin or other binder through an extrusion process. Made from various types of recycled paper, sawdust or other ingredients. To make particle board, layers of recycled fiber are pressed together. It was developed as an alternative to plywood. With careful handling and careful use, the service life of chipboard is 5-8 years. It must be remembered that with high humidity, the slabs can swell and become discolored. The following types can be distinguished:
- Laminated. It is covered with veneer or film, giving it the appearance of natural wood.
- Simple. No coatings are used; the slab itself is impregnated with a certain composition.
Chipboards
We recommend: Marker for whitening joints between tiles - snow-white grout
Necessary tool
The first step will be to develop a design for “updated furniture.” The range of work, selection of paint, varnish and other components will depend on this. It is not recommended to improvise if the procedure is being performed for the first time. We will need the following tools:
- short-haired rollers or brushes of different widths;
- screwdriver (screwdrivers);
- coarse, fine-grained sandpaper;
- putty knife;
- gloves;
- rags;
- hair dryer;
- knives.
When using aerosol cans of paint, there is no need to buy brushes.
Attention! When purchasing rollers, it is recommended to check them for sticking of hairs to the surface and the strength of the lining.
Screwdriver
Putty knife
Dye selection
The best option is special products from the chemical industry. However, you can experiment with conventional wood paints: alkyd, acrylic, oil. They are applied to a previously prepared surface. Paint for chipboard furniture is selected based on the surface structure of the coating. Some enamels mask irregularities and roughness well. Glossy options create a “mirror” effect. If you choose a satin base, less dust will accumulate and the risk of mechanical damage will decrease. You can first familiarize yourself with the characteristics of the selected product on the label. There are fast-drying and slow-drying solutions.
Please note: Leather painting
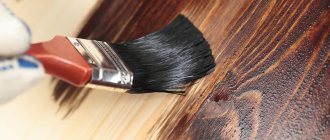
Oil based paints
They quickly cover a significant surface area. However, they have a strong and unpleasant odor of acetone, a solvent. To do this, the room should be well ventilated (or work outdoors). In order to achieve maximum artistic and decorative effect, enamel must be applied in several layers. You must first check that the previously applied coating has dried thoroughly.
Oil paint for wood
Based on alkyd resins
Products in this group are characterized by excellent performance. This product should only be handled in a well-ventilated area (as it emits an unpleasant odor). Among the advantages of the product are:
- resistance to bacteria and microorganisms (shower, bathroom or bath);
- aesthetics;
- durability;
- resistance to air temperature changes;
- shine;
- indelibility (during long-term use).
Enamel is inexpensive, widespread, has proven itself, and can be applied to the surface without any problems.
Alkyd enamel for wood
Based on acrylic polymers
The product is universal in its characteristics. Acrylic furniture paint is applied smoothly and evenly to the surface and does not emit toxic or unpleasant fumes. Enamel has such advantages as:
- low cost;
- practicality;
- short drying time;
- durability;
- wear resistance.
If paint gets on the flooring or other objects, it can be easily wiped off with a cloth without leaving any traces. However, this must be done quickly. When answering the question of how to paint furniture, everyone will choose an option based on their needs.
Acrylic enamel for wood
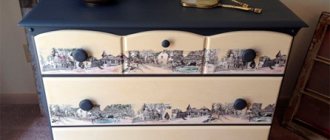
Painting laminated chipboard shelves
I ended up with 5 shelves in a completely inappropriate color (my husband made them from leftover chipboard. Here they are!
The shelves were much needed, but the color! I don’t know exactly what it’s called, maybe alder, light red. It didn’t suit my living room and bedroom interior in any way. On the Internet I didn’t find anything specific about the type of paint for chipboard, except acrylic. The laminated chipboard is covered with a protective film, like varnish, on top, and the paints do not stick. Aerosol paint was the best option, but I already had negative experience using it in my apartment (I don’t have any other place to paint :). I painted chairs from Ikea with aerosol paint, then there was a coating of this paint everywhere (the baseboard in some places was never washed(()). Therefore, aerosol paint was immediately ruled out.
The idea itself was as follows: so that it would not be very expensive, so that the remaining paint after the renovation would be used, and so that it would have the effect of peeling paint. After some time of searching and calculating the cost, I came to the following decision: I use the remaining latex paint to apply the main color (ivory color), I will make the top layer a little shiny (I bought 1 liter of acrylic gold enamel for 342 rubles and 200 ml of pearlescent acrylic enamel for 132 ruble), and I will make the bottom layer black and gold (there was a little color).
The necessary tools were already there. So, to decorate the shelves we need:
– 1 liter of latex paint;
– 1 liter of acrylic (construction) gold enamel;
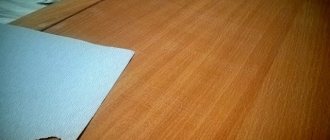
– sandpaper and sponge;
– 200 ml of mother-of-pearl acrylic enamel (construction);
Don’t look at the biggest jar (I’ll tell you about it a little later).
We carefully go through all the shelves with sandpaper. Three, three, three. We check with our hands whether the roughness of the surface is felt. I used 150-grit sandpaper (I think). Now I don’t remember exactly, I chose medium grain. For me this was the most difficult process. My hands were so tired that they simply couldn’t hold the sandpaper. By the way, in order to make it easy to rub, I adapted my daughter’s cubes. I wrapped 2 pieces in sandpaper and it was more convenient to rub. Here's the result:
Then I remembered that I have two old frames that don’t fit me anywhere and the watch (I brought it from work) is terrible :). And immediately the idea of creating a collection of items for my interior came to mind. I disassembled the frames and the clock, and sanded them well.
I also hadn’t painted the molding in the bedroom above the bed, so I decided to embellish it too - paint it with exactly the same paint (left over from painting the walls in the bedroom) that was in the big can in the photo.
The next stage: I apply the color that will be visible through the main one. To do this, I mix gold enamel and black color in an unnecessary jar to make black gold.
I make this color to match the pattern on my wallpaper.
I apply paint only where I need it. I don't paint the entire surface.
I leave it to dry. At this time I prepare for painting (skin and tape around the edges with masking tape) and paint the molding in the salon.
While I painted the molding, my shelves and everything else dried. I go over the edges and corners with a candle, that is, where I want the bottom paint to show through. Then I do the same with the molding. The photo was taken only on the molding.
I shake off the excess candle with a sponge.
Of course, my main concern is how the latex paint will adhere. Still, it is not intended for such surfaces. Let's move on to the first layer. The first shelf is ready with one coat of latex paint.
The molding is also covered with latex blue paint on top, the same as the shelves.
And outside the window there is such a sad thing - grayness and rain in full swing.
But I continue my work. I bring, so to speak, joy and comfort to the house