One of the common techniques for decorating furniture is decoupage with wallpaper and other paper materials. Most often it is performed to give old furniture an original look. This will also hide damage acquired over the years, renew and extend the life of your favorite item. This decor will allow you to transform the furniture so that it fits perfectly into the interior of your apartment or house.
Decoupage is very diverse. With its help, you can revive individual parts or entire furniture by gluing individual scraps of wallpaper. Using decoupage, you can create an original thing with your own hands that will decorate your home and meet the requirements of modern decor.
What is decoupage
The term “decoupage” comes from France; translated it means “to cut out.” In simple terms, the process is reminiscent of creating an applique, which is coated with varnish on top. Some also use acrylic paints in their work. By decoupaging furniture with wallpaper, an old item gets a second life. Most often, this decoration technique is used to give exclusivity to a household item, as well as to disguise scuffs, unevenness, or to stylize it to match the interior of a room or home.
Types of decoupage
There are different ways to do decoupage. The final result and effect depends entirely on the chosen method:
- Traditional - gluing the surface of the product and applying varnish on top. The material can be paper, wallpaper, decoupage napkin. Sometimes postcards are used to decorate such equipment.
- Reverse decoupage - glue is applied to the material from the outside, and the fragment is fixed to colorless glass.
- Artistic style - a pattern is superimposed on a painted plane, so as to create a single artistic canvas.
- Decopatch – the product is completely covered with various pieces of material. For work, elements are used, cut with curly scissors or torn by hand. They stick very tightly to each other.
- Volumetric decoupage - the finished product is embossed. Most often this technique is used for the Baroque style.
Execution technique
Decoupage of furniture with wallpaper is a classic method, so the standard gluing technique is used. For work, you can take any type of wall paintings. The vinyl type should be soaked in water first to separate the paper backing. The product can be covered with a piece of wallpaper with a picture or with a solid canvas.
Are you planning to do decoupage, but don’t know how to glue wallpaper onto chipboard furniture? To do this, you need to use a special fixing agent, since PVA will not cope with thick paper. It is also recommended to use a rubber roller during the process for smoothing and better grip.
Methods
Creative ideas in this area are always being improved. Over time, new techniques appear that craftswomen want to master. There are no restrictions for creativity and imagination. The main thing is to study the issue in detail and practice a little. There are currently 5 types of decoupage known.
Updating the interior with recessed furniture lamps
Each method has a different level of difficulty. For example, classic, original and volumetric decoupage are considered simpler methods, while artistic and reverse are considered to require skill. In addition, the latter create the impression of professional work of high quality.
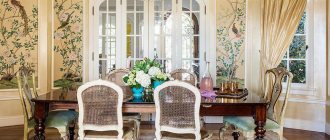
Execution options will depend on the complexity of the work, the selected materials and surface. Three-dimensional techniques with elaboration of details, using different methods and careful selection of materials are effective. The features lie in the principle of creating decoration. For example, when decorating a cabinet in the Provence style, where there are many noble notes and grace, surfaces with an aging effect are used. Light shades, an abundance of pastel colors, floral motifs and floral patterns are relevant here.
Classical
This type of technique is the simplest, it can be considered a base for others. This is an application on some basis. Decorating in the classic version is possible on various prepared surfaces. The wood is sanded, primed, glass, plastic, leather are degreased with alcohol, the fabric is washed and ironed.
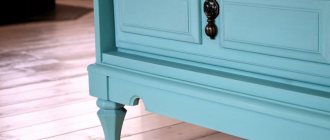
When decorating the bases with multi-layer napkins, you need to be as careful as possible. Such materials are very thin and can tear easily. If you are decoupaging a cabinet with wallpaper, you must first soak it for 30 seconds in plain water. Products glued on the inside look interesting. For this work, it is better to purchase a special decoupage glue; if this is not available, then PVA will do.
Napkins are selected taking into account the style of furniture design
Reverse technique
This technique is applicable to glass surfaces (transparent). The main difference from the classical method is a clear sequence of actions and extreme accuracy. Here the design appears on the back of the glass, then the dishes are used not only as decoration. The downside of this method is that it requires at least minimal skills to work.
First, the image is fixed to the base on the outer part (with the front side facing away from you), additional work is performed, for example, contours are painted, the desired effects are created. Then the surface is primed, if necessary, the outer side is decorated with direct decoupage and varnished.
Art
This decoupage is a combination of artistic techniques to create unique decorations on furniture or other substrates. This allows you to achieve the effect of a completed work with smooth transitions and gradients from the main plot to the main background. The key principle here is the imitation of painting in an artistic style and graceful execution.
Using this technique, you can restore a cabinet or other large furniture, making it original and exclusive. Despite the apparent complexity, you should not refuse such work. Sometimes the plot requires color additions with shading transitions and shading. It is better to learn this technique first, and then move on to more complex things. To begin with, you can use a special drying retardant, which makes it possible to gradually develop the background, create gradients, and halftones. Artistic decoupage is recommended for experienced craftsmen.
Volume
This modern method involves the use of natural materials, fabric flaps, and modeling paste. This decor is suitable for creating three-dimensional three-dimensional (3D) images. Materials used:
- modeling paste;
- wood putty;
- textile;
- special art gel;
- 3D decoupage cards.
Purpose, features of basic types of furniture hinges, installation nuances
Using modeling paste, animal figures, flowers, cartoon characters, and various subjects are sculpted. Putty is needed for finishing work, correction, and creating specific effects, for example, brickwork, wood or other natural structures. This method requires more expensive materials than the previous ones.
Original decopatch/depatch
This term refers to a technique using special paper. You can also choose napkins with interesting prints. Decopatch creates the illusion of a complete pattern, but it is assembled from individual flaps, resulting in a kind of paper patchwork.
Here we use rice paper, decoupage cards, napkins, old cards, sheet music, newspapers, magazines, and decopatch paper. The size of the materials will depend on the size of the object. They can be glued overlapping, forming an interesting combination.
This technique is applicable to create a background, as well as as an independent decorative element. Any objects, for example, papier-mâché figures, are suitable for the base.
Decoupage furniture with wallpaper
Stale pieces of wallpaper, combined with imagination and special glue, can turn a boring piece of furniture into an exclusive, original thing. To do this you will need:
- Wallpaper glue.
- Roller and brushes.
- Different types of scissors: large, with pointed ends and small.
- Ruler.
- Sandpaper.
- Decoupage glue.
- Acrylic paints.
- Acrylic lacquer.
- Wallpaper.
- Item for decoration.
Preparation
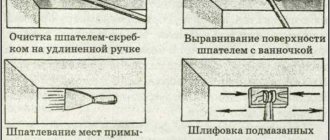
The process of decoupaging old furniture with wallpaper begins with preparing the surface. The working base must be completely flat, only in this case the image and varnish will stick well. So, the process consists of the following steps:
- Cleaning and wiping the surface of the product.
- Fill small cracks with foam filler and large cracks with putty. Drying.
- Level the surface using medium-hard sandpaper. Fine is used to obtain a smooth surface. These are two consecutive stages.
- Cleaning the surface from dust and coating with primer or paint.
We produce pasting
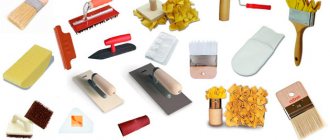
Collecting the necessary materials
Before you start work, you need to take care of the tools and material. Here's what we'll need:
- sandpaper (sandpaper), an appropriate attachment for a drill or grinder, to prepare the surface for pasting;
- in some cases a hair dryer, but not necessarily;
- measuring instruments - ruler, tape measure, corner;
- tools for markings and markings - pencil, pen, marker;
- cutting tool - knife, scissors;
- primer and wood putty for preparatory work;
- tools for applying compounds - roller, brush, spatula;
- rags for smoothing and removing glue;
- PVA glue.
Related article: Wiring in hazardous areas
Using a grinder to sand surfaces
As you can see, the list is quite impressive. If you don't have some materials, buy them. By the way, if the fittings of your furniture are worn out, then you can change them too. For example, a handle, a new handle for a cabinet will not cost much, but will add color to your newly made wallpapered furniture.
Preparatory work
Before wallpapering furniture, you need to take care of the surface on which you will apply the material. We need to make it suitable for such work, so we will perform the following manipulations:
Typical domestic kitchen cabinet after decoration
- To make it easier to work with a cabinet or bedside table, you need to disassemble it and remove all the fittings from it.
- The next step is to sand the decorative surface and remove the entire layer of varnish from it. This can be done using sandpaper, which is very labor-intensive; it will be easier to put the appropriate attachment on a drill, grinder or screwdriver and go over the varnish.
You can also remove the varnish using a hair dryer. To do this, the surface is heated and the applied composition is scraped off with a spatula. But even in this case, you can’t do without sanding.
- If your furniture is made of solid wood and has not been treated with anything, then it is recommended to go over it with sandpaper to create some roughness.
- In the next step, we remove all dust from the skin using a damp cloth. Give the furniture some time to dry.
- After examining the dried surface for defects, we decide whether it needs to be puttied. If the cracks and grooves are not so large, and the wallpaper for pasting is embossed, you don’t have to do this. If the defects are deep, you will have to level the surface with putty, maybe even in several layers.
- As you probably already guessed, after the putty has dried, the putty areas must be treated and leveled with the general surface. This is also done with sandpaper.
- Now the surface of the cabinet is almost ready, all that remains is to prime it for better adhesion to the wallpaper.
Related article: How to make a computer desk from solid wood?
Carrying out the preparatory work will ensure 80% of success, even if you cannot hang the wallpaper beautifully the first time, you will already have a basis for further experiments.
Creating decoupage
Do-it-yourself decoupage of furniture with wallpaper is carried out in the following sequence:
- After preparing the product and completely drying the primer composition (paint), the preparation of the material (in our case, wallpaper) begins. They are adjusted to the size of the product, taking into account allowances on each side, approximately 7 cm.
- Special glue is applied to the work surface and wallpaper. The composition is kept for 5 minutes for impregnation.
- Wallpaper or cut-outs with images are glued onto furniture. It is recommended to use a rubber roller for smoothing. You need to work from the middle to the edges. All movements must be extremely careful, since glue-impregnated paper is easily torn.
- Everything dries well.
- Excess material is cut off and the edges are sanded using sandpaper.
- A layer of acrylic varnish is applied over the decorative coating. Drying.
Interesting! To further decorate the surface of old furniture, you can use all kinds of elements - foil, book pages, glitter, favorite photos, feathers, dried flowers, lace and ribbons.
Creating a relief surface
The described master class on decoupage of furniture with wallpaper can be complicated and made not a flat surface, but a relief one.
The preparatory stage is carried out in the same way as described above. After this, wallpaper is glued onto the finished surface and dried. When creating a relief surface, the first layer is the base layer and sets the general background for the future composition.
Next, you need to prepare individual images or geometric shapes with which the previously pasted furniture will be decorated. Large elements are glued along the perimeter of the surface with a distance of several centimeters from the edge. Smaller pictures are recorded on top of these fragments, then even smaller ones, and so on. In total, you can make up to 20 layers so that the elements around the perimeter become embossed. If geometric shapes are used for decoration, the result should be the effect of a truncated pyramid. For pasting, it is better to take multi-colored, bright elements, then the product will turn out very interesting and unusual.
In the central part of the tabletop you can place an applique of leaves. If plants dried in the fall are taken for work, then they can be glued immediately. Fresh summer leaves must first be dried under a hot iron so that they do not rot under a layer of varnish.
To obtain an unusual, from an aesthetic point of view, effect, you can “walk” along the contour of the leaves with colorless silicone sealant; it will give the application additional volume. After finishing the decoration, the top of the product is coated with acrylic varnish.
How to glue the material with your own hands?
Any furniture can be decorated, even a closet. Pasting is used not only on external panels: other parts are affected : interior space, drawers. All stylistic decisions and the color of materials depend on the taste of the owner. You can experiment with shades and patterns.
- Furniture needs to be cleared of things.
- Clean the surface from dust, dirt, and wipe dry.
- If the surface is varnished, then it can be cleaned of varnish with a sanding machine.
- Check for damage. If there are cracks or chips, cover them with putty.
Attention
Usually the bottom of the drawers is covered with wallpaper scraps.
The gluing process is an important and final stage. It consists of several steps:
- Take furniture dimensions.
- Transfer them to the canvas and make a pattern. Cut to desired length.
- Spread the pieces with glue and apply them to the selected part (how and with what to apply glue?). If the base of the canvas is non-woven, then the glue is applied to the surface of the cabinet (how to glue wallpaper on a non-woven base?).
- A rag or roller is used for fixation.
How to glue on doors?
Before you start gluing, you need to disassemble all furniture fittings . This will allow you to properly glue joints and other hard-to-reach places. But assembly should only be done when everything is thoroughly dry.
- It is best to remove the doors - this will make it easier to tidy them up.
- Prepare the necessary materials and tools in advance.
- Take the necessary measurements and transfer them to paper.
- Then you need to coat the door with glue and attach the cloth. It is not difficult to apply pieces of material, since they are not large in size.
- You need to paste the surface carefully, smoothing it with a soft cloth so that no air remains.
Additional tricks
During the master class “Do-it-yourself furniture decoupage with wallpaper”, or rather, after its completion, you can use additional techniques:
- Craquelure - used to create an artificial aging effect on furniture. It appears in the form of microscopic cracks. To do this, craquelure varnish is applied to the surface, and acrylic paint of the main shade is applied on top of it. As it dries, the coating cracks and the effect of antiquity is obtained.
- Patina is also used to create the illusion of antique, but most often when it comes to metal elements. She darkens them.
- Abrasion – created by applying wax to the desired area of the surface. Next comes a layer of paint. After complete drying, the painted area is treated with sandpaper.
- Tinting - a small amount of pigment of the required shade or glitter is added to the varnish and the surface is covered with the resulting composition.
- Potal – silver, gold and other colors of metallic paints are used. It is sold in thin sheet, crumb, or liquid form. Furniture decoupage experts recommend the latter option; it is more convenient to use.
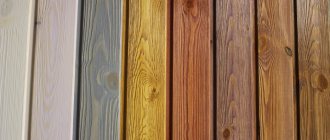
How to choose the right wallpaper
Despite the fact that wallpapering is the most affordable, and also, perhaps, simplest way to cover an old cabinet, you need to understand that an important step is the correct choice of material, which must be of high quality. At the same time, the choice of texture and color is not limited by anything other than the imagination and desire of the apartment owner.
Advice! In any case, despite the fact that you can choose shades based on individual preferences, there are certain basic design laws, following which will ultimately help you get an attractive interior.
Here are examples of what you need to consider when decorating cabinet doors or its body:
- If there are certain designs and patterns on the room wallpaper, it is desirable that the furniture be finished with a single-color coating.
- Photo wallpaper can also be used to decorate this piece of furniture. In this case, it is advisable to use narrow options.
- In cases where the wallpaper in the room is pastel or light, it is best for the cabinet to be hung in richer and brighter colors.
- At the same time, the surface that is inside the cabinet may be a little brighter.
- Self-adhesive wallpaper for closets is also of increased interest, since their use helps to complete all restoration work at a faster pace. In addition, in this case it is much easier to do the gluing yourself, with your own hands.
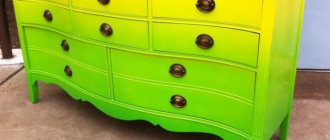
Ways to emphasize interior style
In order for the furniture after decoupage to fit harmoniously into the interior of the room, it is necessary to use appropriate materials and designs during the decorating process:
- Provence. The ideal option is images of flowers in light green, blue and pink shades.
- Baroque. Relief patterns on furniture surfaces.
- Retro. Decorating products with black and white checkered and striped wallpaper.
- East style. It is necessary to use wallpaper with appropriate motifs and designs.
- Children's room. The choice is varied - images of your favorite characters, numbers, letters, animals, etc.
- Art Deco. Linear patterns in white and black.
It is not difficult to decoupage furniture, but only those who approach the issue creatively and follow the rules of application technique will be able to get a good result.
Wallpaper selection
Using wallpaper is the simplest and at the same time cheapest way to decorate furniture. However, high-quality material should be used for this, otherwise all the work will be done in vain. As for the choice of color and texture, it all depends on individual preferences and the interior of the room.
If the walls are decorated in light colors, then it is advisable to choose brighter wallpaper for the closet. In this case, the inner wall can be covered with material to match the wall covering. If there is a pattern on the walls, then it is better to decorate the furniture in a single color.
Wardrobe decorated with wallpaper in a children's room
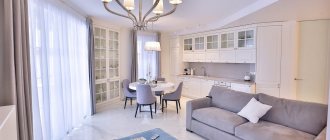
Often, furniture is covered with the same wallpaper as the walls or part of the walls in the room, using this finishing option as a special design technique for interior design. You can also use canvases with a marble, wood or other material pattern.
An interesting and unusual solution is to use photo wallpaper on the closet. Moreover, you can purchase self-adhesive sheets, which will greatly simplify the pasting procedure. Of course, the choice of design in this case depends solely on your imagination.
When choosing a material, you should also think about its performance qualities. It is advisable that it can withstand wet cleaning, especially if you are going to refinish your kitchen cabinet. Ordinary paper wallpapers should not be considered as an option, as they will quickly become unusable if they are not varnished.
Advice! If the furniture has defects, it is best to use a rich color coating with small patterns or designs. This will hide the unevenness.
In the photo - an option for decorating a closet with wallpaper