A beautiful arch is a decoration for an apartment, and vice versa, a poorly made decorative element will ruin any interior, even an expensive one. To make a structure such as a do-it-yourself plywood arch, you will need the ability to work with wood, accuracy and a sense of style. This design technique should not be thoughtlessly or inappropriately used to try to make a room feel cozy.
Decorating the interior with an arch is permissible when required:
- hide an irreparable defect in the doorway;
- create an opening between walls of non-standard sizes;
- complement the interior with an arch in a style that matches furniture or other design elements, such as baseboards, door frames, and the like;
- replace the door with an arch, if it is not needed, for example, the door interferes with normal air circulation in the room.
Attention! The door provided for in the room design was installed for a reason. It is installed in accordance with building and sanitary standards, saves from drafts, and increases the sound insulation of premises. When selling an apartment, the buyer may require the doors to be restored. Therefore, before making an arch, think about the feasibility of installing this structure.
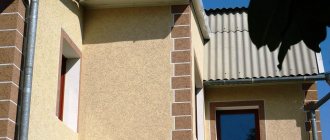
Photo 1. An example of successful interior design with an arch
To make an arch with your own hands from plywood, we will take as a basis the design shown in the photo above. This arch frames a doorway of non-standard size. Please note that if you separate a small corridor with huge doors, it will turn into a meaningless nook. In this version, when installing an arch, you get a combined space of a corridor combined with the hall from which the photograph was taken. The design of the arch is designed in the same style as the doors, baseboards and walls of the premises. It looks good, and you can make such an arch yourself.
Return to content
Materials and tools
Manufacturing will require inexpensive materials and a standard set of tools for an ordinary craftsman who has an understanding of working with wood.
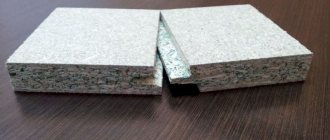
- Plywood, thickness 18-21 mm, size 2.44x1.22, only 4-5 sheets;
- Plywood, 3 mm thick, same dimensions;
- Wooden bars;
- Electric drill with a set of wood drills;
- Hammer;
- Jigsaw;
- The miter box is rotary;
- Edge router with a set of cutters;
- Grinding machine;
- Finishing nails;
- Self-tapping screws;
- Mastic for grouting corner joints;
- Aqualak of a suitable tone;
- Polyurethane foam;
- Liquid Nails;
- Twine;
- Construction level;
- Pencil.
Return to content
Wooden arch
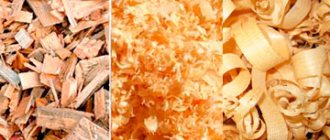
Working with this material must be very delicate. Oak, beech, mahogany are suitable, but pine is no worse in strength - durable and inexpensive wood. Any wood must be well dried so that it does not warp or dry out.
The arched part is made together with the door, being its upper part. The door ramp should also have the same top configuration. A solid arched opening is made from wood, preferably with one beam.
Let's consider not an arch compatible with a door, but an open arched opening. The work occurs through a number of stages:
- the fastening frame is mounted;
- prepared parts are stacked and connected;
- possible voids are foamed and puttied;
- external cladding is applied.
Making a template
Before making a plywood arch directly with your own hands, you need to prepare a template. A template for the curvature of the future arch is necessary for cutting out the platbands of the upper part of the arch. The quality of the platbands depends on the accuracy of making the template. To make a template, we saw off a strip 6-10 cm wide from the length of the side of the plywood. The length of the template should be 1/3 greater than the width of the doorway. If there is no plywood of this size, you can join two strips. At the junction it is necessary to connect the sheets with a strip of the same plywood, fastening them with small bolts and nuts. The result was a long strip of plywood, larger than the width of the opening.
We apply the strip in an arc between the sides of the opening. We select the curvature as desired and fix it with twine. We thread the twine into the holes at the ends of the strips made in advance. The result was a design similar to a bow for shooting arrows. For reliability, you can fix the curvature using a longitudinal strip secured with self-tapping screws between the sides of the bent strip. Thus, we obtained a template for the curvature of the clypeus.
Return to content
What is an arch and its varieties
An arch is an ancient architectural element that is increasingly used as an internal decorative element of an entrance or interior door, or rather a doorway. An arch is a universal opening in a wall that can give “volume” to a small room, and at the same time, zone a small apartment.
Door frame
Taking into account the wishes of the homeowners, thanks to arches, designers can turn different ideas into reality, giving the doorway a different look. Today, modern materials make it possible to give arches different geometric shapes, as well as to form intricate vaults. Most often for the manufacture of arches and their cladding they use:
The structure of the arch is a support for partitions and walls. But, since the doorways in high-rise buildings are not load-bearing, the only requirement that is put forward to them is to withstand their own weight (with finishing finishing material). If the wall is load-bearing, the material must be selected according to external loads.
Any version of the arch, which is mounted instead of a door, performs a purely decorative function. The frame of the structure can even be made from a lightweight profile for fiberboard or chipboard; you can also use wooden beams. The only important point is to securely fix the partition so that the decor does not fall off or become deformed after a few days.
The most common examples of interior arches
As we noted, the design of a house can be beautifully complemented with an arch, because there is a huge variety of its forms. They can be made in a classic or romantic style. Art Nouveau is also often used. No less popular are the ellipsoidal shape, trapezoid, “portal” and many others.
The first example is made as a regular semi-arch, in the shape of a semicircle. In the last photo you can see a square interior opening called a “portal”. This design method is carried out with strict adherence to rectangular outlines. All other samples are intermediate variations between the two basic forms.
But these are not all options. You can also experiment with side supports, use curved posts, etc. The form can be finished and decorated in different styles, the main thing is that the passage fits harmoniously into the home interior. In some apartments, classics and a round, correctly bent vault look great, in others - portals, it all depends on the taste preferences of the owners
Pay attention to the advice of experienced finishers:
- Classic arches are best done in apartments with high ceilings, at least 3 m.
- In panel-type high-rise buildings, it is better to frame the doorway in the Art Nouveau style.
- It is preferable to decorate wide doorways from the corridor to the hall in a romantic style, for which wide counters are selected.
- The finishing of the “portal” opening goes well with the interior of the room, which uses clear lines. “Portal” is ideal for houses made of lining, logs or timber. This combination is very elegant and harmonious.
Read also: DIY slatted Christmas tree
Cutting out the arched casing
Place a sheet of thick plywood on a flat horizontal surface and attach a template to it. If the template does not fit on one sheet, apply a second or third sheet. We place the template so that the sides of the plywood are equally spaced. If the plywood size is small, it is necessary to join the sheets. Be sure to keep in mind that when joining sheets of plywood, it is necessary to reduce the size of the segments by the depth of the plywood grooves. Mark with a pencil the contours of the lower part of the casing. Stepping back 10 cm, we draw the second contour of the clypeus.
Using an electric jigsaw, we cut out the curvature of the casing according to the markings. We need two identical blanks for both sides of the arch. It’s good if one piece of plywood produces an arc or even two. Usually on such an arch it is necessary to join pieces with different curvatures. To do this, use a router to cut out a groove in one piece and a protrusion in the other, which, when connected, form a larger segment. So we connect all the pieces. They must be carefully glued into a single whole. We select the appropriate glue and press it to the surface with clamps. Press the joint into the joint using a wedge. We wait for the glue to harden, so we proceed to further gluing the arc. Using a milling cutter, carefully process the edge of the arched casing and grind it. We do the same with our other half.
Return to content
Stages of work
We described the first ones. It is necessary to make drawings and preliminary purchase of material, as well as prepare the area for further processing (dismantling, for example). It is also worth mentioning separately about safety precautions. It is best to prepare gloves and construction glasses. The sheets will be attached to the top, so it is very important to protect your eyes.
The next step will be to attach an aluminum or wooden profile, depending on the drawing and type of building. Initially, the workpiece is fixed using a self-tapping screw. It is necessary to do the side parts first and only then the arch. In order to get an even semicircle, you need to build the profile correctly. To do this, it is best to make small parts of the structure in increments of 5-10 cm around the circumference, after which you can begin attaching the plywood sheets.
You can cut out the desired structure with a jigsaw or, if size allows, simply attach the sheets, bending them slightly. Then fasten them together at the joint. To do this, you can use a thin flexible strip made of the same plywood. The sheets are attached end-to-end to avoid creating an unnecessary protrusion. It is better to fill the resulting voids between the openings with polyurethane foam. This will strengthen the structure.
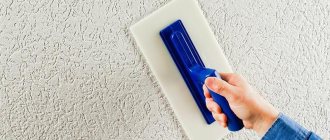
Finishing
Almost the final, but not the final stage will be finishing. To seal seams, it is better to purchase a special putty that will be suitable in composition and properties. If further painting of the surface is planned, it is advisable to putty the screw heads as well - it will be more organic. After puttying, the surface must be carefully sanded with fine-grain sandpaper (this is the case with painting), after which it is also important to remember about the primer. Thanks to a good wood primer, you can end up with a uniform coating that will last a long time. It is also a good idea to use paint mesh or fiberglass. They will help the paint apply more evenly.
It is also possible to place additional elements under the arch arches. This could be a decorative detail or lighting. By the way, it's worth it
Cutting out vertical trims
An equally important step in the process of making an arch with your own hands from plywood is to prepare the vertical trims. A total of four platbands will be required. We take thick plywood. We mark the platbands. We take the height 20 cm higher than necessary. Width 10 cm. Saw off the required sections exactly. If necessary, join as described above. We grind and process the edges with a milling cutter.
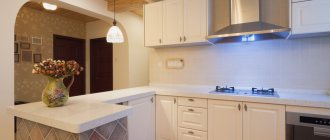
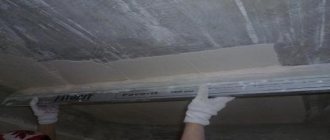
Photo 2. Bent plywood arch
Return to content
WHEN YOU CAN CONSTRUCT AN ARCH
- To mask an irreparable defect in the doorway.
- In order to make it possible to organize an opening in the wall with non-standard dimensions.
- In a situation where you want to add additional elements to the interior in a style that matches the type of furniture or other objects, such as baseboards, door frames, cornices.
- And the most common case is when there is no need for a door at all, since it interferes with the movement of air flows.
When deciding to create an arched opening, you should take into account the fact that the doors in the apartment are provided for by the project for a reason. They are designed to protect residents from drafts and increase sound insulation. In addition, when selling a home, the new owner may be dissatisfied with such a renovation and will demand a reduction in the price or restoration of the door. For this reason, it is necessary to think through all possible risks in advance and make a fully informed decision.
We make a bent arch vault
The most important step in making a plywood arch with your own hands is to prepare the bent arch arch. The vault of the arch must be made to correspond to the arched casing of curvature. The vault must be made of thick plywood. Otherwise, the design will look like a cheap decoration. First, we saw off the arch blank from thick plywood. The width of the vault is equal to the width of the wall in which we decorate the doorway with an arch.
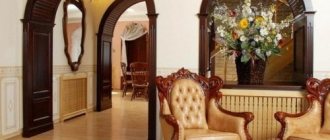
The easiest way to make bent plywood is to make longitudinal cuts on the workpiece, and then bend it according to a template. We make cuts with a router or saw more than 2/3 of the thickness of the plywood sheet. The cutting pitch is 1-2 cm. The number of cuts depends on the curvature of the arch.
Photo 3. Such cuts on plywood make bending the sheet much easier
The bending process described in the photo above is not so simple. First, practice on small pieces of thick plywood. The most common defect is cracking on the side opposite to the cuts. You can improve the results by soaking the sheet with water or steaming it before folding. Determine the soaking and steaming time experimentally.
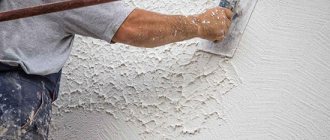
Next, using a template, a workpiece with standard curvature is made. Before bending, coat the grooves with suitable glue. Do this carefully, because when bending, excess glue will be squeezed down and this will greatly reduce the quality of the work. The photo below shows the process of bending plywood on a homemade machine. In this case, the workpiece is narrow. No problem. This machine can also bend wider sheets. By moving the template closer to the middle of the workpiece being bent.
Photo 4. The process of bending a workpiece using a template
Photo 5. Machine for bending plywood with holes for clamp stops
Return to content
Second way
Take a piece of paper or cardboard and draw the arc of the arch. Fold two sheets of plywood together, draw the resulting contours of the arch and carefully cut out a semicircle with a jigsaw. Clean the edges of the cut to avoid splinters. The sheets on both sides of the opening must be secured with dowels.
Plywood semicircles installed in the doorway form a void. There are several options for filling them out. Can be installed across:
- planks;
- lining;
- narrow wooden slats;
- thin plywood;
- Fiberboard (fibreboard).
If the paneling or slats are varnished, it will turn out quite decorative.
Before wallpapering or painting, the gaps between the boards must be filled and plastered, then the inner surface of the arch will become smooth.
To ensure that the arch in the opening is absolutely smooth, you can use a mesh under the plaster. There is a dissolving plaster tape on sale, which, after applying the solution, dissolves and the surface becomes even and smooth.
Let's start installing the arch
The arch installation stage is the most critical; it is necessary to correctly fasten the parts together without obvious gaps. Otherwise, the whole structure will look unsightly. Small gaps can be sealed using a special mastic, large ones cannot. Many methods have been proposed for attaching the arch to the wall, using finishing nails, self-tapping screws, and closing the heads with plastic caps.
We will secure the arch parts using polyurethane foam. Until the foam hardens, secure the parts to spacers made of slats. We additionally fasten the platbands to the arch with finishing nails without heads.
All is ready. You can probably make some improvements to the design, which served as an example of such a product as a do-it-yourself plywood arch. We will be glad to see your suggestions.
Return to content
Preparatory work: selecting the necessary components
The materials you will need are, in general, ordinary. The instrument is also well-known, nothing exotic. Here is a general list of goods needed for the intended business:
- six sheets of plywood with thicknesses of 19-22 mm and parameters 2.47x1.23;
- six units of the same size material, but with a thickness of 4 mm;
- wooden beams;
- glue;
- ordinary polyurethane foam;
- rope for leveling;
- mastic;
- drill with appropriate drill bits;
- miter box;
- jigsaw (or electric version of the tool);
- sander;
- edge router;
- nails;
- matching color aqualak;
- a simple school pencil;
- set of self-tapping screws;
- level for measurements;
- perforator (for punching cracks).
With these things you can begin your planned work without fear of a lack of material.