If you want to achieve such a result as a perfectly flat ceiling when carrying out repairs, then, of course, you need to make some effort. And, first of all, to achieve this effect, it is important to eliminate any differences and irregularities that are initially present on its surface. Leveling the ceiling is carried out using beacons, and also, contrary to controversial opinions on this matter, without them. It is on consideration of both methods that we will dwell today.
- Pros and cons of leveling the ceiling with and without beacons
- Necessary materials
- Preparation for work
- Aligning the ceiling with beacons
- Leveling the ceiling without beacons
Leveling the ceiling with and without beacons: pros and cons
Leveling a ceiling made of concrete slabs is not easy, and often it lies unevenly and with differences. There is little attractiveness in this, so you can only rely on leveling the ceiling with your own hands and strength. You can turn to specialists, but often the ardor in this direction is dampened by the price of work on leveling the ceiling, which, depending on the characteristics of the room and the general “front of work”, practically “bites”.
Aligning the ceiling with beacons is one of the main solutions to solve the problem under consideration. This leveling method is also accompanied by plastering the ceiling, and it is often stated that there is no specialist who could make a perfectly level ceiling without using beacons.
This statement is partly true, but there is also a refutation for it, and it is one of the options that we will consider in this part of our article. Its main advantages are that the use of this method allows you to reduce time and financial costs. It is precisely in the event that savings in these parameters is a determining factor for you (that is, you are short on funds), you can level the ceiling without beacons - the cost of this activity will be reduced due to the smaller amount of material consumed.
Plastering the ceiling along beacons makes it possible to achieve an almost ideal surface. In this case, the leveling process is extremely simple: beacons are installed, then a solution is applied, after which, using a rule, minor defects are repaired (leveling with a rule). The advantages of this option are the already noted quality of the surface, the absence of a gap between the leveling layer and the ceiling itself. In addition, the ceiling thickens only within the thickness of the leveling mortar layer, and not as in cases of using a frame and drywall. The downside is that if the ceiling is long or curved, then the layer can become wide, and therefore the consumption increases in terms of labor costs and, as you might guess, in terms of the material used.
When plastering without the use of beacons, the relief of the ceiling is more or less repeated while simultaneously smoothing out its unevenness. As a result, both time and materials are saved, but the downside is that the ceiling is not leveled as such. This method may be suitable for large rooms where high quality is not required.
Leveling the ceiling using the rule
Recommendations for a beginner
In order to properly plaster the ceiling with your own hands, you must follow the following recommendations:
- The brand of plaster should be the same as that of the primer and putty. Decorative plaster is selected in the same way.
- When priming the ceiling, you should be wary of contamination of the coating.
- The work should begin with cement plaster. It is used to level concrete surfaces. The composition will last a long time and is suitable for rooms with changing humidity and temperature.
- If you choose lime plaster, you must wear a respiratory mask when working with it (how to choose the right plaster?).
Even an inexperienced person can work with plaster. The main thing is to follow the rules, work with great care, and carefully read the information that the manufacturer of the mixture indicates on the packaging.
Ceiling leveling: materials
Before moving on to explanations on this topic, I would like to point out that in each specific case, specialists use their own, so to speak, proven method of puttying. Nevertheless, there are general principles that will allow you to determine how to do this correctly. These statements are also true regarding the tools used, not to mention specific materials or technologies.
For example, the choice of spatulas. Spatulas used as the main tool can be selected that, in your opinion, will be more convenient to use, the main thing is that they are of different sizes. Most often, large spatulas of 60 and 45 cm and small spatulas of 8-12 cm are used. The latter are more suitable for applying the mixture used on a large spatula.
Considering that in most cases, not a ready-made mixture is used (it is also more expensive), but a mixture that requires preparation, that is, diluted with water in a container, there is also a nuance that concerns the mixing method. Therefore, the recommendation on this point can be boiled down to the following: if possible, do not mix the mixture by hand, use a mixer or drill with an appropriate attachment - the result obtained when using the technique manually simply cannot be achieved.
To begin the process, you will need the appropriate materials. In particular these are:
- materials for leveling (gypsum plaster, putty);
- primer;
- wooden goats (a stepladder will not work here, it will simply be inconvenient for you to perform the necessary actions and even take a stable position for this);
- plastering rule 1.5-2 meters (special strip for this type of work, it can be metal or wood);
- spatula 10-12 cm, 45 cm and 80 cm wide;
- an electric drill equipped with a special nozzle for stirring the plaster mixture or a construction mixer;
- building level;
- strong thread or special painting cord;
- a 10-12 liter bucket, a basin or container with a similar volume (for mixing the solution);
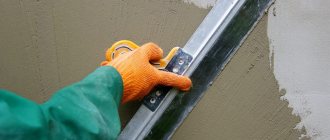
- lighthouse perforated profile;
- maklavitsa - it is advisable to have this tool on hand, in particular it is necessary if you have to work with uneven concrete floors;
- paint roller – this tool will allow you to prime the starting putty in an even layer;
- a brush used for subsequent washing off of primer and whitewash.
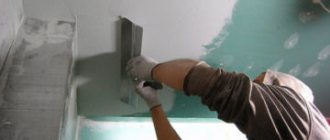
How to apply the solution correctly?
To prepare a solution for plastering, you need to add water to the finished mixture, as described in the manufacturer’s instructions. The mixture is added to the water, and not vice versa. For stirring you can use:
If beacons are used in the work, the solution is applied to the space between them.
- The solution is applied with a spatula. The procedure is repeated as many times as necessary so that the surface is completely filled - so that there is a slight excess of leveling material. It is very good when it protrudes a little beyond the beacons.
- Excess is removed with a spatula. To do this, the tool must be moved along the surface in a zigzag manner, moving it towards you. You should not make a layer thicker than 2 cm.
- After treatment, you must wait some time, as the layer must dry completely, and then you can begin to reapply the solution.
Preparation for work
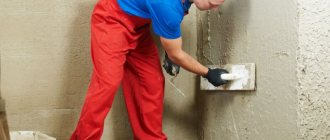
Initially, an important point is to clean the ceiling from excess materials, this could be peeling plaster, lime or paint, etc. Ideally, of course, the ceiling should be leveled along the base itself (concrete, etc.), removing absolutely all finishing materials from the surface . This will ensure more stable adhesion of the new layer of material to the surface and eliminate, as an option, the destruction of the remaining finish under one or another influence. If you are sure that the old plaster has sufficient strength, you can level the ceiling directly using it, as a base.
After the excess layers have been removed from the surface of the ceiling, using a painting cord, you need to draw a control line - it will become the level based on which beacon perforated profiles will be installed in the future (they are also beacons). Using a level, you need to mark marks in the corners of the room, and stretch the paint cord between them, also marking an approximate line.
Peculiarities
Whatever finishing is envisaged - wallpapering, painting or whitewashing, work should begin with preparing the surface to be treated. This type of work requires certain skills. Leveling the ceiling can sometimes be difficult even for experienced craftsmen.
When choosing a method for finishing any surface, you should find the best option and take into account the pros and cons of the applied material. Plaster is often used to level the ceiling, because this material has certain advantages:
- environmental Safety;
- it is used to provide a durable and long-lasting coating;
- When doing the work yourself, you can save a lot;
- natural material is suitable for finishing residential premises, will be harmless for allergy sufferers and for people with diseases of the bronchopulmonary system;
- When applying plaster to the ceiling, the height of the room will decrease slightly.
Read more: What to glue wallpaper or ceiling plinth first After considering the advantages of this material, you should find out what disadvantages the plaster mixture has:
Source
Aligning the ceiling with beacons
- Before installing the beacons, you need to prime the ceiling and then wait for it to dry, which may take several hours. Then the mixture is prepared using water and starting putty. If you wish, you can purchase ready-made mixtures for leveling the ceiling, which will make the process easier, but this cannot exactly be called a rational step, especially if you adhere to certain restrictions on repair costs (ready-made mortar is more expensive).
- Next, a path is applied to the ceiling using a putty mixture, and a beacon is applied to it. Such a path is made at a distance of 10-15 centimeters from the wall. The thickness of the beacon profile is usually 6-8 mm, and this value does not affect how the putty should be applied. The thickness of the profile determines, first of all, its rigidity, which means that the thicker the beacon is, the stiffer it will be. In addition, the thicker the beacon, the more solution you will have to add.
- When installing a beacon, you need to focus on the previously created control line. The profile used usually bends from side to side, so this feature will have to be adjusted, leveling if necessary. This is done using a building level.
- The installation of the next beacon is carried out so that between the new and the previous beacon there is a distance of 15-20 centimeters shorter than the length of the building rule used. So, if the length of the rule is 200 cm, then on average the distance between the beacons should be 180-185 cm. This condition is explained by the need for the free use of the rule for its intended purpose.
- To ensure a common plane for the position of the beacons, a thread must be pulled under the profiles in the middle of the ceiling. After installation in one common plane, they should be smeared using starting putty, this will prevent them from becoming unsteady in the future.
- Before starting to putty on the beacons, you need to let them dry, and it is better if the work is continued the next day. Don’t be surprised if you find out that the craftsmen move on to the next stage within a few hours; it is their professional experience that allows them to start work before the specified time.
- While the beacons are drying, you can start filling up potholes, cracks and floor joints.
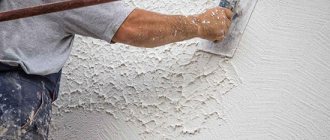
- Now the beacons are installed, so you can move on to the next stage, which consists of throwing the starting putty onto the ceiling while periodically running it over the beacons as a rule, thereby eliminating the possibility of the solution getting out of the beacons. These actions continue until the space between the beacons is filled with putty.
Location of beacons on the ceiling
If necessary, leveling the ceiling along the beacons, the video will be the best and, in addition, a clear example of the necessary actions. You can view it below.
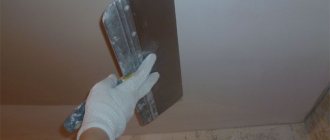
The next step after the beacons have dried is to putty on the beacons. As the final stage in leveling the ceiling for further painting, the application of the next, second layer of putty to the ceiling surface is considered. Only this time a finishing putty is used, and it should be applied after priming the first layer of putty. Usually, specialists apply it, so to speak, “lightly”, without the need for subsequent sanding, which allows you to achieve a smooth surface. For beginners in the repair business, this will add more work; for sanding, a special grater is used, to which, in turn, a diamond mesh or sandpaper is attached. Be sure to take care of eye and breathing protection for working in such conditions, using a respirator and special glasses.
To conclude this point, I would like to give a recommendation regarding a layer of putty, which should not be more than 50 mm. Otherwise, too thick a layer can lead to the collapse of the mixture, even if the layers are applied gradually, layer by layer. Taking this into account, monitor the thickness of the layer, and if it is exceeded, use additional reinforcement elements or a cement-sand mixture with mesh.
Perforated beacon profile
Primer, why it is needed and which one is better
You won't be able to properly plaster the ceiling without a thorough primer. It improves the adhesion (adhesion) of the plaster mixture to the base. Basically, all problems with falling and peeling finish on the ceiling are due to the fact that the base was not primed. That’s why we don’t skip this stage. Moreover, if there are several layers of plaster, it is advisable to treat each of them with a primer (with complete drying).
First, we prepare the base - we clean it of old coatings, and then treat it with a primer. To do this, pour the composition into a paint bath, take a roller on a long handle (telescopic rod) and distribute the composition over the ceiling. If there are any depressions - recesses, defects on the surface of the ceiling, into which the roller simply does not fit, we pre-treat them with a brush dipped in primer.
Ceiling primer before plastering
Now about which primer for the ceiling is better. According to the masters, this is “Betonokontakt”. After drying (24 hours), a rough, sticky film remains on the surface. The putty “clings” to it perfectly. Just one thing: you need to make sure that while the primer is drying, no dust gets on it. Otherwise, there will be no effect from such processing. It can only get worse.
Leveling the ceiling without beacons
Considering the specifics of the work, this method is also referred to as leveling the ceiling according to the rule. We noted the features of this type of alignment above, so let’s move directly to the main stages of the process.
- First you need to prime the ceiling surface, and then decide on the scope of work. To do this, take a rule and apply it in different areas of the ceiling surface. This is done without a solution; the essence of this stage is to visually identify existing problem areas and depressions; you need to outline them for yourself with a pencil. The areas where the ceiling meets the wall also need to be checked in this way.
- To mix the solution, as for many other works with mixtures, you will need a mixer or drill equipped with an appropriate attachment. If you plan to apply a layer of solution that is not too thick, then it is better to mix it in a small amount. This is explained by the fact that if the solution is used too slowly, stirring it after 25-30 minutes will be ineffective for the simple reason that chemical reactions of this type will occur in its composition, which will lead to hardening. As you might guess, it will no longer be possible to use it due to its unsuitability, and even such a cost-friendly method of leveling the ceiling will turn out to be unjustified.
- Spreading the solution on the ceiling surface is carried out using a 45-centimeter spatula and an 80-cm spatula that assists in application. The solution must be applied in slightly larger quantities than is initially necessary at those stages when work is carried out on areas previously marked with a pencil. Next, set aside the tools you are using and run the rule over the surface of the ceiling, thereby cutting off the excess amount of mortar. The result is a fairly flat surface, on which the layer in some areas can rise up to several millimeters or even be even with the overall surface. Without pauses, you need to continue producing the solution, and you should not pay attention to the surface, which in some cases is not entirely smooth.
- The rule is used for a surface in a vertical position; it should be drawn from the corners and to the center. In areas where the ceiling plinth meets the wall, the tool is used in a horizontal position. If you need to stretch the solution when turning the rule with it taking a different angle as a continuation of the already leveled section of the ceiling, then there is no need to rush. This area needs to be allowed to harden, so it’s better to work on another part. After about half an hour, you can switch again to this problem area, completing the alignment.
- By similarly dealing with the rest of the ceiling surface, you will thus be done with the rough work. After this, although the solution will look hardened, it will also be damp. To continue the work, you will again need a 45-centimeter spatula, with whose help you will need to cut off the existing irregularities formed during the plastering process, and also remove those flaws that remain after using the rule.
- It is recommended to additionally make the solution slightly more liquid in consistency for passing through the ceiling in the areas where the layers transition.
- Next, the ceiling needs to be allowed to dry, after which the next day you can proceed to putty. Upon completion, the ceiling surface must be cleaned using a spatula, even better if this is done using a special grater with a diamond mesh or with sandpaper attached to its base. After cleaning, the surface must be primed (this will strengthen the surface).
Read more
Add a comment
Which water sockets are better: pressed or crimped?
What is the difference between water sockets for pressing and crimping? Why does our expert recommend installing water sockets specifically under the press? What are three reasons for this?
2 comments
It’s very good that all the nuances of the work are shown. It is for amateurs that they are important. Keep it up!
The expert's phrase made me smile - “We will now show you how to level the ceiling on a flat plane without beacons” - !!)))). But. If it is level, then, of course, you need a lot of skills to level it!!)))
Source