In turn, manufacturers of metal doors try, as far as possible, to give their products a more or less aesthetic appearance.
However, few people associate blued steel with aesthetics, much less with the warmth of a home, so most owners of steel doors strive to drape their cold surface in various ways. Most often, laminate cladding is used for these purposes. In this article we will look at how to cover a door with laminate with your own hands.
Why do you need to cover your front door with laminate?
The entrance door block is always reliable and difficult to break into. The best material for this design is metal. Arrays are rarely preferred. The door turns out to be durable. However, this is not the only thing the property owner wants to receive. The entrance is the face of the house. The beautiful design of the door and the entire entrance opening comes in second place after strength.
It is easier to give an aesthetic appearance to a block made of solid wood. The wooden structure can be sanded, opened with impregnations with coloring pigments and varnish. After restoration it will look like new. With a metal structure it is more difficult. If you simply paint it, it will not acquire a presentable appearance. In addition, the disadvantage of metal is its high thermal conductivity and poor sound insulation.
It is optimal to cover the front door with laminate instead of painting, and lay sheets of heat-insulating material under the finishing. The metal door will acquire all the positive qualities that it lacked before: beauty, high levels of noise and heat insulation.
After covering the metal door will become attractive, sound and heat insulation will improve
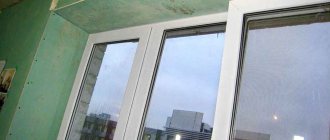
In addition to the entrance door, interior doors are often updated with laminate. Here, beauty is most often required from the cladding. Additional sound insulation won't hurt either. However, not every interior door is convenient to cover. It is best to work with blind panel doors. If there are glass inserts, it will be difficult to select and attach the laminate.
It is optimal to cover an interior panel door without glass inserts
The video shows a do-it-yourself laminate door and other useful information:
Types of laminate door finishing
Conventionally, finishing can be divided into two types: one-sided and two-sided. The first type is most often used for the input block. To decorate the front door with laminate yourself, the boards are attached only to one side of the door from the room. The fact is that the cladding will disappear on the street side. Laminate is not resistant to moisture, sun, or temperature changes.
An interior door can be sheathed on both sides. They are both indoors. However, difficulties may arise here too. Double-sided cladding increases the thickness of the sash. You will have to solve problems with fit in the frame, since the door will protrude beyond its boundaries. You may have to rearrange the loops.
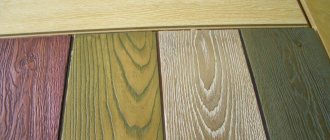
Laminate is convenient for finishing due to a wide selection of shades
The advantage of laminate as a finishing material is a wide selection of boards in colors. To decorate the inside of the front door with laminate, dark shades that imitate the structure of wood are often chosen. For example, walnut, alder, bog oak, mahogany. The interior door block is less susceptible to contamination. Here you can use a light-colored board, for example, white, gray, ash, imitating light pine.
Important! The laminate for finishing is selected in such a color that the updated door block fits harmoniously into the overall interior of the room.
Finishing can also be divided into two types:
- doors only:
- sash plus slopes.
The first option is acceptable for interior doors. The walls are usually thin and do not form slopes. Technological gaps are hidden under platbands or extensions. When it comes to the entrance block, laminate door slopes will be the best addition here. The load-bearing walls are thick. The slopes are wide. They will look aesthetically pleasing in the same design.
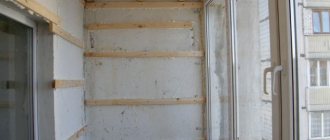
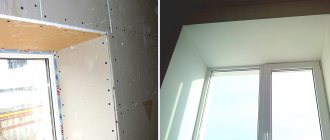
Preparing door slopes
Before proceeding with the installation procedure, you must first carefully prepare the surface. Depending on the installation method, it is necessary to align the sides and top of the doorway.
You can line the walls with plasterboard
If possible, it is recommended to seal all holes with foam and insulate the slopes.
If installation will be done using glue or putty, pre-treat the surface with a primer.
This will increase the level of adhesion, prevent the appearance of fungus, and also remove possible contaminants from the surface.
Start work from the top
Afterwards you need to mark and cut. Keep in mind that the slopes must be installed so that they completely cover the opening. First of all, they work with the threshold and only then move on to the upper part.
It is better to start all procedures from the upper transverse bar. After its installation, you can proceed to measuring the side sections.
It is recommended to cut the laminate using an electric jigsaw, this will prevent possible damage to the material. If you don't have a jigsaw, you can use a wood saw. To learn how to tidy up door slopes, watch this video:
The markings are applied after carefully taken measurements. If you doubt the calculations made, use a template made of other materials.
Door upholstery with laminate: pros and cons
A creative approach to updating a door is popular among people who like to do everything themselves. It's not just about saving money. There are many additional advantages:
- Possibility of exclusive design. A person will give the door the look he wants, and not what is offered in the store.
- Attaching a laminated board is not difficult to do yourself without the use of expensive tools.
- It will take a maximum of a day to finish one side of the sash.
- Laminated boards are designed for laying on the floor. This means that it has wear resistance and strength. The finish will be resistant to scratches and dents.
- High-quality laminate retains its original color throughout its entire service life.
- There is also no way around this without economic benefits. The costs will be three times less when compared with finishing with a special overlay made of laminated MDF.
On the street, due to prolonged exposure to moisture and temperature changes, the laminated board disappears
The downside is the impossibility of finishing from the street side. Laminate flooring will quickly disappear from exposure to natural factors.
How to design a laminate joint in a doorway
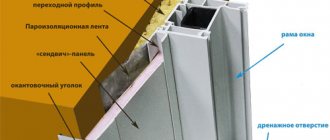
The finishing material has one feature. It is capable of slightly changing size due to fluctuations in temperature and humidity. Builders have a term called a floating floor. The installation technology requires leaving compensation gaps around the perimeter of the room near the walls. If they are absent, the finishing coating will swell during expansion. Deformed areas will appear on the floor. The deformation gap is left 15 mm wide. It is hidden near the walls with a plinth. However, exactly the same gap can occur in the door area.
The technological gap in the door area is hidden under a decorative threshold
The formation of a technological gap at the door occurs in several cases:
- When a joint between laminate flooring and another floor covering in an adjacent room is formed.
- When the laminate is laid to the threshold of the front door.
- When the slabs of neighboring rooms are laid in different patterns. There is no possibility of laying a solid board through a doorway without a threshold.
The manufacturer of the flooring indicates on its products the maximum allowable area on which it can be laid without a technological gap. Usually this indicator is converted into length, and it is a maximum of 10 m. When laying laminate flooring near a door that does not have a threshold, and covering the floor of both adjacent rooms according to the same pattern, measure this distance between two opposite walls. If this figure is more than 10 m, an expansion joint will have to be made at the threshold. Otherwise, the trim near the door in the frame area will come apart.
If it is not possible to finish the door opening with laminate without a technological gap, the use of glue, putty and other mixtures for masking is not appropriate here. The best option is to hide the seam under the decorative strip. Thresholds are produced in different colors, widths, and lengths. The materials used are aluminum, plastic, alloys of non-ferrous metals, etc. The plank is usually screwed with self-tapping screws to the subfloor. If the base is concrete, plastic dowels are driven in first.
How to cover a door with laminate yourself
The principle of finishing any door follows one algorithm. First, prepare the base, and then attach the new cladding. If heat and sound insulation is expected, a frame is created and the cells are filled with insulation.
Tools and materials
The work will require a small amount of materials. First of all, you need laminated boards and a corner that matches them in color. It can be made from any material: aluminum, MDF, plastic. For fastening you need good glue and screws.
The circular saw does not leave chipped edges on the laminate
When it comes to tools, it is important to choose what is best for cutting laminated boards. A jigsaw will cost less. In addition, the power tool is convenient for making shaped cuts, for example, in the area of the lock and handle. However, a jigsaw leaves chipped edges. An even cut will be obtained using a grinder or miter saw.
Auxiliary tools you need are a pencil, a ruler, a screwdriver or screwdriver, a wooden hammer, and a carpenter's square.
Sanding a door before laminate upholstery
There is no point in sanding an interior door before facing it. Its surface will still be covered with a new finish. The exception is when peeling paint needs to be removed. As for the metal entrance door, everything depends on its condition. Due to temperature changes, the metal condenses. However, moisture quickly dries on the surface as it is blown away by air. Under the skin there is nowhere for condensation to evaporate. The metal will begin to rust.
When the door is new, covered with factory enamel, you don’t need to do anything to it. But if the paint begins to peel off, rusty spots appear, the surface is sanded with sandpaper or a grinder. The metal is wiped from dust and degreased. The surface is opened with a rust converter. When the composition dries, wipe off the white residue that appears with a rag. Finally, two layers of soil are applied, giving each layer time to dry.
Finishing the front door with laminate
Finishing work can be carried out in two ways: on a hung and removed door. The first option is not convenient, but it is suitable if the sash cannot be removed from its hinges. When there are no problems, the door leaf is dismantled. The sash is laid horizontally on the table, all fittings are removed. After grinding and treatment with protective compounds, the creation of the frame begins. It is needed not only to cover an iron door with laminate, but also to lay insulation.
When suspended, the sash is insulated if it cannot be removed from its hinges
Along the perimeter of the door, slats are attached with glue or metal screws. Additionally, two elements are installed across the canvas. The cells formed between the slats are filled with foam plastic or other insulation in the form of slabs.
Advice! If the front door opens onto a heated entrance, there is no point in insulating it, except for sound insulation.
The laminated board is attached to the frame slats
When the frame is ready, the insulation has been laid if necessary, and the sheathing begins. First, the laminate is simply laid on the sash and marked with a pencil where and how much to cut. Mark out places for cutting for fittings. After marking along the drawn lines, a cut is made.
Fastening of workpieces is carried out in two ways:
- glue;
- with self-tapping screws or nails, having previously drilled holes in the laminate.
The first method of fastening is aesthetic, since the fasteners are not visible. However, it is less reliable. Nails and screws will firmly fix the sheathing, but the caps will remain visible.
It is optimal to choose a combined method. The laminate is glued to the transverse slats, and the boards are fixed with self-tapping screws along the perimeter. The hats are hidden under the edging of a decorative corner, which can even be glued on. After finishing, the fittings are returned to the sash and hung with hinges on the frame.
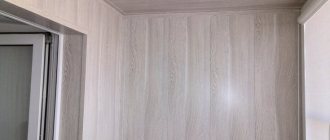
Finishing an interior door with laminate
When a panel door without glass inserts is installed between rooms, it can also be covered with laminated boards. No special preparation is needed, except to clean it from dust. There is no need for insulation, which means there is no need to fix the slatted frame.
The panel door is simply covered with a laminated board
To finish a door with laminate yourself, simply glue the board onto the surface of the door. You can go around the perimeter with self-tapping screws. Then, on the side where the leaf adjoins the door frame, the edging is not made with a corner, since the extra thickness is inappropriate here. Edging on the other side of the sash is also undesirable. It will only ruin the appearance. It is better to drill holes under the screw heads, disguise them with putty, and paint them with paint to match the color of the laminate.
Do-it-yourself slopes for a laminate entrance door
To decorate the entrance block in the same style, the slopes are trimmed. The board is secured in two ways: glue or clamps. The first option is suitable if the surface of the slopes is durable, for example, made of concrete.
When the wall material is loose or large flaws are observed, the entrance door slopes are finished with laminate on the frame. Wooden slats are used. They are attached to the wall with dowels. The slats are placed along the edges of the slopes: one row at the corner, and the second row near the door frame.
The rack frame is attached along the perimeter of the slopes
The gaps between the wall and the slats are filled with foam. For insulation, the frame can be filled with foam plastic. Blanks of the required length are cut from the board, and it is equal to the width of the slope. The laminate is fixed to the frame with clamps.
The boards are installed horizontally, fixed to the frame with clamps
The fastening element - the clamp is nailed to the wooden frame element
When the entire perimeter of the slope is sheathed, the technological gap is closed with platbands. If it is dark in the area of the front door, a recessed lamp is built into the upper trim. The resulting void due to the frame allows this to be done.
Inserting a lamp into the slope skin will improve the illumination of a dark passage
Process components
Sheathing using laminate consists of the following steps:
- purchase of materials and procurement of tools;
- removing the door from its hinges;
- preparation of slopes;
- fastening the coating to the canvas;
- hanging the front door on hinges.
Carrying out work with the above facing coating will be an effective option if you prepare everything necessary in advance. You will need the following materials and tools:
- wooden slats;
- platbands;
- glue;
- corner made of plastic or MDF;
- sandpaper;
- polyurethane foam;
- thermal insulation material (optional);
- clamps;
- screws for metal and wood;
- dowel-nails;
- electric jigsaw with a thin blade;
- drill with drills;
- perforator;
- mallet;
- metal scissors;
- square;
- roulette;
- level;
- pencil.
A door finished with laminate should look more attractive. Therefore, before covering it, it is removed from the hinges and the protruding fittings (latches, handles, lock plates, peephole) are carefully removed.
If an old metal door with non-removable hinges is to be sheathed, then some effort will be required to remove it. There is no need to worry if any of the front door slopes are slightly damaged as a result of this process. It will also be covered with laminate.
Advice from the experts
When you decide to do something like this for the first time, you cannot rule out making mistakes. Often they are related to the choice of suitable material. Recommendations from experts will help prevent them:
- For finishing, high-class laminated boards are used. This requirement is especially true when cladding of the entrance block is provided. Here preference is given to class 34 material.
- The color is selected in accordance with the design of the overall interior of the room.
- Preference is given to products of well-known brands. The board may be expensive, but it is of high quality. Besides, you don't need much of it.
The color of the door block trim is selected to match the interior of the room
A low price indicates the poor quality of the laminate, even if it is high-end.
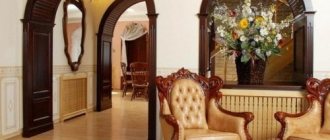
Photos in the interior
The threshold is selected to match the color of the floor covering
If the distance between opposite walls of adjacent rooms is more than 10 m, a technological gap is provided at the threshold, which is masked with a threshold
Even if, when laying, the boards are joined to tiles or other flooring in the next room, the seam is masked with a plank
In the area of the doorway, it is sometimes practiced to finish a section of the floor with boards of a different color to match the color of the frame, trim and trims
When laying, the laminate can be joined to linoleum, and the seam is similarly then hidden under the plank
Reviews
Sergey Zatsepin, 27 years old
The front door was covered with laminated boards 3 years ago. It is made of solid wood, so no additional insulation was installed. I attached the cladding directly to the sash without creating a frame. I placed it completely on glue and secured it at the edges with self-tapping screws. I painted over the hats.
Oleg Petrishin, 39 years old
Last year in the fall I covered a metal door with laminate slabs. Expanded polystyrene was used as insulation. Heat loss has decreased, good sound insulation. The slopes were also finished with boards. I am satisfied with my work and recommend this method to others.
Materials and tools
To complete the work, you will first need a laminate. A substrate is laid under it, and, if necessary, waterproofing. For finishing the walls you need baseboards.
To join the slabs, use a wooden or rubber hammer
The tool you need is a hammer. It should be wooden or rubber. You will need a tamping block, beveled wedges for spacers along the walls, a level, a carpenter's corner, and a pencil. It is best to cut slabs with a jigsaw.