DIY slope installation
The easiest way is to install sandwich panels or PVC sheathing, since there are all the necessary additional elements, often included with the window. The most difficult thing to work with is plaster.
Algorithm for covering with plastic or sandwich panels.
- The opening is cleaned of dust and dirt. Cut off excess polyurethane foam. All cracks and crevices are sealed with plaster or putty, depending on the depth.
- Measure the opening using a bubble level.
- Cut an F-shaped profile around the perimeter of the opening. The slats are cut at 45 degrees so that they can be joined at the corners. If necessary, a wooden frame is first made onto the opening as a frame.
- Screw the profile with self-tapping screws. The fastening is loose.
- If necessary, thermal insulation . Expanded polystyrene and mineral wool are installed in the cavity between the frame and the profile. In the latter case, waterproofing must be laid on top of the insulation. Polymer heat insulators do not need to be protected.
- Plastic panels are cut to size. The joints are treated with sealant. The vertical elements are fastened first, then the horizontal ones. A technological gap is left between the panels, which is sealed with sealant.
The slopes are installed after the installation of the ebb and window sill.
Installing a plasterboard slope yourself is more difficult. The preparatory stage is the same, however, you can attach the sheets directly to the wall only if the latter is even. In other cases they do this.
- Using a tape measure, measure the slope in 3 places to take into account curvature and unevenness. Using these data, a template is drawn and cut out of drywall. It is recommended to install it “dry” and adjust the dimensions.
- Cut a metal profile or wooden beam for sheathing. When finishing a window, it is better to use a metal profile.
- Mount the frame with self-tapping screws. First, vertical slats are placed on one slope and secured with cross members. The distance between the brackets is 50–60 cm. To fix the racks, 2–3 crossbars are enough. They are made from the same profile. Then the sheathing is assembled on the second slope.
- The drywall element is screwed to the frame with self-tapping screws. The fastener caps are recessed into the material. First they install the top part, then the side slopes.
At the last stage, the seams and joints are sealed with putty, having previously strengthened them with reinforcing mesh.
General information about external slopes on windows
Slopes perform the protective function of connecting the window frame with the wall of the building. When installing the profile, the seam is filled with mounting foam, which reliably protects the room from drafts and street dust. But leaving the window in this form is not aesthetically pleasing, and the foam is subject to deformation under the influence of ultraviolet radiation and moisture. Therefore, the arrangement of slopes is a necessary stage in construction.
For exterior finishing, you can choose the most suitable type of material based on price and appearance. This element should fit harmoniously into the design of the facade of the house, and not reduce the cost of expensive cladding. High-quality work will extend the service life of window frames and the building as a whole.
Reference! Installing external slopes increases the sound insulation of the room. Properly done sealing will prevent street noise from entering your home. This is especially important for residents living in houses near the highway or childcare facilities.
Replacement and repair
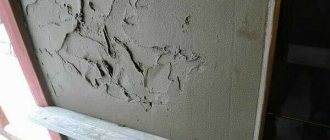
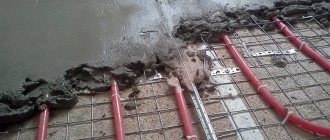
When repairing a plastered surface, the composition is removed mechanically, and then a new layer of plaster is applied. However, the work is dirty, “wet”, and lengthy. This type of repair takes longer than installation.
Sections of drywall that are damaged or leaking cannot be replaced. It is necessary to remove the entire damaged slope by drilling out the fasteners, and then put a new one in its place. There is no need to change the frame. As a result, repair turns out to be much simpler than installation. The same applies to sandwich panels - the entire slope needs to be replaced.
Only cladding cut from lamellas . It consists of small elements that can be dismantled and new ones installed.
Advantages and disadvantages of popular options
Before giving preference to one or another type of finishing material, you should familiarize yourself with its characteristics and advantages.
Plastic
One of the popular options, which is characterized by an affordable price and a low level of heat transfer. This eliminates the appearance of condensation even in severe frosts. The appearance of the panel goes well with the window frame (be it wood or metal-plastic), giving the impression of structural integrity.
The service life of such slopes is 5-15 years. From a wide range of parameters and color palettes, you can always choose the right option. Anyone with a hammer and saw can carry out the installation. There is only one significant drawback - the impossibility of restoring a damaged fragment.
Metal
Sheet metal slopes are strong and durable. But only those who have previous experience working with metal will be able to install the structure. For finishing, galvanization coated with a layer of polymers is often used.
This treatment gives the product a presentable appearance and prevents the development of corrosion. To prevent street noise, cold, and moisture from penetrating into the room, heat and vapor barriers will need to be laid under the metal sheets.
Other unusual materials for finishing slopes
The original design of the window can become the highlight of the interior. And we are talking not only about different color options for the plastic frame, but also about the design of the entire window opening.
To finish slopes you can use:
- Ceramic tiles are an excellent option for a bathroom or kitchen (here you can make a smooth transition from the apron to the window);
- Mirror plastic (mosaic or film) - suitable for small rooms where there is not enough sunlight;
- Artificial stone - in combination with imitated frames, this material can create a unique window opening design.
In all cases, the design arrangement of elements looks good when part of the tile or mosaic extends beyond the slopes onto the walls near the window. In the same way, you can “frame” the doorway to give the room a certain style.
Photo report 1: installation of slopes from sandwich panels without starting profiles
This method is suitable when the window is installed so that the distance from the window frame to the opening wall is too small. In this case, installation with a starting profile (see below) is either very difficult or - usually from the hinge side - completely impossible.
After installing the plastic window, the following picture was observed.
The installation of slopes for plastic windows begins with preparing the opening: we cut off the remaining foam with a stationery knife. It is easy to cut, just don’t overdo it, cut it flush and don’t cut it out - the foam both holds and insulates the frame. Pieces of plaster that interfere and protrude are also removed. If they hold up well and do not protrude beyond the plane of the future slope, you can leave them - the foam will slide less.
Then, around the perimeter of the window we nail (we place it on dowels if the wall is concrete) a thin strip - 10 * 40 mm - with the wide side facing the slope.
Nailed around the perimeter of the rail
Usually they don’t level it, they nail it as is, but if you want, you can make it level by placing pieces of plywood, thin boards, etc. in the right places.
Groove for plastic sandwich panel
Next, we cut the foam around the perimeter of the frame so that the sandwich panel fits there. It should go in about 1 cm. We cut off the foam carefully so that there are no residues on the frame, but without damaging the plastic.
Now you need to cut the plastic panels correctly. You can do it in a standard way: using measurements, you can make a stencil. It seems easier with a stencil. Take a sheet of paper larger than your window (I had old wallpaper). Apply to the slope, crimp, bending the excess. Cut along the curved lines, try on, adjust as necessary.
It is more convenient to start from the upper part of the opening. Having made a paper stencil, we outline it on the plastic. Considering that about 1 cm will go into the foam groove, add this centimeter along the edge that will be inserted there. We cut it out with a small margin - it’s easier to cut it off than to cover it up later.
We cut it with a hacksaw and a metal blade, try it on, adjust it so that the plastic stands up straight, without bending. We level it so that the panel is flush with the plaster. The edge turns out to be almost even; where necessary, we trim it with a file.
Inserted plastic slope top
Having removed the tried-on and adjusted strip, along the outer edge that will be nailed to the plank, we drill holes according to the thickness of the nails, retreating about 0.5 cm from the edge. This will make it easier to attach and will not damage the plastic.
We put it in place again, take a balloon with mounting foam and short “sprays” to fill the gap with foam. We try to get as deep as possible, but don’t pour too much: when it swells, it can distort the plastic.
Fill it out like this
There are several points to consider when working with polyurethane foam. If the plastic is smooth, the foam does not have a very good grip on it. To improve it, either treat the surface that faces the wall with sandpaper, and/or prime it with something to improve adhesion. The second nuance: for normal polymerization of the foam, moisture is needed. Therefore, before installing the plastic, the slope is sprayed with water from a spray bottle. Naturally, there should be no dust on the wall - it should be swept away with a brush or removed with a vacuum cleaner. If the plaster or mortar is loose, the opening is pre-treated with a penetrating primer, which will bind the concrete particles together.
Then we lift the panel, pressing down the foam, insert the nails into the holes and fasten the outer edge to the bar. The inner one rests against the window frame.
Fixed top plastic panel on the window slope
Using the same technology - cut out a paper template, try it on, transfer it to plastic - cut out a plastic side. Here you need to be especially precise so that the gap between the slope panel and the window sill (upper slope) is minimal. To do this, the edge will have to be sanded. To make the edge smooth it is easier, it is more convenient to process it with sandpaper attached to a smooth block, a file or a sharpening stone (half a circle, as in the photo).
Processing the edge of a plastic panel
We adjust it until it matches perfectly (as best as possible) at the top and bottom, and install it in place, driving one edge into the groove near the window. When the result is satisfactory, we level the outer vertical edge to the same level as the wall plaster. You can do this with a stationery knife on the spot, or you can draw a line on the panel (with a pencil, a thin marker, scratch it with something sharp) and then modify it with whatever is convenient.
Having removed it, we also drill holes for nails along the outer edge. We install the panel in place, take foam, and fill the gap from bottom to top. Too much foam is not good here either, as it can bend the plastic. Therefore, we fill it in short portions, trying to fill it as deeply as possible.
On the vertical parts of the slopes, you can do it differently: apply foam to the panel ready for installation along the far edge, which goes under the frame, before installation. The strip is made continuous or applied as a small snake. Only you need to do this not from the very edge, but stepping back a little. Then the plastic part is inserted into the cut-out groove, positioned as needed, and the rest of the gap is filled with foam (do not forget to wet the wall before installation). Once filled, press, level, and secure with nails into the bar.
The upper and lower joints are fixed with masking tape until the foam polymerizes.
To prevent the foam from moving the edges of the slope during the polymerization process, tape the joint at the top and bottom with masking tape. No matter how hard you try to adjust the plastic evenly, gaps, albeit small ones, remain. They can be covered with acrylic. It is sold in foam-type tubes and placed in the same mounting gun.
Squeeze the strip into the gap, rub it, level it, remove the excess with a damp soft cloth or sponge. This operation needs to be done in small areas and wiped carefully - completely clean. As long as the acrylic has not hardened, it cleans up well. Then - with great difficulty. It is more convenient to start sealing cracks from the top - immediately - the horizontal panel of the slope, then the joints, then move down first along one side, then along the other. The last to be sealed are the joints with the window sill.
After drying - 12-24 hours, depending on the sealant (written on the tube), acrylic can be pulled into the seam - this is if the cracks are large. Go through all these places a second time using the same method. After the second layer has dried, if there are any roughness or unevenness, they can be smoothed out with fine-grain sandpaper, folded in half. In general, it is better to carefully level it while it is still wet, otherwise you may scratch the plastic.
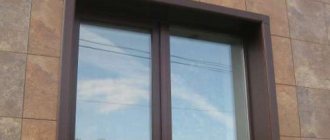
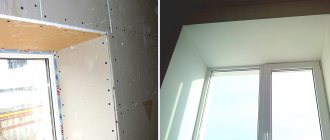
Installed plastic slopes
That's it, the plastic slopes are installed. After the final polymerization of the foam, the bevels must be puttied, leveling with the surface of the walls. After this, you can remove the protective blue film. As a result, the window will look something like this.
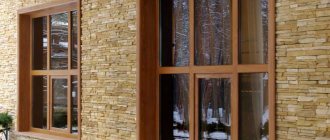
Window with plastic slopes (sandwich panels)
When installing these plastic slopes, sandwich panels were used. These are two layers of plastic, between which there is a layer of foamed propylene foam. Using the same technology, you can make a window frame from inexpensive plastic window sills or white PVC wall panels. The most unreliable material is panels: even wall panels are pressed through quite easily, and if the front layer of plastic is thin (cheap), then the jumpers are visible in the light. This is not the case with sandwich panels and plastic window sills. And it takes a lot of effort to push through, and there are no jumpers even for clearance.
Installation of plastic windows is described here.
How to finish window slopes - starter kit
First, you must decide for yourself which finishing option you are ready to implement, taking into account your skills in handling tools and materials. In total, methods can be divided into 3 categories:
- with preliminary plastering;
- on a frame base;
- on an adhesive or cement base.
Preliminary plastering of slopes is suitable for both internal and external slopes. The low cost of materials and the durability of the finish make this method one of the most common. The surface obtained after plastering is smooth and durable; it can be used as a base for any type of finishing with decorative materials.
The disadvantage of plaster is its low thermal insulation properties, which creates a risk of freezing of the slope, moisture condensation and mold formation. Plastering will also require a lot of time spent on the work itself and waiting for complete drying. In addition, finishing window slopes with your own hands with plaster requires skills or, at a minimum, theoretical knowledge, as well as a number of tools: a level, slats, a drill or a hammer drill with a nozzle for mixing the solution, a trowel, self-tapping screws.
Making a frame is much easier and faster; in addition, it becomes possible to well insulate window openings.
Strength is the Achilles heel of most frame structures, since mainly light and thin materials such as plasterboard or PVC sandwich panels are used for their cladding. The cost of materials and work will be slightly higher than the cost of cement and sand for plaster, but the result will not be long in coming - after the frame is ready and sheathed, you can use any finishing method according to your ideas about the interior.