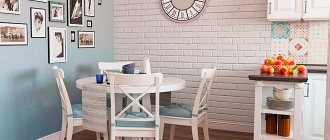
Ways to imitate brickwork
There are several interpretations of this design solution. The range of finishing materials is quite wide, and the choice mainly depends on financial and physical capabilities.
The least labor-intensive method is gluing panels specifically designed for interior decoration. They are rectangular in shape and made of plastic. The outer side of such a panel is decorated like brick. The finishing work itself does not take much time and effort, and the result is quite acceptable.
But such a wall does not look entirely natural. If you want to achieve greater realism, it is recommended to use ready-made tiles or special wallpaper that imitates brickwork.
If you have limited finances, you can use one of the following methods to recreate the appearance of the wall:
- plaster or putty (during repairs, excess finishing materials usually remain, which can be used);
- cardboard.
How to make imitation brick with your own hands
There are several ways to finish the brickwork. We will analyze each of them in a separate article with a detailed master class:
Wallpapering
The simplest option for decorating walls would be wallpapering . Smooth, inexpensive wallpaper with matching bricks was a popular option for hallways and kitchens. Modern production offers many types of brick-look roll wallpaper made of strong and durable materials, for example, vinyl, non-woven fabric, fiberglass. Their drawing surprises with its realism; it is quite difficult to find identical bricks the first time. The price for one roll can be up to 5 thousand rubles.
Photo wallpapers differ from roll wallpapers in that their pattern is not repeated . Besides the brick wall, they usually have something else painted on them: old crumbling plaster, paint, graffiti. Photo wallpaper with imitation brick can be ordered from any design studio. They will print them according to your design and desired size. The price starts from 400 RUR/m2.
A few words about egg trays
The trays that are used to transport ordinary chicken eggs are mostly made from paper waste and waste paper sent for recycling. They are quite dense, have a certain shape, and inside the eggs themselves are more or less tightly packed into special cells.
Since such a tray contains only paper, it is absolutely safe, and besides, it can be used by needlewomen and craftsmen to create various objects from papier-mâché. Papier-mâché is a special plastic mass that can be easily given the desired shape, created from paper and glue. You can make anything from it: masks, crafts, figurines, various accessories, and so on. Depending on the type of papier-mâché, you can create objects of varying texture and strength.
An egg tray is a product made of cardboard and paper, ideal for creating papier-mâché
On a note! Most often, papier-mâché is used to make various crafts for school. However, the list of options for using this mass is quite extensive. Papier-mâché is suitable for a variety of projects, from creating jewelry storage boxes to all kinds of stucco molding that decorates the walls of the house.
An egg tray is one of the most affordable materials that is great for creating papier-mâché. But everyone throws them away, except for handicraftswomen. Although in fact it is best to recycle such trays if you do not want to use them in any other way.
On a note! Until the early 70s of the last century, eggs from USSR poultry farms were transported using sawdust and straw. Later, the equipment necessary for the production of egg trays was purchased abroad.
Egg trays are used to make original little things that fit perfectly into the interior.
If you like to make things with your own hands, then the egg tray is a real find for you. This is a great option to make something useful in everyday life or just a beautiful thing. In this article we offer you to get acquainted with a master class on creating brickwork from such trays.
How to make a brick wall with putty?
Necessary materials
- Putty;
- cardboard for stencil;
- masking tape;
- knife;
- pencil and ruler;
- dye.
Stages of work
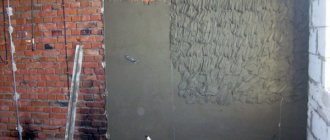
- First, prepare the surface. It is most convenient to cover it with decorative bricks when the wall is already plastered. Plaster levels the surface and makes the process of applying material easier and faster.
- It is necessary to cut out a stencil of our brick from cardboard, add allowances there to design the distance between the bricks. When the wall is ready and dry, using a stencil, pencil and ruler we mark our bricks. Don't forget to offset the rectangles, just like real masonry would look like.
- Now you need to use masking tape to glue the vertical and horizontal stripes of the seams. To make it easy to remove the tape later, first stick the long horizontal ones and then the vertical ones.
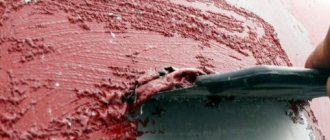
- Next, apply a layer of putty on the wall over the tape. Depending on what kind of structure you want to see on your bricks, you can smooth the surface.
- When the putty has set a little, you need to remove the tape. At this stage, you can already see how the wall has turned into brick. The main thing is to remove the tape in time, otherwise once it hardens, you will no longer be able to remove it.
- Now all that remains is to wait for the putty to dry completely.
- When the putty has hardened, you can further create the desired relief. This can be done using a regular spoon. Somewhere the bricks can be leveled, or unnecessary pieces of plaster can be removed from the spaces between the bricks.
- After that, paint the wall in the desired color and enjoy the result. Instead of putty, you can also use decorative plaster, having previously painted it in the desired color.
Video on how to decorate a brick wall with putty:
Main details
The most important thing in all the work is to make the “right” bricks. They must be the right size. There are many varieties of this material, but most often in masonry you can see the following dimensions: 250 by 120 by 95 millimeters and 228 by 138 by 65. There is also a dimension that is less common: 250 by 120 by 88 millimeters.
In addition to choosing the dimensions, you still have to decide which side the brick will lie in the masonry - this is also done in different ways and you need to choose the option that suits you. Having decided on this, a template is drawn on the cardboard according to which the parts will be cut. When the marking is applied, everything is cut along it and put aside for now. Some of the parts will have to be cut in half to imitate halves of stones.
Imitation using plaster
The work will require the following materials and tools:
- plaster;
- tile adhesive;
- tape (painting);
- primer;
- dye;
- container for mixing the solution;
- medium-sized spatula;
- drill with a special attachment for stirring;
- pencil;
- roller;
- brush;
- measuring tool;
- scissors;
- latex gloves;
- template (stencil).
The latter can be purchased at any hardware store. The stencil is a hollow mesh shape consisting of many rectangular bricks. It is applied to the wall and plaster is applied, and after drying it is removed. An analogue can be adhesive tape or reinforced tape. They are glued according to the markings of the seams between the “bricks”.
First of all, prepare the surface - remove the old cladding and level the wall . If there is paint, then leave it, but first make notches. Then a layer of acrylic-based primer is applied. Apply the finished stencil and fix it or glue it with tape. When using the latter, mark the wall. It happens like this:
- Place pencil dots on the wall along both edges with a vertical indent of 7.5 cm. Marks located opposite each other are connected by a straight line horizontally.
- Glue strips of paper tape along the marks obtained. Recommended thickness is 1.5 cm.
- Paper tape is glued vertically every 25 cm.
- To achieve a checkerboard pattern, in the second row the first line is glued at a distance of 12 cm from the edge.
To imitate a brick wall using plaster with your own hands, after such manipulations, mix the solution according to the instructions on the package and apply it to the wall using a spatula. The recommended layer thickness is 4–5 mm. Level the surface and carefully remove the tape markings. Since the paper may become wet, the procedure must be carried out as quickly as possible.
The result is bricks. If necessary, smooth out sharp edges with sandpaper.
The dried plaster is covered with paint (latex, acrylic, water-based) of the required color. The seams between the bricks are painted with a contrasting color – usually white. It is convenient to use a thin brush.
If it is not possible to spend time on painting, the color is mixed into the plaster. In this case, it is recommended to immediately mix a large volume of mortar so that it is enough for the entire wall and it turns out to be one tone.
Examples of brick-like plaster in the interior
Before we begin to study the technology of finishing brick walls using plaster, we will get acquainted with several examples of performing this work.
The photo below shows the original version of imitation brickwork. Its author deliberately avoided the straight lines of mortar joints. The result is an interesting surface, as if carelessly put together by a mason.
And here is a typical example of untinted gypsum plaster “like brick”. The work was done with high quality, so even at close range the imitation is indistinguishable from natural facing masonry.
Painting bricks white with dark seams is a common decoration technique. It is often used in Scandinavian-style interiors.
To create a beautiful surface, you need to carefully mold the raw plaster into brick shapes. In addition, it is necessary to carefully process the “face” of each stone, giving the array the appearance of aged masonry. We see a successful example of this approach in the photo below.
Standard masonry stone of regular shape with sharp edges is not the only option for decorative plaster. Designers love to use imitation brick in the interior with smooth and torn edges.
Brick-like plaster can be used to decorate not only a solid wall. With its help you can make an apron in the kitchen, decorate corners and doorways.
- Inexpensive way. Such coverage will not require financial investments.
- Eco-friendly. The plaster does not contain harmful impurities.
- Simple. No special skills or tools are needed here. Just a little care and patience.
Marking
Before starting the main work, it is necessary to prepare the surface - remove the old finish. If it is not level, level it with plaster and cover it with a primer. Another option is to use drywall, this is a dry leveling method. However, if the area of the room is small, this method is unlikely to be suitable, because the sheets will “eat up” the space.
Please note: if the apartment is in a new building, you can start decorating the room no earlier than 1 year after the completion of the house. Otherwise, the walls may shrink and cracks may form.
Once the surface is prepared for work, you can begin marking. And there are two options here.
First: some construction stores sell a ready-made mesh form; this method is simpler, but also more expensive. Second: independent marking. How to make an imitation brick wall with your own hands?
- The standard brick size is 250 mm x 65 mm, the size of the joints is about 15 mm, although this is not important, and they, of course, can be changed.
- Cut a brick out of cardboard with seams on the sides.
- Mark the center of the brick, also taking into account the seams. You should get a blank like in the photo below.
Marking starts from the left corner. Provide in advance for indentations from the ceiling and floor - at least 5 cm. First, you can mark out the area according to the lattice principle, marking a grid, and then draw half of the brick through the row. Trace the resulting stones and you will have standard brickwork.
It is convenient to use 15 mm thick masking tape. Glue the jumpers overlapping, be sure to leave “tails” at the edges so that the tape can be easily removed later.
If you forgot about the primer during the processing stage, you can apply it directly over the tape now.
Preparation of solution and application
You will need the following tools:
- Container for diluting the solution;
- Wide, narrow spatula;
- Gloves, oilcloth.
The most reliable solution is gypsum plaster and tile adhesive. You can knead it using a special attachment on a drill (mixer) or manually. What is important to consider? If you have no experience in repair work, do not mix a large amount of mixture at once. Before you have time to apply it, it will dry out.
Progress
Surface preparation
The surface on which the brickwork will be imitated (it can be a wall or panel) must first be prepared.
Clean the wall of old wallpaper, if necessary, prime it with a special construction primer or a 1 to 2 solution of PVA glue and water. If the wall was covered with paint, then wipe the surface from dust and degrease.
Imitation of decorative brickwork
There are quite a few varieties of bricks. It all depends on which one suits your interior best. And, if you have the opportunity to experiment with the color of the brick, then you need to decide on the size of the bricks right away. The main dimensions of the brick can be seen in the figure
In addition, the type of masonry depends on which side of the brick will be visible. Each side has its own name and will look completely different in the interior.
1 - bed 2 - spoon 3 - poke
There are different options for decorative brickwork: for example, the outer side can be completely laid out with a bed or a spoon, or it can combine different sides of the brick.
In our example, we will imitate red brick masonry; we will lay it with a spoon with dimensions of 228x65.
On a sheet of thick cardboard (packaging box) we draw out the “bricks” of the required size.
Then we cut the sheets along the marked lines using scissors or a stationery knife and a ruler.
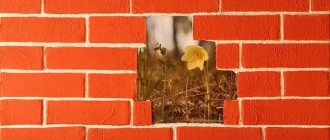
The “masonry” in the interior can be either solid or reveal some kind of image to us. For clarity, in this example we took a photo from a calendar. In the interior this can be a drawing, photo wallpaper, stucco, etc.
Mark the boundaries of the drawing. If the boundaries according to the plan will have to go under the decorative brickwork, we place the drawing on the wall. We glue, we draw, we sculpt.
We cut some of the resulting “bricks” in half. This is necessary so that the masonry is staggered and looks realistic.
We begin to glue the “bricks” to the surface. This can be done with glue for heavy wallpaper, such as vinyl. You can use PVA glue or any other convenient for you to work with. After some experiments, I settled on this method: PVA construction glue + hot glue gun. If we consider them separately, PVA glue dries for a long time and does not immediately fix the bricks, and a hot glue gun, if used without PVA, uses up the rods very quickly. Therefore, we do this: apply PVA glue to the entire rectangle, with the exception of the corners themselves. We apply glue from a hot-melt gun to the corners. Hot-melt adhesive immediately fixes the “brick” in the right place, and PVA securely fastens it within 24 hours.
It is most convenient to start laying from a corner. We fix the first “brick” in the lower left corner.
We will fasten the next one at a certain distance, leaving space for an imitation seam of 07-10mm.
We will retreat the same distance from above, starting to lay out the second row. It will start with half a “brick” to create a checkerboard pattern.
When all the rectangles are glued, we leave them to dry for the time specified in the glue instructions. If it is PVA construction adhesive, then the drying time will take about a day.
When the glue has dried and the “bricks” are securely fixed along their entire length to the wall or panel, we begin decorating with napkins. This is to add texture to our brickwork and to hide the corrugation of the packaging board.
The napkins need to be thick and of high quality so that when soaked in glue they do not tear or roll up.
Using a brush or sponge, thickly apply PVA glue on top of the rectangles.
We crumple the napkin in our hands to form folds.
And we apply it to the wall, in the place where the glue was applied. Apply glue on top of the napkin with a brush once again.
Select the gaps between the rectangles with a brush or finger.
This way we cover the entire wall. We make sure that there are folds and well-defined gaps - seams between the masonry.
Let it dry for another day.
When the glue dries and hardens, we begin painting.
The color is selected in accordance with the design. In this example we imitate red brick. By mixing white, orange, red and black paint we achieve a similarity to the original color of the brick.
And we cover the “bricks”. You can do this with a brush, or with a sponge, imitating the slightly porous structure of brick.
Then we go through the “seams” in the brickwork with a thin brush. You can also choose the color of the solution to suit your taste. But most often it has a slightly grayish tint.
Remember that after drying the paint becomes lighter than it appears in its liquid state. If after drying the color does not suit you, then the wall can be repainted until it acquires the desired shade.
When everything is ready, the folds on the bricks can be highlighted with darker or lighter paint, thereby giving the masonry a little antiquity and texture.
Apply paint of a suitable shade to the “bricks” with a dry brush.
It is best to varnish the paint on top to protect the surface from moisture and dust.
Such walls in the interior look very believable and beautiful. The work is not difficult, you don’t need to be a professional builder or finisher to complete it, the materials are available, and everything can be done to your liking, choosing colors and shapes to match the interior.
Painting and varnish
The process is more creative than complicated—be sure to use multiple shades of paint. For red bricks, brown, red and black are suitable. For white - just white paint, slightly diluted with black to a grayish tint. The solution turns gray or dark gray. The result will depend on your efforts and the talent of the artist. After the paint has dried, you can coat the surface with varnish.
Imitation of a brick wall with your own hands.
Every day, a brick wall is used more and more often: previously, such surfaces were carefully decorated, but today, on the contrary, they are even artificially created. Moreover, not only professionals, but also ordinary people can reproduce such an imitation. All you need is a little patience, a great desire and this article, from which you will learn all the secrets of creating an imitation brick wall with your own hands.
Option 3 – traced brickwork.
To simulate it you will need:
- kitchen sponge;
- Ruler and pencil;
- paint of the desired color (in our case it will be obtained by mixing the available 2 red and 3 dark paints).
That's the whole list.
- Cut the sponge to the required brick size.
- On the wall where the imitation will be created, draw the lines along which you will work.
- Dip the sponge into the paint (or mixture) and press it firmly against the wall. Do this several times until you get the print you want. Next, make a gap (indent) and repeat this step again until the entire wall is covered with these “bricks.” And don’t be afraid if something isn’t perfect – it’s even more natural.
We imitate cardboard bricks at home
Corrugated cardboard is best suited due to its density and structure.
Necessary materials
- Sheets of corrugated cardboard or thick cardboard boxes;
- thick paper napkins (preferably high-quality ones that will not be almost completely dissolved by glue);
- a lot of glue, such as PVA;
- wide brush;
- hot glue and a gun for it;
- stationery knife;
- pencil and ruler;
- dye;
- varnish (optional).
Process sequence
- As in the previous version, the wall must be prepared: cleaned and degreased, primed.
- Cut out rectangles of the required size from cardboard. If naturalness is very important to someone, the standard length and height of a single brick is 250x120 mm. Using a ruler, mark horizontal lines on the wall to make it easier to mount the bricks evenly on the wall.
- We coat each cardboard “brick” with PVA glue. IMPORTANT: do not touch the corner parts. Apply glue from a gun to the corners. This integrated approach will allow you to fix cardboard bricks to the wall almost instantly using hot glue, and gradually drying PVA will enhance the effect over the entire surface of the element.
- The most creative stage is decoration. To create the effect of roughness and decoupage on the wall, apply glue to each brick tile with a brush, glue paper napkins to them, and coat the top with glue again. Before gluing the napkin, crumple it in your hands - this will help achieve a more realistic appearance of the brick structure.
- A round stick or just a finger will help to create the appearance of seams - we use them to press down the seam line so that it “sinks” into the wall. The sharp edges of the rectangular cardboard tiles will smooth out the napkins.
- At the last stage, we move on to painting the brickwork with paint. To enhance the decorative and protective effect, you can apply varnish to the wall.
Option 4 – brickwork made of putty.
To recreate it you will need:
- directly putty (any except finishing);
- level;
- pencil;
- putty knife;
- window seal with a thickness equal to the desired joint of the false brick wall.
A furniture stapler may also come in handy (if the glue you choose cannot securely hold the seal), but it is not necessary.
So, the standard brick dimensions are 250x65x120 mm. In accordance with them, basic surface markings should be carried out.
- Step back 65 mm from the floor, use a level and a pencil to mark a straight line and glue the window seal onto it.
- Step back 65 mm from it again and do the same thing again. And so on until the entire surface of the future “brick” wall is filled with these horizontal stripes.
- Make vertical markings. To do this, step back from the lowest point (from which one, it doesn’t matter, unless there is a corner in your false wall, otherwise you need to start from there) 250 mm and draw a vertical line, then another 250 mm... and so on throughout the first row. The second row and each subsequent even row should be done in the same way, only in order to get a checkerboard order, the first “brick” must be halved. Afterwards, glue all the drawn lines with a sealant.
- Dilute the putty, fill the resulting “honeycomb” to the entire thickness of the seal (there is no need to cover it) and leave until completely dry (about 24 hours).
- Peel off the seal (this is not difficult to do, since it does not “resist”), paint the imitation brick wall with your own hands in a more natural color, and after it dries, cover the seams with tile grout or cement.
Step-by-step algorithm of actions
Drawing the wall
The easiest way is along a long rail. Naturally, with exact observance of the distances between the horizontal lines (the bricks have the same dimensions). You can focus on the standard. The thickness of single – 6.5, one and a half – 8.8, double – 13.8 (cm).
Application of imitation coating
There are many techniques, so we will limit ourselves to only the most common ones, based on the fact that the work is done independently.
Using adhesive tape (masking tape)
Before starting work, the wall must be painted in the color that should be at the seams. Typically gray or white (or something in between). The fact is that depending on the components and their ratio in the mixture, the dried solution takes on a different shade. Next, horizontal seams are marked (using tape). After this, it is easy to highlight individual bricks, simulating masonry with shifting products in adjacent rows (pieces of tape are attached vertically).
Peculiarity
: Since the tape will then have to be removed, there should be free ends left, sufficient to grab them with your fingers. After this, the prepared mixture is applied to the wall.
Important
: the consistency of the solution should be such that it does not flow down the wall. And the layer should be applied minimally, no more than 2 - 3 mm.
Option #1
- based on gypsum. But this material hardens quickly. Therefore, it is necessary to introduce a so-called “moderator” into the mixture. Its use leads to the fact that the layer of gypsum mortar does not harden for 20 to 40 minutes. Otherwise, it will simply not be possible to remove the tape to mark the masonry seams.
Option No. 2
– plaster mixture + tile adhesive (1 to 1). In this case, only the smallest fractions of sand are used in the preparation process. This means that you will have to purchase it specially, since the usual one (from a river or from a quarry), even well sifted, will not work.
Flaws
: If the object is large, covering the wall with tape will take a lot of time and material. If the solution hardens too quickly, it can lead to problems in removing the tape from it in order to preserve the appearance of the design.
Stenciled
The method is more complicated, since you will have to prepare the grate. It is made from a sheet of plastic or rubber, knocking out rectangles in it.
In addition, it is advisable to create a template from thin slats, the undoubted advantages of which are:
- the ability to work with solutions that harden quickly, since they have time to “set” and dry;
- a large selection of materials and flexibility in carrying out any set of works. The shape of the structure fully repeats the elements already discussed;
- the ability to create a template directly on the wall and an image of any shape;
- naturalness and authenticity of the appearance of the resulting brickwork.
Flaws
: a stencil needs to be made or money must be spent on purchasing a finished product.
Do-it-yourself imitation of a brick wall made of polystyrene foam (ceiling tiles)
For false bricks, flat polystyrene foam tiles without a pattern are suitable. For our purposes, you can use any of its sides. The optimal size of the “stone” is 7/15 cm. If you increase the proportions, the wall will look unnatural. The process of making “stones” is simple: we squeeze them out of the ceiling tiles.
First, we apply markings on the polystyrene foam with seam allowances. Next, we press straight lines, after which we cut out the “bricks” with a painting knife. We glue the finished products with our own hands onto the desired part of the wall. We use ceramic tile adhesive as a binder. There is no need to fill the seams with plaster. The gaps between the “stones” need to be made very small: 1-1.5 mm.
After finishing the gluing work, the bricks need to be painted. We try to apply as much paint as possible into the gaps, thereby creating an imitation of brickwork.
Do-it-yourself imitation of a brick wall using plaster (tile adhesive)
For the manufacture of parts, any tile adhesive is used, which is sold in the form of a dry mixture. It needs to be diluted with water until it becomes a very thick sour cream. It is best to use a white composition. Then we will divide the entire mass into 3 parts, adding a little paint to each of them.
It is important that the paint differs in shade in each part.
Mix the mass in each pile like dough. We will get a mass with beautiful stains. Roll it out into a “pancake” and cut bricks of the same size. We lay them out to dry. We do this until we collect the required number of “stones”.
We glue it to the wall using the same tile adhesive. Fill the seams with a compound painted in a darker color. At the end, the wall surface can be covered with several layers of varnish.
How to paint false bricks?
To get a more natural shade, you should mix two types of ocher: light and red. Then add a small amount of white to them. To make the texture of the brickwork look like the real thing, we use the stamping technique to apply paints.
We take a sponge and begin to apply the pre-prepared thick mixture to the wall. After which you will need liquid paint in a “burnt bone” shade. We spray it on the bricks using a regular toothbrush.
To make the decor look even more natural, we paint each row in a special way.
The second can be given a tint using mars diluted with water.
For the third - use sienna and white. All paints are applied using the same stamping method. Then they continue to alternate shades in the same order. Upon completion of the work, it is recommended to varnish the wall in two layers.
If you want to get a matte surface, then lightly sand it with fine sandpaper.
This type of decoration has several subtleties, because due to its characteristics it can either create a special atmosphere or clutter it up.
It is worth remembering that it is not at all necessary to imitate masonry in the area of all walls; one surface out of four, decorated in this way, will be enough. When planning your actions, it is important that you imagine a complete image of your own room - and then everything will work out.