14727 0 5
Zanoza November 12, 2016Blonde with head and arms
Plasterboard wall putty
No matter how good the drywall (gypsum board) is, in order to paint it efficiently, it is necessary to carry out a number of manipulations. Today I will try to give all the information on this issue so that preparing drywall for painting will be as clear and easy as possible.
The most important thing is to get perfectly smooth walls as a final result, and this can only be achieved with careful puttying; you will also need to grind and prime the surface. But first things first!
Briefly about working with gypsum boards
Drywall is suitable for work in various types of premises. It is allowed to use sheets even in rooms with high humidity (kitchen, bathroom). The only requirement is the use of special materials with moisture-resistant impregnation (GKLV) and the creation of a good and high-quality exhaust system. After all, even in cases where the plasterboard is moisture-resistant, the hood must work efficiently, otherwise the moistened layer of cardboard and plaster will create an attractive environment for fungus, mold and other microflora.
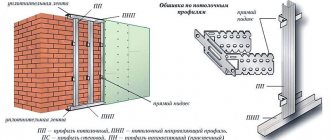
With the help of plasterboard, even very uneven walls that are difficult to level in other ways are finished, and new partitions are created in the room. This material helps to level the ceiling as quickly as possible and without complex manipulations, as in the case of applying leveling mixtures.
Plasterboard box hides communications
Let's briefly go through the main advantages of plasterboard sheets:
- ease of operation;
- affordable price;
- Different sheet thicknesses, which allows you to create a light and even suspended ceiling;
- long service life;
- safe components in the composition;
- suitable for painting, wallpaper and finishing with decorative plaster or tiles;
- Moisture-resistant and fire-resistant sheets are produced, allowing you to expand the scope of plasterboard;
- With its help, walls are leveled, partitions, arches, niches, and boxes are created.
Note that finishing sheets of drywall is also easy. The main requirement is proper surface preparation.
Paint selection
So, whether it is possible to paint drywall is already clear, but the finishing material must be chosen correctly. You should understand what requirements will be placed on the finishing layer. Drywall is painted with a material that does not emit unpleasant odors either during work or after its completion. The product must also have the following properties: dry quickly, be resistant to dry or wet products, and hydrophobic. If paintable drywall will be used in the kitchen, then it is better to choose a composition that can be easily washed and cleaned.
Water-based paint
Water-based paint is used for painting drywall more often than other types. The base is water, to which coloring pigment and other components are added. The advantage of the compositions is that they are odorless, and you can choose a suitable shade from among them. But the layer will have to be updated periodically. There are the following types of emulsion-based paint:
- Acrylic. They are created on the basis of acrylic resins. This coating is resistant to wet and dry abrasion. But not all types of these paints are resistant to the direct influence of moisture. Some of them are intended exclusively for dry rooms. The presented composition does not release toxic substances into the environment.
- Latex. This material is resistant to dirt and moisture. It fits well on the surface and provides a reliable decorative coating.
- Silicate. They contain liquid glass, so they repel water well and are quickly cleaned of dirt.
- Silicone. The best option, as it satisfies all the necessary requirements. The material is resistant to moisture and temperature changes, it can be cleaned with detergents, and is not afraid of fungus and mold. But these compounds have a high cost.
Painting with water-based paint is appropriate in rooms of any purpose. They are most suitable for decorating interior surfaces.
Enamel or oil paint
When answering the question of what paint to paint drywall, many craftsmen do not recommend using oil-based compounds. But this opinion is wrong. The specified building material is strong enough to withstand even fire-resistant coatings on metal. The only requirement is good preparation of the base. Before applying a layer of paint, the drywall is not only puttied and primed, but also treated with PVA glue.
Oil formulations provide good coverage and dry quickly. But they have an unpleasant odor and can release harmful substances into the air. If it is necessary to repaint such a finish, the previous layer will have to be completely removed or the same type of material must be used.
For bathrooms or kitchens, you can use moisture-resistant enamels. With their help, you can create a dense film on the base that will be resistant to moisture and temperature changes. This paint contains a solvent and a pigment.
Where to start preparing for painting
Since the final coating will be paint, the surface of the gypsum board must be smooth and without noticeable flaws. Therefore, do not skip any step before coloring, otherwise the final result will not be as expected.
Primers specifically designed for treating drywall sheets
The first thing that is important to pay attention to is the absence of drafts, changes in humidity and temperature in the room. These factors will affect the final result, since gypsum board absorbs excess moisture in the room.
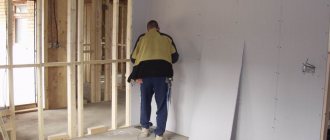
Having finished covering the walls or ceiling with sheets of plasterboard, first of all make sure that the sheets are attached correctly. Somewhere there may be a missing place for tightening the screw, which will lead to swelling or disruption of the joining of the sheets. Make sure that the screws are in place and properly embedded in the plasterboard sheets. Those areas where the gypsum board is damaged by an incorrectly screwed screw are recommended to be sealed nearby with another screw. After this, the main stages begin. There are only four of them and they look like this:
- Priming process;
- Surface putty;
- Finishing;
- Grouting the surface before painting.
Each stage requires adherence to technology. Adhering to this technology is not difficult. By the way, the decoration of the walls and ceiling is practically the same. Therefore, these tips are suitable for processing walls, ceilings, niches, boxes, arches.
Using corners to increase the rigidity of gypsum boards
Proper priming of plasterboard walls
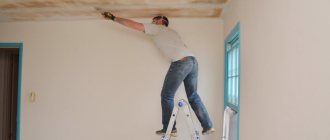
When starting to prime, remember that well-primed plasterboard copes better with excess moisture and is not affected by harmful microflora. The primer will also help level out the absorption level of the surface. This will prevent stains from appearing on the finish.
It is important to know that plasterboard sheets should never be treated with an alkyd primer. This type of primer mixture is not friendly with cardboard and will lead to swelling and cracking of the material.
After priming, the surfaces of the walls or ceiling are left to dry for a day or two.
The next stage is gluing the joints of the sheets with a special reinforced tape. This is required to ensure that the putty does not crack at the joints, and for better joining of the sheets. Internal corners, if any, are also treated with this tape.
Gypsum putty from Knauf
If we are talking about external corners, then it is necessary to add protection against impacts from large objects, which leads to the formation of dents. Therefore, external corners are treated with special plastic or metal corners. They are attached with glue or self-tapping screws. If the outer corners are shaped, then in a hardware store, look for corners that can be bent.
After sealing the joints and corners, proceed to the next stage - puttying the walls or ceiling.
Sanding seams and corners
If the layer is well leveled when sealing seams on drywall, sanding can be kept to a minimum. Why is it better to sand less? Because firstly, it’s long, and secondly, it’s dusty. Moreover, the dust is very fine, floats in the air for a long time and rises again from any movement. To reduce the amount of flying dust, wet rags, wet sawdust, etc. can be placed on the floor. Doors leading out of the room are covered with a wet cloth; it should be larger than the size of the door - so that dust does not fly into other rooms.
To begin with, you can go over it with a sharp, even spatula and cut off all the most protruding irregularities. Next is the sanding process. Since corners and seams at this stage do not need to be sanded to perfect smoothness, take a sanding mesh with a mesh size of 180-200 and a wooden block. A mesh is attached to the block (you can use staples from a construction stapler, but the staples should not stick out). This device levels the surface. When working, it is advisable to highlight it with oblique light - this way all the irregularities are more visible. But you can’t putty plasterboard under wallpaper so carefully.
There are special holders for the mesh, but you can get by with a block
One thing - it’s better to grind in a respirator and safety glasses. Gloves will be a good idea. The dust is very fine and penetrates literally everywhere. After the seams and corners are sanded, the surface is primed again. Moreover, all of it, since dust has also settled on the untreated areas, and it worsens adhesion.
The most inconvenient places for puttying and sanding are the inner corners. For the secrets of fast, high-quality grinding of corners, watch the following video.
Choosing the right putty
Since gypsum has a porous structure and is susceptible to various external factors, the putty of walls and ceilings must be suitable for the needs of the material. Ideal putty options are gypsum, acrylic or waterproof if finishing walls and ceilings in the bathroom or kitchen.
Reinforced mesh for processing joints
Inexperienced repairmen often wonder about the advisability of starting putty on plasterboard walls. It would seem that the plasterboard wall is already almost flat. Therefore, we note separately: poor-quality treatment of walls and ceilings for painting can reveal all the defects of the base. That is why a well-painted surface should be simply perfect and without the slightest flaws.
The mixed putty is applied in a thin and even layer to the surface. The layer should not be thick, since the surface of the gypsum board is already smooth. The consumption of gypsum putty for each square meter of surface does not exceed one kilogram with a layer of one millimeter.
The first step is to seal the places where the screws are screwed. After this, the surface for painting is puttied, starting from the joints of the drywall sheets. This is due to the fact that in such places there are irregularities, from which the rest of the surface will need to be leveled.
Use a large spatula in conjunction with a narrow spatula to apply the mixture.
It is advisable to putty the surface of drywall in one layer. After completing the putty, the base is dried. Next, the surface is treated with medium-grit sandpaper. After wiping the surface and cleaning it from dust, the base is primed again before finishing.
Required Tools
Set of tools.
For work you can use the following tools:
- A set of spatulas for working with putty.
- Set of brushes. A brush is required for painting walls around the perimeter, corners, and borders of protrusions. It is rational to use a flat brush no more than 10 cm wide and a thin flute brush.
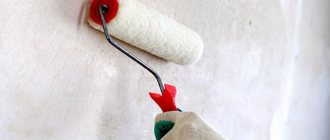
- Rollers. Painters recommend a roller with a medium length of pile (it has better contact with the paint). Long pile, saturated with paint, becomes heavy and inconvenient to work with. Short pile can cause the formation of unpainted areas.
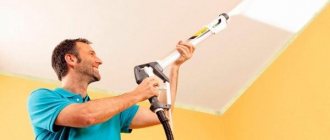
- Spray gun. The painting process is highly efficient; the paint is evenly distributed on the surface. Not suitable for small objects: a lot of paint settles on adjacent surfaces. Personal protective equipment (respirator, safety glasses) is required. High cost of the spray gun.
- Drill. Special attachments will make it easier to mix putty mixtures and stir paint.
- Sanding float, sandpaper.
- Ladder.
- Buckets, baths.
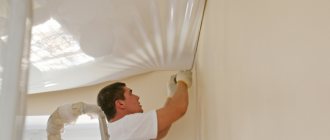
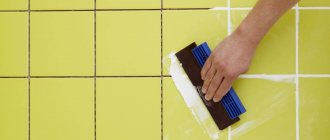
Smooth and even wall using finishing putty
The final stage is finishing putty on the walls. It is applied in a thin and uniform layer. Apply the material using two spatulas - large and small. Use a small spatula to scoop up the putty from the container and apply it to a wide construction spatula. And after that, with smooth movements, the mixture is applied to the base.
A short video review from the master:
After puttying, the surface is finally sanded. Do this with fine-grained sandpaper until the base becomes completely even and smooth. After this, the wall will acquire the required evenness, smoothness and snow-white color. After painting you will receive a smooth and durable coating without flaws.
Puttying walls for painting is a painstaking job, but it allows you to make them perfectly smooth for further finishing. A good starting and finishing putty for painting is the key to a successfully completed task. However, do not forget to choose the right putty for specific rooms, for example, to level a plasterboard wall in a bathroom or buy a special, water-repellent one in the kitchen.