Is it possible to glue drywall to polyurethane foam?
Plasterboard is laid on a wall in several ways.
The most reliable is to assemble a frame from wood or galvanized profile. The frame gives strength and, if done correctly, guarantees durability. Also, between the guides, in the space between the plasterboard sheet and the wall, an additional layer of insulation is laid, most often it is mineral wool. Communications are also hidden there - electrical wiring, switches and other parts that will spoil the appearance from the outside. Using a frame connection, you can level out any curvature of the wall surface by reducing the area, but this method is not suitable for apartments with a small area, because every centimeter is precious there. Then they use another technology - attaching drywall to the wall with glue, but for this the wall must be smooth, without sharp changes and have a curvature of no more than 3 cm.
The rarest method is to install drywall to the wall using foam. It has a number of advantages:
Foam will provide additional thermal insulation and reduce the penetration of sounds from outside, which is important when working with walls that open onto a neighboring apartment. Connection occurs with almost any material from which the wall is made - concrete, brick, wood, SIP panels. High fastening strength. When applied correctly to the surface, the sheet cannot be torn off by hand. The only drawback is that in order to properly attach drywall to the foam to the wall, you need to press it for quite a long time at intervals of 15 minutes for one hour
Therefore, this method requires a lot of effort, sometimes even more than one person, because for uniform gluing you will have to call someone for help
The only drawback is that in order to properly attach drywall to the foam to the wall, you need to press it for quite a long time at intervals of 15 minutes for one hour. Therefore, this method requires a lot of effort, sometimes even more than one person, because for uniform gluing you will have to call someone for help.
When to use glue and when to use foam? Polyurethane foam takes a lot of effort, but gives great strength. Most often, this issue is decided based on the degree of curvature of the wall - if it is less than 30 mm, then you can use glue, or rather, an adhesive composition specifically designed for this. It can be purchased at any hardware store. If the curvature is more than 30 millimeters, and it is not possible to erect a frame, you can glue drywall to polyurethane foam.
Method No. 1
For this method you will need:
- screws;
- self-tapping screws;
- plastic plugs;
- foam;
- polyurethane foam;
- a little glue;
- drill or hammer drill .
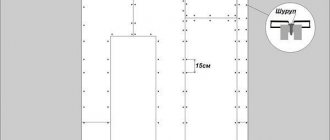
Attach the sheet to the wall . Drill it at 7 – 9 points evenly. Remove the sheet, then drill more holes at the marks for the plugs. Insert the plugs .
Glue pieces of foam rubber onto the sheet from the inside of the drywall at a distance of 10 cm from the holes. Foam rubber will play the role of a spring , which will adjust the level. Place the finished sheet against the wall and secure it with screws. first put washers on the screws , so the foam will not push the head into the sheet.
Make holes 2-3 cm from the screws. them with polyurethane foam . Please note that the foam will expand. The contact patch between the foam and the wall should be up to 10-15 cm. Therefore, examine in advance how much foam flows out when you press the button. Then you will not be able to see this, because all processes will take place behind the sheet outside of your field of vision. Foam must be pumped into each of the holes.
What to glue drywall to
The process of installing gypsum plasterboard using glue can be carried out on smooth reinforced concrete walls or on partitions, the basis of which is tongue-and-groove blocks.
You can find out which tile adhesive is best to use during construction in this article.
Manufacturers and prices
The leading position in this case is occupied by the following brands:
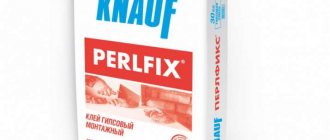
- Perflix is a universal composition based on gypsum binder. You can purchase this Perlfix 30 kg composition for 330 rubles per bag.
- Silicone is an adhesive for installing plasterboard sheets, the use of which ensures rapid adhesion of the material to the base. This glue will cost you 450 rubles.
Adhesive for aerated concrete consumption per m3 and other characteristics of the material can be found in this article.
- Ceresit SM 11 is a mixture for plasterboard sheets. It is also recommended to use such an adhesive composition provided that the material is installed in a room with high humidity. You can buy glue for 560 rubles.
You can find out how long it takes tile adhesive to dry from this article.
- Knauf - assembly adhesive for drywall sheets. It has minimal consumption and quick coupling. The cost of the composition is 670 rubles.
Tile adhesive consumption per 1 m2 is calculated according to the scheme described in this article.
Consumption
As a rule, the consumption of a particular brand of glue is indicated on its packaging. This value is also influenced by the evenness of the wall:
- When installed on a flat surface, the consumption of the mixture per 1 m2 will be 0.5 kg of the mixture.
- When installed on a surface with defects, the consumption will be 3-5 kg.
- If installation is carried out on a surface with unevenness up to 20mm, then 4-6 kg of glue will be needed.
- When installing single partitions from slabs, 1.5-2 kg of adhesive mixture will be needed per 1 m2.
Which adhesive for ceramic tiles is best to choose and how to use it correctly can be found in this article.
Sealing seams
If you decide to install drywall using glue, then you should determine in advance the required amount of material, as well as the appropriate type, taking into account the main characteristics. To seal the seams between sheets of drywall, you must use a special putty. It has a special edge to obtain an even putty seam. If the installation of gypsum plasterboard is carried out in a room with high humidity, then it is worth using a special putty to seal the joints. Speaking specifically about the manufacturer, I most often use Fuhrenfüller putty to seal the seams between sheets of gypsum plasterboard.
This article describes the best adhesive that can be used for ceiling tiles.
The video explains which adhesive to choose for drywall:
Homemade from plaster
How to do it yourself? To prepare homemade glue, you need to take gypsum-based putty and add water to it. In this case, you can use both starting and finishing putty. The solution must be mixed using a special construction mixer. The resulting mixture should be of suitable thickness, since the solution should not be too liquid. After all, it will be simply impossible to carry out work on installing plasterboard sheets with such a hive.
You can see which glue to choose for use in the bathroom here by reading the article.
Now you can add PVA glue to the resulting mixture and mix again using a mixer. If you use 12-15 kg of putty, then you will need 1 kg of glue. It only takes a few minutes for the glue to sit, and then it can be spread over the surface of the wall.
What winter adhesive for gas silicate tiles can be used and applied, and most importantly, how to do it correctly, you can read here from the article.
It is applied pointwise, with slaps. When installing drywall on slopes, the number of points should be approximately 3-4. Be sure to apply the prepared composition to drywall. The advantage of homemade glue is that you can save on repairs, because such a composition will be much cheaper. But there is a drawback here. Ready-made formulations are designed for specific operating conditions. For example, if you use homemade glue to install drywall in the bathroom, you will not be able to get a good adhesion. Over time, the sheets will begin to fall off, and you will have to do the repair again.
You can use Prospector tile adhesive weighing 25 kg in the following cases described in this article.
The video shows the consumption of Perlfix plasterboard adhesive:
Sticker attachment methods
Method No. 2
This technology is great for relatively flat walls . If you have not yet decided how to glue drywall to a concrete wall, it is recommended to use glue in this situation. Please note that the layer of glue will not be thick, which means that the wiring simply will not fit under the drywall. First you need to groove the wall to make recesses for the wires. To do this, use the following algorithm.
- Make markings for the electrical wiring line .
- Punch the wall with a hammer drill.
- Lay out the wires . They need to be secured with clamps every half meter.
- Using a diamond bit on concrete, make sockets for the socket boxes . They are needed so as not to make additional holes in the drywall to route the wire.
- Prime the surface . If you are dealing with untreated concrete, use a regular primer. For a painted surface, use a special primer. Otherwise, you can remove the paint and treat it with a regular primer.
- Wait for the primer to dry.
- Read the instructions on the glue package and mix the adhesive solution . Please note that some brands set quickly. Study this question on the packaging before you start making the solution. Otherwise, by the time you glue the first sheet, all the glue will dry out.
- Make markings on a sheet of drywall for outlets and switches.
- Drill out these exits. Use a regular wood crown. The holes in the sheet must line up exactly with the holes in the concrete.
- Apply glue in strips to the sheet. To do this, use a notched trowel. Process the entire surface completely so that you can accurately align the sheet on the wall.
- Place drywall on pads facing the floor. They can also be cut from drywall.
- Push the sheet against the wall, but do not press it. Route the wires through the holes.
- Lift the material and press it against the wall. You need to apply maximum pressure in the most protruding places.
- Check verticality using a level.
Method No. 3
This technique is not much different from method number 2. However, it is suitable if you are gluing drywall to a brick or concrete wall that is very curved .
During installation, you need to take into account the fact that the already pressed layer of glue should be from 0.5 to 3 cm . When applying glue, make sure there is a sufficient amount of viscous material.
In the middle of the sheet, the glue should be laid out in two rows around the entire perimeter in piles , at a distance of up to half a meter between the rows, and between the piles - up to 0.3 meters. Then you should place the sheets on the linings and perform the alignment according to the rule.
After you have applied and leveled the glue, the sheet needs to be pressed against the wall and checked for verticality . This is done using a level, then using a rule. To level it, tap it, and if the rule matches the level, then you need to do the following:
The nuances of working with drywall on polyurethane foam
How to glue drywall?
Drywall can be glued with foam in two ways:
- First, the sheets are attached to the wall, then foam is poured.
- The foam is applied to a sheet of drywall and then pressed against the wall surface.
An important point is the weight of the plasterboard sheet.
The second point is the quality of the polyurethane foam.
The room temperature should be at least 5 degrees Celsius.
When choosing the second method, the foam should be applied in a zigzag, then wait a while and only then attach the sheet to the wall.
After the foam has dried, the seams are sealed with putty.
For an even bond between drywall and foam, the sheet should be pressed against the wall at the following time interval: press for 15 minutes, rest for 15 minutes. Then the work will be of high quality and without defects.
Surface preparation
Before installing a sheet of drywall on polyurethane foam, you should learn the features of this type of fastening. Drywall can be attached both to flat walls using foam and to walls with a large curvature. If such curvature is present, guides should be used.
Before installing plasterboard sheets, you need to properly treat the wall surface.
Step by step preparation:
- It is necessary to remove wallpaper, old paint that is hanging off like scales.
- If there is loose plaster, it should also be removed and the hole filled with putty.
- The prepared wall should be coated with a primer.
- After drying, one sheet should be applied to the wall and 9 holes should be made.
- Drill holes for fastenings along the resulting grids.
After this, you should prepare the necessary materials and tools.
Materials, tools
To work with drywall you will need the following tools and materials:
- Screws, self-tapping screws.
- Level, ruler.
- Plastic plugs.
- Ordinary foam rubber.
- Construction foam.
- Glue.
- Drill.
In addition, you will need reinforcing tape, putty, spatulas, and primer.
Fastening drywall to foam
During the preparatory work, 9 holes were made in the wall. Plastic plugs should be inserted into them. Now:
- Glue pieces of foam rubber onto a sheet of drywall with glue; it should be 10 cm from the holes; the foam rubber will regulate the level.
- A sheet of drywall with foam rubber should be attached to the wall with screws. Place washers on the screws. The cap will not sink into the drywall due to the pressure of the foam.
- Taking 3 cm from the fasteners, you should make small holes with a diameter of 2 mm.
- Foam is released into these holes. Do not pour in a lot of foam. It increases 2-3 times. By pressing the lever a little, the foam will fall inside.
- For greater confidence in the correctness of your work and quality control, you need to do the entire procedure on 1 sheet of drywall. Leave this sheet for 24 hours. Afterwards, check the quality of the work performed on the glued sheet. If the sheet is not swollen from foam, holds tightly to the wall and does not “walk”, you can continue installing drywall along the entire wall. If there is the slightest deviation, you should remove the sheet from the wall and find out the reason. There may be several of them:
- leaf swelling - a lot of foam was pumped in;
- movement - fasteners are not clearly fixed in the wall; the quality of the foam is unsatisfactory;
- the sheet has fallen off - you should not continue working with this method.
- After the foam has dried, carefully remove the remains with a construction knife.
- The penultimate step is finishing.
There is another way to install drywall to the wall using foam.
This method is used if the wall does not have large deviations from the plane. There is no need to drill here. No fasteners are needed either.
- The wall is prepared for installation of drywall and primed.
- Foam is squeezed out onto a sheet of drywall using a snake. This is done either in stripes or along the perimeter and in the center.
- You should wait 15 minutes.
- When the foam begins to expand (sometimes ten minutes is enough for this), the sheet should be applied to the wall.
- It should be remembered that about 5 mm of free space should be left from the floor and ceiling. To do this, pieces of gypsum board are placed.
- After pressing the sheet against the wall, you need to set it in a strictly vertical position. Vertical and horizontal lines must be level. You also need to check that the sheet is installed correctly diagonally.
- After placing the sheet, it is fixed with wide wooden boards, a wooden device with soft edges (so as not to damage the surface of the gypsum board).
- For an hour, you should press the sheet with your hands for 15 minutes and rest for 15 minutes.
- After which the glued gypsum board is left for a day.
- After the foam has hardened, the residues are removed (they may be around the edges), the joints are reinforced, and the entire surface is puttied.
Adviсe
Large diameter washers must be placed under the screw heads, since the foam, when expanding, creates a lot of pressure, and the screw heads will break through the surface of the sheets. After hardening, the screws need to be unscrewed, the washers removed and screwed in again, this time completely, slightly recessing the heads into the paper layer.
The length of the screws should take into account the size of the gap from the wall. Ideally, the length should be such that the screw is screwed in to the end of the plastic plug.
If the wall material allows (wood, sandstone, gypsum block), self-tapping screws can be screwed without plugs, directly into the ceiling. Only in the last two cases, the length of the fasteners must be taken longer so that the outer layer of the ceiling material does not crumble.
To facilitate the alignment process around the perimeter and in the center of the plasterboard, you can glue small pieces of foam rubber with any glue. The foam rubber will push the sheet away from the wall when the fasteners are unscrewed and will compress freely when tightened.
The amount of glue near the edges should be such that it does not come to the surface, as this will create problems when filling the joints.
It is better to purchase foam that is designed for gluing polystyrene foam. It does not expand as much and has better adhesive properties.
Before installing drywall, it is necessary to clean the surface of the wall from dirt and dust, and then moisten it and the surface of the drywall.
The surfaces to be bonded must be thoroughly cleaned of dust and primed. The glue works better in high humidity, so the surfaces must be moistened with a spray bottle before gluing.
The choice of glue depending on the flatness of the wall
There are three options for surfaces to which plasterboard sheets will be attached:
- flat surface (stone or monolithic plastered walls) with a height difference of no more than 5 mm;
- Brick wall;
- surface with significant unevenness.
Plasterboard can be glued onto a flat wall using almost any adhesive. This can be cement- or gypsum-based adhesive, polyurethane foam, or polymer mastic. The simplest and most affordable method is mounting on polyurethane foam.
For gluing sheets to a completely flat surface, adhesive mastic is suitable. Manufacturers package it in plastic tubes, from which glue is squeezed out using a special gun.
An adhesive composition based on cement or gypsum will need to be diluted with water before use according to the description on the package.
If the installation of drywall is carried out on a brick wall, then any glue can be used if the masonry is even. For uneven brick surfaces, Perflix is ideal, which is applied to the sheets pointwise along the entire perimeter. The thickness of the glue layer should vary from 5 to 30 mm, the distance between the “dots” should be approximately 30-50 cm.
In order to glue gypsum plasterboard onto an uneven wall, the Knauf-Perlfix adhesive composition is suitable, and the curvature should be no more than 2 cm. If the slope is greater, it is necessary to cut the sheets into strips 10 cm wide and glue them to the wall at intervals of 35 cm at using Fugen putty.
Advantages and disadvantages
Each renovation option has both advantages and disadvantages. Some prefer to attach drywall using a special frame, while others advocate the use of special adhesive mixtures and solutions. What are the advantages of polyurethane foam if it is used when installing gypsum boards?
- With its help, you can significantly save money on profiles, screws and related materials.
- Installation time is saved, because all work is completed faster.
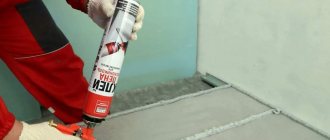
One of the options for applying mounting foam to gypsum boards.
However, do not rush to attach drywall to foam, rejoicing at the opportunity to save money. This method also has its disadvantages:
- such fastening is considered short-lived and fragile, because the foam can dry out over the years and the sheet can fall off. To avoid this, you need to properly prepare the surface, use high-quality materials and attach the gypsum board to the wall and not to the ceiling;
- there is no way to level the wall. It is necessary to glue the gypsum board onto a flat wall, because it cannot be leveled using polyurethane foam. And sometimes the sheet itself is difficult to place evenly against the wall, because the foam under pressure spreads to the sides and the sheet is pressed through.
It is also worth noting that there is a special foam for polystyrene foam, which does not expand very intensively. It is best to use it, as the sheet will lie more evenly. It’s worth thinking about whether foam for drywall on the wall may not be the best option and you should use special adhesive solutions that are more flexible in work.
Those who doubt the reliability of polyurethane foam can watch this video.
Surface preparation before installing drywall on foam
Having decided to mount drywall on a wall or ceiling using foam, you need to familiarize yourself with the features of this type of fastening. This is a convenient way to install sheets, since the wall surface may have deviations of different levels. In case of very large deviations, special guides are used for gluing sheets.
Fixing drywall must be very reliable, since the properties of the foam affect its ability to push the material away from the wall. Of course, it is better to perform preliminary surface preparation. Walls, ceilings and sheets must be primed.
Preparation stages:
- Remove old finishes from the wall.
- Cover the wall with primer.
- Attach a sheet of drywall to the wall and drill at 9 points.
- Drill holes for fastenings according to the marks.
After completing the preparatory work, you can begin attaching the gypsum board sheets. When installing it yourself, experts recommend first installing one sheet and letting it dry. If the next day you are satisfied with the result, then you can continue working.
How to correctly calculate material consumption
To determine the amount of polyurethane foam for the entire area of wall or ceiling cladding, the following indicators are required:
- seam length;
- depth of the gap between the wall and the gypsum board;
- seam width.
See also
How to properly stick a protective film on your phone without bubbles at home
The expected trajectory of the seam is measured on the sheet. Determine at what distance from the wall the plasterboard slabs will be installed. The seam width is optional. By multiplying the three indicators, you get the consumption per sheet. By dividing the result by the area of the sheet, you will find out approximately how much is needed per 1 m2 of cladding.
The number of cylinders is adjusted by a factor of 0.7-0.6, since the foam does not completely come out of the container.
Additional tips and tricks
The optimal temperature of the working mass inside the cylinder is 23 °C. To achieve this, it is recommended to keep it at 22-25 °C for about 12 hours before starting work. Use the product as follows:
- shake the bottle 20 times;
- remove the protective cover;
- attach the gun.
During these operations, keep the cylinder upside down. When doing the main work (applying glue), hold it with the bottom up. The speed of foam release can be adjusted using standard methods using a screw on the gun and a trigger. Shake the can regularly during use.
To prevent the foam from hardening, adhere to the following rules for operating the gun:
- do not remove it while there is foam in the container;
- when the glue runs out, quickly disconnect the empty container, replacing it with a new one;
- After completing the work, clean the device with a special liquid (Premium Cleaner);
- Remove the hardened mass mechanically.
It is recommended to store cylinders with glue for no more than 15 months, maintaining a storage temperature of 5-25 °C. At the same time, place them strictly vertically, the valve should look up. When transporting, wrap the product in cloth. Transport in the trunk. Observe safety precautions when working. Do not smoke or light a fire near. It is necessary to ensure a flow of fresh air in the room. Protect the skin of your hands with gloves and your eyes with goggles. Do not inhale vapors.
Share link:
Is it possible to glue on uneven walls?
One simple way to level a “falling” wall is to cover it with plasterboard on a pre-made frame.
If the difference in wall unevenness is small, the method of gluing sheets is used. To use this technology, you need to familiarize yourself with the nuances and rules.
- The type of plaster and adhesive composition must be selected in accordance with the humidity and temperature conditions in the room.
- The frameless method is applicable if the wall has an unevenness of maximum 5 cm.
- When carrying out installation, you must follow the step-by-step instructions in compliance with all the rules.
- To select glue, you need to pay attention to the material of the rough wall.
If you follow all the rules, installing gypsum boards with glue will be easy and will last a long time.
What can drywall be glued to - the basis of walls and ceilings
When choosing a mounting adhesive, you need to take into account not only its suitability for working on drywall. A suitable product should not “conflict” with the base material that is supposed to be leveled. As for gypsum plasterboard, choosing an adhesive is not difficult: porous kraft paper or construction cardboard (the top layer of drywall) adheres well to most thick, astringent compounds
Restrictions usually relate to the wall base; attention must be paid to this issue
Brick, aerated concrete, shell rock
Gypsum plaster has proven itself well for gluing gypsum boards. It is ideal for sealing uneven surfaces with wide joints. Most gypsum-based building mixtures are inexpensive - cost per 1 sq. m of area will be about 50 rubles. The most popular remain Perlfix from Knauf and Volma.
Polyurethane foam is also suitable for brickwork, gas blocks, and foam block bases. Work with it happens quickly, efficiently, and the result in the reliability of fastening the material is excellent. The foam is applied to the sheet in a “snake” pattern, wait a couple of minutes, and apply the gypsum board to the wall. Further expansion of the foam may become a problem, so it is better to additionally use dowel-nail fastening. Instead of foam, you should use special polyurethane glue in cylinders, but its price is much higher.
Concrete
The easiest way is to glue drywall to a concrete wall or ceiling using regular cement tile adhesive. If the wall is monolithic, then its unevenness is insignificant, and the finishing process occurs quickly. Panel partitions may be more curved; in some cases it is better to use the frame method of installing drywall.
In addition to cement mortars, the following are suitable for gluing gypsum boards:
- gypsum mortar or putty;
- polyurethane foam and polyurethane glue;
- acrylic putty.
All these means will ensure excellent adhesion with a small joint thickness, but it is more economically profitable to use cement mixtures with fine grains.
Expanded polystyrene
Often the basis for the installation of gypsum boards is insulation materials - penoplex, polystyrene foam, expanded polystyrene. They protect the room from freezing, but cannot be finished and must be covered with plasterboard. If we take into account that insulation materials already conceal sufficient space in the room, then the use of a metal frame will only aggravate the problem. To glue the sheets, you need to use acrylic putties or special adhesive foams for gypsum boards.
Drywall, GVL
The second layer of plasterboard can be glued to gypsum fiber or drywall using almost any means. The master does not need to smooth out blemishes or wall defects; the base is perfectly flat. Therefore, it is better to choose solutions and adhesives that provide a minimum thickness of the seam - silicone-based sealants, acrylic putties, liquid nails. Foam, gypsum, and cement should not be used, as they will add unnecessary thickness to the joint.
Tile
It happens that sheets of plasterboard are glued directly to the tiles during kitchen or bathroom renovations. If the room is damp, you should use silicone sealants. In case of moderate or inconsistently high humidity, you can get by with moisture-resistant tile adhesive. Such products do not deteriorate due to changes in the microclimate in the room, serve for a long time, and have a high degree of adhesion.
When purchasing tile adhesive or sealant, you need to make sure that it contains an antiseptic and a fungicide - such components will help fight the appearance of mold and mildew. Sealant can also be used to fill cracked tile seams for more reliable fixation of the structure.
Baguette
Acrylic putty is used to glue ceiling plinths to plasterboard walls. It has a thick texture, and the baguette will not move down the wall until the composition finally sets. Also, white putty can be used to beautifully fill the gap between the wall and the finishing material and hide unevenness. Instead of acrylic putty, synthetic adhesives such as Titan, Momenta, and Liquid Nails are also often used.
Tree
Polyurethane adhesive is usually used for cladding wooden walls. There should be a note on the packaging about the possibility of woodworking. Instead, you can buy products based on epoxy resin, but they are difficult to use and quite expensive. Before covering the walls with plasterboard, be sure to treat them with an antiseptic agent, which will protect the material from infection by fungus. Moreover, it is recommended to supplement the gypsum board fastening with dowel nails.
Main varieties: pros and cons
Adhesive compositions can be based on gypsum or polymers. Gypsum adhesives provide the best connection to panels, as they are a material close to gypsum plasterboard. Their disadvantage is that they set quickly, which makes it necessary to prepare the glue in small portions.
Polymer adhesives form a more durable connection with the surface of walls and ceilings. A long period of setting time makes it possible to correct cladding defects.
Assembly adhesive
Construction adhesive is prepared from a dry mixture based on gypsum with binders and adhesive additives immediately before the start of facing work. The amount of adhesive should correspond to a work cycle of approximately 30 minutes. Assembly adhesives are used for interior work, for gluing plasterboard sheets and insulating boards. The base is brick, concrete, foam concrete, plastered surfaces with minor defects (potholes, deviations from level up to 2 centimeters).
The gypsum-adhesive mixture is packaged in paper bags of 30 kilograms. Water with a temperature from +5 to +30 degrees is used as a seal. The room temperature should be no lower than +5 degrees. The shelf life of a whole package is 6 months, damaged - depending on humidity (from 24 hours to 7 days).
To ensure better adhesion of the mounting mixture, low-hygroscopic surfaces are pre-primed with the product specified in the instructions. Work related to changes in the level of humidity in the room (installation of self-leveling floors, leveling screeds) is carried out before installing drywall with mounting adhesive. Water and dry mixture cannot be added to the prepared solution. The position of the plasterboard on the wall can be adjusted within 10 minutes after gluing.
See also
Technical characteristics and instructions for use of Dragon glue
Gypsum based mastic
There are two types of gypsum mastic: based on wood glue or chalk. The composition is prepared immediately before gluing, in small portions. Glue-based mastic has good ductility and strength. Preparation of the adhesive composition consists of 2 stages. At the first, wood glue is boiled: 20 grams of animal wood glue are soaked in 1 liter of water; after swelling, cook until completely dissolved and cool. Gypsum (1 kilogram) is added to a 2% adhesive solution and mixed well.
The composition of gypsum-chalk mastic includes gypsum, chalk and dextrin, water. The percentage ratio between the components is 70:28:2:100 (respectively). Dextrin is dissolved in 1 liter of warm water. Gypsum and chalk are mixed and poured into the dextrin solution.
Chalk mastic is more plastic than adhesive mastic and has a long setting period. The advantages of adhesive mastic are better adhesive properties.
Specialized
The design of the premises uses high-tech materials, the combination of which allows you to create projects of any complexity. The purpose of specialized adhesives is to create very strong, reliable and safe connections between materials of different classes. Types of specialized adhesives:
- Polyurethane on a one-component basis. The structural composition has high adhesion and setting speed. Feature – increase in volume when drying. The polymer product is colorless and odorless. The volume of the can for household needs is 20 milliliters.
- Fireproof silicate. Used for installation and repair work of air ducts of stoves and fireplaces, as well as their cladding.
- Methacrylic. Purpose: obtaining strong connections with metal, glass, ceramics, plasterboard when creating design compositions.
The dosage of specialized adhesives in retail does not exceed 1000 milliliters.
Liquid Nails
Polymer acrylic emulsion does not contain solvents and is used for exterior and interior use. The glue provides a moisture- and heat-resistant connection between artificial products (including drywall) and smooth and porous surfaces made of stone (natural and artificial), concrete, wood, and metal.
The surface for facing with plasterboard using liquid nails must be flat, dry, and free of dust (metal and stone treated with a degreaser). Apply glue to drywall in dots or in short strips using a gun or syringe. The curing period is 24 hours. Temperature conditions for performing work are from +10 to +35 degrees. Shelf life – 1 year. Release form: 0.28 liter container.
See also
Rules for choosing adhesives for chipboards, the best brands and tips for use
Polyurethane foam
The composition of polyurethane foam includes polymers, catalysts, blowing agents and stabilizers. Depending on the relationship between the components, polyurethane foam can be:
- summer;
- winter;
- all-season.
Adhesive foam in the form of an aerosol is pumped together with a propellant (gas-forming agent) into a metal container. The mixture squeezed out of the container, when interacting with water vapor in the air, begins to expand and then polymerize (harden). Polyurethane foam is used as a sealant, sound and heat insulator, as well as a fixative for structures made of metal, PVC, wood, and drywall.
Preparing a plasterboard wall: what is needed?
To fix the gypsum board to the wall, you need materials and tools:
- The selected type of drywall is moisture-resistant, ordinary.
- Dowel-nails, self-tapping screws.
- Selected adhesive for fixing sheets.
- Hammer, construction mixer.
- A plumb line, usually a sharp knife, a level.
- Container for preparing glue, spatula.
- Primer, roller, brush.
After collecting the necessary tools, as well as purchasing all the materials, you need to prepare the rough surface.
- Clean the wall of old cladding, wallpaper, paint.
- Existing cracks must be reinforced and puttied. Seal all holes with cement or gypsum based mortar.
- The surface is coated with a primer.
When the primer dries, gypsum boards are prepared. Holes for switch sockets are cut out in them.
For high-quality wall finishing, you need to properly prepare the adhesive mixture:
- The specified amount of water is poured into a clean container.
- Add a little dry mixture to the water and mix.
- After this, add the specified amount of dry mixture and slowly mix with a mixer.
- After obtaining a homogeneous mass, pour a small amount of PVA into the glue and mix again.
After kneading, the solution must stand for at least 5 minutes to completely dissolve the additives and obtain elasticity.