How to attach the plaster mesh
To understand how to properly attach the mesh to the wall, it is worth considering the two most popular types of mesh - fiberglass and metal. It is much easier to secure the first named type of product, since for this you only need to screw in several screws at an equal distance from each other. Such fastenings are sufficient to securely hold the mesh.
To keep the mesh more securely, you should roll it out across its entire width in one piece, without dividing the product into several. Vertical beacons are installed at a distance of about two meters from each other during installation. After the mesh is hung on the screws, the plaster applied seals it to the wall, so additional fastening elements are not needed.
The installation process for metal mesh is slightly different. This is due to the fact that under its own weight such a product is not able to be securely held on the mounts. Also, the cells of metal mesh are large and require additional fastening with mounting tape.
To secure it, you only need to cut off part of the mounting tape so that it can completely cover one cell. After cutting the mounting tape, it is fixed to the wall with self-tapping screws. You need to calculate the distance between the fasteners in such a way that the mesh does not sag on any section of the wall.
Types of grids
There are several types of products used for reinforcement, the main ones being the following materials:
- fiberglass;
- metal.
Types of reinforcing mesh: a - metal;
b - fiberglass When applying a thin layer of solution on a flat surface, fiberglass cloth is usually used. For finishing curved walls, when the thickness of the plaster is more than 2 centimeters, only a metal product is suitable.
In turn, metal mesh also comes in several types:
- woven - durable and flexible material, which is made from wire of small cross-section. This product is used for both external and internal work. When choosing a woven fabric for reinforcement, it should be taken into account that the optimal cell size in this case is 1x1 cm;
- wicker - also known as chain-link mesh. Best suited for finishing large surfaces. The most common cell size is 2x2 cm;
- welded - made from wire using spot welding. The rods located perpendicular to each other form square cells, the optimal size of which for reinforcement is 2-3 cm. Welded products are most often used for finishing buildings subject to severe shrinkage;
- expanded metal – made from sheet metal by forming diamond-shaped cells on a special machine. Such material is usually installed in cases where a small solution consumption is expected per 1 m2.
Surface preparation
Before you start plastering the walls, you need to clean the surface of dirt and old finishing materials. After finishing work, there should not be any additional materials on the surface, as they can cause the plaster to peel off.
After cleaning the surface of the walls, it is necessary to apply a primer. Such compositions increase the strength of the wall and improve the quality of adhesion. They also prevent mold and corrosion. The primer helps the surface dry quickly and promotes better absorption of compounds that are applied after it.
Useful tips
Correct installation of the reinforcing element increases the strength of the finishing layer and makes it resistant to cracking and damage. Violation of the mesh fastening technology can lead to peeling of the material. Therefore, when working, you should follow the advice and recommendations of experienced craftsmen:
- Before reinforcement, the surface is thoroughly cleaned of dirt and dust. To do this, use a construction vacuum cleaner, a soft brush or a rag.
- All irregularities, cracks or other gross defects are eliminated in advance. The treated wall is pre-primed with a deep penetration solution. It creates a durable polymer film on the base.
- The reinforcing material is fixed only after the soil has completely dried.
- The plaster is applied using the spray method. After this, level it with a sponge or brush. This technology contributes to a more uniform distribution of the composition.
- To increase the reliability of fastening, pieces of fabric are overlapped. It is at least 5 centimeters.
The reinforcing mesh is overlapped, placing one strip over the other by 5 cm.
Methods for attaching reinforcing mesh are varied. The choice is determined depending on the type and thickness of the canvas, the composition of the solution and the type of base. The main task of the master is to secure the reinforcement so that it does not sag or sag. In this case, the leveling layer will be strong and reliable.
Applying plaster
After preparing the surface and fixing the reinforcing mesh to it, plaster is applied in several layers. To properly apply the composition to the surface, you should consider the features of creating different layers:
First layer. Plaster is usually applied in two or three layers, depending on the material of the walls. Concrete, for example, requires three coats. The first of them is called “spray”. The plaster at this stage has a creamy consistency and is thrown onto the wall surface in any order. The composition can be spread, but throwing it on allows you to speed up the process. After applying plaster to a certain area of the wall, you need to wash the tool. After casting, the composition is leveled with a two-handed spatula from bottom to top.
Second layer. After the first layer has completely dried, you need to knead the plaster, the consistency of which should resemble dough. Then you need to throw the composition on the wall and, taking a trowel, spread it in the horizontal and vertical directions. It is after applying the second layer that the reinforcing mesh is completely covered with plaster. If it still protrudes to the surface, you need to apply the plaster again.
Third layer. At this stage, you need to level the composition more carefully so that no errors remain on the surface of the walls. Before applying the finishing layer, you need to wet the surface of the plaster.
This mesh plastering technology is universal and can be used when working with walls made of various materials.
Methods for attaching beacon profiles
In construction practice, 2 main methods of attaching plaster beacons are used:
- For solution.
- For the threaded type of fastener - a special bracket (it is possible to use plastic “eared” fasteners).
For solution
The method allows you to securely attach profiles to any type of base: brick, wood, concrete. To complete the installation, you will need to apply the solution at several points marked on the wall and attach a beacon. Next, you need to accurately set the profile and check the verticality with a level. Then you should wait for the solution to dry at the attachment points. If the beacons have not moved, you can begin the process of plastering the wall.
The advantage of this method is its simplicity and the ability to correct errors.
Using a special plastic “eared” mount
The main task of this type of fastener is to securely hold the beacons. The configuration of the fastening material is represented by a kind of adjustment system. Fastening “eared” beacons is especially effective when plastering ceilings and slopes. Also, do not forget about this type of clamps when pouring floor screed.
- high installation speed;
- reliability and durability of fastening;
- You can start completely plastering the walls immediately after installing the intermediate beacons;
- If a mistake was made, the product can be dismantled and then used again.
The final stage of work
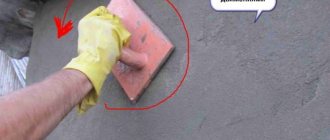
After the plaster has completely dried, it must be prepared for fixing finishing materials. To paint and wallpaper, just sand the surface with sandpaper. If there are noticeable unevenness on the wall, you need to start using the largest brand of paper. For ease of work, a piece of product is clamped on a grater. Grinding is done in a circular motion with little effort so as not to create new defects on the surface.
When the wall becomes uniform, you need to change the brand and continue grouting. If the surface will be painted, you need to take P120 paper. During the entire process, you should use goggles and a respirator to protect yourself from dust.
Since it is quite difficult to sand the surface in the corners, it is worth working either without a grater or using bars with sharp corners. If you want to make the work process easier and faster, you can purchase an electric grater. But to treat the walls of one apartment, it is not profitable to buy such a product. After sanding, you need to sweep away the dust with a brush.
Types of fasteners depending on wall material
For installation work, use fasteners that match the base material. So nails are only suitable for working on wooden surfaces, and sometimes on brickwork. To attach a metal mesh to a metal structure, spot welding is used. For concrete and brick surfaces, self-tapping screws and dowels are used.
It is better to purchase self-tapping screws, taking into account the fact that the plaster solution is a wet environment. The best hardware is those that are not afraid of exposure to water.
Attaching a plaster mesh is not as difficult a job as installing beacons or decorative plaster. But the reliability, strength and durability of the finish depend on its quality.
Applying plaster under wallpaper and painting
Before starting work, you should determine exactly how the room will look and what will be used as finishing materials. If you choose wallpaper, you need to determine its type and thickness in advance. If they are thin, you need to apply several layers of leveling plaster. This will allow you to hang the wallpaper without any unevenness or bubbles.
For the room in which wallpaper will be hung, it is better to purchase ready-made dry mixtures, since using them you can prepare higher-quality plaster.
If plastering the wall surface occurs before painting, you should carefully prepare the wall, without leaving even small irregularities on it. The whole process is carried out in several stages:
- first, a leveling layer is thinly applied;
- after the surface has dried, the finishing layer is applied;
- Before painting, the wall is sanded until a smooth surface is obtained.
then, if necessary, two more layers are applied to eliminate defects;
If the described technology for applying plaster is fully followed, the surface is obtained without any unevenness or defects. To do everything correctly, it is better to carefully watch the video, which shows how professionals work.
Mesh for plastering walls
With all the variety of building materials used in the construction of walls, the most popular type of finishing is still plaster. Even if it is subsequently planned to use other finishing materials, everyone tries to complete at least rough plaster.
- What are they? ↓
- Masonry ↓
- Universal mesh ↓
- Fiberglass mesh ↓
- Plurima ↓
- Armaflex ↓
- Steel mesh ↓
- Metal mesh ↓
- Galvanized ↓
- Which one to choose? ↓
- How to install? ↓
- Ceiling mesh reinforcement ↓
- The use of plaster mesh when sealing joints in floor slabs ↓
- Cost ↓
In the 90s, the concept of “European-quality renovation” entered our lives. At the same time, everyone puts their own meaning into it. Some people mean high-quality finishing materials and expensive repairs, others believe that these are, first of all, perfectly smooth surfaces made in accordance with European standards. To level the walls, use a plaster mesh.
However, the standards of European countries do not require the mandatory use of reinforcing mesh. It is recommended to use it only in difficult places.
The mesh helps reduce the appearance of cracks, but does not ensure the integrity of the finishing layer.
Advantages when using:
- Applying the solution to the mesh can be done quickly, which makes plastering work easy, even without experience.
- If the mesh is securely fastened to the base, then you can be confident in the durability and strength of the finishing layer.
- The plaster applied to the mesh will, in fact, be a monolithic structure that will not be subject to shedding and cracking.
- Grid plaster provides reliable adhesion to walls made of any materials.
Lesson 06. How to attach plaster mesh
We continue the theme of plastering walls. Today is the sixth lesson, and we have to learn what a plaster mesh is, why it is needed and why it needs to be attached to the wall even before the beacons.
The fact is that plaster is an excellent material for leveling our crooked wall. But in addition to obtaining a flat and smooth surface, it is necessary to make the wall strong and reliable. And this is exactly what the plaster mesh will help us with.
Types of plaster mesh
There is quite a variety of it in nature, but for home purposes, especially for those new to renovation, it is enough to have an idea of the 2 main types of plaster mesh:
- metal plaster mesh;
- fiberglass (plastic) plaster mesh
Below, in the picture you can see these 2 types of mesh:
Which one to choose for working on the wall?
You need to look at the wall carefully. If, even after the failure of large mounds, your wall is still very uneven and the differences reach more than 5 cm, then it is wiser to secure a metal mesh in such places (holes or depressions). If the wall is lumpy, but the convexities and concavities along the wall fluctuate within 2-3 cm, then it is enough to use a fiberglass mesh.
Now let's talk about fastening. The mesh must be attached over the entire area of the wall. Usually the mesh is sold in rolls. You unwind the roll and, just like wallpaper, which you glue from the ceiling to the floor with paper sheets, here you, on the contrary, attach the first strip horizontally from one edge of the wall to the other under the ceiling. Then lower, under the first piece, roll out the next one. For a room height of 3 meters you need to secure 3 such strips.
Fiberglass plaster mesh
Fastening fiberglass plaster mesh is much easier than metal mesh. And that's why. It is enough to hang the fiberglass mesh on a few screws, and it will simply hang down under its own weight. Naturally, the screws must be screwed into the wall up to the caps.
I specifically showed you the lighthouse here so that you would understand why you need to first attach the mesh and then the lighthouse. The wall will be much stronger if the mesh that forms the basis of the future plaster is a single monolithic piece. That is, it is better to first roll out the mesh in one piece on the wall, and then install the beacons, rather than install the beacons, and then cut the mesh in pieces from one beacon to another.
By reading my blog, you are probably making repairs.
this page to your bookmarks .
This is where all the useful home improvement stores are located. Why is it enough to hang the mesh under its own weight on self-tapping screws? Because when you dilute the plaster solution and throw it on the wall, the slaps of the plaster will seal the mesh directly to the concrete. Since the plaster sets quickly enough, the mesh will stick securely to the concrete. And due to the fact that the mesh is a single monolithic piece, the entire plane of the thrown plaster will gain sufficient strength.
Metal plaster mesh
Metal plaster mesh is another matter. It is more capricious, and it will not be possible to secure it under its own weight. Among other things, the mesh cells are quite large and larger than the screw head. To attach it, I would like to recommend that you use mounting tape, which is ideal for this. To make it easy to cut the tape, you will need special metal scissors.
We take scissors and cut slices of the mounting tape, and then attach the metal plaster mesh using such slices as shown in the figure:
Here you will have to work hard and cut a lot of such slices so that the entire metal plaster mesh fits tightly to the wall and does not sag!
Metal
| In these catalogs you can choose metal and fiberglass meshes | Fiberglass |
Important Notes
We got carried away with the plaster mesh before installing the beacons, but there are additional works that need to be done even before attaching the plaster mesh. Can't you guess?
Remember where lesson #4 ended? You and I knocked down the biggest bumps on the wall. But at the same time, our wall became very dirty. And if we stretch a plaster mesh over this dirty wall and start throwing plaster on it, it will immediately fall off, therefore:
- After all the bumps have been knocked off the wall, we take an old vacuum cleaner in our hands and vacuum the wall, or use a wet rag and wash our wall. The wall must be clean. After the dirt has been removed and the moisture has dried, we dilute the primer and prime the wall once, and after 2 hours a second time. If you have forgotten how to do this, take a look at the article: How to prime the walls in an apartment.
- When attaching any of the meshes, try to use the shortest screws possible. Why? Because, we remember that you cannot screw a self-tapping screw into a concrete wall, you will have to install a dowel, see the article What is a dowel. And any installation of a dowel is dust, which is described in detail in the article: Construction dust. So it turns out that we primed the wall and then started drilling! Of course these are microparticles, but they will again be all over the wall. Therefore, we take small, short self-tapping screws and “5” dowels - no more. And we slowly drill holes, install dowels and attach the plaster mesh. It is advisable to carefully sweep it downwards in the drilling areas, without spreading dust.
- Some people prime the wall through the plaster mesh after drilling. I don't really like this method. The fact is that when priming, it is necessary to ensure that there are no formation of soil puddles on the wall, but if there is a mesh, this cannot be guaranteed, especially for fine-grained fiberglass mesh. Therefore, this is a double-edged sword, and it’s up to you to decide how to prime it more conveniently. But it is necessary to prime it before plastering, and definitely twice.
So, today we learned how metal and fiberglass mesh is attached to the wall when performing plastering work. Ahead of us is a very long-awaited lesson on setting up the first plaster beacon.
Plaster reinforcement
This article will discuss the purpose, methods of application and types of plaster mesh that are used to reinforce the leveling mortar applied to wall surfaces.
In addition, the reader will be offered step-by-step instructions on how to attach a plaster mesh to the surface of walls made of various building materials.
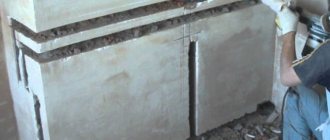
The photo shows a scheme for finishing a concrete wall.
Purpose of plaster mesh
The main purpose of the reinforcing mesh is to create a relief base on the wall surface for reliable fixation of the leveling layer of plaster mortar. In addition, the ribbed cellular structure promotes reliable binding of the solution particles to each other, thereby forming a single monolithic surface.
When doing plastering work with your own hands, the use of reinforcing mesh is recommended for the following reasons:
- Simple and quick application of the solution allows you to plaster walls without even having any skills in this type of work.
- Thanks to reliable fixation of the solution, high strength and durability of the coating is ensured.
- The monolithic design and elasticity of the plaster layer after drying allows you to avoid shedding, peeling and cracking of the surface as a result of the natural shrinkage of the building or exposure to atmospheric factors.
- The relief structure of the base ensures strong adhesion of the mortar to the surface of walls made of any building materials.
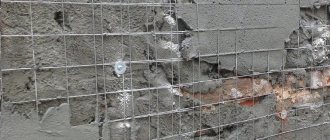
Applying plaster to a fiberglass reinforcing base.
Reinforcing base
Currently, there are many different types of reinforcing materials, each of which is intended for use under certain conditions. For plastering walls at home, the most suitable are two types of materials: metal and fiberglass reinforcing mesh for plaster with small cells. They are suitable for both outdoor and indoor use.
Deciding on the choice of the necessary material is quite simple. If the wall is fairly smooth and does not have deep cracks, dips and other damage, as well as significant deviations from the geometric dimensions, and to correct them the thickness of the leveling layer will not exceed 30 mm, it is necessary to use a fiberglass-based reinforcing mesh.
Metal plaster mesh should be used in cases where a rough wall made of brick is being finished, without grout or rough concrete, and also if its surface has pronounced construction defects and deviations from geometric dimensions. The thickness of the leveling solution in such cases can be 20-50 mm.
Expanded metal mesh with zinc coating.
Advice! When purchasing metal mesh, you should give preference to products with zinc coating. Its price can be significantly higher than the cost of conventional steel, but it is characterized by increased durability and can be used for both interior and exterior work.
Installation of metal mesh
To install a metal reinforcing base, it is necessary to use self-tapping screws, construction dowels and galvanized mounting tape.
- Before attaching the mesh under the plaster, it must be cut from the roll to the size of the wall and degreased by wiping it with a rag moistened with solvent or acetone.
- You should start from the ceiling, securing the upper edge of the panel along the entire length using self-tapping screws, placing cut pieces of mounting tape under the caps. For these purposes, you can use widened washers, but their cost is much higher than the cost of the mounting tape.
- In concrete and brick walls, you need to pre-drill holes and install plastic dowels.
- Thus, it is necessary to secure the panels on the entire surface of the wall, installing fasteners in a checkerboard pattern at a distance of 400-500 mm.
- At the joints, the panels should overlap each other with an overlap of 80-100 mm.
Fastening to brickwork using a self-tapping screw with a wide washer.
Advice! To speed up the work, instead of self-tapping screws, it is more convenient to use dowel-nails, which are installed with several blows of a hammer.
Fastening the fiberglass reinforcement base
As for how to attach the mesh for fiberglass plaster, it just needs to be attached to the wall with self-tapping screws in several places, first along the top edge, and then along the entire perimeter. As a rule, additional fixation is not required, since later, when applying the plaster, it will be securely fixed in the thickness of the leveling layer.
It should be noted that it is more convenient to unwind the rolls and fasten the panels along the wall parallel to the floor plane, and it is better to start installation from any upper corner of the room. At the joints it is also necessary to provide for a slight overlap of the panels.
You also need to know that the greatest strength of the leveling coating is achieved when using solid mesh panels the entire length of the room, so you need to try to cut it so as not to cut it into small individual pieces.
Plastering the surface using a fiberglass base.
Methods for attaching plaster mesh to the wall
Plaster has long been used as a technology for leveling walls. But in addition to its leveling abilities, the applied plaster layer must be durable and firmly attached to the wall. Previously, this was often done using hammered nails or shingles attached to the wall crosswise (diagonally). Today we have moved away from these methods. The plaster mesh replaced it.
In essence, the mesh product functions as a reinforcing frame for the applied layer of plaster. Attached to the wall, it holds the mass of leveling material and prevents it from cracking.
Types of plaster mesh
Today, manufacturers offer two main varieties:
- metal,
- fiberglass (plastic).
The question of which one to choose comes up often. To determine the need for use, you will need to examine the surface of the wall for differences and irregularities. If the difference is within 5 cm, then it is better to use a metal product. If within 2-3 cm, then fiberglass will do.
Fastening rules
The technology for attaching plaster mesh of different types is different. Therefore, it is necessary to consider each option separately.
Installation of fiberglass variety
Of the two options, this is the simplest, because the fiberglass mesh is simply attached to the wall with literally a few screws. It should hang under its own weight, thereby creating a smooth mesh surface. To increase strength, fastening is also done along the lower edge.
There is one point to consider here. If the plastering will be carried out along the beacons, then first lay the mesh and then install the beacons. You can do it the other way around, only in this case the material will have to be cut into pieces of a width equal to the installation step of the beacons. In terms of a reinforcing frame, a one-piece fabric without joints is better.
If the difference in plane is very small, then the plaster mesh is laid over the plaster, which is not applied to the wall in a very thick layer. This is done simply:
- First of all, a thin layer of plaster is applied to the plane of a small section of the wall, usually chosen in width equal to the width of the canvas. To do this, you need to use a half-meter metal trowel.
- Now you need to unwind the canvas and apply one edge to the upper corner of the room.
- It is very important to correctly straighten the mesh so that it fits tightly to the corners of the room both horizontally and vertically. Some craftsmen launch mesh reinforcing material on the surface of adjacent planes within 3 cm.
- Now you need to pick up the same trowel and straighten the canvas completely, sinking it into the applied plaster layer.
In principle, this is where the fastening process ends. After the applied plaster has dried, you can proceed to leveling operations using putty. Watch the video on how to properly glue the mesh for plastering.
Installation of the metal variety
For obvious reasons, namely: the large weight of the product, large cells and difficulties with aligning the mesh itself, it will not be possible to “plant” it with an adhesive composition. Therefore, this method is immediately rejected. Regarding self-tapping screws, this option is acceptable, but with one caveat - wide washers must be placed under the heads of the self-tapping screws.
You should not buy them as a separate item. Washers can be cut from perforated mounting tape or from straight hangers, which are used to attach plasterboard sheets.
It is most convenient if you cut the tape so that the homemade washer is an element with two holes. A self-tapping screw will be screwed into one of them, the other element will serve as a mounting strip. The photo below shows how to properly install the double washer.
In principle, there are no restrictions on the location of installation of self-tapping screws on the wall. They can be screwed into any place at different distances from each other. The main task is to straighten the plaster mesh and securely attach it to the wall. Of course, from above, near the corner between the wall and the ceiling, the fasteners should be located parallel to the corner and with an installation step of within 50 cm.
It should be noted that fastening can be done not only with self-tapping screws. Depending on what material the house was built from, other fasteners can be used. For example, ordinary nails are 60-70 mm long. They are driven into a brick wall into a masonry joint to a depth of 50 mm, bending the top edge with the cap. This is clearly visible in the photo below.
If you don’t have wide washers, mounting tape or direct hangers at hand, then fastening can be done with ordinary self-tapping screws that are screwed into plastic dowels. Simply connecting the fasteners to the tensioned fabric is carried out using ordinary wire, preferably knitting wire, as shown in the photo below.
- it is necessary to screw the self-tapping screw into the dowel not completely;
- then tie a wire under its cap, the free end of which is wrapped around the wire of the plaster mesh;
- after which the screw is screwed in until it stops.
Useful tips
Let us highlight one very important point that concerns the technology of applying the plaster layer. The wall under the plaster must be clean and sound. Therefore, first of all, we clean the wall surface from dust using a vacuum cleaner or broom. And then it must be primed, preferably with a deep penetration primer, which penetrates deeply into the wall material, where it polymerizes, increasing the strength of the top layer. As soon as the primer has dried, we proceed to installing the mesh structure.
And other recommendations:
- To install the plaster mesh, it is better to use small self-tapping screws. You will have to drill holes for the dowels, and this is just another dust that you previously got rid of. The smaller the holes, the less dust.
- Some craftsmen apply primer after installation. Not the best option, because puddles of primer form in places where the material comes into contact with the wall surface. This especially happens if a fiberglass sheet with small cells is installed. In principle, both options are used today, and everyone decides for themselves what to do. But keep in mind that before using the solution, the wall plane will have to be primed twice.
- The mesh is laid on the surface in overlapping strips with an offset of one cell. If this is a fiberglass option, then the overlap should be carried out with a mixing of 3-5 cm.
Conclusion
There are many ways to attach a mesh structure under plaster as a reinforcing frame. Choose the one that is easier for you and more convenient in terms of work and the availability of fastening materials. The main task is the strength of the fastening.
Features of fastening metal mesh
Particular attention should be paid to the metal mesh, as it has the heaviest weight. This requires the most reliable fixation using nails and screws. Some builders make holes for dowels in advance, before laying the material. Fasteners are installed in increments of 25-30 cm. Therefore, approximately 16 fasteners are required per 1 m2.
Healthy! Metal mesh is used when working exclusively with cement-sand plasters. Such thick and heavy materials are completely unsuitable for foam insulation. It is also worth considering that a metal product cannot be properly leveled, so the layer of plaster will be larger.
Algorithm for working with metal mesh
The work process looks like this:
- We clean the walls and dry them well. We degrease the mesh itself (if galvanized material is used, then just rinse it with a wet cloth).
- We measure the walls and cut the mesh, taking into account that it will overlap 10 mm. For cutting, it is better to use special metal scissors. If they are not there, and the diameter of the wire is small (for example, less than 0.8 mm), then ordinary scissors will do, but they will have to be constantly sharpened.
- We fix the mesh using dowels (holes for them should be made in advance in increments of 20-30 cm). Hardware is selected in accordance with the thickness of the material so as to securely fix it. As a rule, it is permissible to use standard 80-90 mm nails for walls made of foam concrete. They are easier to use, they are cheaper, and the quality of fasteners is in no way inferior to dowels, which are usually used for brick and concrete surfaces.
Important! In places where the mesh overlaps, it is recommended to install dowels at a distance of no more than 10 mm from the edge. Two adjacent grids will be hung on these fasteners at once.
- Using a hammer drill or a drill with an appropriate attachment, we make a hole for the dowel. Its depth should be 2-3 cm greater than the plastic insert. After this, pour a little brick chips into the hole to strengthen the fixation.
Healthy! Make sure that the protruding part of the dowel does not exceed the thickness of the plaster, otherwise it will complicate the finishing work.
- Drill the same holes along the line. We put a mesh on each dowel. At the same time, it needs to be stretched a little to avoid unevenness. In this case, the material can be placed both horizontally and vertically (whichever is more convenient for you).
- Check that the mesh lies flat. If there are any shortcomings, we fix them.
- We install the next row of dowels, which should be placed in a checkerboard pattern under the first line. Since the mesh is usually 1 m wide, 3 rows of hardware will be needed for fixation.
- We cut out the mesh for door and window openings. Some people simply bend it, this is also acceptable. The main thing is that at the edges of the bent sections it does not turn out so that the material protrudes above the plaster.
Installation of plaster mesh
Mounting mesh for plaster is used to securely fix a thickened layer of finishing mixture on the surface of walls and ceilings. Using the mesh, foundation defects and possible errors when plastering premises are eliminated.
The mounting mesh evenly distributes the load from the plaster layer over the entire surface of the base, thereby preventing the appearance of cracks in the finishing material.
The use of reinforcing mesh extends the service life of the plaster coating.
Options for plastering walls
The historical tradition of plastering walls to insulate a home and add internal aesthetics to the room continues in our time. Previously, wooden shingles were used to reinforce plaster, which was nailed to the wall in the form of a lattice.
Later, steel mesh began to be used, and now synthetic mounting products are used to reinforce the finishing mixture, which have simplified the plastering process and brought the quality of rough surface finishing to another level.
Depending on the thickness of the finishing mixture layer and the purpose of the object’s surface, a range of mounting products made of metal and synthetic materials is produced.
Due to their anti-corrosion properties, synthetic products for reinforcing plaster have increased the service life of the coating and the quality of the finish.
Types and purpose of plaster mesh
The industry produces mounting reinforcement products used for interior and exterior decoration of building walls. Reinforcing sheets are used when the plaster thickness is more than 2 cm.
When exposed to external atmospheric loads and large-area surfaces, steel products are used, and for internal surfaces in the finishing material, the reinforcing layer is usually metal and synthetic.
Metal mounting grids
Metal reinforcement in plaster finishing is used when applying a thickened layer of finishing mixture and for external cladding of facades and basements of buildings:
- Metal plaster mesh. Metal wire reinforcement is used to reinforce plaster used in finishing interior surfaces of premises. The product cannot be used in wet rooms or outdoor areas due to metal corrosion. Products are made by welding with a cell size of 2 to 5 cm, from wire with a diameter of 3 to 5 mm. On special machines, using the expanded metal method, mounting reinforcement products are made from sheet metal for reinforcing the finishing plaster coating. This reinforcing mesh is used when applying a layer of plaster up to 3 cm thick.
Cells 100 by 100 mm are suitable for a 5 cm layer of plaster
Features of choice
You can choose the right mesh for the wall taking into account the following nuances:
- The fabric must have high resistance to alkaline solutions. For testing, a part of the product is placed in a solution for 25 days, then the tensile properties are checked. The strength of the layer should be maintained.
- The coating must be resistant to stretching.
- Depending on the density of the plaster layer and the quality of the base, the appropriate cell size is selected.
- The material is selected to be of high quality for long-lasting use.
- Fastening elements are required to be purchased in the kit.
- The technical characteristics of the mesh (strength, material of manufacture, resistance to temperature conditions) are indicated in the product passport.
- The mesh material is selected according to the type of base (concrete, brickwork).
Installation work.
The installation process is divided into several steps.
First of all, the surface to be plastered is degreased and coated with a special primer. This is necessary to ensure good adhesion of the mortar to the wall or ceiling.
Then the chain-link mesh for plastering walls is cut into sheets to make it easier to work with. It is worth considering that along the joints of walls or rustications on the ceiling, reinforcement should be placed in the form of solid sheets. In this case, it is good when the edge touches the adjacent wall or the bend of the wall is ten to fifteen millimeters. This strengthens the corners. It is very important to make a right angle with plaster.
Each type of construction mesh for plastering uses its own technology. For example, fiberglass material is attached to the first layer. Press it in a little, then apply the next layer. The fiberglass mesh for plaster ends up inside the plaster layer.
To ensure that the facade fiberglass mesh under plaster holds firmly, some experts prefer to use different fastenings - screws and self-tapping screws. First, the surface is marked at the rate of sixteen holes per square meter.
Then holes are drilled at selected points where dowels or screws are placed. So that their caps protrude slightly above the wall or ceiling. Spread the first layer of plaster mixture. Put a net on the hats. Cover with plaster.
An important point is that it is better to apply the mixture throughout the entire space, but it is worth distributing it starting from the middle - in different directions. At the same time, the edges of the canvas are pressed at the corners with a wide spatula. And the second spatula is used for smoothing.
When plastering the ceiling, it is suggested to first make holes, then insert fasteners into them. After this, glue the plaster fittings to the ceiling with mounting tape. This option is suitable if lightweight material is used. Then metal plaster beacons are installed. The mixture is applied. It is important to ensure that it fills the cells and adheres to the surface of the ceiling.
We choose metal.
Professionals recommend choosing a metal mesh for plaster in cases where surface differences are more than four centimeters. Durable metal will help hold the thick layer of mortar that will have to be applied in this situation.
Steel materials are the only option if the mixture contains cement, which contains alkali. The fact is that metal is less susceptible to alkali than plastic.
A solution with clay also requires the use of metal reinforcement. Material with cells of 50 by 50 millimeters is suitable.
Mesh for plastering facade walls can be used for different purposes. For screeds, it is produced with a larger cell and made of thicker wire. For plastering, the thickness of the wire can reach one and a half millimeters, and the cells usually have a size of 30 by 30 millimeters.
One more point: roll material is used for facade work. Sectional is usually used indoors.