The base for the finishing floor covering must be strong, level, and reliable. And in many ways, the result of the work done will depend on the materials used to create the subfloor, as well as on the correct installation. That is why experienced builders do not recommend that beginners use types of coatings that are difficult to use. One of the best options for creating a rough base for the finishing coat is plasterboard for the floor. It fully meets all requirements, and its installation is very simple and can be done by any novice builder without experience.
Drywall for floors
Drywall on the floor
Drywall is a fairly common material. It is used in various areas of construction - for installing interior partitions, for creating suspended ceilings, and bases for installing finishing floor coverings can also be made from it.
Drywall - what is it
Sheets of this type of finishing material are made from a special “dough” made from gypsum and mixed with special fillers, covered on both sides with sheets of cardboard. All elements are connected to each other under high pressure. At the same time, gypsum itself as the main material accounts for about 91% of the total mass of the sheet, about 6% - for cardboard, only 1% is occupied by moisture, starch and special surfactants. To increase the service life, the sides of each sheet can be treated with a special compound that protects the material from water, however, not all manufacturers carry out this procedure, since the price of the material immediately increases. Drywall has special requirements for production; they are regulated by the requirements of GOST R 51829-2001. The standard sheet width is 120 cm.
Gypsum fiber sheets
On a note! Drywall is not new to the construction world. This material first saw the light in the 19th century in the USA. It was invented by A. Sackett, who then owned a paper mill. It was he who invented the “construction board” of 10 layers of paper, which were connected to each other by a thin layer of plaster. And the version of drywall that we see now was obtained and patented by Clarence Utsman, also a native of the USA, an engineer by profession. The material came to Russia in the 50s of the twentieth century.
Types of drywall
There are three main types of material:
- GKL is a common type of material;
- GKLV – moisture-resistant plasterboard;
- GKLO is a fire-resistant material.
GKLV is used in rooms where the humidity is quite high. And fire-resistant material is used for arranging fireplace portals, for lining areas located quite close to fire sources. Among the types of plasterboard, one can distinguish a material characterized by increased strength and sheets that have the property of increased sound insulation.
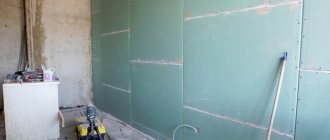
Laying drywall on the floor
Using drywall to create a subfloor is an inexpensive, easy-to-install, but reliable way to create a level subfloor. And not every material can boast of having such a large list of positive features.
GOST R 51829-2001. Sheets are gypsum corrugated. Specifications . Downloadable file (click the link to open the PDF in a new window).
GOST R 51829-2001
Moisture-resistant plasterboard sheet
The nuances of laying various floor coverings on plasterboard
To make the surface resistant to harmful influences, laminate is mainly used for finishing cladding. It is laid on a special substrate, installation is carried out by locking assembly.
The laminate has sufficient rigidity, which provides protection for plasterboard flooring
Also, tiles can be glued to bases that have at least 3 layers of gypsum plasterboard. To do this, pre-treatment of the surface is carried out, which includes a primer. The disadvantage of this option is that when dismantling the decorative layer, the plasterboard base is damaged.
When choosing tiles for plasterboard flooring, it is advisable to choose large-sized products that have increased strength, for example, porcelain floor tiles
Linoleum and other soft materials are not recommended for use as they do not provide load distribution. It is for this reason that areas under furniture legs become damaged very quickly.
Advantages of plasterboard floors
Drywall has many advantages - this is why this material is so often used to create a subfloor. Advantages of using drywall:
- the ability to refuse to lay concrete screed that is difficult to install and takes a long time to dry . On the contrary, drywall makes it possible to create a dry screed;
- Installation of plasterboard sheets can be done independently , without the involvement of third-party specialists. And the speed of laying this material is quite high;
- The weight of the sheets is relatively small , which allows installation on a wooden base. It can even be laid in several layers;
The main feature of plasterboard sheets with vinyl (laminated) coating is their front surface
- ease of processing - to cut drywall, you do not need to purchase any special tools;
- the price of the material is acceptable;
- the base, created from plasterboard, will have a perfectly flat surface;
- plasterboard increases the sound and heat insulation properties of the floor.
Leveling the floor using plasterboard sheets
The only drawback of this material is the inability to combine with some types of topcoats. However, drywall can be safely laid under tiles, laminate, and linoleum. The main thing, if a soft finishing material is used, is not to run on the floor in high-heeled shoes and not to drop anything heavy on it, since drywall is a rather soft material and can be easily damaged.
Advice! Drywall is best laid under laminate, tiles, and parquet boards.
Features of gypsum plasterboard
Drywall is a fibrous material made from a combination of gypsum base and fluffed waste paper. Both components are pressed under high pressure during the production process. As a result, due to the uniform distribution of waste paper fibers over the entire surface of the sheet, a fairly strong material is obtained, characterized by elasticity.
Additionally, both sides of the gypsum board are treated with a special compound (water repellent), which increases moisture resistance. Drywall intended for laying on the floor is sanded, after which various impregnations are applied to it, eliminating the possibility of chalking.
How to choose drywall
For installing drywall on the floor, it is best to use material produced by. Sheet dimensions – 1.5mx0.8mx12.5 mm. The weight of one sheet is about 18 kg.
Arrangement of bulk floor "Knauf"
By the way, it is one of the leaders in the sale of plasterboard on the building materials market - it holds about 70% of the market for this product. However, in addition to this company, the products of the brands “Rigips”, “Giprok” and “Nida Gips” (France) have proven themselves very well. Products from Scandinavia or Belarus (“Belgips”) are also in demand. There are also Russian manufacturers of plasterboard - this is the company OJSC Gips, which sells sheets under the name Volma. They are cheaper than foreign ones, but at the same time have high quality. The products of the Gifas industrial group (Sverdlovsk) also performed well.
Prices for plasterboard for floors KNAUF
KNAUF gypsum fiber sheet
GKL characteristics - sheet size
In general, when choosing drywall, you should focus on the following indicators:
- type of work performed;
- leaf mass;
- physical parameters and sheet dimensions;
- edge type;
- price.
Plasterboard floor, joints between elements are puttied
Table. Types of edges of drywall sheets.
| Designation | Description |
| PC (VR, KP) | Rectangular edge. Sheets with this type of edge are usually used for dry installation technology. The option is ideal for floors and partitions. |
| UK (AK) | The edge is beveled longitudinal. The sheets must be puttied using reinforcing tape. They require careful step-by-step sealing of seams. |
| PRO | The edge is slightly flattened, beveled, longitudinally modified. Such sheets are produced only by . The joints are connected only with the use of special reinforcement tape. |
| PLC | Semicircular longitudinal edge, which does not require labor-intensive work on sealing seams. The joints are filled with putty. |
| KS (BA) | Similar to the PRO edge. Joints are installed only using reinforcing tape. |
| 3K (RK) | The edge is slightly rounded. The joints are puttied without using tape. |
| VARIO | A beveled, flattened, slightly rounded edge occurs only in sheets. The elements are connected using putty, sometimes using reinforcing tape. |
| FC | Seam edge type. The joint is reinforced with sickle tape. |
| PLUK | Beveled HRK-like semicircular edge. The joints are sealed with reinforcing tape and putty. |
Type of gypsum board edge
Fireproof plasterboard
Laying slabs
When the preparation is completed, you can begin the actual installation of the plasterboard floor. You should immediately arm yourself with the necessary tools - a jigsaw, drill, screwdriver.
Laying is done from the doorway. This is due to the fact that you should not walk on expanded clay, otherwise your footprints will later act as unnecessary voids under the drywall, and the slabs may begin to “play,” so follow a simple rule - laying from the door into the interior of the room.
The plates are connected to each other with an adhesive joint, so you need to carefully apply the glue to the desired areas. For greater reliability, we recommend additional fastening to the floor with self-tapping screws. Fasteners should be placed at a distance of no more than 30 cm from each other, with at least 3 cm to the edge of the sheet. Such parameters are optimal for ensuring that the plates are securely fixed.
For greater reliability, secure the drywall to the floor with self-tapping screws.
You can do such work yourself, but if possible, it is better to invite a partner to do the work. This will help not only complete all work faster, but also better control the various stages of both preparation and the actual installation of drywall. By the way, it is also more convenient to move the slabs with two people, because one similar slab weighs about 18 kg.
By repeating this process over the entire area of the room being decorated, you will complete the procedure for laying plasterboard flooring. Agree that this is not at all that difficult, based on the description. However, in reality everything is a little different. If you have never done such work before, then decorating the first room can be a real test of pedantry for you.
Unfortunately, many people forget that all operations must be controlled using a level, so they end up with a low-quality floor that will definitely have to be redone in the future. Therefore, follow all the technology steps!
Preparation for installation
Before drywall is laid on a rough base for leveling, the surface must be carefully prepared. Whether it is a concrete screed or an old wooden floor, they must be cleared of debris.
Attention! Since the sheets of drywall themselves are quite fragile, they can easily break with any, even slight bending.
A sheet of drywall can be punched through with a moderate force blow.
Also, before installation, plasterboard sheets are brought into the room where the work will be carried out and rest there for at least 12 hours before work begins. This will allow them to “get used” to the indoor microclimate.
You should purchase all the necessary materials in advance. This is plasterboard, expanded clay backfill, vapor barrier film, damper or edge tape, self-tapping screws for drywall, PVA glue.
Calculator for calculating the required materials for dry screed
Go to calculations
On a note! The edge tape can be replaced with polyethylene foam having a thickness of 1 cm.
Advantages and disadvantages of plasterboard sheets
The advantages of gypsum fiber floors include:
- installation is carried out exclusively using the “dry method”, which means that only dry components will be used in the work. The advantage, in this case, is that the room will maintain a comfortable macroclimate and humidity level, both during and after the renovation;
- affordable price for the material itself and repairs in general, because you can do it yourself, I don’t hire a team of professionals;
- shortest installation time;
- no special knowledge and skills are required to work with plasterboard sheets; they are easy to process and cut;
- GVLV themselves are residually light and perfectly smooth, which means that they are suitable for laying top floor coverings without additional surface treatment of sheets with tiles, linoleum, carpet, etc.;
- plasterboard allows you to create additional sound and thermal insulation of the room;
- the low weight of the product allows you to create a two-layer floor surface that will not put much pressure on the slabs covering the base.
Subtleties of laying on a wooden floor
If plasterboard sheets are laid on a wooden base, which can be a wooden floor, then it is first laid with plastic film and bulk thermal insulation material. Next, two layers of drywall are usually installed. The upper one is mounted overlapping with the lower one. Step – about 40 cm.
Drywall on wood floor
Floor covering
The floor covering can be ceramic tiles, laminate, or parquet. In special cases - linoleum. For covering (except for tiles), a backing (cork, polyethylene foam) is laid on the plasterboard.
The process of laying laminated panels on a plasterboard floor After the substrate, there is a certain technology for laying the coating. If you lay linoleum, then it should be leveled. You should not place sharp objects on linoleum; they leave dents and tear the coating.
Instructions for laying tiles on a plasterboard floor If these are laminated panels, then special wedges should be installed between the wall and the laminate, which will create a gap of 1 cm.
How to put under tiles
Ceramic tiles, due to their demands on the evenness of the base, are usually laid on a carefully leveled concrete screed. But it’s easier to lay it on a layer of drywall, which is also ideal for this. The technology is simple - sheets of drywall are placed on a cleaned rough base, covered with film, with wooden joists installed on top and a layer of mixed expanded clay, perlite and vermiculite poured between them. The edges of the drywall sheets are processed with a plane so that an angle of 45 degrees is obtained. Each sheet is attached to the base not only with glue, but also with self-tapping screws. Then the floor will be as reliable as possible. Ceramic tiles are already installed on top of this “pie”.
Diagram of a heated floor using plasterboard
Useful recommendations and tips:
- for installation of plasterboard floors, only special sheets are used that can be used for these purposes;
- The edges resulting from cutting must be processed. They are chamfered, and then putty and reinforcing tape are used;
- the air temperature in the room should not be less than +10 degrees;
- air humidity in the room where work is carried out should not be higher than 60%;
- the size of the fractions of the material that is poured under the drywall on a layer of protective film should be within 3-8 mm;
- the width between the joists on which the drywall is laid is no more than 2.5 m;
- the joints of the vapor barrier film should be taped, the film strips should be overlapped (at least 20 cm), and the material should also be applied to the walls a little;
- the density of mineral wool, if it is used for heat and sound insulation, should be 125 kg/m3;
- without lags, drywall can only be laid on a perfectly flat surface;
- It is not recommended to walk on prepared, compacted backfill under drywall.
Seam between sheets of drywall
Differences between plasterboard for floors
If compared with a concrete screed, then:
- Floor drywall is cheap compared to cement, sand and labor. If you have a 4 cm screed and take plasterboard for a 20 m2 floor and do it all yourself, then the total cost will be about 10 thousand rubles.
- There is no water when working with Superpol plasterboard. This means that the neighbors below will not be flooded, there will be no high humidity in the apartment, and there will be no fungus on the walls.
- Laying plasterboard for floors will take one day for a total room size of 20 m2.
- Weight. The entire structure of the plasterboard floor will not be weighty. Therefore, it can be easily done on a wooden floor.
- After leveling the floor with plasterboard, you can immediately begin finishing - covering the floor with the final material.
- When installing drywall on the floor, you can hide any communications (pipes, wires) underneath it.
With all the advantages of “Superpol” there are some disadvantages. There is one big drawback - plasterboard flooring cannot be covered with soft materials (carpet, carpet). Any mechanical impact:
- a heavy object fell;
- walking in heels;
- rearrangement of furniture.
The process of laying tiles on a plasterboard floor will have a negative effect on the plasterboard surface. GCR is a fragile material, so laminate, parquet, and tiles should be laid on top.
Plasterboard floors: sheet layout diagrams
There are two ways to install drywall sheets.
- To obtain the most reliable and rigid base, 3 sheets of drywall are fastened together. They are connected with screws and glue.
- In the second option, sheets of drywall are laid in two layers and connected using an adhesive composition. This method is only suitable for installing carpet and linoleum.
In the diagram, plasterboard sheets are laid in two layers
The sheets can also be laid according to the following schemes: in the first case, the first sheets are mounted starting from the far corner of the room parallel to the wall in which the door is located. The last leaf in the row is trimmed if necessary. The second row is laid starting from trimming the last sheet of the first row. Next, the remaining whole sheets are laid. In this way, the entire rough base is sewn.
Attention! The joints of the four sheets should not meet in one place. Only then will the plasterboard base be strong and reliable.
In the second case, the sheets are mounted starting from the wall opposite to the entrance towards the exit from the room. Otherwise, the sheets are laid in exactly the same way as in the first case.
Installation of plasterboard sheets on the floor
Preparatory stage
In order for the flooring to last for a long time, it is necessary to fulfill a number of conditions before laying it. The first thing you need to do is purchase special plates designed specifically for this type of work.
At the next stage, you will need to prepare the “rough” floor for further installation:
- The surface is cleaned of small particles.
- Cement or other screed mortar is applied.
- After drying, you can begin installing the floor covering.
Basic rules for gluing wallpaper on drywall
At the second stage, it is also recommended to lay a layer of thermal insulation material. For these purposes, expanded clay is best suited, which can be replaced with perlite.
Before starting work, a polyethylene film is laid on the surface in two layers (this approach allows you to create a vapor barrier), each piece of which must be fastened to the next one. A waterproofing tape is laid along the perimeter of all walls, which prevents drywall from coming into contact with them. This tape is also used to increase sound insulation in a room.
At the end, expanded clay is applied to the film, which is leveled using guides. Such preparation of the floor will not only provide high thermal insulation of the room, but will also protect the drywall from moisture penetration from below.
In addition, before laying gypsum boards, it is recommended to lay out all sheets on the floor and leave them for 12 hours. This must be done, since the material adapts to the current temperature and humidity parameters within the specified time.
Another question that should be clarified before considering installation technology: is it possible to walk on drywall? As already noted, this material is quite durable, so it can withstand the weight of an adult. However, the sheets must lie on a hard surface.
Installation of drywall on the floor
Step 1. The prepared floor surface is covered with a vapor barrier film. Individual strips of film are laid overlapping (20 cm) and lightly placed on the walls. This is necessary so that the drywall has as little contact with the walls and floor as possible.
Laying vapor barrier
Attention! If you use drywall that does not have additional protection from moisture, then if there is excess moisture in the room, it may collapse or warp.
Step 2. The walls around the perimeter of the room are covered with edge tape.
Gluing edge tape
Step 3. Beacons are installed. They are mounted at such a distance from each other that a rule can be laid on them, which will then be used to level the poured expanded clay mixture. For the manufacture of beacons, the CD 60 profile is usually used. The profiles are installed on low-height strips made of expanded clay mixture. Beacons are leveled.
Installation of beacons
Beacons are leveled
Step 4. The floor is covered with an even layer of expanded clay mixture with fractions up to 5 mm in size. It is recommended to pour it level.
Expanded clay backfill
Calculator for calculating expanded clay backfill for dry screed
Go to calculations
Step 5. The expanded clay mixture is leveled using the rule. The layer is compacted well.
Expanded clay leveling
The rule used for alignment is
The process of filling and leveling expanded clay
Step 6. The beacons are removed, and the remaining holes are filled with a layer of expanded clay. You cannot move on the bedding after leveling.
Filling holes after beacons
Step 7. A layer of foam plastic can also be laid before laying the drywall. It is used with a density of 35 and above. The foam is laid close to the wall.
Laying foam
Polystyrene foam laying process
Step 8. Drywall sheets are trimmed if necessary in places where they will coincide with various communications. The sheets are placed in such a way that there is a gap of 10 mm between them and the wall. Laying the first layer of drywall can also be done on an expanded clay mixture if the material is laid in several layers.
Laying drywall
Step 9. Penoplex (extruded polystyrene foam) is laid, i.e. heat-insulating material. The sheets are laid in a checkerboard pattern so that the joints of several sheets are not in the same place.
Laying penoplex
Also, sheets of drywall, if they were installed using polystyrene foam, can be laid without polystyrene foam. In this case, the first layer of drywall is coated with PVA glue, and then the second layer of drywall is laid on its surface.
Applying PVA glue to the first layer of drywall
Laying the second layer
Step 10. A layer of GVLV (floor element) is laid. This is a gypsum fiber material. The joints of individual elements are connected with glue.
Laying GVLV
Step 11. GVLV floor elements are additionally connected to other elements using self-tapping screws. Step – 30 cm.
Sheets are fastened with self-tapping screws
Step 12. It is enough to clean the base from dust and you can lay a layer of topcoat.
Cleaning the base from dust
Allow me to introduce
Device
First, let’s talk about what a plasterboard floor or dry screed is.
It includes the following layers (from bottom to top):
- Vapor barrier . Usually dense polyethylene plays this role. It prevents dampening of the backfill and filtration of water vapor through the ceiling: drywall and gypsum fiber board are not resistant to moisture;
- Backfill . As a rule, expanded clay screenings are used for this purpose; less often, the floor is leveled with perlite or quartz sand. The backfill layer can have a thickness from 20 to 150 millimeters;
Please note: expanded clay screenings (coarse sand) combine high grain strength with a porous structure, providing good thermal insulation qualities and minimal weight, which means a small load on the floor.
- Two layers of gypsum plasterboard or gypsum plasterboard . Either ready-made floor elements can be used (the most common dry screed on the Russian market is Knauf Superpol), or ordinary sheets of wall plasterboard or gypsum fiber sheets. Wall gypsum plasterboard is laid with obligatory overlap of seams; Knauf Superpol slabs are made with edges that overlap and are attached to each other with glue and screws.
Ordinary wall plasterboard can be used to level the floor.
In addition: a damping edge strip is laid around the perimeter of the room between the backfill and the walls. It eliminates the transmission of acoustic vibrations to the walls when walking, and also compensates for the expansion of the dry screed during fluctuations in humidity and temperature.
Advantages
What is good about gypsum board or gypsum board against the background of traditional concrete screed?
- Relatively cheap. With a total screed thickness of 4 centimeters and the use of Knauf Superpol materials, leveling the floor in a room of 20 square meters with your own hands will cost less than 13,000 rubles;
- Guaranteed absence of leaks through the ceiling - no wet work is carried out. For comparison: with the slightest violation of the seal of the substrate, the ceiling of the apartment below will be saturated with cement laitance, which, of course, will not please your neighbors;
- Speed of work. Leveling the floor in the notorious room of 20 square meters will take one working day, 30 m2 - two days, 50 m2 - three;
Manufacturers and sellers focus on speed of work.
- Light weight screed. Due to the low backfill density, dry screed can be performed even on wooden floors;
- The floor is ready for the finishing coating immediately after completion of the work. For comparison, a concrete screed gains full strength only after a month;
- Dry screed can be used for laying any lines - water supply, wiring (of course, in corrugated PVC tubes), air conditioning lines, etc.
Flaws
In essence, this solution has only one drawback - limited compatibility with finishing coatings.
Many organizations offering the installation of dry screeds promise in their advertisements that gypsum fiber board and gypsum plasterboard can be installed on the floor under any type of covering (including carpet and linoleum). This is actually a half-truth.
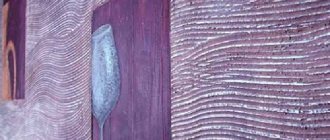
Under a soft coating, a relatively weak gypsum-based material will retain a flat surface only if safety rules are strictly observed; in particular, falling heavy objects on the floor, walking on the floor in stiletto heels, horseshoe heels, and in general any strong mechanical impacts should be excluded.
GCR does not differ in mechanical strength. The edge of the leaf in the photo was crushed when it was stepped on.
I strongly advise limiting the list of finishing floor coverings to deformation-resistant materials that allow you to distribute the load over the maximum area of the substrate:
- Tiled;
- Parquet board;
- Laminate.
The laminate will protect the drywall from impacts and distribute the load over the maximum area.
Floor on the ground on the ground floor with dry prefabricated screed
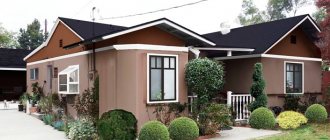
Flooring on the ground is an economical solution for a private home.
What is a floor on the ground and what types of floors are there on the ground?
You can find out about this on the previous page:
“What are the types of floors on the ground - design options
.
A concrete floor on the ground lies directly on the wet and cold ground. The floor structure should serve as a barrier that protects rooms in the house from cold and soil moisture.
For residential premises on the first floor of a house, an inexpensive option would be to install a floor on the ground with a dry prefabricated floor screed, Fig. 4.
A floor with a prefabricated screed is afraid of flooding. Therefore, it should not be done in the basement, as well as in wet rooms - bathroom, boiler room.
The ground floor with a prefabricated screed consists of the following elements (positions in Fig. 4):
| Fig.4. Floor on the ground in a private house. |
1 - Flooring - parquet, laminate or linoleum.
2 - Glue for joints of parquet and laminate.
3 - Standard underlay for flooring.
4 - Prefabricated screed made of ready-made elements or gypsum fiber sheets, plywood, particle boards, OSB.
5 - Glue for assembling the screed.
6 - Quartz or expanded clay sand.
7 - Communications pipe (water supply, heating, electrical wiring, etc.).
8 — Insulation of the pipe with porous fiber mats.
9 - Protective metal casing.
10 — Expanding dowel.
11 - Waterproofing - polyethylene film.
12 - Concrete base made of concrete class B22.5.
13 - Foundation soil.
The design of the connection between the floor and the outer wall is shown in Fig. 5.
| Fig.5. Connection to the outer wall of the floor along the ground. |
The positions in Fig. 5 are as follows: 1-2. Varnished parquet, parquet, or laminate or linoleum. 3-4. Parquet adhesive and primer, or standard underlay. 5. Prefabricated dry screed from ready-made factory-made elements with a “groove-tongue” connection of sheets. 6. Water-dispersed adhesive for screed assembly. 7. Moisture insulation - polyethylene film. 8. Quartz sand. 9. Concrete base - concrete screed class B22.5. 10. Separating gasket made of waterproofing roll material. 11. Thermal insulation made of polystyrene foam PSB 35 or extruded polystyrene foam, thickness as calculated. 12. Foundation soil. 13. Plinth. 14. Self-tapping screw. 15. External wall.
The layout of the floor on the ground, waterproofing of the base and walls, in a building with residential premises, is shown in Fig. 6.
| Fig.6. Layout of the floor on the ground and waterproofing in a private house. The arrows indicate the cold bridge. |
Here, in Fig. 6, the positions are as follows:
- Cellular concrete blocks.
- Waterproofing.
- The foundation is combined with the plinth.
- Plaster on mesh.
- Net.
- Blind area.
- Glue, solution.
- Interior decoration.
- Floor on the ground.
Let's take a closer look at some elements of the floor structure.
Why is there a prefabricated screed made of sheets, and not a monolithic one?
For floors, there are thermal technical standards for floor heat absorption.
Floor heat absorption
- the property of the floor surface to perceive heat to a greater or lesser extent during periodic fluctuations in heat flow or air temperature.
The heat absorption rate for residential premises is 12 W/m2*deg.S. - no more. Depends on the thermal inertia of the materials in the floor layer. Simply put, stand barefoot with one foot
on a wooden floor and the other on a concrete floor, you will feel the difference in the heat absorption of the floors.
In order to ensure the standard heat absorption of the floor without additional layers of insulation, this design uses a screed made of relatively “warm” slabs in combination with sand backfill.
The prefabricated screed has other advantages. The prefabricated screed is laid on a layer of dry
quartz sand (washed construction sand). This layer also affects the heat absorption of the floor. The thickness of the sand layer in the proposed floor structure must be at least 40 mm. and no more than 100mm.
In this layer of sand you can place pipe distribution with various communications. Then the height of the sand layer should be 15 mm higher than the pipes. (Fig.4). Instead of quartz sand, you can use perlite or expanded clay sand of a fraction of 1.5-5 mm, in a layer up to 100 mm thick.
A sufficiently thick layer of light sand will improve heat absorption and sound insulation of the floor.
Products for construction and repair
⇆
A layer of insulation can be placed under the prefabricated screed . The design of such a floor is shown in the figure:
Fig.7. A layer of insulation is placed under the prefabricated screed. 1 and 2 - finished floor; 3 - substrate; 4 - self-tapping screw; 5 - sheets of prefabricated screed; 6 - glue; 7 — edge tape; 8 — thermal insulation slabs; 9 - interlayer; 10 - dry leveling backfill; 11 — moisture insulation; 12 - floor with uneven surface; 13 - plinth; 14 - glue; 15 - wall.
The presence of insulation boards under the prefabricated screed will provide better heat absorption rates for the floor and make the floor energy-saving. Heat leakage into the underlying layers of the floor will be significantly reduced.
Extruded polystyrene foam (EPS) boards or rigid mineral wool boards with a density of at least 125 kg/m3 are used as thermal insulation.
The layer (item 9) serves to uniformly distribute concentrated point loads in the soft layers of the floor. As a layer, moisture-resistant gypsum fiber - GVLV, or glass-magnesite - SML sheets with a thickness of at least 10 mm are used, laid on a backfill layer with a gap at the joints of no more than 1 mm. The joints of the sheets are taped with construction tape. The joints of the interlayer sheets (item 9) should not coincide with the joints of the thermal insulation slabs (item 8).
If you use EPS boards with tongue-and-groove joints for thermal insulation, then you don’t have to make a layer .
How to properly dry-screed a floor
Work on installing the screed is carried out in a room with a temperature not lower than + 10 ° C and air humidity not exceeding 60%.
Work on installing a prefabricated dry floor screed is carried out in the following sequence:
- A moisture vapor barrier is laid on the concrete base of the floor - a polyethylene film with a thickness of at least 0.15 mm. with overlapping strips at joints of 200-300 mm.
- A layer of sand is poured and leveled, compacted and leveled again.
- Lay the first layer of sheets with a gap at the joints of no more than 1 mm. and with a displacement of joints in rows of at least 250 mm.
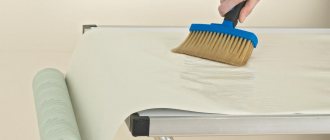
- Apply glue in a continuous layer sequentially under each sheet of the second layer.
- Lay the sheet of the second layer on the glue. The displacement of the joints of the sheets of the lower and upper layers, as well as in the rows of the layer, must be at least 250 mm.
- The sheets of the upper layer are attached to the sheets of the lower layer with self-tapping screws, Fig. 3.
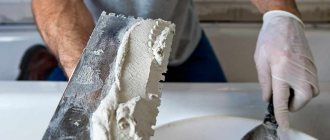
- The joints between the sheets and the places where the self-tapping screws are installed are leveled with putty, and a primer is applied if necessary.
| Rice. 3. Location of screws in the prefabricated screed |
When laying sheets of prefabricated screed, to ensure displacement of the end joints of sheets in adjacent rows and to eliminate waste, each new row begins with laying the part of the last element of the previous row cut off in place, Fig.1.
A gap of 10-20 mm should be left between the screed slabs and the walls, filled with edge tape.
The following board materials can be used to construct a prefabricated dry floor screed:
- gypsum-fiber moisture-resistant sheets (GVLV);
- cement particle boards (CSB);
- gypsum moisture-resistant particle boards (GSPV)
- chipboards (chipboards);
- oriented strand boards (OSB, OSB);
- plywood
Let's consider the features of using sheets of different materials for screeding.
Screed made of gypsum fiber sheets - GVL
It is recommended to use moisture-resistant gypsum fiber sheets of the GVLV grade (GOST R 51829), 10-12 mm thick. It is more convenient to use small-format sheets measuring 1500x1200x10 mm.
To glue gypsum fiber sheets together, PVA glue or adhesive mastic is applied in a continuous layer.
During the installation process, the sheets are fastened with self-tapping screws no less than 19 mm long. The self-tapping screw for gypsum plasterboard is special - it has a double-start thread and a device for self-countersinking, which makes it possible to penetrate into the sheet in one pass. Conventional self-tapping screws very often spontaneously unscrew under the influence of operational loads.
Screed made of chipboard and oriented strand boards and plywood
Between the leveling layer of sand and the wood covering of the screed, it is necessary to lay an additional layer of moisture vapor barrier made of waxed paper or glassine.
Prefabricated screeds made of waterproof plywood are convenient to use under coverings that are made using small nails - floor coverings made of solid boards or mosaic parquet made of various types of wood (parquet carpet). Plywood screed provides better heat absorption rates for floors and is more resistant to mechanical stress.
When using chipboard, OSB, and plywood in residential premises, it should be remembered that these materials are a source of harmful gas - formaldehyde.
Read more about this in the article: “Formaldehyde in the home.”
A prefabricated dry screed can be turned into a water heated floor. Read how to do this here.
The construction market offers ready-made structural elements of factory-made prefabricated screeds - special slabs with seams, dry backfills of various compositions.
Watch the video, which shows the installation of a prefabricated screed from ready-made factory-made elements.
Procedure for preparing a floor for drywall tiles
Before you lay linoleum, hardwood or tile over drywall floors, there is some work that needs to be done. First, remove all debris from the floor so that the base is clean. Polyethylene film is laid over the entire area of the subfloor. Ideally, only one part will be used. If this is not possible, the film should overlap by 10-20 cm. This material is necessary for vapor barrier.
At the initial stage it is necessary to install a vapor barrier film
The joints of the film can be additionally sealed with tape. Polyethylene is installed to cover a portion of the walls above the level of the final floor covering.
Logs are laid on the floor, which perform several functions at once. They press the polyethylene so that it does not move. If two pieces of foil were used, it is advisable to lay one of the joists so that it overlaps the place where they are connected. The logs themselves can be wooden or a regular metal profile will do. They will serve as additional support for the drywall.
Delays are recorded in steps of about two meters. To install them, dowels of the appropriate length are used. A thermal insulation layer is poured along the height of the logs. Expanded clay is best, but other materials can be used. If drywall is not used, it will not have enough support to withstand mechanical stress. Laying the slabs directly on the base would be possible if it were perfectly level and no insulation was required.
The scattered expanded clay is leveled to the level of the logs. You will have to line up from the window and head towards the entrance to the room. As a result, the surface should be smooth. Further work will be carried out from the front door so as not to disturb the uniformity of the expanded clay layer.
Now you can lay drywall on the floor under tiles or any other decorative covering.
Having leveled the expanded clay layer, you can lay sheets of plasterboard on the floor
Useful tips and advice
Before you begin leveling the floor, it is better to bring plasterboard slabs for the floor into the room in advance - exactly where you need to place them. This is really necessary.
It is important that the GVL adapt to the conditions (temperature, humidity). The material must be kept in the room for at least 9 hours!
If you want to lay it in exactly two layers, the second layer is usually placed offset. The displacement step reaches 400 mm! You should not cover the floor with just any plasterboard - choose special brands designed for this - here it is better to consult with sellers and read information on the topic “ plasterboard for the floor reviews
" The weight of gypsum fiber boards for floors can reach 18 kg - conventional wall slabs weigh much less.
Types of GVL
There are two types of gypsum fiber sheets that can be used to level the subfloor:
- Regular. They can be used in rooms with normal levels of not only temperature, but also humidity. An example would be a bedroom or living room.
- Moisture resistant. They are suitable for installation in rooms with high humidity, such as bathrooms, kitchens, etc. They have a hydrophobic impregnation, due to which the ability to withstand water only increases.
There is also a division of all sheets used in work into moisture-resistant sheets in small formats, labeled DIY. They have reduced dimensions of 1200*1200*10 mm. Due to this, the weight of the product was reduced and better convenience was created during the installation process. Even one person can cope with the installation of a high-quality and even floor. Fibers of fluffed waste paper are distributed throughout the entire volume of the sheet. They are additionally treated with impregnation, which reduces the level of chalking. In addition, there is a water repellent, both on the back and front sides.
The use of plasterboard in floor structures
Much more often, plasterboard as a building material with special properties is used to organize drains for utility and communication networks in raised floor systems. This option for using the material is justified by its resistance to minor temperature fluctuations, poor electrical conductivity and resistance to moisture.
In private housing construction, the inedibility of the material for rodents is cited as an argument in favor of a raised plasterboard floor. The thermal properties of plasterboard sheets are quite mediocre, so underfloor heating systems do not have a destructive effect on them.
GCL for the floor requires a breathable layer, so steaming and waterproofing should be carried out from the ground side. Assuming a full-length foundation slab or plinth underneath, drywall can be laid on the concrete and floor without leveling or subflooring.
All slab residues can be used as filler in cement or sand screeds. Floor leveling can also be done using plasterboard and its finishing, but with the obligatory pouring of concrete.
If you decide to make plasterboard floors in the bathroom, think about the problem of waterproofing the main base, after which you can lay plasterboard followed by waterproofing the entire surface of the floor.
Pros and cons of laying gypsum boards on the floor
When choosing between concrete screed and plasterboard, you need to consider the pros and cons of each of them. Drywall has the following positive qualities:
- There are no losses between floors, since all work is carried out without liquid mixtures
- The small mass of the dry screed is determined by its low density, which allows the use of even wooden floors
- Any communication systems can be installed in a dry screed, after laying corrugated pipes
- No time is required to apply the finish. You can begin finishing work immediately after installing the drywall.
- Budget
- Quick installation and leveling of the floor with plasterboard. One day is enough to finish the floor in a room of 20 square meters
Leveling the floor with a dry screed: subtleties and special knots
What a dry floor screed is should be clear. The technology is indeed simple, but there are some points that are not clear “just like that.”
These are Knauf profiles for dry screed and the rules for them
Lighthouses and working with them
Setting up beacons for dry floor screed is a whole story. Branded ones - those that are used by representatives of the company, are difficult to buy. They simply don't exist. They are usually replaced with drywall profiles. They work with them like this:
The most difficult thing when doing a dry floor screed is to level the expanded clay and prevent dips and voids
You have to get smart somehow
In general, it seems clear and easy until you start doing it. The beacons are not secured by anything - I pressed a little harder, and he left. You have to control the effort, constantly check whether the bar has moved or whether the level has dropped. If you have a laser level, it’s still easier. Otherwise it's really difficult.
Beacon installation options
Laying beacons on flat cakes will cause problems with the deflection of the GVL. Above these “piles” the layer of expanded clay will be smaller, which will cause deflections. There is an option - screw in self-tapping pins and adjust them in height. Attach platforms to them on which to rest the profiles. After leveling, it will be necessary not only to remove the profiles, but also the platforms. It would also be very good to unscrew the screws. This will be ideal.
There is another way, but it is acceptable for not very wide rooms. The guides are screwed to the walls; special rules will need to be made for them. In order:
- We screw the profiles to the walls at a certain height. It is clear that they must be aligned in a horizontal plane.
Here is the guide on the wall. Also, at the same level, we attach it to the second one. We take a long, flat board, a piece of thick polymer. It is important that the bar is level, without bending. If there is any defect, it must be eliminated. We make cutouts on the sides so that the plank can slide along the beacon guides. The cut should be such that the lower edge of the strip installed on the beacons is at the level to which the backfill must be leveled.
This is a non-standard option: beacons for dry screed are screwed onto the walls
And this is how to make a rule for beacons on walls
It's much easier to work this way. Firstly, your rule is guaranteed to be in place. There is no need to constantly check the position of the beacons. Secondly, it is easier to stack the sheets from the floor rather than balancing on the sheets. Thirdly, you can tighten the screws after the entire floor has been laid. Fourthly, the beacons are removed after installing the sheet material and do not interfere with the process in any way.