Home / Installation, repair, maintenance / Plastering / How to repair a ceiling using a mesh?
A thorough repair of a standard concrete floor without installing suspended or tensile structures is impossible without high-quality plastering. In this case, the ceiling is usually reinforced with a special mesh. Next, we’ll talk about how this finishing is done, why reinforcement is needed, and how the reinforcing material is attached to the ceiling.
Functions of cement-sand plaster
Cement-sand plaster has several tasks:
- level the walls inside and out;
- protect the façade and interior walls from excess moisture. To enhance the effect, special modifiers can be introduced into the solution;
- create a comfortable microclimate in an apartment or house - the plaster is vapor-permeable, which allows the walls to “breathe”, regulating the indoor air humidity;
- block, while effectively, the path of street noise into the house. Sound-absorbing ingredients will help enhance soundproofing properties;
- reduce heat loss - thermal conductivity is only 2 times higher than that of mineral wool (0.93 W/m*K);
- serve as the basis for finishing finishing work.
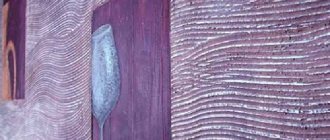
Shingles
Shreds are knocked out of a row of plaster mesh. It's not a mesh at all. But without it it is impossible to plaster wooden walls, be they logs, beams or boards. Sometimes they try to use welded metal mesh, but only on interior partitions.
On load-bearing walls, especially in new buildings, there is a high risk of metal deformation due to the “breathing” of wood - linear dimensions change greatly under the influence of humidity. Deformed reinforcement will tear the plaster. But in old wooden houses, where the wood has dried well, everything can be reinforced with welded mesh. The drani does not have this problem - it breathes synchronously with the wall.
Shingles are narrow planks from 1 to 2 m long, 15-20 mm wide and 3 to 5 mm thick. Sold in packs of 50 or 100 pcs. in each. They are quite expensive.
Advantages and disadvantages
Among the strengths of drani:
- environmental friendliness - natural wood cannot be an allergen or emit harmful substances;
- is not afraid of changes in temperature and humidity - can be used in unheated rooms, on balconies and loggias;
- improves the heat and sound insulation properties of the wall;
- light weight;
- simple installation technology - the whole process can be done with your own hands.
Flaws:
- burns well - requires treatment with fire retardants. In practice, such a procedure is not carried out, the explanation is simple - in case of a fire it still won’t help, and money is never superfluous;
- susceptible to rotting - protective impregnation is needed, but without oil elements (it is not friendly with solutions). Experienced plasterers prefer good drying instead of treating with special compounds;
- high price, as already mentioned above.
In addition to the plaster mesh, there is also a painting mesh, which has several varieties:
- putty mesh. Made from fiberglass. Looks like textiles. Cells 2x2 mm. Thickness - 0.8-1.2 mm. Density up to 60 g/cm3. Used to increase the strength of putty when painting walls. Not applicable for other types of finishing;
- fiberglass - glass fibers pressed into a thin sheet. Sometimes called a spider web. The purpose is the same as that of the putty net;
- serpyanka - putty mesh cut into strips. For ease of use, many manufacturers apply glue on one side. The main purpose is to reinforce cracks, joints, and seams between sheet materials.
Types of suspended ceilings by type of construction
Another criterion for classifying suspended ceilings is the complexity of the design. It is divided into two types:
- single-level design;
- multi-level.
The type of construction should be selected based on the individual characteristics of the room in which the renovation was undertaken.
Single-level suspended ceilings
A single-level suspended ceiling is a structure without niches, protrusions, steps and other volumetric parts. It can be mounted from slabs or sheets of plasterboard. This option looks simple, without unnecessary details that could hurt the eye.
Installation of the structure is carried out in three stages:
- make markings;
- attach the frame to the main surface;
- install the slabs.
As a rule, in rooms with single-level ceilings, a lamp (chandelier) is used as the main light source. Sometimes 1 - 2 lamps are added.
Multi-level suspended ceilings
Multi-level ceilings require a more complex design. This type of suspended structure allows you to hide unsightly corners, protrusions, and veil communications and wiring.
Multi-level ceilings may contain one or more figured elements: islands, steps. In addition to hiding the shortcomings of the room, such details perform the function of zoning the space.
Types of suspended ceilings by design
Suspended panels and slabs today are produced in different shades. This allows you to choose an option for any room. Some manufacturers produce models for painting. They are suitable for any design experiment.
In addition to color variety, suspended ceilings can be:
- glossy;
- perforated;
- medical.
Let's take a closer look at these models.
Suspended glossy ceiling
Glossy suspended ceilings are popular among buyers. This is due to the low need for lighting in a standard home. Thanks to the glossy surface, the hanging material reflects light, increasing the level of illumination in the room. If the slabs or panels for the ceiling were intended for further finishing, you can achieve a glossy effect using:
- glossy paint;
- self-adhesive films.
Interiors with glossy surfaces look impressive and expensive.
Perforated suspended ceiling
Perforated ceilings are most often used in offices, shopping centers, gyms and other commercial facilities. Additional perforation of the panels provides better ventilation and sound insulation of the room. Due to additional openings, a pleasant microclimate is created in the room.
Medical suspended ceiling
Medical ceilings, as the name implies, are designed specifically for hospitals, clinics, and clinics. They must not only perform aesthetic and practical functions, but also meet high hygienic safety requirements. The main material for medical panels is stone wool. It does not burn and improves acoustic performance in the room. The panels can be washed and disinfected. Additionally, the panels are coated with an antimicrobial coating, which prevents the growth of dangerous bacteria in the material.
Types of grids
There are several types of products used for reinforcement, the main ones being the following materials:
- fiberglass;
- metal.
Types of reinforcing mesh: a - metal;
b - fiberglass When applying a thin layer of solution on a flat surface, fiberglass cloth is usually used. For finishing curved walls, when the thickness of the plaster is more than 2 centimeters, only a metal product is suitable.
In turn, metal mesh also comes in several types:
- woven - durable and flexible material, which is made from wire of small cross-section. This product is used for both external and internal work. When choosing a woven fabric for reinforcement, it should be taken into account that the optimal cell size in this case is 1x1 cm;
- wicker - also known as chain-link mesh. Best suited for finishing large surfaces. The most common cell size is 2x2 cm;
- welded - made from wire using spot welding. The rods located perpendicular to each other form square cells, the optimal size of which for reinforcement is 2-3 cm. Welded products are most often used for finishing buildings subject to severe shrinkage;
- expanded metal – made from sheet metal by forming diamond-shaped cells on a special machine. Such material is usually installed in cases where a small solution consumption is expected per 1 m2.
Representatives and properties of painting meshes
It is difficult to find the best product to ensure a smooth surface.
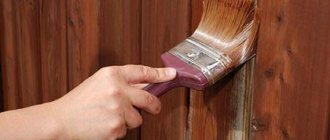
Why do you need a painting mesh?
When using reinforcing mesh for putty in construction, it becomes much easier to process walls. All kinds of building mixtures can be applied to the product: cement-sand mortar, putty, decorative compounds of any viscosity. The product is also required when laying tiles to reinforce the adhesive and compact the mixture. The product is used to seal cracks, it is used to cover the space around doors and windows, to process joints, and it is laid on the floor during the process of pouring a concrete screed.
Mesh in rolls
They produce several options for painting mesh for wall putty, including fiberglass products with large cells. This option is resistant to alkalis. Even after a fairly long period of use, there is no rust on it.
Other benefits include:
- light weight of the material;
- resistance to high loads;
- preventing wall deformation;
- increase in service life;
- improving adhesion of plaster;
- prevention of crack formation.
It is necessary to distinguish between the facade version of the mesh, which has a higher fiberglass density and larger cell size, from products for work inside buildings. Such materials are characterized by small cells and low density.
Fiberglass for walls and ceilings
When choosing products, it is necessary to take into account the type of surface. Fiberglass is a fabric that is produced from special fibers by heat treatment and pressing.
This product has the following quality characteristics:
- fire safety;
- high reinforcing properties;
- excellent tensile strength;
- antistatic;
- hypoallergenic.
Thanks to the use of safe components in production, fiberglass does not have a negative impact on human health. Considering its resistance to biological damage, this material can be considered an excellent addition to protecting ceilings and walls from mold and fungal infections.
Fastening the mesh using the correct technology
First you need to calculate the amount of canvas that will be required to complete the work. The method of fastening will depend on the type of base and the material itself. In any case, the cellular fabric must be secured strictly according to technology, avoiding strong tension or sagging.
Fastening the reinforced mesh
If lightweight products are easily fixed to the mortar by rubbing it in with a spatula, then thicker, more durable materials need to be fixed more securely. The operating procedure will be as follows:
- measure the required amount of material, carefully cut off a suitable piece;
- Secure it at the top with dowel nails, smooth out the corners and secure with self-tapping screws;
- repeat a similar operation from below, ensuring the optimal degree of tension;
- At the end of the work, attach the material in the middle so that it fits well to the rough base.
Installation of metal mesh under plaster
How to fix a product under a plaster base
Colored and other decorative fabrics are secured with simple self-tapping screws. At first, they are not completely screwed into the base at equal intervals according to the markings. Then put on the mesh and screw the screws into the wall completely. Sagging of the canvas must be completely eliminated! Small pieces of material or temporary coverings can be attached to the foam.
Fastening the mesh for drywall plaster
Coating with polymer sheets
Typically, such canvases are fixed with a mortar and a spatula. Cut the mesh into pieces of the required size, taking into account seam allowances. Apply a layer of plaster, carefully press a piece of material into it, and smooth it with a spatula. The fabric is overlapped so that one strip overlaps the other by 15–20 cm. If the walls have a complex configuration, the fastening is additionally reinforced with staples, screws or dowels.
Plastering walls with polymer canvas
Metal coatings
For a layer of plaster equal to 3–5 cm, a metal mesh is usually used. It weighs quite a lot, so it must be securely fastened. Before starting work, the canvas is degreased to remove dirt and lubricant residues. Traces of rust on carbon steel are treated with an anti-corrosion compound. Cut out pieces of the required size depending on the placement method (crosswise or lengthwise) using metal scissors or a grinder.
In the structure, holes with a diameter of 6 mm and a depth of 3 mm greater than the length of the dowels are drilled using a hammer drill. The approximate distance between the holes is made equal to 25 cm. The mesh is fixed to the wall with an overlap, starting from the top corner, and the edges are fixed with new dowels. The material is not pulled too tightly so that after plastering it can take an optimal position. Afterwards, the plaster is applied in several stages with intermediate drying of the layers.
Fastening the chain link to the wall
Tape (mesh) for drywall
Reinforced plasterboard or plasterboard reinforcing tape is used before puttying to make the structure stronger. Self-adhesive fiberglass serpyanka can be used for interior decoration, as well as for restoration or strengthening of external parts of walls. Drywall reinforcing tape has isotropic properties - regardless of the direction of application tensile load resists tension equally. Reinforcing tape for drywall should have high adhesion to the putty. This is achieved by increasing the contact area between the gypsum and the tape material.
It is desirable that when the tape is frozen into the putty, no air bubbles form between the tape and the putty.
- reinforcement of joints of plasterboard, chipboard, hardboard and other sheet materials;
- reinforcement of the junctions of door and window frames with walls;
- reinforcement of cracks, corners and seams, concrete and plastered surfaces;
- reinforcement of wall and ceiling surfaces.
Despite the fact that the self-adhesive mesh has an adhesive base, for a better effect it still needs to be secured with a layer of putty or plaster. In 90% of cases, the cobweb is glued during further painting of the surface. There are two options for reinforcement - fiberglass is fixed between layers of starting and finishing putty or glued to the finish for direct painting. In the first case, the texture of the ceiling remains smooth, in the second it has the texture of a cobweb.
To fasten the fiberglass mesh to the base using dowel-nails with a wide head or façade butterflies, the canvas is fixed at the edge, near one of the walls, then a roll or cut of the mesh is rolled out, stretched and secured with 3-4 fasteners per m2. The main thing is that there is no sagging, otherwise difficulties will arise in the work. The instructions recommend that one person tension the material, and a second person fix it. Installation of metal (or fiberglass) plaster mesh occurs as follows. The first nail is driven in from any corner of the ceiling section.
Then, at a distance of 20-30 cm, all the others are attached in one row. At the next line, the location of the nails should be slightly shifted (by 10-15 cm) relative to the previous one, that is, the fasteners are installed in a “checkerboard pattern”. In this case, the distance between the rows is also 20-30 cm. Disadvantages: labor intensive, the strength of the surface reinforcement will depend on the size of the formed mesh cells, the wire inside the plaster can rust (corresponding stains will appear on the ceiling) if it is not additionally treated during installation. When purchasing a mesh, you need to buy an additional adhesion agent for it, for example, glue (PVA, bustylast), putty or plaster.
What should I use to glue the painting mesh onto the ceiling? Since on one side the mesh has one self-adhesive surface, and on the other side it is not so reliable, that’s why additional fastening agents are used. This finishing method involves preserving the fiberglass material and then painting it with a water-based composition.
If necessary, use acrylic-based paint. As a result of the work, the texture of the ceiling will be transformed, becoming crisp and clear.
Why is plaster reinforcement needed, what function does it serve?
If you apply the mixture in the usual way, it will take a lot of time for pre-layer drying. Plaster on a mesh is applied faster, immediately over the entire thickness of the coating. The cells keep the composition stationary; they divide the common layer into many components. The strength of plaster on walls if a mesh is installed is much higher; it is not afraid of accidental impact loads. The mesh forms a monolithic slab.
The strength of plaster on walls if a mesh is installed is much higher; it is not afraid of accidental impact loads.
https://youtube.com/watch?v=eTyYGk_53Ps
Installing plaster mesh on the ceiling
Before knitting reinforcement for the foundation, you will need to select its cross-section. The working rods in the slab are arranged perpendicularly in both directions.
Vertical clamps are used to connect the top and bottom rows. If the side of the foundation does not exceed 3 m, then the minimum permissible diameter of the working rods is set to 10 mm. In all other cases it is 12 mm.
The maximum permissible cross-section is 40 mm. In practice, rods from 12 to 16 mm are most often used. Before purchasing materials, it is recommended to calculate the mass of the required reinforcement for each diameter.
Reinforcement schemes for a monolithic foundation slab along the main width assume constant cell dimensions.
Conditions of use
How mesh reinforcement will perform during operation depends on several factors. The mesh for plaster, due to its substance, must be chemically “compatible” not only with the binding components of the mixture, but also with various additives included in the solution. Therefore, the type of plaster composition used must be taken into account when choosing a mesh. This is how cement mortars “dissolve” some plastics even after curing. The gypsum composition does not have such an effect, therefore it is compatible with networks made of any material.
An important condition is also the place of application of the reinforcing mesh for plastering walls, the thickness of the plaster layer, etc.
Briefly about the selection criteria for the intended purpose:
- Grids are used for exterior work, plastering of pools and bathtubs, as well as when the thickness of the leveling layer is more than 3 cm.
- Plastic products are chosen if the plaster mixture or putty is based on gypsum.
- In the decoration of fireplaces and stoves, chain-link is used to reinforce clay or cement composition, and fiberglass is used for thin plaster.
For outdoor use
Extreme street conditions limit the choice of facade mesh material for plaster. To reinforce the facade with insulation, the use of fiberglass and basalt sheets is allowed. For the base that is most susceptible to external mechanical influences, metal reinforcement is preferable.
Manufacturers, taking into account the harsh operating conditions, produce meshes for facade plastering, which is indicated in the product labeling. Such networks are able to withstand sudden temperature changes and exposure to UV rays.
These products are also used in unheated rooms.
For interior work
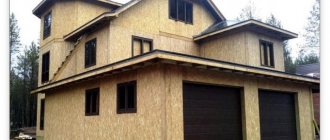
Plastic mesh for wall reinforcement is most often used when finishing ceilings, due to their low weight. They are suitable for interior work. Lavsan mesh is also used for plastering internal walls and partitions made of OSB and chipboard. The technology of reinforcement is described in the articles under the headings Decorative plaster and Plastering.
For the ceiling
Light nets are especially suitable for gypsum plaster ceilings. When thin-layer plastering, the threads of synthetic products overlap more easily, which reduces the consumption of plastering materials.
Often the ceiling in old-type houses is “decorated” with rustics - they are sealed with mortar with sickle reinforcement, or a mesh fabric is placed in accordance with their direction. The entire ceiling surface must be covered with canvas (the joints overlap by at least 10 cm). The corners of the junction of the wall and the ceiling plane are also reinforced with overlap.
Ceiling plaster on mesh
As we can see, plastering ceilings is not the easiest part of the renovation. To perform this task efficiently, you must have special knowledge and skills. Before you start plastering, the ceiling must be carefully prepared. However, even a thoroughly prepared surface cannot serve as a 100% guarantee of the strength and solidity of the plaster layer. During the plastering process, various errors in work are possible, for example, violations of proportions, exceeding the permissible thickness, non-compliance with temperature conditions, sudden temperature changes. These factors can contribute to the deterioration of the plaster. The solution to this problem is the use of special plaster nets.
Types of plaster mesh and selection criteria
The main criterion when choosing a plaster mesh is the thickness of the plaster layer. Plastering the ceiling without using a mesh is possible only if the base is sufficiently smooth, without rust, and the thickness of the plaster layer is less than 2 cm. If the unevenness on the ceiling is more than 5 cm, then experts generally do not recommend leveling the ceiling with plaster. In this case, it is better to use suspended or suspended ceiling structures.
To level ceilings with plaster, two types of plaster mesh are used: fiberglass and metal reinforcing mesh. The first option is used for ceilings with rustications and a plaster layer thickness of up to 3 cm. A fiberglass reinforcing mesh protects the surface from cracking. If the thickness of the plaster layer exceeds 3 cm, then there is a risk of it collapsing under its own weight. To avoid this, a reinforcing metal mesh is used.
Installation procedure for fiberglass plaster mesh.
Important! For high-quality plastering of the ceiling, it is necessary to use a mesh with the following parameters: cell size – 5x5 mm; density – 110-160 g per sq.m. The material must be resistant to alkalis.
The mesh sheets on the ceiling can be placed either lengthwise or crosswise. First of all, it depends on the presence of rust on the ceiling. If there are any, then solid canvases are located along each of them. If there is no rust, then the grid can be positioned at your discretion; the main condition is that it must cover the entire surface. By cutting the canvas to the required size, you can leave small reserves (about 10-15 cm), then the mesh will cover the joints between the ceiling and walls, and they will be securely strengthened.
The mesh should be located in the very middle of the plaster layer, so it will be most effective. Based on this, we begin plastering the ceilings by applying the first layer of plaster mixture or putty. Then a mesh sheet is applied and recessed. The next layer can be laid immediately, or you can let the first layer of plaster dry.
Sometimes fiberglass mesh plaster is attached directly to the ceiling surface. In such cases, it is fixed with screws or staples. Then a layer of plaster is applied. This option is indeed possible, but only if the thickness of the plaster layer does not exceed 1 cm. With a thicker layer of plaster, the mesh appears to be on the edge and is not such an effective means of strengthening the surface.
Important! Adjacent mesh sheets are laid on the ceiling surface with an overlap of at least 10 cm.
Installation procedure for metal plaster mesh
As already mentioned, reinforcing metal mesh is used when the thickness of the plaster layer is more than 3 cm. As a rule, in such cases, a cement-based plaster mixture is used. It is possible to use gypsum plaster, but subject to strict adherence to the manufacturer's recommendations.
To work, you will need a mesh made of galvanized metal (mesh size: 10x10 mm or 12x12 mm). An alternative option is expanded metal mesh (mesh size 10x25 mm). A special feature of the grid is diamond-shaped cells arranged in a checkerboard pattern. The advantages of expanded metal mesh are its light weight (the thickness of the sheet from which it is made is only one and a half to two millimeters). The mesh adapts well to the surface even with the minimum permissible thickness of the plaster layer, and is also easy to cut. Another plus is that it does not leave rust marks.
Important! Regardless of the type of plaster metal mesh, the material must be thoroughly degreased before use.
The location of the metal mesh on the ceiling, as well as the fiberglass mesh, depends on the presence of rust. If they are, it means that the material is laid along each of them in one piece. Metal scissors are used to cut metal mesh.
The mesh on the ceiling is fixed with screws and mounting tape. On average, 16 holes are required per square meter of surface (the distance between the holes should be 25-30 cm; the depth of the holes should exceed the length of the dowels by 2-3 mm). We use a six-millimeter drill (drill). As a result, the mesh should fit tightly to the surface; in places where the material sags, it is necessary to install additional fastening.
Important! The edges of the reinforcing material should under no circumstances dangle; they must be carefully secured. In this case, adjacent canvases overlap by 10 cm.
Plastering the ceiling on a grid is carried out using metal plaster beacons, which are mounted directly on the reinforcing material after it has been laid.
If it is necessary to apply two layers of plaster, the work procedure is as follows. The first layer is applied with a trowel, pressing the solution through the cells so that it adheres to the surface; then it is leveled and allowed to dry completely. Only after this is the second layer of plaster applied.
How to get rid of rust on plaster
Rust stains that appear as a result of wet plaster (as a result of leaks) are difficult to remove.
There are several ways:
- decolorization of dyes with hydrogen peroxide or sodium hypochlorite (the latter is not used for gypsum plaster);
- treatment with orthophosphoric acid (solution) converts rust into insoluble compounds;
- the stains are covered with hydrophobic putty, which allows steam and air to pass through, but does not allow liquid water to pass through;
- at the finishing stage, spot insulators (spot-insulating primers) are used;
- For painting, you can use special water-based primers with an acrylic base with a modifier - air-curing epoxy resin. Such primers create a membrane that allows steam and air to pass through, but prevents capillary seepage. The primer has good adhesion to water-based paints.
Plastering metal is not as difficult as one might think. The main thing is to ensure adhesion, coordinated operation of the coating and the base, and protect the finish from rust. Then the plaster coating will not sag, fall off in pieces and become covered with rusty spots.
Varieties
Even such a simple thing as a reinforcing grid for ceiling plaster has several types. They are selected depending on the type of plaster, the thoroughness of the finish and the base with which to work. Most often, the following types are used:
- Putty mesh made of plastic or fiberglass. It is used for layers from three millimeters to thirty. Easy to attach and very easy to cut with regular scissors.
- Metal galvanized. Necessary in cases where it is necessary to make a layer of more than 30 millimeters. For cutting you will need metal scissors or a hacksaw.
- Wooden shingles. Currently, it is used only for finishing surfaces in old buildings and is practically not in demand in modern construction. You can make it yourself from thin wooden slats.
- A self-made grille from any metal wire. Used when restoring old houses or in cases where no other variety is available. Can be used in conjunction with shingles.
Types of plaster mesh
Reinforcement products can be of different types and made of different materials depending on the application.
The most commonly used canvases are:
plastic masonry. It is used for brickwork, is made of polymer materials and has a cell size of 5x5 mm;
Plastic masonry grating.
universal small. Used for reinforcing thin layers in finishing plasters, made of polyurethane with a cell size of 6x6 mm;
Universal fine micro mesh.
- universal average. It has a cell size of 13x15 mm and is used for layers of medium thickness;
- universal large. Cell size 22x35 mm. Used for thick layers of plaster over large areas;
- fiberglass. This product is highly durable and resistant to temperature changes and chemical influences. It has a cell size of 5x5 mm (photo). The scope is not limited;
Cement plaster on fiberglass grating.
- armaflex. It is made of polypropylene with a cell size of 12x15 mm and has reinforced cell connection units. Used for plastered areas with heavy loads;
- steel mesh. Made from wire steel with different cell sizes. The product is used in places of high load during interior decoration;
- galvanized mesh, made of intertwined galvanized wire with automatic soldering at the plexus nodes. The product is particularly reliable, the scope of application is not limited, but its price is an order of magnitude higher than others.
Installation of fiberglass or propylene mesh
- To install the product, you need to apply the first layer of plaster or putty, then apply a mesh to the treated surface and slightly press it into the layer that has not yet hardened.
- After partial drying or immediately after installing the network, you can apply a second layer. The thickness of the layers must be distributed in such a way that the reinforcing fabric is located exactly in the middle of the entire thickness of the finishing layer.
Press the fiberglass grid into the mixture.
- You can often find this method when a propylene or fiberglass mesh is installed on the surface to be treated before applying plaster and secured with self-tapping screws or special metal staples. This method is acceptable for small coating thicknesses, where the total thickness does not exceed 10 mm.
- The ends of the reinforcing fabric in the internal or external corners are pressed tightly with a wide spatula or construction rule, at this time, the remaining parts of the fabric are smoothed with a small spatula or by hand.
We first fasten the network with self-tapping screws, then plaster it.
Installation of steel or galvanized mesh
To work with metal reinforcement you will need a tool such as:
hammer drill for making holes for dowels;
Electric hammer drill.
- trowel or ladle for throwing a layer of plaster;
- a large spatula or construction rule for leveling the surface;
- dowels with washers for fastening the reinforcing fabric;
- metal scissors for cutting mesh.
So:
- Metal sheets are used in cases where the coating of finishing plaster exceeds 30 cm or has a high load on the surface. Before starting work, the canvas must be degreased or wiped with a damp cloth.
- Next, the canvas is cut using metal scissors (photo) into small pieces for ease of installation. If there are seams in the floor slabs on the surface of the ceiling or floor, then the net is laid exactly on this seam.
Cut out the required piece with metal scissors.
- Using a hammer drill, holes for dowels are drilled in the surface to be treated at a distance of 20-35 centimeters from each other and the dowel tips are inserted. After this, sheets of canvas are placed on the surface and fixed with dowels with slight tension, preventing the mesh from sagging.
- Metal or plastic beacons are attached to the installed network strictly according to the level and given time to dry. The finishing solution can be applied in two stages depending on its thickness.
- The first layer is applied with a ladle or trowel, after which it is ironed well with force so that the solution passes through the mesh and does not leave voids.
- The second layer is applied after the first has completely dried and the surface is leveled according to the installed beacons using building rules. In most cases, the beacons are not removed, but are left in place to further strengthen the finish.
We install beacons and apply the mixture to them.
Mesh or cobweb
There are two types of reinforcement - strengthening the ceiling with fiberglass mesh and cobwebs. The mesh is fixed to the base of the ceiling or between layers of plaster, fiberglass is glued to the surface between layers of putty or on top of the putty layer.
Fiberglass reinforcement is necessary if:
- — The base is old and has a weak surface,
- — There are joints of different materials,
- — It is necessary to apply a layer of plaster from 3 cm for leveling
Spider web reinforcement is required if:
- — Old ceiling,
- — It is planned to paint the base,
- — There is a desire to achieve a uniform surface texture during further finishing.
The technology of reinforcement with mesh and fiberglass is different, so each of them will be discussed in turn.
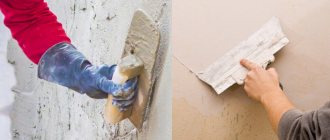
Grout
At first glance, grouting is one of the simplest tasks facing a qualified or novice craftsman. Incorrect movements, increased thickness of the plaster layer, refusal to use tools moistened with water are factors that can lead to extra layers of coating created in the previous stages.
Grout
There is no grout (covering), which means that the surface finishing will remain unfinished. A very liquid plaster solution is applied to the wall in small portions and a rapid, fast, but high-quality distribution of the solution over the entire treated area begins immediately. Work is carried out only on moistened but already established plaster. By making circular movements in a counterclockwise direction, experienced and novice craftsmen achieve complete alignment and eliminate all possible shortcomings of the work done.
High-quality multi-layer priming will help prevent excessive absorption of moisture from the solution. For such treatment, you will need to use a ready-made solution containing various additives that prevent the appearance and development of fungus and mold. In addition, strict compliance with all the requirements of the technological process will help achieve the goal.
Popular manufacturers
In the market of construction and finishing materials, domestic manufacturers occupy leading positions:
- — has been working in this segment for 20 years, producing 50 thousand types of goods. It produces “VERTEX” mesh for reinforcing polystyrene insulation, and “Valmiera” fiberglass mesh.
- produces all types of metal mesh from wire BP 1, BP 2, steel, surfacing, spring. He is a representative of Cherepovetsky.
- - the main supplier of reinforcing fiberglass mesh CCI-160 (density 160 g/m²) in the West Siberian region. It produces “TG-Textilglas” - a mesh for working over a layer of insulation.
- (Izhevsk) offers not only metal and fiberglass reinforcing mesh, but also glue for their fastening.
- - German representative on the market of specialized fiberglass mesh. The main production of plaster mesh is located in Sonthofen.
Plaster mesh 1 meter wide is delivered to commercial enterprises in rolls 30-80 meters long (roll weight 80 kg) with fasteners and additional elements. In retail trade, goods may be sold by the meter.
Is plaster reinforcement required?
Considering that in Russia it is customary in most cases to carry out repair work under European-quality renovation conditions and this type of repair assumes, first of all, its compliance with European standards, in the future we will also point out the building rules adopted, in particular, in Germany in relation to work for plaster
.
Reinforcement of the internal plaster layer is usually done using a plaster mesh. Its purpose is to reduce the impact of the underlying base on the finishing layers and minimize the risk of cracks associated with the movement of such layers.
Plaster mesh is not used to increase the adhesion strength of the plaster layer to the base. To do this, you should use special solutions such as “Betokontakt” (see also the consumption of materials for finishing work).
The use of such a grid is not expressly provided for by the current Russian building regulations. In turn, European standards, although they do not necessarily require reinforcement of the plaster layer, indicate that the use of plaster mesh is possible
in cases where there is a need to reduce the risk of cracks in the plaster layer. However, reinforcement of the plaster layer within the meaning of European building standards cannot serve as a means to prevent the formation of cracks caused by structural processes (for example, deflection of floors, shrinkage, creep of load-bearing structures or their deformation caused by temperature changes) (see DIN V 18550 p. 4.3 paragraph 2 and paragraph 6.3).
In accordance with SNiP, the thickness of the plaster layer made with gypsum mixture is on average 15 mm (which corresponds to European construction regulations). This plaster is applied in one layer. In the case of reinforcing the plaster layer, the mesh is installed (embedded) in a freshly applied and leveled plaster
to a height of at least 2/3 of the entire plaster layer (for example, to a height of at least 10 mm with a total thickness of the plaster layer of 15 mm) without the formation of folds and even before the formation of a crust on the surface of the main layer is covered with a subsequent layer
of plaster
having a height of no more than 1 /3 of the total layer thickness (the technology of applying “wet layer on wet base” or “wet on wet”) - thus, virtually all plastering work is carried out in one layer.
The plaster mesh is laid with an overlap of at least 100 mm (at the junction of one structural element to another - at least 200 mm).
Plaster reinforcement
on the surface of the walls, in most cases, it is not carried out entirely, but only at the junctions of various finishing surfaces and structural elements. When applying a plaster layer to the ceiling surface, it is recommended to apply reinforcement over the entire area of such a layer.
When covering the wall surface with ceramic tiles, the plaster layer is not reinforced. At the same time, the thickness of the plaster layer in accordance with European standards is 10 mm versus 15 mm, provided for subsequent wallpapering of the surface or covering with layers of paint.
Plastering work should be carried out provided that the mass humidity of the underlying base is no more than 8% (Russian SNiP) or the residual moisture is no more than 3% (V DIN, Germany).
Our Austrian colleagues once conducted detailed research and found that in the case of using gypsum plaster
in new buildings subject to structural deformations (for example, in the form of shrinkage), it is possible to reduce the risk of cracks on the surface
of the plaster
, provided that
the plaster
in the form of a layer 20 mm thick and reinforced with plaster mesh.
Currently, there are actually plastering and painting stacks. The first has a cell measuring 5 x 5 mm and is used to reinforce the plaster layer. The second has a smaller cell - 2 x 2 mm and is used when applying putty. In addition, the so-called “cobweb” - fiberglass, which is also used to reduce the visibility of cracks that may form in the underlying layers, has become widespread on the Russian market.
When preparing the surface of walls and partitions “for painting,” as a rule, a “cobweb” is used. In this case, reinforcing putty layers with painting mesh is not used in most cases. However, such work can be performed additionally at the request of the customer or if there is such a task in the project.
You may find it useful:
Share a link to this page:
In what cases is it used?
If all the planes in your house are relatively flat and the repairs are supposed to be purely cosmetic, light leveling with a mixture not exceeding one centimeter in thickness can be done without strengthening. However, if your home is new and may shrink, or in cases where the mortar will be applied thicker, it is better to use strengthening bases.
If the applied composition will be applied to a thickness of more than three centimeters, the use of reinforcing materials becomes a mandatory part of the work. Without reinforcement, in this case the plaster will no longer hold on and will fall off.
However, to obtain a better result when leveling surfaces even with a small leveling thickness, a polymer painting mesh for the ceiling is often used. It is somewhat thinner than the metal used when working with thick layers of mortars, but it significantly strengthens the surface and prevents the formation of cracks in the coating.
The procedure for plastering aerated concrete with your own hands
Preparing the walls
Before applying plaster indoors, it is necessary to prepare the aerated concrete surface. It is necessary to inspect the aerated concrete walls for defects.
- If there are protrusions and irregularities, it is necessary to cut them off with a plane or aerated concrete float. If you neglect this, in the future it will lead to excessive consumption of the plaster mixture and an increase in the thickness of the plaster, which contributes to the formation of cracks.
- If there is a through gap in some places between the blocks, it should be sealed with plaster mortar to the level of the wall. You can use special glue for aerated concrete blocks; you won’t need much of it.
- After the repaired areas have dried, you should clean the wall with a stiff brush to remove sagging and random pieces of mortar.
Through gaps between gas blocks
Next, a primer is applied.
Primer for aerated concrete under plaster
Using a primer for aerated concrete allows you to reduce the moisture absorption of the wall, while maintaining the vapor permeability of aerated concrete. The primer fills the pores of aerated concrete, creates an additional protective layer and improves the adhesion of the plaster solution to the base.
To answer the question of which primer to use for aerated concrete, let’s consider the types of primers depending on the type of room:
- For dry rooms, universal primers are suitable, for example Unis, Volma Plast primer, TEX Moisture Protection Profi.
- For bathrooms and kitchens, it is better to choose a deep penetration primer. It is recommended to use brands such as Ceresit CT 17, Prospectors, Knauf-Mittelgrund.
Primer Volma Plast
Before applying the primer, it is recommended to remove dust from the surface of the aerated concrete; to do this, you can moisten the brush with water and walk along the wall once. This will not only improve the quality of primer application, but will also reduce its consumption.
You can apply the primer to aerated concrete walls manually with a brush or roller, or you can use a spray gun to speed up the process and spray the primer in an even layer over the entire surface of the wall. Let the primer layer dry and proceed to the next stage of work.
Applying primer to aerated concrete blocks
Is a mesh needed when plastering aerated concrete?
The mesh is necessary to prevent cracking of the plaster. We recommend using fiberglass mesh that is resistant to alkaline environments.
The mesh is attached to the wall using ordinary nails, which are driven in one-third, after which the nail is bent to limit the movement of the reinforcing mesh. Ideally, there should be a few millimeters between the wall and the mesh.
Fiberglass mesh
Installation of beacons
If the thickness of the planned plaster layer is more than 10 mm, then it is recommended to plaster the aerated concrete walls along the beacons. Beacons are necessary to obtain a perfectly flat plaster surface. Usually a metal beacon profile is used; a profile for plasterboard sheets may also be suitable. Beacons are usually installed at a width greater than the width of the rule by 10-15 cm.
Beacons on aerated concrete wall
The procedure for applying plaster to aerated concrete
1. The first layer (“spray”) is applied to a thickness of no more than 5 mm. To do this, prepare a liquid “creamy” solution, after which it is poured with a sharp movement using a ladle. No leveling is required for this layer.
2. The second layer (“soil”) is the main stage of plaster. For the second layer, a thicker solution is prepared. Apply the solution using a spatula, evenly between the beacons.
3. Next, using the construction rules, the mixture is leveled. Alignment should begin from the bottom of the wall. The process is performed from the bottom up, with the rule being moved in a zigzag motion from side to side. The removed excess mortar is poured onto the free sections of the wall. Thus, leveling continues until the excess solution is removed as a rule.
Leveling the plaster using the rule
4. After the plaster has dried, the beacons are removed, and the resulting recesses are filled with mortar.
5. Apply plaster mortar in corners and hard-to-reach places: near pipes, radiators, etc.
6. When the plaster is completely dry, apply a “covering” with a thickness of 1-3 mm. The mixture is also leveled by the rule. After drying, the surface is rubbed with a construction float or sandpaper in a circular motion.
Grouting plaster
How to attach
There are several options for how to repair a ceiling using a mesh. Each of them differs both in the type of materials used and in the method of attaching the reinforcing base to the ceiling. In fact, attaching it is very simple:
- For nails and staples. You can use special dowels with a wide head. The fastening is carried out according to the following scheme: the first nail is driven in the corner and fixes the initial section, after it, the next one is driven in at a distance of about 20 centimeters and then, at the same distance, the remaining nails are driven in in one row, attaching the reinforcing base to the plane. The adjacent row of nails is shifted relative to the first by 10 centimeters, forming a “checkerboard” order. The distance between rows is about 30 centimeters.
- A plastic or fiberglass mesh for putty can be attached to the applied composition itself. To do this, a solution is first applied to the surface, and then, after slightly leveling the applied mixture, a reinforcing grid is pressed into it. After this, the plane is leveled by the rule. This method is used when the layer thickness does not exceed 15 millimeters.
- Another option for laying a reinforcing base is used when plastering on beacons occurs. In this option, the screws are installed first, which will serve as a guide for installing the beacons, then a solution is applied into which, through the heads of the screws, a ceiling mesh is placed under the putty. After this, the beacons themselves are installed and further alignment is carried out.
After the first layer of the composition is applied, it must dry. There is no need to use reinforcement in subsequent passes. All that remains is to apply the finishing coat of putty and sand the resulting surface.