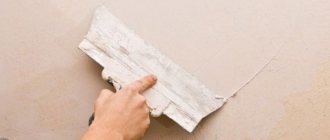
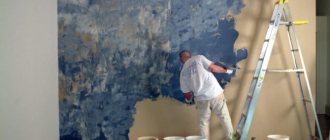
When leveling walls and ceilings, you can use different materials, but plasterboard is most often used for this. This is due to several reasons. Firstly, the material is convenient and easy to install. Secondly, it is quite inexpensive. Thirdly, even an inexperienced master can cope with such work.
But after installing the sheets, you also need to think about how to refine them or prepare them for further cladding. Many people apply decorative plaster to drywall. This allows you to make an already flat surface even more ideal, and the layer will not take up additional space that the drywall has already occupied.
Is it possible to apply decorative plaster to drywall?
This finish is considered common, but there is still a lot of debate on this issue today. Some people say that it is impossible to cover ordinary drywall with liquid plaster. Others are convinced that plaster is the most effective way to finish gypsum boards. To prevent the material from deforming from moisture, you need to buy moisture-resistant sheets.
Applying decorative plaster is a popular way of finishing plasterboard surfaces
Application rules
When applying plaster solutions to drywall, you need to consider:
- Plaster can only be applied to drywall that is resistant to moisture. It is painted green, marked in blue - GKLV. The gypsum layer of such sheets is impregnated with special compounds with water-repellent properties.
- Several thin layers of solution are applied to problem areas (dents, depressions). The next one is applied only after the previous one has dried.
- Before applying the plaster solution, you need to treat the material with a deep penetration primer. It will serve as a barrier to the penetration of moisture from the plaster mortar into the gypsum layer of the walls. Apply the primer in a thin layer, making sure that the entire surface is saturated. After the composition has dried, apply the primer again.
- When using decorative plasters, you must strictly follow the application instructions.
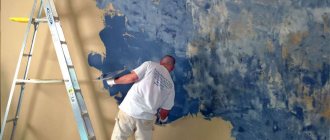
Plasterboard walls only at first glance seem perfectly smooth. Even such a surface requires preparation before performing the final stage of finishing work.
Peculiarities
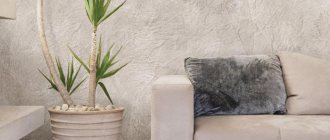
The main feature of decorative plaster is considered to be elasticity. Thanks to this property, it can be easily applied to plasterboard sheets if the master has experience in finishing rooms. With the help of this finishing material you can turn even a simple interior partition into a real masterpiece. A wall covered with this plaster will have a unique texture and look very beautiful.
Decorative plaster is also in demand due to the fact that it is undemanding to the surface to be coated. This minimizes preparatory work. As a result, the ceiling and walls will be covered with a seamless finishing layer, which will hide small defects on them (cracks, differences, etc.). In addition, plaster on drywall is completely harmless to humans.
It should be noted that moisture-resistant types of decorative plaster allow finishing damp and technical rooms.
Decorative plaster will give the surface a decorated appearance and eliminate minor defects
List of tools and materials
Covering plasterboard walls with plaster requires the necessary tools and raw materials. The list includes: primer, spatula or trowel for laying and spreading the mixture, water, plaster mixture, roller or brush, varnish, paint. You may also need a vacuum cleaner or rags to clean the wall surface. Thus, decorative plaster is an excellent finishing material. It will not only decorate any room, but will also help disguise various defects, including cracks and swelling of the wall surface.
This mixture has a number of advantages: it is easy to use, does not require complex equipment for application, and lasts a long time. Some types do not allow moisture to pass through and are resistant to low and high temperatures. Of great importance is the fact that this is an environmentally friendly material that does not emit harmful chemical compounds.
Types of drywall
You need to choose plaster taking into account the type of drywall. GKL is of the following types:
- ordinary;
- moisture resistant;
- fire resistant;
- moisture- and fire-resistant.
The more useful qualities drywall has, the more expensive it is. Most often, the walls of premises are finished with ordinary and moisture-resistant sheets.
Types of drywall
Drywall plaster: structural, textured and Venetian coatings
The use of plasterboard sheets when preparing premises for finishing makes it possible to level even the most crooked surfaces, which are abundant in old houses. In addition, this material is inexpensive, convenient and easy to install, which even construction beginners can handle. All that remains is to find the answer to one question - what and how is drywall plastering done?
In fact, it is very often asked by home craftsmen who want to save money on literally everything. There will be no definite answer here, since everything depends on the final result of the repair. For example, if you decide to put up wallpaper, think about how quickly you will get tired of it and want to change it.
In the photo - self-made gypsum board plaster
When that day comes, you will realize that you did the right thing several years ago by plastering the drywall, since in this case, after removing the wallpaper, you will be left with a smooth wall. Otherwise, the cardboard covering the plaster will fall off along with the decorative plaster finish, making further use of the sheets unacceptable.
Plastering plasterboard walls in an apartment
There are two types of gypsum board plaster - for wallpaper and for painting. In the first case, small scratches are possible on the finishing putty, which will be hidden behind the decorative finish. In the second, you will have to smooth everything down to the “mirror”.
In the article we will also answer the question - is it possible to apply decorative plaster to drywall? In this case, other rules apply.
Types of decorative plaster - what type of composition to choose
The plaster adheres well to drywall, making the wall surface even smoother. After applying it, there is no need to cover the walls with wallpaper, because they look beautiful without it. The main thing is to choose the optimal mixture for finishing the walls.
Handitex
Quite a popular type of plaster.
Designed in the following styles:
- Relief.
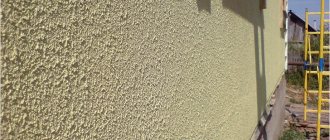
- Fur coat or bark beetle. It has an original look.
The “Fur Fur” and “Bark Beetle” finishes have several types that differ in their reliefs
The color of the mixture depends on the amount of dye. “Shuba” and “Bark Beetle” coatings come in several types, differing in relief. The classic look has medium depth and an unusual texture.
As necessary, artificial grains are added to the mixture, with the help of which it is possible to radically change the appearance of the finish. Some mixtures are similar to mastic. The density of the applied solution is regulated by water, which is simply added to it. Dyes are also added to the mixture to change the color.
The pattern for the wall needs to be thought out in advance, taking into account the style of the room.
Handitex dries completely within a day.
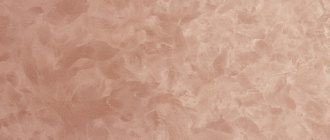
Silk
It is used to cover different surfaces, and it always looks different on the walls. It is characterized by a velvety shimmering surface. The required shade can be given to the material by adding paints to the solution.
On drywall, silk plaster looks like a velvety and shimmering surface
This type of plaster contains artificial silk fibers, which is why it is often called velvet. In addition, the mixture contains cotton and cellulose fibers, as well as water-soluble glue. Various glitters and plasticizers are also added to the diluted solution.
Main advantages:
- Unique look. Allows you to create a surface with a unique texture.
- Long service life. If the application technology is followed, the coating will last more than 10 years.
- Environmentally friendly. Made from components that are harmless to human health.
- Maintainability. Areas damaged during operation can be repaired at any time without any problems.
Content
If you plan to use plaster to finish plasterboard walls, then listen to the following tips:
- at the stage of purchasing materials for repairs, choose moisture-resistant sheets that have special markings;
- Be sure to use special primers that have the ability to penetrate deeply;
- apply the plaster to problem areas (small dents or potholes) in thin layers several times, and do not forget to give the previous layer time to dry completely;
- use all kinds of decorative plasters for finishing drywall, while strictly following the recommendations for its application given by the manufacturer in the instructions.
How to plaster drywall
It is allowed to repair small dents and potholes that appeared on drywall sheets in case of improper storage, violations of transportation rules, as well as small errors made during installation. In this case, the surface is first primed, then a layer of putty is applied, and a little later a thin layer of plaster is applied. It must be remembered that the putty layer should not exceed three millimeters. If the depth of the pothole is greater, then you cannot do without plaster.
It is not recommended to use a thick layer of plaster to hide frame installation errors that have led to the appearance of obvious unevenness in the walls. This will, of course, hide the defect for some time, but over time the plasterboard sheets will not withstand the weight of the applied plaster. This will be expressed in their deformation, the appearance of cracks, and peeling of the plaster layer. Therefore, if large distortions are detected, it is better to immediately correct installation errors by replacing sheets with defects with high-quality material.
Drywall perfectly tolerates the effects of special types of decorative plaster, which can be safely applied to its surface in a thin layer, having previously primed it. The most popular are granular stone materials, characterized by varying degrees of coarseness and color, which can be of natural or artificial origin. There are two ways to apply grain coatings:
- paste mixtures, ready for use, are applied to the prepared surface using a trowel or spray; the thickness of the layer depends on the diameter of the grains, exceeding it by one and a half to two times;
- dry colored stone chips are applied using a sprayer to the surface of the drywall, previously lubricated with a mastic adhesive composition.
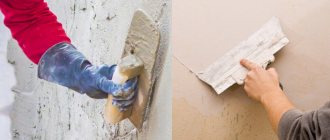
Application of decorative plaster
- After finishing the installation of plasterboard sheets, clean their surface from settled dust. An industrial vacuum cleaner copes well with this task. If it is not available, use improvised means. A rag that needs to be slightly wetted in water will do.
- Apply putty to uneven areas, seams and joints. After the mixture has hardened in these places, cover the entire wall with a leveling layer.
- Apply a primer suitable for drywall surfaces. Manufacturers usually recommend suitable primers. Choosing a primer for moisture-resistant drywall.
- Proceed to applying decorative plaster.
Important! These works are carried out at moderate air humidity and above-zero temperatures (+5° to +35°C). It is necessary to use rubber gloves and a respirator (gauze bandage).
After finishing the work, wash all the tools thoroughly, close the remaining finishing materials used tightly in jars and store them in a dry place. Perhaps someday they will be useful for restoring damaged decorative coatings.
Depending on the type of decorative plaster, the option of its application depends. You can learn about some of them from this video.
Thus, from all of the above we can conclude that not all drywall is suitable for plastering. It is advisable to purchase moisture-resistant drywall, but even this must be protected with deeply penetrating primer solutions. You should not apply too thick a layer of leveling plaster, otherwise the result of the repair will disappoint you. Nothing and no one prevents the use of decorative plasters for finishing plasterboard walls. Therefore, experiment and ensure that your home is the most comfortable and original.
We recommend similar articles
How to choose wallpaper: classification of materials for gluing
What tools to use for finishing plasterboard walls and ceilings
To decorate walls with plaster, you will need to purchase a special high-quality tool from a building materials store, since the final result will depend on this.
For example, working with an inexpensive spatula will leave unsightly stains on the walls. Manufacturers of decorative plasters advise using professional tools. There is no point in saving on it, since you won’t have to buy a new mixture to replace the used one.
Tassels
When working with decorative plaster, you need to use high-quality, expensive brushes, otherwise fluff will remain on the walls. Moreover, it is advisable to buy brushes from well-known brands with hard bristles.
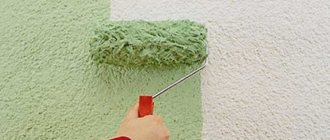
Brushes and rollers are ideal for applying decorative material
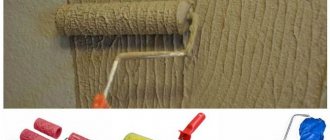
Roller
To prepare walls for plastering, you need to buy a simple roller with a tray.
To form patterns on plaster, you need to purchase embossed metal or plastic rollers with a working surface of soft fleecy material. During the selection process, it is necessary to take into account that the shorter the fur, the less textured the coating will be.
Square trowel and spatula
Thanks to the wide variety of trowels, it is possible to create unique designs on the walls. Tapping the tool allows you to adjust the thickness of the plaster.
To apply the mixture to the walls, you will also need a spatula with a smooth working surface. You cannot work with Venetian with spatulas that were previously used to apply other types of plasters.
You can scoop the mixture from a bucket with an inexpensive narrow (up to 5 cm wide) spatula.
For Grotto, Marmorino and Travertine plasters, you can use spatulas for decorative plasters, as well as tools left over after working with the Venetian.
Rectangular trowel, spatula and plastic boards
Plastic boards
Using these boards, a design is formed. For example, to work with Marseilles wax, they use a special plastic board, which is sharpened in a special way and looks like a triangle. Thanks to this shape of the board, it is possible to cover hard-to-reach places with the mixture (corners and areas near the baseboard).
Sponges, soft cloths
These products are used to polish the surface of the plaster. To reduce the time for this work process, it is allowed to use a sander with a felt wheel. The speed of this power tool should be no more than 600 rpm.
To get an original pattern protruding above the plastered surface, use stencils and sponges
Stencils
Made from hard plastic. Allows you to make beautiful drawings and patterns on the walls. Specialized stores today offer a wide range of stencils, which allows you to make any room very cozy and beautiful.
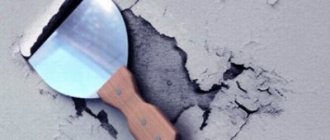
We remove defects
Applying plaster mortar to plasterboard is simple, but the process requires some knowledge.
The instructions are as follows - we have to seal the joints, places under the screw heads, roughness and potholes.
- Any surface must be prepared before plastering, some better, some worse. In our situation, the drywall should be cleaned of dust that settled on the sheets during installation. It’s great if you have a construction vacuum cleaner; an alternative is a damp rag, which will also cope with this task.
Priming gypsum boards
- An important stage is the preparation of the plaster mortar. The durability of its operation depends on this. You can prepare it from a dry factory mixture or use a ready-made solution.
Advice: since your mixture is based on gypsum, you must follow the proportion of water indicated on the package, and also prepare it immediately before application.
Preparing the solution
- Seal the joints between the sheets.
To do this, put a solution on a spatula that is specially designed for sealing seams, and use a pushing motion to place it into the seams. Also, do not forget to reinforce the joints with plastic sickle tape or specially perforated paper tape. Plastering on drywall with gypsum mixture
There is also a way to seal seams using fiberglass and PVA glue. You can putty joints without reinforcing tapes using Uniflot putty. The tapes are sold in a roll of the required width; the latest version has a roll 1 m wide, so with a regular drywall knife you will need to cut the material into strips 70 mm wide.
Serpyanka tape has an adhesive base, so it can be attached directly to drywall and then treated with plaster. The paper tape should be installed on a thin layer of plaster, and then covered with another layer on top.
Tip: Pay special attention to the outer and inner corners. From the outside, you can strengthen the corner with an aluminum perforated corner.
The second layer of plaster should be applied after the first has dried, and before finishing puttying the joints, it must be sanded with fine sandpaper or a high-number sanding mesh.
Sealing joints with paper tape
- Seal the areas above the heads of the screws, first recessing them slightly into the sheet. Be careful not to tear the top layer of cardboard. Puttying these places should be done crosswise, this way you will better fill these places. Then plaster other surface irregularities.
Advice: do not allow solution build-up on the surface of the plasterboard; if it appears, remove it with a wide spatula.
For the main plastering of gypsum boards, use a different material that differs from the one used for the seams. Prepare the sheets in two layers, applying the second after the first has dried, so you can better see where the solution has dried. Then sand it with the desired number of sandpaper or sanding mesh.
GKL sanding
Plastering a plasterboard ceiling follows the same pattern. Don't forget to sand it as well, especially if you are preparing the surface for painting. (See also the article How to putty a ceiling for painting with your own hands.)
Features of preparatory work
The first step is to check the condition of the surface. This will allow you to determine how well the drywall was installed (the size of the seams between the sheets, whether the screws are tightened correctly, etc.). If the screws are recessed into the material by more than 1 mm, they need to be unscrewed and others screwed in next to them.
If the heads of the screws, on the contrary, protrude above the surface of the sheets, they need to be tightened more tightly.
The screw heads should not protrude above the surface of the sheet.
During the inspection, they also look at the condition of the seams to determine which ones need to be unstitched. At the same time, mark the seams that need to be glued with mesh mounting tape (serpyanka). The tape is impregnated with PVA glue, so if it does not adhere well to the surface, then it must be additionally coated with glue.
Preparation of plasterboard sheets also involves covering them with a primer. Thanks to this, it is possible to improve the adhesion of the putty to the wall. In addition, it will protect the material from moisture. However, before applying the primer, the wall must be cleared of debris and dust.
Features of drywall
Drywall (GKL) is a building material in the form of sheets, which consist of 2 layers of construction paper and a gypsum core. Such sheets are sheathed on various surfaces and all kinds of designs are created. Drywall is attached to the walls using self-tapping screws or by gluing with suitable adhesives.
Structure of plasterboard sheet
In terms of strength, plasterboard is inferior to stone, brick, concrete, wood, and therefore often requires additional protection. Often the edges of drywall sheets break, corners break off, and screw heads stick out unattractively. All these defects can be covered with plaster, although not every solution is suitable for gypsum plasterboard. Plaster that is too heavy will deform the sheets; too wet a mass will cause destruction and a decrease in strength. Therefore, the question of how to plaster drywall is quite complex and requires making the right decisions.
How to putty drywall
Plasterboard is puttied with mixtures of different compositions that have different properties. Therefore, it is worth examining the features of the main types of putty.
Gypsum putty
The binding material of this putty is gypsum, so it dries quickly and does not shrink. It needs to be mixed in small volumes, as the gypsum hardens quickly.
Gypsum compositions are easy to apply, have good vapor permeability and strength
It is not advisable to use this mixture in damp rooms, because it will swell due to moisture. Gypsum is a natural material and is therefore harmless to human health.
Advantages:
- not afraid of fire;
- dries quickly;
- made from materials that are harmless to humans.
The main disadvantage is that it is deformed as a result of exposure to moisture.
Cement putty
Thanks to the cement base, it has high chemical activity. True, because of this, it shrinks more during drying, but manufacturers compensate for this with special additives. When using cement putty, cracks may appear on the surface being treated, so several layers of material must be applied to the base.
After using cement-based putty, the walls acquire the necessary evenness and strength.
They use sand as a filler, which improves the strength of the coating.
Advantages:
- Resistant to moisture. Therefore it is suitable for residential and technical premises.
- Dries slowly.
It is also worth noting the low cost of cement putty, which makes it quite common.
Modern polymer compositions
Polymer-based putties are characterized by strength and ductility. Made from acrylic and latex.
Advantages:
- Allows you to level and strengthen walls.
- Practically does not shrink.
- Reliably adheres to the base.
- Elastic. The layer of polymer putty is not destroyed as a result of mechanical influences (impacts, friction, etc.).
- Does not burn and does not emit substances hazardous to humans.
- Suitable for all rooms, regardless of the temperature and humidity level in them.
Polymer putties are more economical, have an attractive appearance and excellent quality
In addition, polymer putty is economical to use and is evenly applied to the walls, so it is easier to work with.
Decorative coatings made of marble chips
Some experts classify this material as a type of putty. It consists of stone chips in the form of small stones of various colors mixed with adhesive materials. You can buy it in small buckets in the form of a thick mass. It is laid in an even layer on the surface of the drywall with a spatula. The advantage of this coating is that it can be applied to any materials: concrete, drywall, cement. Decorative chips help cover up cracks and defects in the wall.
It is resistant to mechanical stress, low and high temperatures, and water. It is also important that it has a porous structure, which allows the wall to breathe. The first stage of application is leveling and drying the surface. The second is priming. For these purposes, any paint can be used. The third is the direct application of stone chips.
In order for it to sinter better, it is recommended to dilute it with a small amount of water, then mix thoroughly until the mixture has a homogeneous consistency. Take a little mixture and spread it from top to bottom with a spatula. It is optimal not to make more than 2-3 movements with a spatula. The final stage of work will be to coat the surface with varnish after approximately 2 weeks.
How to plaster drywall: technology
The plaster must be applied to a cleaned, leveled, puttied, primed and dried wall. First, the surface must be coated with a primer to protect it from moisture and improve adhesion. Then you need to wait for it to dry. Then the drywall is covered with one layer of plaster, which is applied with a trowel or spatula.
The plaster is smoothed using circular or straight movements of the tool. After applying the final finishing layer, you need to wait for it to dry. The plaster hardens completely after 7 days.
The applied plaster is thoroughly rubbed in a circular or arcuate motion.
Technology of applying decorative structural plaster
It is recommended to apply plaster only to a flat, clean and dry drywall surface. At the first stage, the base of the drywall is strengthened using a special primer. This will ensure the presence of an intermediate layer, which is necessary to prevent moisture from penetrating between the wall and the finishing layer. After priming, you need to wait until it is completely dry and only then start laying the mixture. The plaster mixture is laid on drywall in one layer. To do this, it is advisable to have a special tool available: a spatula or a construction trowel.
Decorative plaster can be applied in several ways: circular movements and straight ones. At the end of the work, you need to wait some time for the mixture to harden. The plaster will fully harden in about a week. The thickness of the layer of decorative plaster can be several millimeters.
How to apply decorative plaster on drywall with your own hands
The process of finishing walls with plaster differs slightly depending on the type of mixture.
Structural and textured plasters
First, the base is treated with a primer, after which it dries, structural plaster is applied to the wall in one layer with a spatula or trowel. It is applied in circular and straight movements. It can be up to several centimeters thick.
To finish drywall with a textured mixture, you must first apply a layer of paint and sand to it. After the paint has dried, you need to apply 1 or 2 layers of plaster to the wall. Then you can make the desired pattern on the coating using different tools. The complexity of the pattern will depend on the number of layers of plaster.
Methods of applying a pattern to a textured coating
Venetian
For this plaster it is necessary to make the surface perfectly flat. After treating the wall with a primer with a spatula, you need to lay the first layer, after which it dries, you need to remove all irregularities from the surface. Next, the next layers of Venetian plaster are laid in the same way, which can be from 5 to 12. After laying the last layer, you need to clean the surface with sandpaper, after which it is advisable to cover the plaster with white wax.
Stages of applying Venetian plaster
Marble chip coating
In order for this material to better adhere to the walls, it is necessary to dilute it with a small volume of water, after which it is good to spread the mixture until it has a homogeneous consistency. Then you need to take the solution with a spatula and spread it on the wall from top to bottom. It is best to make 2-3 movements with the tool. At the final stage of plastering work, 2 weeks after applying the mixture to the wall, the wall must be varnished.
Decorative plaster with marble chips is applied with a spatula from top to bottom.
Bark beetle
It is necessary to plaster the walls with this mixture holistically, that is, you need to cover the wall in one go. This will avoid the presence of seams and differences on the coating. Surfaces adjacent to the wall must be protected with masking tape.
Take the mixture with a spatula, after which you need to distribute it evenly over the wall from the lower right corner. The tool must be held at an angle of 60°. Cover the wall in rows vertically or horizontally. The thickness of the plaster should be such that grooves and scratches can be made on it without any problems.
Options for applying the bark beetle plaster pattern
After application and partial drying of the mixture, a pattern is formed on the surface (after 20-40 minutes). Using a plastic float, strokes of the required depth are applied; if necessary, the wall is moistened with a splash of water. Then the joints are rubbed without pressure so that they are not visible. For normal drying of the coating, it is necessary to maintain a room temperature of +10°C and a humidity level of no more than 80%.
Each type of plaster has certain application features, so during the work process it is advisable to adhere to the manufacturer’s instructions and recommendations.
Do-it-yourself plaster mixture application technology
Depending on the type of plaster, you can select patterns that will ultimately be formed on the finished base. If gypsum mixtures are used, they are quickly absorbed, so you need to work in dry rooms without changes in humidity. Cement compositions tolerate high levels of humidity well, so they are applied to moisture-proof plasterboard sheets.
Polymer compounds are relatively new on the market. They are not afraid of humidity and are universal in terms of forming the desired type of pattern. But their price is high. It is uneconomical to use it for processing large volumes.
Technology for applying a mixture of plaster to drywall:
- Prepare a small amount of solution, as it hardens quickly on the surface.
- Initial plastering of the corners is carried out. Then they gradually move towards the center of the wall or ceiling.
- They try not to exceed a layer of plaster of 5 mm, since with a larger volume it does not have time to dry and cracks.
- To obtain an even layer, you need to press the tool with even force. Do not interrupt movements or use different angles of inclination when working.
- Each new piece is applied with a slight influx onto the previously attached plaster. The result is a kind of dressing that allows you to achieve a solid layer.
- Watch for elevation changes. If it is impossible to correct a homogeneous layer, it should not be masked with a new layer. First, you need to wait until the previous layer has completely dried, and then apply the final layer to the width required to seal the defects.
Important
An important finishing touch is getting the base in order. You need to level the plaster with sandpaper or rub it with a paint float.
Drywall plaster or putty - what's the difference?
Putties are mainly used to eliminate minor defects on walls (cracks, potholes, etc.). Plaster is intended to form a high-quality leveling layer on the walls, and in the case of decorative plaster, to achieve the required visual effect.
The difference between putty and plaster is their purpose
Materials have different drying times. The plaster dries for several days, and during this period of time it gains only 50% of its strength. The putty dries in 24 hours. There is no need to level the surface of the plaster using a mesh or sandpaper.
What you need to know about plaster
- Plaster for drywall should be gypsum based. It is usually offered in 30 kg paper bags. Remember that it has a fast setting and hardening time (5 minutes and 30 minutes respectively), so it should be diluted in limited doses.
- Drywall can be glued to plaster. If you do not have such work experience, it is better to play it safe with self-tapping screws and dowels. They can be mounted directly into the wall, or into a pre-fabricated frame made of wood or metal (then no dowels are needed).
Plastering walls with plasterboard - an alternative to wet plaster
- You can use drywall instead of plaster to level the walls. Installation takes place in a short time, and it is not as difficult as it might seem.
Tips and tricks
Experts advise adhering to the following rules:
- More attention must be paid to the preparation of the coating in order to achieve the desired result in wall decoration. For example, you should not heavily wet ordinary drywall with a primer, as it becomes deformed from excess moisture.
- When reinforcing the seams, to prevent the mesh from slipping, it must be slightly sunk and covered with another layer on top. Then you need to run a spatula across the surface - first across, and then along.
- After the mixture has hardened, uneven areas need to be removed with sandpaper, so there is no need to worry about sagging during work.
- It is necessary to mix the mixture before starting work, because compositions based on gypsum and other fast-hardening materials dry quickly. If you do not adhere to this rule, there will be a large overconsumption of the mixture.
- If the plasterboard structure has corners, then they need to be reinforced with an aluminum perforated corner. It must be laid on putty and then covered with the mixture.
Drywall corners are reinforced using perforated corners
You need to remember all these recommendations while working in order to beautifully decorate the walls in an apartment or private house.
Finishing plasterboard walls with decorative plaster is not a complicated procedure, so this work can be done by yourself. You just need to follow the technology of its application, the manufacturer’s instructions and the advice of experienced professionals. In addition, it is necessary to select the right materials and tools. Thanks to this, you can beautifully decorate the walls in your apartment or your own home.
Decorative finishing of drywall. We create an imitation of masonry
This is also a kind of applied creativity, and you might also want to try it.
Therefore, get acquainted with the process that we presented in pictures:
| Photo for clarity | Process description |
Marking on a piece of drywall | To make bricks, all you need is a metal square, a pencil and a utility knife. Set for yourself the size of the brick that you will adhere to when marking the tongue or butt sides. |
The front side is cut first | Now the marked sheet needs to be cut into bricks. To do this, first the top cardboard shell is cut along the lines. |
Then the back | Then the sheet is turned over and the second shell is cut at the bend. The sheet is first divided into strips and then into bricks. We don’t throw away the half-sized pieces; they will come in handy. |
ready-made bricks | Note: If the edges of the cuts are not very smooth, it doesn’t matter, this will also give your imitation more authenticity. |
| How to glue decorative stone onto drywall | To glue plasterboard bricks, you can use the most common and inexpensive tile adhesive. Dilute it according to the manufacturer's instructions and apply it to the wall. Note: The base should first be primed - you can use the same glue, but diluted to a more liquid state. |
How to glue decorative stone to drywall: reinforcement of the outer corner |
|
Applying glue | Apply glue to a small fragment of the wall and make grooves with a comb with the finest teeth. |
Installation of the first tile | If the wall is adjacent to an outer corner, start tiling from there. In this case, glue the first brick with a protrusion equal to the thickness of the drywall. Note: This is necessary so that, for complete plausibility, an imitation of the butt side of the brick is glued to the perpendicular side. Accordingly, its length should be reduced by the thickness of the gypsum board. |
How to glue decorative stone to drywall - laying with a gap | You lay the tiles by analogy with masonry - with offset joints. Make a gap between them of approximately 10 mm. You can use a piece of drywall as a template. |
Wetting the surface with a sponge | After the glue has hardened, you can begin the decorative part of the work. First, you will need to remove the cardboard shell from the surface of the bricks, for which it is moistened with water using a dish sponge. |
Removing the paper casing | The moistened paper is easily removed, after which the exposed gypsum layer is also saturated with water. |
How to make decorative brick from plasterboard - applying relief | This is done to make the plaster more pliable. Arm yourself with a utility knife, a chisel, and “straighten” the masonry - causing chips and chips in the corners that bricks have. |
Do-it-yourself decorative brick from plasterboard - sanding | You clean the surface with a stiff brush and sandpaper, sweep away the dust, prime it - and your “masonry” is almost ready for finishing. |
What kind of plaster - Bark beetle
This product is a type of decorative plaster and is divided into two groups:
- Acrylic, acrylic-silicone, silicone - ready for use, tinted in any color
- Cement – supplied dry, not tinted
It is used on gypsum and cement bases, and can be used for outdoor work and in wet areas. The finished surface of the walls resembles patterns on wood eaten away by wood-boring beetles, which is how this plaster mixture got its name.
Its undoubted advantages include the variety of design. The textured structure is formed due to the marble or granite chips included in the composition, which creates the desired effect. The desired pattern can be applied by choosing the direction of movements when smoothing. Coarser grains are usually used for finishing facades; for interior work, a smaller fraction is used.
There are four possible types of patterns:
- Classic vertical
- Horizontal
- Mixed, combining both of the above types
- Chaotic
The disadvantage is that the requirements for the base are more stringent than for conventional plasters. Since the solution is applied in a layer of only a few millimeters, the surface must be fairly smooth.
Compound
The main component of the mixture, which gives the plaster a decorative effect, is crumbs of various fractions of marble or other solid minerals. Filler: perlite or chalk. Portland cement, gypsum, acrylic, silicone, or liquid glass are used as binders.
The grain size can vary from 0.8 to 3.5 millimeters. The texture of the pattern, the depth of the grooves, the thickness of the plaster layer and the consumption of the solution depend on the size of the mineral chips.
Crumbs of a large fraction are used to make thicker layers of finishing plaster. For interior walls, fine grain is used, creating a more delicate and elegant pattern.
Figure 2. Bark beetle plaster in the hallway interior.
“Bark beetle” is produced in the form of dry compositions for making your own solution and in the form of ready-made pastes, which only need to be stirred before use.
Dry formulations are cheaper than ready-made formulations and are supplied in paper bags of various sizes. It is not difficult to make a solution, following the recommendations on the package. You can prepare any amount of solution at a time. The remains of the mixture are perfectly stored in dry places in closed packaging. When preparing a solution from dry compounds, dye can be added.
Figure 3. Dry compositions for bark beetle plaster.
Ready-made solutions are produced in durable, sealed plastic buckets of various capacities. They can be tinted using computer technology and special devices to match the color to any interior and avoid painting plastered walls.
Figure 4. Ready-made solutions for bark beetle plaster.
Important. Solutions made from dry mixtures must be prepared within approximately an hour. Due to special additives, ready-made pastes are suitable for use for much longer. It is allowed to take long breaks in work; you just need to hermetically seal the container with the remaining solution.
It is not necessary to tint the material. You can paint finished plaster by selecting paint on the same basis as the plaster compositions. A façade made from compositions of different colors looks good.
The ready-made solution is much more expensive than dry mixtures and requires certain skills in application. Under no circumstances should it be diluted with water.
The dry mixture is easier to work with, but requires additional time to prepare the solution.
Important. The consumption of the solution depends on the fraction of stone chips. The smaller the grain, the thinner the layer and the less solution is used.
Figure 5. Combination of different shades of plaster on the facade of the house.
In any case, it is better to select the color of the plaster taking into account the general style of the apartment or land plot.
Drywall arches
In modern interiors, especially in living rooms and hallways, arched structures of various types are often found. The most popular are classic and domed doorway designs. Also, with the help of a decorative arch, the room is divided into separate zones. The design itself can be simple or have curved smooth lines and patterned cutouts. It depends on the imagination of the performer. An experienced craftsman must create an arch, since this process requires precise calculations and a certain skill.
For this work, in most cases, arched plasterboard with a thickness of 6.5 mm is used. The opening width and bending radius are preliminarily measured. Next, according to the obtained dimensions, the gypsum board is cut out. At the required site, a stable arc-shaped metal frame is manufactured and firmly attached, which is subsequently covered with plasterboard. At this stage, the lighting is thought out; it should be installed before the sheathing begins. The work must be done carefully and carefully to avoid gross mistakes and damage to the fragile drywall.
Plasterboard shelves
In a room, it’s easy to create a beautiful functional shelf from gypsum plasterboard, or you can combine many of these elements in one overall composition and you’ll get a kind of furniture wall. At the same time, it will ideally suit the style and dimensions of the room.
The principle of creating plasterboard structures is based on the same steps:
- design, drawing up drawings and sketches;
- placing markings on the working surface;
- production and installation of the frame;
- cutting sheets and covering the base;
- decoration.
The project can be drawn up using the old proven method on paper or using convenient free 3D computer modeling programs. Precise, detailed design is the key to excellent results.