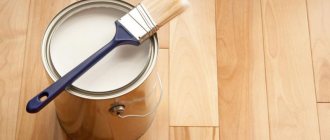
Painting the walls in the bathroom is a simple, quick, budget option. Many people mistakenly believe that it is impossible to create an elite, expensive interior in this way. There are many variations of surface coloring, most of which are not without some creativity. As a result, you can get an original wall design created by yourself. For the average person, it is difficult to distinguish such design from original projects. Let's look at the numerous ways to use coloring compounds in the bathroom and learn how to choose them correctly for a room with such a difficult microclimate.
Pros and cons of painting a bathroom
Ceramic tiles are considered the traditional coating for bathroom wall surfaces. The material has proven itself really well in the last century and has stood the test of time. However, despite all the variety of colors, patterns and shapes that manufacturers now offer, the tiles are still a little boring. The practice of painting walls began in a number of Western countries, where this fashion came to us from. Paint has a lot of advantages, among which it is worth noting:
- Purchasing the substance will cost much less than buying tiles. Working with the material is also much easier. It is enough to stock up on brushes and masking tape, which will prevent the composition from smearing on other areas of the wall.
- Variety of use cases. It is not necessary to paint the entire wall with the same color. You can resort to a number of design solutions: creating a gradation of shades, decorative painting, combination with tiles.
- The hardened layer of paint is easy to clean; simply wiping it with a damp sponge a couple of times a week is enough.
The disadvantages of using paint to cover bathroom walls include:
- The need for preliminary leveling of the surface. The paint composition will only emphasize the unevenness of the wall, so it will have to be carefully prepared using putty and primer.
- The paint is not recommended for use in bathrooms where there is no good ventilation. Although moisture-resistant compounds are a step above conventional ones, they are not yet able to withstand moisture in the same way as ceramics. In poorly ventilated rooms, sooner or later the walls will begin to become damp, which will lead to the appearance of fungi and mold.
- The paint layer is not resistant to mechanical damage, like ceramic tiles. One blow is enough for a piece of coating to crack or even break off. It’s easy to remove the paint and paint the wall again in a different color. This relative advantage will be highly appreciated by those who prefer to radically change the interior every couple of years.
For many of our compatriots, painted walls evoke strong associations with the “official” blue or green color that is so often used to cover entrances. In fact, the range of paint colors is rich and varied.
Preparatory work before painting
A prepared surface is the key to uniform application of paint and a uniform shade. If there are defects on the walls, then paint cannot be applied without eliminating them. Before painting the walls in the bathroom with your own hands, they are plastered, primed and puttied. The evenness of the surface is checked with a beacon. It is suspended on a rope in the far corner of the ceiling to the wall. The lighthouse hangs freely, close to the wall. This is how the gaps are determined.
The walls are leveled if the unevenness exceeds 0.4 mm. Too large differences on the surface are leveled with plasterboard on a profile frame.
Choice of putty
For the bathroom, putty that is moisture-resistant, heat-resistant, and can withstand temperature changes is purchased.
Two types of putty material are used:
- Composition: high quality Portland cement, fine-grained sand, crushed marble chips (replaced with clinker chips) - this is a water-resistant cement. The wall is being plastered. To prevent shrinkage in the future, the wall is watered with water for the first three days.
- Composition: acrylic or latex base, additives, synthetic additives in the form of minerals - this is a polymer waterproof material. There is no shrinkage after application.
It is strictly forbidden to use gypsum compounds in the bathroom. When they come into contact with water, they swell and fall off.
Selection of plaster
The main criterion when choosing plaster for a bathroom is moisture resistance. If we are talking about reducing cash costs, then the walls are leveled for painting with cement compounds.
Recommended plasters for the bathroom:
- facade light plaster IVSIL THINER;
- for monolithic leveling of walls Profit Hydrophobe;
- for hard waterproof coatings Ceresit CR 65;
- universal reinforced composition UNIS SILIN.
Wall leveling material
If there are large unevenness on the walls, then plasterboard is used to level them, which will be able to withstand the humidity in the room. It is mounted on a profile frame structure.
For leveling, cement plaster is also used, which is prepared independently. Composition: cement M400, M500; sifted fine-grained sand; 3 tbsp. l. dishwashing detergent. Cement and sand are combined in a ratio of 1:3. A detergent is added to the bucket with the prepared solution, which increases its plasticity (and the hardening time on the surface increases).
Choosing paint for walls
First of all, when choosing paint, pay attention to the appearance of the coating. There is a classification of compositions according to this criterion:
- Matte. Paints with this effect perfectly mask wall defects and add depth to the shade.
- Glossy. This type has a more presentable appearance, is more resistant to moisture, but at the same time emphasizes the slightest irregularities in the walls.
- Semi-matte. An intermediate option between gloss and matte surface.
- Textured. They give the coating a roughness, which looks great in combination with conventional glossy or matte paints. Perfectly disguises unevenness.
However, what is much more significant for the room is not the appearance of the coating, but the composition of the coloring matter. The ability of the paint to withstand regular contact with moisture and elevated temperatures, which is considered the norm for a bathroom, largely depends on this. Depending on the production technology and composition, moisture-resistant paints are classified into the following types:
- Water-based.
- Latex based paints.
- Acrylic.
- Silicone based.
- Group of alkyd paints.
- Chlorinated rubber compounds.
- Oil paints.
Let's look at the disadvantages and advantages of each type of moisture-resistant paint.
Water emulsion: pros and cons
Water-based paint dries very quickly after application to the surface. The composition is absolutely safe for humans and does not have a sharp, unpleasant odor. It is easy to give water-based paint a special shade by adding a special pigment to the jar. They are sold at any hardware store. Among the disadvantages, we can only note the need to comply with certain conditions during the painting process: the room temperature should not be lower than 5 degrees, otherwise the paint will not “set”. Includes:
- Antiseptic.
- Thickener.
- Latex.
- Filler.
Water-based paints are classified into the following types:
- Acrylic. In addition to latex, acrylic is also added to the composition, which gave the name to the subgroup of paints. This type is considered the most common among water-based emulsions. Thanks to the combination of latex and acrylic, the surface becomes more resistant to water. When applying two layers, cracks can be masked.
- Mineral. They are made on the basis of slaked lime or concrete. Typically used for external and internal work with brick or concrete walls, suitable for finishing ceilings. The only disadvantage is the short service life. Mineral paints are not sensitive to moisture, grease, light and temperature changes.
- Silicate. Produced on the basis of liquid glass. They have high air and vapor permeability. They resist moisture well, but their protective qualities deteriorate if the humidity of the room differs significantly from that of the surface on which the coating was applied. They are among the “long-lived” paints, as their service life reaches 20 years.
- Silicone. Manufactured on the basis of silicone resins. In terms of cost, they top the “rating” of the most expensive water-based paints. They are a type of vapor-permeable composition, therefore ideal for finishing “raw” walls.
Water-based paints must be thoroughly mixed before use to obtain a uniform color. According to the instructions, they even allow the addition of small portions of water. Tools can be easily washed off after painting, which makes this type of paint even more attractive to the buyer.
Latex
If in water-based paints the ingredients are combined using various resins, then in latex paints this role is assigned to the substance of the same name. Latex holds pigments and water together, which evaporates when it dries. At the same time, the particles of the binder combine and form a thin but durable film. Latex paints also do not emit an unpleasant odor, dry within two hours, and allow air to pass through, so there is no need to worry about the formation of bubbles on the surface. They can easily withstand constant contact with moisture and regular washing; have high abrasion resistance and good adhesion to any type of surface. Unfortunately, latex paints are quite expensive and often become a breeding ground for fungi and mold. The last problem is easily solved with the help of an antiseptic primer, which is applied to the wall or ceiling immediately before painting.
Acrylic
This type of paint is made on the basis of acrylic, as is clear from the name. They are highly resistant to moisture and direct sunlight. Even a couple of years after repair, the surface does not fade. However, acrylic paints tend to darken the color after the layer dries. This nuance must be taken into account when choosing the shade of the composition. Unlike oil paints, they do not crack. Acrylic compositions without water have increased strength and are often used for outdoor work.
Silicone
Silicone-based paints have appeared relatively recently. This group of compounds has a high cost. The price is compensated by the characteristics of the paints and their wide range of applications. They are moisture-resistant, but vapor-permeable, which ensures natural air exchange in the room and prevents the walls from becoming damp. Silicone paints are insensitive to sudden changes in temperature (including frost) and exposure to sunlight. They do not crack or swell with “bubbles” when painted. Silicone paints dry quickly enough, do not emit an unpleasant odor and are completely safe for humans.
Characteristics of chlorinated rubber waterproof paint
Chlorinated rubber paints appeared on the market not so long ago, but have already established themselves as an excellent option for combining low cost and high performance. They are made from a mixture of pigments, a solvent and a white powder called chlorinated rubber (the end product of the reaction between chlorine and rubber). Such compositions are used to cover walls not in bathrooms, but in rooms where swimming pools are located, or in saunas and baths. The fact is that chlorinated rubber paints have no competitors in terms of resistance to moisture. However, the composition is capable of changing consistency after the surface has dried. When the temperature rises to 60 degrees, it softens, and when it drops, it hardens. If the air in the room becomes even hotter, there is a risk of decomposition of the composition with the release of hydrochloric acid vapors.
Chlorinated rubber paints are usually used in the finishing of industrial facilities. During drying of the composition, no chemical reactions occur. Chlorinated rubber simply hardens after the solvent evaporates. The paint's resistance to the latter is very low. Because of this, the first layer may soften after applying the second. Manufacturers often add small pieces of aluminum to the composition, which create an original decorative effect and increase the strength of the coating.
Alkyd
Alkyd paints have high adhesion and are used to coat almost any surface: concrete, wood, metal. In the latter case, the composition prevents the development of corrosion. Paints are made based on alkyd varnish. When dry, they can release toxic substances, so the bathroom needs to be well ventilated. There are two types of alkyd varnishes:
- Pentaphthalic.
- Glypthal.
Pentaphthalic varnish is used more often for the production of alkyd paints, since during cold drying it promotes faster hardening of the composition, and the resulting film becomes stronger than a layer with a glypthal base. In other cases, glypthal varnish hardens faster. When choosing an alkyd paint, you should pay attention to its fat content. The density of the composition, the hardness and elasticity of the coating, and the drying speed depend on this indicator.
Features of using oil paints for bathroom decoration
Oil paints are made from drying oil. This variety can be safely called “greetings from the past”, since before the advent of acrylic, alkyd, silicone and latex compositions, it simply had no competitors. Half a century ago, oil paints were widely used for painting walls, both inside and outside. The main disadvantage of the composition is the very long drying time. In a bathroom with high humidity, this process may even take several days.
During drying, the composition emits a sharp, unpleasant odor, so the room will have to be ventilated for a long time. Although oil paints adequately withstand the test of high humidity, they are not recommended for use for finishing a bathroom, since after a year or two the coating will begin to crack and repair work will have to be carried out again.
Preparation for finishing
Before renewing the surface coating, you need to prepare it well, since the final result depends on their condition. Also make sure you have all the necessary tools.
Required Tools
- Roller
- Brushes
- putty
- Putty knife
- Protective mask and goggles
Preparation
First, you need to remove all the furniture from the bathroom and remove existing decorative elements from the walls. This applies to all holders, towel hooks, curtains, rugs and other small items. Then the walls and ceiling must be freed of all old coatings. If you want to get rid of old tiles, then feel free to tear them off the walls. Next you will need to level the surface, making it perfectly flat using plaster.
Unsplash
If the walls have been painted, the coating can be removed with a scraper or sharp spatula. The resulting cracks must be filled with moisture-resistant putty. If there are wooden surfaces in the room, they must be sanded and dirt removed. This way the new layer will stick better.
Don't forget to remove mold and mildew if present. A chlorine solution or a special mixture, which can be bought at any hardware store, can effectively cope with this. We recommend carrying out this procedure a few days before painting so that the surfaces have time to dry. And to get rid of grease stains, it is better to use a detergent designed specifically for these stains.
After leveling and removing the old coating, all surfaces must be washed to get rid of dust and small chips.
Cover all plumbing fixtures with thick polyethylene. It is better to wrap the toilet and washbasin with shockproof material so as not to break these fragile products during repairs. We recommend removing switches and sockets. Cover those areas that you do not plan to treat with dyes with masking tape. Your premises is ready for use.
- Ceiling
How to paint a ceiling correctly: the whole process from preparing the base to finishing
How to prepare walls for painting
The application of the coloring composition to the wall is preceded by a preparatory stage. The surface must be cleaned of the old coating layer, leveled with putty, and plaster, primer and antiseptic must be applied. The complexity of the task directly depends on the type of wall surface. Preparing bare brick is considered the most labor-intensive. You will have to beat off the remaining cement mortar and possibly cover the wall with reinforcing mesh. The easiest way to work is with a plastered surface.
Recommendations and methods for removing old paint from walls
If the wall has already been painted, then it must be completely cleaned of any remaining composition that will create unevenness and roughness on the surface. Nowadays it is easy to purchase a special solvent on the market. Using a brush, spread it evenly over the entire surface and leave for a couple of hours. When the composition penetrates deeply into the paint layer and softens it, you can begin cleaning the wall.
To do this, you will need a regular scraper or spatula. For some types of paint, special solvents are sold that effectively soften only a specific composition. Sometimes, the old layer “eats” into the wall so much that it has to be removed using tools such as a grinder or a soldering iron. In the first case, the entire room will quickly be filled with small particles of paint and plaster, and in the second, toxic substances can be released due to strong heating. For this reason, solvent is considered the safest and most reliable option.
Painting tools: their advantages and disadvantages
The following tools can be used to paint the surface:
- Brushes of different hardness and width. Suitable for treating small, hard-to-reach areas (the area behind the toilet, shower or bathtub). They may leave unsightly “smears” and smudges, which will disrupt the uniformity of the surface.
- Rollers. Used to cover large areas. They allow you to quickly treat an area of the wall and at the same time provide a uniform layer. It is better to use foam rollers.
- Spray guns. This group includes atomizers and atomizers. The tools work on a similar principle: they spray the composition at a certain distance from the surface under air pressure. Gives a uniform coating. The person himself regulates the degree of coloring and the amount of paint that is spent on each square centimeter. To reduce the consumption of the composition, simply increase the distance between the wall and the spray gun. It is recommended to work in a respirator or a special mask.
Spray guns are considered the most modern option. They are used not only for painting walls, but also for furniture of complex configurations. If a combination of several colors is used, then use masking tape to delimit individual areas.
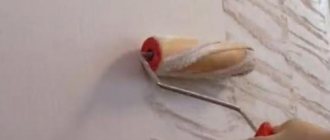
Paint application technology
Let's look at the technology of applying paint to a wall using a roller step by step:
- First you need to clearly demarcate the area to be painted. It is indicated by stripes of paint drawn at a distance of several cm from the border.
- Now you need to dilute the paint and pour a small portion into a special container (two-section trough) for rollers.
- Then the roller is moistened with paint, the excess of which is removed by test rolling the tool on a special ribbed surface of the container.
- Now the paint is applied to the wall with a roller. Movements must be continuous. The tool is moved along the vertical axis: up and down.
- When the paint on the roller begins to run out, it is repeated over the already treated surface to remove the resulting stains.
- Now the roller is re-wetted in paint and the whole procedure is repeated again with the adjacent section of the wall.
You should work either in a well-lit room or in daylight. This way you can immediately notice shortcomings and eliminate them in a timely manner. Borders and small details are painted last. For painstaking work, it is better to replace the roller with a brush.
Paint consumption
Paint consumption will help you purchase the right amount of composition for finishing a specific area. This indicator is always indicated on the jar. As a rule, manufacturers calculate the approximate surface area that can be covered with one layer of the presented paint. These data are considered approximate. The permissible calculation error depends on the wall material, the number of layers of paint, the degree of its dilution, the characteristics of the composition, the application tool and even the environmental conditions in which the painting work will be carried out. The ideal value is considered to be a consumption of 1 liter per 5 sq.m in one layer. To measure the area of a wall, you will need to multiply its height by its width. Don't forget to add borders, fillets or small decorative elements.
Decoration in different styles
Painting the walls in the bathroom is suitable for both a range of modern styles and a number of classic and ethnic styles. Silver paint is ideal for high-tech. Traditional loft brick walls can be easily transformed with white, blue or soft brown shades. For modernism, you can use a combination of ombre (color gradation) and wavy lines at the transition points of tones. For ethnic trends, painted walls are perfect, the surface of which is additionally decorated with decorative paintings with national motifs. For example, for a bathroom in an Egyptian or African style, characteristic angular patterns are suitable. Moorish or Moroccan interiors are decorated with elegant script made in blue, brown and green colors. For a bathroom in the Russian style, painting is used.
When using paints, much attention is paid to the types of finishing materials that were used to cover the floor and ceiling. They should be combined not only in color, but also in texture. By creating smart combinations, you can emphasize one or another zone in the room or, conversely, disguise a separate area, making it neutral.
Which color should I choose?
It is better to paint a small bathroom or a combined bathroom in light colors. This is a well-known trick that will help visually expand the space. These shades look good in combination with traditional white sanitary ware. In a spacious bathroom you can embody any ideas - contrasting shapes, geometry, ornaments, different types of finishes.
Important: on walls painted dark, splash marks are more visible.
Matte paint will better hide small imperfections on the wall, but it is impossible to remove dirt from it without leaving traces. If you settle on it, dark shades are preferable.
Glossy, on the contrary, will highlight all the imperfections of the surface; it should be perfectly smooth and clean. But walls painted with it are easy to clean and you are not limited in your choice of color.
The interior style of your bathroom also dictates some rules in choosing the color of the walls. In a modern high-tech bathroom, cool gray glossy walls and all shades of blue will look good. Neutral pastel colors - powdery pink, sand, light green - will fit well into Provence.
The photo shows a high-tech bathroom with painted walls
Bright accents and geometry are suitable for pop art and art deco.
These are just general rules and you have the right to do everything your own way.
Decorative painting methods
In addition to classic solid painting, when working with paint you can use a number of special tools for original techniques:
- Stencils. Used for applying drawings over a layer of dried paint.
- The “stardust” effect is achieved by spraying paint of a different color using a hard brush, which is thoroughly wrung out before the procedure. This technique looks beautiful and stylish on dark walls (purple, blue) if light or silver paint is sprayed.
- Aging effect or stippling. Apply to completely dry surfaces. Glaze is applied on top of the paint layer. While the composition has not hardened, it is artistically smeared over the surface using a sponge. As a result, the bottom layer of paint is gradually exposed.
- Contrasting coloring. To work, you will need paints of different colors and supplies of masking tape. Adhesive tape is used to limit individual areas, which are painted in different shades. The technique is often used to create complex geometric patterns.
- "Chaos of strokes." For work, use a rag roller made by yourself. Pieces of fabric are wound onto the holder in such a way as to create as many folds and knots as possible. A new shade is applied to the already dried layer of paint using this tool. The result is an original, abstract pattern.
- The effect of wrinkled skin. Sheets of thin decorative paper are placed on top of the freshly applied paint. It is crushed and the composition is allowed to dry. After this, the surface is re-painted. The wall takes on a characteristic relief. To get the effect of regular leather, use a homemade suede roller. It is convenient for them to form the desired relief on a fresh surface.
- Textured coloring. It is used as an analogue of Venetian plaster. A special roller is used for this work.
In the latter case, you can additionally use a colored primer or pearlescent glaze, which give a simply stunning effect if their shade is correctly matched to the tone of the base paint.
Choosing KM for room design
The choice of paint and varnish is influenced by the design of the room.
Color
The choice of color adapts to the interior elements. The main thing is not to disturb the harmony of the design. Today, only white, blue or light shades of dye are no longer chosen. Mother-of-pearl paints of contrasting shades are applied, or matte colors of violet, lilac, and blue are combined.
Matte or glossy
The water-based emulsion gives the surface a matte finish. The shades look saturated and the room looks muted.
Varnish and metallic compounds give the surface a glossy finish. A space with such a coating visually expands. The room acquires lightness and respectability. For a small room, shades of coffee with milk, pink, turquoise, azure, and blue are recommended.
Designers sometimes combine painting KM walls in one room, which give a matte and glossy look. In large rooms, a combination of light and dark colors is used.
Using decorative plaster to decorate bathroom walls
For the bathroom, special moisture-resistant decorative plaster is used. The material is sold dry. The substance is based on polymers, to which decorative particles and even crushed pieces of natural stone are added. As a rule, textured plaster imitates the surface of granite or marble. The coating can be used as a finish or combined with paint. Textured plaster ideally hides defects in the surface of the walls, while improving the interior of the bathroom. This coating is not afraid of moisture, sunlight and temperature changes. Some manufacturers offer plaster, which at the same time acts as insulation, which is suitable for rooms with insufficient heating.
How do colors affect a person?
Today, a bathroom can be decorated with absolutely any color or shade. High-quality furniture, accessories and fittings will help complement the visual perception of colors.
When choosing a color for a bathroom, it is recommended to consider several criteria. Each shade has a specific effect on well-being and emotional background:
Red. It stimulates metabolic processes and activates the perception of the brain center. It is used for large rooms. In addition, multi-level lighting is used here. It reduces the concentration of bright colors and has a positive effect on emotional perception. For contrast, use white or black.
Orange. This shade belongs to a number of antidepressants. It helps to cheer up early in the morning and relax after a hard day. Warm lighting allows you to add coziness and a bit of warmth.
Storage room in an apartment: photo review of the best solutions. Is it worth making a room out of a storage room in a one-room apartment?
Yellow. Prolonged stay in such a room can provoke increased excitability and emotional imbalance.
Green. This shade stimulates the flow of physical activity and charges with positive energy. Thanks to him, he manages to collect his thoughts.
Turquoise. It helps you relax. This color tones and creates a feeling of complete comfort. The abundance of glossy details creates a refined atmosphere in the relaxation area.
White. It is a favorite among most modern designers. It gives the room a feeling of crystal purity. A white bathroom reflects the internal state of its owner.
Blue. It is often used in rooms with south-facing windows. There is always bright sun here. The blue tint has a cooling effect. To reveal the depth of this shade, flood lighting is used.
Mistakes to Avoid
When painting walls, you should avoid a number of mistakes that beginners in painting often make:
- Do not apply paint to an unprepared wall. Perhaps the coating will indeed serve faithfully for some time, but its appearance will leave much to be desired.
- If work begins with a certain area, it is not recommended to abruptly change painting areas, running from one corner to another. You need to paint the wall sequentially, slowly moving along the chosen direction.
- The coloring composition also needs to be prepared: stir, add pigments if necessary, add water or white spirit if its consistency is too thick.
- Pay attention to the expiration date of the paint. Some compositions may thicken only slightly over time, but will completely lose most of their properties. This cannot be determined visually, but after application and during operation, all imperfections will appear in all their glory.
- For better adhesion of the coating to the surface, be sure to use a primer.
- No further finishing work can be carried out if the paint has not yet dried.
It is also not recommended to experiment with chaotic application of paint to the surface, unless, of course, this is part of the process of original wall decoration.