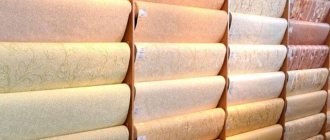
Leveling a wooden floor with a self-leveling mixture is a procedure for eliminating differences in the height of the floor covering. Such mixtures help protect the tree from various types of influences. For these purposes, materials are used whose filler grain size is no more than 0.8 mm. The compositions are supplied in two versions: finishing and rough. The first type is much more expensive, so in order not to spend extra money, it is recommended to use them strictly for their intended purpose.
Advantages of leveling with self-leveling mixture
Leveling wooden floors with such mixtures has the following advantages:
- Ease of installation. The solutions are easy to apply and do not require long stretching over the surface with hand tools.
- Short drying period. Some manufacturers claim that you can walk on such floors the very next day after pouring.
- Strength. Finished coatings are resistant to mechanical abrasion, as well as high and low temperatures.
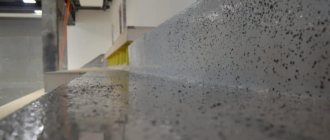
Screed on wooden floors significantly increases their wear resistance
Types of mixtures
The modern construction market offers options for mixtures for leveling wooden floors, which differ in the main component:
- Polyurethane. After drying, a strong and at the same time plastic base is formed. Thanks to this feature, the surface easily withstands various mechanical impacts, including impacts. But at the same time, the material is not resistant to chemically active substances, so you need to use neutral products for washing.
- Epoxy. As the name implies, they are made on the basis of epoxy resins. They also include plasticizers and hardeners. The resulting coating is resistant to various types of chemical influences, but can crack from low temperature or shock.
Polyurethane and epoxy compounds have the highest performance characteristics - Methyl methacrylate. This material contains two main components: methacrylic acid and methyl ester. In most cases, it is used for interior decoration, since it does not withstand exposure to precipitation. Can be used in rooms in contact with the street and at low temperatures. Most often, such floors are poured in industrial enterprises with increased foot traffic.
In addition, each of the listed mixtures contains Portland cement, sand and fiberglass.
Components included in self-leveling mixtures for wooden floors
The materials are also divided into two groups according to the alignment method; this is also important to consider before purchasing. Leveling mixtures require distribution over the surface with a spatula, while self-leveling mixtures spread without the participation of a worker.
All that remains is to choose the brand of material. The products that performed best were Knauf, Ceresit, Starateli, and Vetonit. There is no fundamental difference between them, since the same technology is used for the production of leveling mixtures. The differences lie in additional properties, on which the cost of the compositions also depends.
The quality of modern domestic mixtures is in no way inferior to foreign analogues
Water-soluble mastics
The water-soluble type requires dilution of the composition with water. The presence of water requires taking into account the type of wood. This makes them better suited for oak boards, which have better resistance to moisture.
For other types of wood, the composition should be diluted with less water.
But during this process, be sure to study the manufacturer’s advice so as not to lose the protective properties. It is undesirable to use such products for beech and birch materials; they do not withstand exposure to moisture. Allow 4-5 hours for drying before the first walk on the coating; if there is excess left, they are wiped with a rag, then the base should dry for another 2 hours.
They are better suited for oak boards, which have better resistance to moisture.
Mixture consumption
To calculate the required amount of mixture you need to know the following:
- floor covering collapse;
- planned layer thickness;
- material consumption (manufacturers indicate this parameter taking into account a layer of 1 mm).
If the surface has been previously prepared, then you need to add up the thickness of the layer with the blockage, convert it to millimeters and multiply the resulting number by the consumption indicated by the manufacturer. In most cases, mixtures are supplied in 25 kg bags, so you should divide the total amount of material by this number and round up. Such mixtures do not last long, so you should not buy them in large quantities.
The main factor influencing the consumption of the composition is the magnitude of the floor slope
How to make the right choice?
In order not to make a mistake with the choice of mastic, it is important to take into account all the features of the floor covering as a material, and also be sure to evaluate the conditions of its operation. It is recommended that before going to the store, read about the features of all types of mastics offered on the market, think about which one will suit best. Of course, at every retail outlet there is a consultant who will help you make the right choice, but often he may be incompetent in this matter.
It should also be taken into account whether mastic will be applied initially to a fresh floor or whether the floors have already been in use for some time, and the protective layer and the floor itself need to be updated. So, in the first case it is better to take a transparent composition, but in the second - with a shade of a certain color. Then the floors after treatment will be as good as new.
Before application you need to consider a number of nuances
It is also important to take into account the time costs. There are formulations that can be used immediately, and there are those that need to be prepared. If you don’t want to bother with the preparation, then it’s better to take the first type of mastic. Then you will save both time and, possibly, money - the fact is that the composition that needs to be diluted can easily be spoiled if you add too much solvent to it . And then it will become unusable.
Mastic for wooden floors
Preparation
The first step is to remove the old coating, remove the baseboards and inspect the wooden base for various defects: cracks, through holes, mold, and so on. It is better to replace rotten boards with new ones, and seal cracks and holes with wood putty. If there are a lot of burrs on the coating, then scraping should be done. To do this, you need to remove all fasteners from the floor that could damage the machine, and then sand the surface.
After sanding the floors, defects in the base must be repaired with wood putty.
Important! During the grinding process, it is imperative to use personal protective equipment: thick clothing, gloves, goggles and a respirator.
Wooden planks must be inserted into large gaps. If the floors squeak, the boards are additionally fixed with self-tapping screws.
If the cracks are very large, then they must be filled with planks, and damaged floorboards must be replaced completely
The surface must be cleaned of debris and dust, then apply two layers of moisture-protective primer. The second layer can be applied only after the first has dried (the time is indicated by the manufacturer on the packaging).
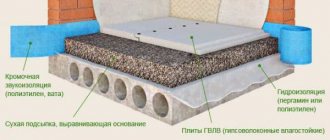
In damp areas, such as the bathroom or kitchen, a layer of waterproofing is installed. This can be a regular polyethylene film or a PVC membrane. The material is placed overlapping, and the joints are taped. If you plan to fill one room, then you need to install a threshold at the exit that will prevent the mixture from flowing into neighboring rooms.
Before pouring, the wooden floor is primed and covered with waterproofing, and a damper tape must be installed around the perimeter
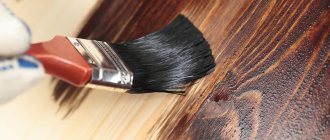
How to apply mastic? Technology
The application of mastic itself does not take much time and does not require much labor. Anyone can cope with this task, provided they follow all the manufacturer’s instructions. The application of protective coatings is especially important in relation to old parquet. With the help of special compounds, almost any old base can be restored to its proper form.
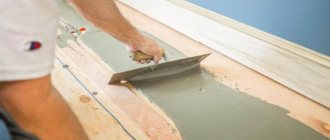
However, before we proceed directly to the description of the parquet restoration process, let us familiarize ourselves with the general rules for using mastics, which we will need for this procedure in any case. So, the most important thing in the process of applying mastic is to carefully distribute the composition over the base, and then wait for it to dry. In this case, it is important to first try to remove the old protective layer, sand the surface, clean it of debris, and then only apply a new layer of mastic.
The composition must be carefully distributed over the floor
Application of mastic can be done in several approaches. That is, first one layer is applied, dried well, and then the floors are covered with mastic several more times on top of the first layer. Then you will be able to achieve the best effect.
Also, the layers should be applied evenly. It is best to use brushes, and of medium hardness. Or special natural polishing brushes will do. But you can also use rollers that painters use.
Edelwachs jar
Level tapping
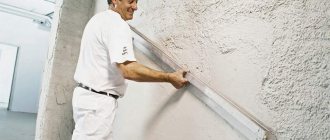
At this stage you need to use a level; it is recommended to use a laser level, it is more accurate. If you don’t have it at hand, you can get by with a hydraulic level. Using these devices you need to determine the zero mark. It is important to remember that the maximum slope for working with self-leveling mixtures is 1 cm. If the value is larger, it is better to level the floors with plywood or boards, since the wood may not support the weight of the mixture.
To mark the line of the finished floor, it is necessary to mark the horizon on the walls with a hydraulic level, and then lower it to the planned height
Basic ways to level a wooden floor
Dismantling and reassembling plank flooring is a complex, lengthy, labor-intensive and dirty process, which can be difficult to decide on. However, it is often impossible to do without it - if the floor boards are rotten, sagging, or there are signs of mold or mildew on them. In this case, there is nowhere to go - a complete replacement of the wooden flooring is required. If the boards are strong, well connected to each other, but there is a serious difference in the horizontal plane or in certain areas of the floor, then you can do without opening the boardwalk. Under favorable circumstances, superficial leveling measures are used.
Depending on the nature of the irregularities that appeared on the wooden floor during the period of its operation, the method of their removal is selected.
There are several methods applicable to leveling board coverings:
- Looping.
- Local alignment of a specific area.
- Dry screed.
- Self-leveling compounds.
- Alignment with lags.
- Leveling with pads.
To determine which method is best suited for a particular case, you must first measure the differences in the floor surface using a laser or a regular building level at least 2000 mm long. The permissible amount of unevenness that can be tolerated (unless, of course, creaks appear) should not exceed 2 mm per linear meter of the base.
What to do if the floor is smooth, but begins to creak?
There is definitely something wrong with him. It is necessary to conduct an audit to identify the cause of the unpleasant sounds. Well, then - remove the creaking of a wooden floor , using certain techniques, which are described in detail in a special article on our portal.
Making the solution
You need to pour the contents of the bag into a dry container and gradually add water at room temperature to it, while simultaneously mixing the composition with a construction mixer or drill with an appropriate attachment. One bag usually uses about 6 liters of water. The mixture must be stirred for 7 minutes, then left for 5 minutes and repeat the procedure. The result should be a lump-free solution.
If you don’t have a construction mixer, you can replace it with a mixing attachment on an electric drill
On a note! The self-leveling mixture dries out quite quickly, so you need to prepare an amount that is enough for half an hour of work.
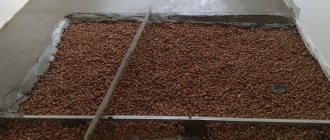
Fill
It is necessary to start work from the far corner of the room. Strips of material 35 cm wide are poured onto the floor. It is important that the individual portions touch each other. If voids form, they need to be filled with solution. To speed up the process, you can roll the surface with a needle roller.
The filler in the starting mixtures is quite coarse, so after drying a rough coating is formed. The finishing layer can be poured a day after applying the starting layer, but you should try to make it as thin as possible.
The mixture is poured in strips and immediately leveled with a trowel or spatula.
Applying mastic to quartz vinyl
To apply mastic to a quartz-vinyl base (yes, mastics can also be used for this type of coating), you will need the following equipment: a mop, gloves and the composition itself.
Step 1. First, any base needs to be rinsed well. It is advisable to use not just water, but special cleaning compounds that will get rid of dirt.
First you need to wash the floor
Step 2. The floors will be treated with mastic using a mop with a microfiber attachment. First you need to saturate the nozzle with liquid. To do this, it is recommended to pour a little mastic on the floor, and then simply place the mop there, move it around, make several movements so that the composition saturates the fabric well.
Applying mastic with a mop
Step 3. Next, you need to pour the mastic in small portions onto the floor, and then level the puddles over the base using a soaked mop. Nothing complicated. It is important to apply the composition evenly.
The process of applying mastic to the floor
Step 4. It is recommended to apply mastic in sections, and then you need to additionally mop along the fibers.
Then you need to use a mop along the fibers
Step 5. Once the mastic has been applied to the entire base, it must be left to dry.
The mastic must dry
Step 6. After the first layer has dried, the mastic must be applied again, dried, and then the floors can be used as usual.
Applying a second layer of mastic
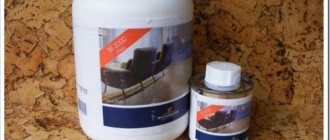
Prices for bitumen mastic AquaMast
bitumen mastic aquamast
Expert advice
If the solution does not spread well in the corners, it is necessary to pour it in small portions and immediately stretch it over the surface with a spatula. Despite their name, self-leveling mixtures may not spread on their own, so it is best to use a needle roller. When choosing this tool, it is important to consider the needle size. It should be 1–2 mm longer than the layer thickness.
You should not buy a product with large needles - it will simply expel air and will not help in leveling.
In addition to a needle roller, it is also advisable to acquire needle shoes for walking on a freshly poured floor.
To level wooden surfaces, it is enough to follow the above recommendations and take into account the information provided by the manufacturer on the packaging.
What will you need?
To make a self-leveling floor yourself, you may need certain tools. The list of things to buy or rent includes:
- the mixture itself;
- wide spatula equipped with a long handle;
- a construction mixer or a regular drill with a special attachment;
- a needle roller, which is used to remove air bubbles from the poured mixture;
Needle roller
- construction level of any type - necessary to evaluate the final result;
- damper tape;
- means for grinding (sanding machine, sandpaper, etc.);
- waterproofing materials (at least thick polyethylene film);
- construction vacuum cleaner;
Construction vacuum cleaner
- hammer, nails, nail puller;
- a sealing mixture that can be used to eliminate gaps between floor boards or sheets of plywood. Can be replaced with putty.
Calculator for calculating dry mortar for self-leveling floors
Go to calculations
Important! When working with liquid mixtures, it is best to wear clothes that you don’t mind. You should also buy special paint shoes, in which you can walk on the flooded floor while leveling it. Paint shoes are special shoes equipped with needle soles. Having walked through the freshly poured mixture in these “slippers”, you don’t have to worry about it spoiling.
Paintshoes