Types of material and its features
There are several types of wallpaper, each of which has its own characteristics. This should be kept in mind when choosing material for a certain type of room:
- Paper wallpaper is the most common and cheapest, but is only suitable for cosmetic repairs.
- Liquid wallpaper is a liquid mixture. As a result of finishing the ceiling with such material, a seamless and perfectly flat surface is obtained.
- Vinyl wallpaper is very popular due to its strength, durability and high resistance to moisture.
- Non-woven wallpaper is durable, elastic and abrasion resistant.
- Textile wallpaper is a textile fabric on a paper or non-woven basis.
In addition, there are wallpapers that can be painted; modern models of this type can be painted more than 10 times. At the same time, it is not at all necessary to remove wallpaper from the ceiling.
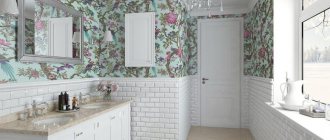
In general, the choice of wallpaper depends on the preferences of the owner; any type of wallpaper can be used if operating conditions allow it. However, it is worth considering that in rooms with low ceilings it is better to stick light colors, it is better to give preference to small and dim patterns. To visually reduce the height of the ceiling, it is better to glue wallpaper in dark colors.
Information about ceiling wallpaper
The concept of ceiling wallpaper is applicable only to material released in Russia under this name. They are denser in structure than wall ones and consist of two pressed paper panels. They have a relief surface, various patterns, white color, and cannot be painted. Foreign companies produce wallpaper that can be used simultaneously for gluing walls and ceilings without delimiting the surface, which significantly expands the range of materials for stickers.
Photo wallpaper
These are non-woven, glass wallpaper, liquid, cork, paper, textile, and others. Their service life is longer, with the possibility of updating some by warping.
Preparation of materials and tools
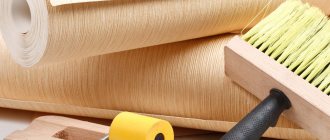
To independently solve the problem of how to hang wallpaper on the ceiling, you will need the following:
- Stepladder or other device for working at height.
- Roulette.
- Pencil or marker.
- Bucket.
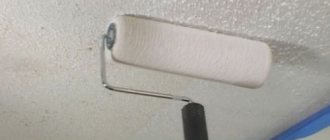
- Brush and roller. It is advisable to use tools with long handles.
- Bath with a special platform for a roller.
- Soft dry rags.
- Device for stirring glue.
The process of wallpapering the ceiling is characterized by great inconvenience, so it is recommended to invite friends or relatives to help. Otherwise, you will need to study materials on how to paste wallpaper on the ceiling alone.
What wallpaper is best to use for covering the ceiling?
To handle the finishing yourself, you first need to decide which wallpaper to choose for the ceiling. When choosing, you should consider the following recommendations:
- The density of wallpaper for finishing the ceiling should not exceed 110 g/m2. If after gluing the wallpaper you plan to paint it, then the recommended density is 150 g/m2;
- For the ceiling you should choose thinner wallpaper. Light but thick trellises will absorb more adhesive and become wet, resulting in a risk of damage when working at height;
- It is better to choose narrow trellises. It is difficult to glue meter-wide canvases. The optimal size is 600 mm;
- European manufacturers do not produce special wallpaper for the ceiling, so you will have to be content with domestic samples;
- For the ceiling, choose plain trellises, without bright patterns;
- if the work is carried out alone, only non-woven wallpaper is purchased. The peculiarity of this material is that no adhesive is applied to the trellises, but they are immediately applied to the glue-impregnated surface.
The following types of wallpaper are used to cover the ceiling:
- Paper. Thin material cannot hide all the flaws and surface irregularities. Only two people can work with paper products - one person cannot do it. Service life is no more than five years. The advantage of paper wallpaper is its low cost.
- Non-woven. Multi-layer durable trellises with embossing. In most cases, they are intended for subsequent paint treatment. The cost is higher than paper ones, but they perfectly mask minor unevenness in the base and are suitable for gluing the ceiling alone.
- Vinyl. Also refers to affordable materials. Thick vinyl trellises hide uneven areas well.
- Textile. These wallpapers are produced by applying silk, linen or viscose fabric to a base of paper or non-woven fabric. The most expensive, high-quality and beautiful material for gluing ceiling tiles.
Fabric wallpaper.
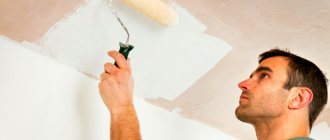
Preparing the surface for work
To perform any finishing work efficiently, it is necessary to carefully prepare the work surface. Wallpapering the ceiling is no exception in this regard. In particular we are talking about the following:
- Old wallpaper must be removed, followed by cleaning the surface from traces of glue.
- The whitewashed ceiling needs to be washed and several layers of putty applied.
- Defects in the form of unevenness or slopes are leveled using putty; if there is a significant difference in height, it is recommended to use plasterboard sheets.
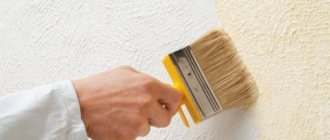
- Wallpaper is applied to a putty ceiling after preliminary priming. You can apply the primer using a regular brush. After the primer layer has dried, sand the surface and begin gluing the wallpaper to the ceiling. It should be noted that priming the ceiling is not a mandatory procedure. However, this process makes the adhesion of the working surface to the finishing material stronger.
- Before wallpapering the ceiling, it is necessary to mark the ceiling. It is important that the wallpaper is positioned perpendicular to one of the walls.
- Before hanging wallpaper on the ceiling, you must turn off the power supply, and the place where the lighting fixtures are attached should be sealed with masking tape.
Gluing technology
Wallpapering the ceiling consists of several stages:
Stages of wallpapering the ceiling
Next, we will consider how this work is performed at each stage.
Stage 1: surface preparation
Preparing the ceiling for wallpapering is one of the most critical stages. The durability of the finish, and even its appearance, depends on it .
The preparation process is as follows:
- First of all, you need to remove the old topcoat. If it's whitewash, it just washes away. Another effective way to remove it is to stick old newspapers to the surface of the ceiling with paste or wallpaper glue, and then tear them off along with the whitewash.
Removing old finishing material
Old wallpaper can be soaked with water and then removed with a spatula. If the old coating is vinyl, before soaking it, you should make cuts in the finishing layer;
- after this, the ceiling must be brushed and washed to remove remnants of the old coating, as well as dirt and dust ;
- Next, it is necessary to prime the surface, which will increase the strength of the base and also improve the adhesion of the glue. The primer is applied using a roller in a thin, uniform layer. After the ceiling has dried, priming must be repeated;
Puttying the ceiling
- If there are chips and cracks on the surface of the ceiling, they should be slightly widened and filled with putty.
This completes the process of preparing the ceiling with your own hands for subsequent finishing. It should be noted that such procedures are performed only if the ceiling is smooth and does not have serious flaws. Otherwise, it will need to be plastered or covered with plasterboard .
Stage 2: marking
To simplify the work in the future, before gluing the wallpaper to the ceiling, you should apply markings to it. In this case, it is necessary to decide on the location of the paintings on the ceiling.
To prevent the seams from being noticeable, it is better to place the canvas along the direction of the light falling from the window. If the room has several windows located on different windows, it is better to glue the canvases along the length of the room. In this case, you will reduce the number of joints.
In the photo - applying markings to the ceiling for wallpapering
Having decided how to glue the wallpaper, you should mark a line on the ceiling along the location of the canvases. The line should be located from the wall at a distance equal to the width of one strip of covering.
To get a straight line, it is best to use a special painting thread. The latter should be fixed at the beginning and end of the future line, then pulled down and released, as shown in the photo above .
As a result, the thread will hit the ceiling and leave behind a straight line. Using it, during the gluing process, you can level the canvas.
Stage 3: cutting the material
Now you need to cut the material with your own hands, cutting it to length. This procedure is not complicated, the only thing you need to keep in mind is that you need to leave a small margin.
If the canvases are plain, i.e. their pattern does not need to be joined, then a margin of 2-3 cm is enough. If the material has patterns, then the margin should be slightly longer than the step of the patterns. Thanks to this, there will be no problems when joining the pattern on the ceiling.
Wallpaper cutting
If you will be cutting on the floor, be sure to cover it with film first so as not to stain the material.
The cutting itself is not complicated. To do this, you will need a ruler of sufficient length and a mounting knife.
Stage 4: Glue Preparation
Before gluing wallpaper on the ceiling, you need to prepare the glue. It should be noted that special attention must be paid to the choice of adhesive composition . The fact is that there are currently different types of adhesives on sale, intended for different wallpapers, and they have different prices.
Paper wallpaper is glued using the most common adhesive for lightweight fabrics. If the material is heavy, for example, you are going to glue vinyl sheets or glass wallpaper, you need to use a special glue that can withstand heavy coatings.
Preparation of wallpaper glue
In addition, it is important to prepare the glue correctly. Typically, this procedure is carried out as follows:
- First of all, water must be poured into a clean container of suitable volume. The temperature of the water and its volume are indicated on the packaging with glue;
- Before adding glue, the water should be stirred so that a funnel is formed in it. This is necessary so that the glue does not form lumps;
- then, continuing to stir the water with one hand, you should gradually add the dry mixture;
- then the glue must be continued to be stirred for another 10 minutes;
- After this, leave the mixture for 15-20 minutes, then stir it again. Now the composition is ready for use.
This completes the glue preparation process. It should be noted that the instructions for preparing the adhesive composition may differ slightly from the diagram presented. Therefore, be sure to read the instructions on the package first .
Stage 5: gluing
So, we have familiarized ourselves with the preparation, now we will look at how to properly glue wallpaper. The only thing, before moving on to gluing, I’ll clarify one nuance.
The fact is that people often ask on forums what to glue first - wallpaper or glue the ceiling plinth? There is no definite answer to this question, since it all depends on the type of baseboard.
Gluing the ceiling plinth over the trim
If the baseboard is made of polystyrene foam, then you can first paste over the ceiling and walls, since the canvases will easily support the weight of this decorative element. If the baseboard is heavy, for example, polyurethane or even gypsum, then the canvas will definitely not withstand it.
Therefore, many craftsmen argue about what to glue first - the ceiling plinth or wallpaper. From personal experience I will say that it is almost impossible to hang wallpaper in such a way as to ensure an even line under the baseboard.
Therefore, it is more advisable to do this:
- first finish the ceiling, leaving no space for the baseboard;
- then mark the location of the fillet on the canvas and carefully cut it along the line with a sharp mounting knife;
- After that, glue the plinth to the walls and ceiling.
If you don’t know what and how to glue the ceiling plinth to the wallpaper, use regular putty. The only thing is to apply it on the back side in a small amount so that it does not stick out and stain the finish of the ceiling and walls.
Thus, I believe that it is better to glue the wallpaper first, and then the baseboard, regardless of the type of the latter.
Home craftsmen, when they find out that they can glue a light baseboard over the trim, often ask: is it possible to glue ceiling tiles to wallpaper? Of course, you can glue it, but no one can guarantee that such a finish will be durable. Therefore, it is better to spare no effort and first get rid of the old coating.
During the gluing process, the canvas must be pressed against the ceiling and held in this position for some time.
The actual wallpapering of the ceiling looks like this:
- work should begin by applying glue with a paint brush. If you are working with lightweight fabrics, for example paper, then the back side of the material is covered with glue. Before gluing wallpaper, vinyl sheets or other heavy types of this material for painting, glue should be applied to the ceiling;
- then the strip is glued. If you are doing this work with an assistant, then you need to stretch the canvas, then align it with the markings and press it against the ceiling.
Scheme for gluing wallpaper yourself
If you do the work yourself, the canvas should be folded like an accordion and placed on your left hand, while with your right hand you need to take the end of the canvas and press it against the ceiling. Then you just need to move along the gluing line and press the canvas to the ceiling;
- During the gluing process, the canvas should be smoothed using a roller. Use it to squeeze out all air bubbles and smooth out wrinkles . You can also use a plastic spatula for these purposes;
- The entire ceiling is covered using this principle.
Home craftsmen are often interested in how to hang wallpaper on a rounded ceiling. There's really nothing complicated about it. You just need to decide on the height of the pasting (the level from which the ceiling wallpaper will start), and then stick the canvases according to the same principle as on the ceiling with even angles.
Here, in fact, is all the information about how to wallpaper the ceiling.
Rules for cutting wallpaper
A beautiful ceiling with a minimum number of flaws can only be obtained by cutting the wallpaper correctly. You can achieve this result if you follow certain instructions:
- The wallpaper roll is laid face up and rolled out to the maximum possible length.
- Using a tape measure, measure the distance on the ceiling between opposite walls and mark it on a strip of wallpaper. At this point, make a corresponding mark with a pencil or marker.
- Bend the strip along the mark, align the ends and smooth the resulting fold.
- Next, use a stationery knife to cut a strip along the fold line.
Difficult places
Wallpapering the ceiling is also inconvenient because sometimes you need to carefully work around obstacles - risers, lamps, baseboards.
Around heating pipes
This area should be covered like this:
- Use a pencil to mark a dot on the wallpaper where the pipe begins.
- From the near edge, the canvas is cut to this point.
- Make a hole slightly smaller than the diameter of the pipe.
- Carefully tape the riser and carefully remove the excess with a knife.
Around chandeliers and lamps
Before wallpapering, the lighting is turned off. The devices are dismantled, the contacts are insulated and immersed in the ceiling. The strip is pasted as usual. Then they find a recess and make a slot, cut the wallpaper crosswise within the hole and go around the corners. Excess parts of the material are cut off so that the ceiling cup of the lamp completely covers the hole. The edges are pressed with a spatula.
Near the baseboards
Use a wide metal spatula to push the wallpaper as far as possible into the corner between the ceiling and the baseboard. You need to work with paper material very carefully so as not to tear it. Next, apply a spatula to the corner and make a cut along the blade with a mounting knife along the baguette. Remove any leaked glue with a dry, clean rag. Then the edges are carefully smoothed.
On the corners
When gluing a ceiling, one of the most difficult places is the corners between adjacent walls. These areas are covered as follows:
- place the canvas on a vertical surface;
- mark the place where the joint should converge;
- make a cut perpendicular to the sheet along the mark.
Another problem area is the beams. First, paste over the front part. Then the fabric is stretched and brought onto the lower plane, carefully pressing it against the beam with a spatula. The material cannot be cut at the corner.
Ceiling markings
After completing the preparatory work and cutting the strips to the required length, it is necessary to make the appropriate marks on the ceiling. In particular, we are talking about the line along which the first strip of wallpaper will be pasted. You can get a straight line using a rope rubbed with chalk. To do this, you need to hammer one nail into opposite walls. A rope, previously rubbed with chalk, is tied to these nails and pulled as tight as possible. Next, the rope must be pulled back and released sharply. The result of these actions will be a smooth chalk mark.
Direct wallpapering
The process of performing work at this stage is determined by the type of wallpaper chosen for the ceiling. For example, when using paper or vinyl wallpaper, the adhesive composition is applied to the material, and in the case of non-woven wallpaper, the adhesive is applied directly to the ceiling. In addition, when applying glue to non-woven wallpaper, you should wait some time, while at the same time, it is important to glue paper wallpaper immediately after coating it with the adhesive.
As for the location of the stripes, there is one rule, according to which the direction of the stripes must be strictly parallel to the wall with the window opening. In this case, the joints of the strips become almost invisible.
The problem of how to properly glue wallpaper to the ceiling must be solved in accordance with specific instructions.
Let's start work
It is better to prepare the ceiling in advance:
- Remove the existing decorative layer.
- Seal the cracks using sealants and plaster.
- Level the ceiling and walls around the perimeter of the room using the same plaster, and if the unevenness is too large, then using plasterboard.
- Sand small imperfections.
- Prime to remove dust that appears during sanding.
- Turn off the electricity, close the windows and vents.
Please note that this list does not include such a relic of Soviet renovation as the newspaper base sticker. Nowadays, it has been replaced by previously unavailable putty and primer. This avoids premature yellowing, which is especially noticeable on light-colored paper wallpaper.
— Preparation of adhesive composition
In most cases, hardware stores offer ready-made adhesive compositions for each type of wallpaper. The mixture can be in dry or liquid form. You can prepare wallpaper glue according to the instructions that the manufacturer comes with its products.
In any case, the glue should be mixed well before use. In this case, the composition must have good density so that the fixation of the wallpaper on the ceiling is maximum.
Preparation of photo wallpapers
- Carefully unpack the tubes.
- Make a picture out of them on the floor.
- Check for various defects (scuffs, wrinkles, foreign stains, etc.).
- Check that the individual parts do not differ in shades.
- Check that the pattern matches vertically and horizontally.
- Check the coincidence of the joints horizontally and vertically, check the instructions. Most manufacturers make a gap of 2 mm, which overlaps the next sheet.
If you find one of the described inconsistencies, return the wallpaper to the store. If you stick them on and then decide to replace them or return the money, you will not succeed.
— Applying adhesive to wallpaper
In order to properly glue the wallpaper to the ceiling surface, it is necessary to correctly apply the adhesive composition to the cut strips. For this purpose, you should take one strip and carefully spread it on a flat surface. The glue can be applied with a brush, making strokes from the central part of the strip to its edges. All actions must be as careful as possible; only in this case can glue get on the front side of the wallpaper.
— Gluing the first strip
At this stage of deciding how to hang wallpaper on the ceiling yourself, you are guided by several instructions depending on the number of people taking part in the process of gluing the wallpaper. If the work is carried out by one person, then the strip is folded like an accordion, the edge is applied to the intended line and the wallpaper is gradually straightened.
In this case, the material must be smoothed with a soft cloth, roller or using a special smoothing brush. Wallpaper gluing with the participation of two people is carried out as follows: one participant in the process takes the strip by the edges and climbs onto a stepladder or other device for working at height, the second participant at this time carefully holds the strip and gradually straightens it.
— Pressing stripes
In order for the strip of wallpaper to firmly adhere to the work surface, it is necessary to remove excess glue and air bubbles from under the pasted wallpaper. To do this, you can use a clean roller, rolling it in the direction from the middle of the strip to its edges. Excess glue is immediately removed with a clean rag or sponge.
— Gluing the remaining strips
The remaining strips of wallpaper are glued according to a similar pattern, so there are no particular difficulties in solving the problem of how to glue wallpaper to the ceiling. However, difficulty can be encountered when adjusting a new strip to an already pasted material. It is very important to tightly join the strips and prevent overlap. When using wallpaper with a pattern or design, it is recommended to combine the stripes while cutting the material into certain areas.
In order to efficiently resolve the issue of how to properly hang wallpaper on the ceiling, it is very important to control the absence of drafts. In addition, after the process is completed, doors and windows should not be opened for several more days.
Wallpapering a ceiling by one person can be made easier by making a device in the shape of the letter “T” with your own hands. It can be made from a plasterboard profile.
Consequences of incorrectly gluing wallpaper to the ceiling
Poor quality work and non-compliance with instructions can cause unpleasant consequences, such as a strip of wallpaper coming off the work surface.
This defect is observed very often, its cause is most often the following:
- Gluing onto old, peeling plaster. The appearance of such a defect can be avoided only by thoroughly cleaning the surface from the old layer of plaster and paint. Pasting wallpaper over lime or chalk whitewash leads to a similar result. Therefore, experienced craftsmen strongly recommend that before gluing ceiling wallpaper, remove the old coating and treat the work surface with a fixing compound.
- Incorrect application of adhesive. In most cases, gluing wallpaper on the ceiling with your own hands is accompanied by applying an adhesive composition either to the work surface or to the wallpaper strips. But some types of finishing material require the application of glue, both on the surface of the ceiling and directly on the wallpaper. The adhesive should be selected in accordance with the type of wallpaper, since there are adhesive compositions specifically for heavy types of this material. It is recommended to use a composition that is thicker than indicated in the manufacturer's instructions. The working surface must be pre-treated and carefully leveled. For thinner wallpaper sheets, the surface must be as smooth as possible. Thick textured wallpaper can mask minor defects, so careful leveling is not required. For good adhesion of the working surface to the finishing material, it is necessary to prime the ceiling and sand it.
- Presence of air bubbles. This defect appears when the web is poorly rolled with a special roller. The switched on lighting makes the bubbles under the wallpaper especially noticeable.
- Stains on the wallpaper can appear when the wallpaper is soaked for a long time or when the adhesive is applied too thickly to the material.
How to remove old wallpaper
Before pasting the wallpaper, you need to remove traces of the last repair. You cannot glue on top. And it’s not just that technology is being disrupted. When the second layer is applied, the water-based adhesive dissolves the one that was previously applied to the wall. The result is that both layers fall off along with the plaster, which was also sealed with water.
And if this does not happen, then the bubbles will also not be pleasing to the eye. Moreover, colonies of parasites can settle in the resulting cavities: mold, fungus, bacteria. And their waste products can cause an allergic reaction, which is highly undesirable, especially if the children’s room is covered.
You can remove the previous layer of wall covering with a spatula. To do this, find the joint, pry up the edge, and pull the strip towards you. In most cases it comes off without problems. If necessary, soften the glue with water. To do this, wet the sponge and blot the wallpaper. Then use a spatula.
To enhance the effect, dilute the detergent in water and use this solution to dissolve the old glue. There are also special compounds on sale for removing the adhesive base. Instructions for use are indicated on the packaging. It is more convenient to apply it to the wall with a foam rubber or textile fiber roller.