Leveling walls with plasterboard allows you to quickly create a smooth, even surface suitable for further finishing. You can glue wallpaper onto drywall without putty if it is made of fiberglass and will be painted. Paper trellises are a budget option for the lazy and those in a hurry to finish repairs quickly. What will be the consequences after renovating the entire room with your own hands over the weekend and is it worth saving so much?
Wallpapering
Budget wall decoration
My nephew is studying to be an architect and helps me do renovations not just for the money. He is interested in knowing what materials are available for finishing and how to work with them. Kirill does not hide from his friends where he spends his weekends and holidays. A few days ago, a fellow student said that cosmetic repairs to wallpaper can be done cheaply and quickly.
He invited his nephew to see how to glue wallpaper onto drywall without putty. The nephew refused to help, but went to see the result. Kirill returned thoughtful and surprised. Why such a quick gluing, if after a few days, when the paper wallpaper has dried, you can see a lot of shortcomings:
- sealed joints and screws glow through the paper;
- the wallpaper was warped at the seams;
- When trying to replace a strip of wallpaper with another, the top layer of drywall separated.
I showed the guy photos in which the trim was glued to gypsum board without continuous putty, with minimal preparation. It was moisture-resistant plasterboard covered with tiles, standard gypsum boards with fiberglass and liquid wallpaper glued to them. The finishing material is opaque and dense; the plasterboard was not completely puttied, but it was primed twice and painted with water-based emulsion. After that, we looked at how to properly glue wallpaper onto drywall; the video showed everything in detail.
How to glue wallpaper alone without outside help - effective ways
The whitewash should be washed off with warm water, the water-based coating should be removed with a spatula. It is recommended to repair potholes and cracks, otherwise these defects will show through the wallpaper. If the ceiling has already been covered with wallpaper, then you need to completely get rid of it and wash off the remnants of the old glue with warm water.
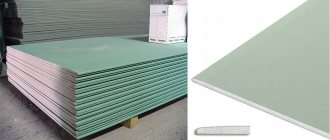
Drywall is one of the modern and popular materials for interior decoration. With it you can perfectly level the walls and ceiling, but it does not look very aesthetically pleasing, so it needs decorative finishing.
You can cover the drywall with wallpaper by filling the joints between the sheets.
When covering a surface with wallpaper, careful preparation is required. An attempt to apply wallpaper over whitewash leads to disastrous results. They will not hold up on whitewash, the canvases will not adhere firmly to the ceiling, since the whitewash will mix with the glue and the wallpaper will simply fall off. Even if you have hung the wallpaper very accurately, the dark surface of the drywall and the white seams between the sheets may be visible through it.
Therefore, the surface of the plasterboard ceiling must first be covered with putty. Before gluing the canvases, the putty surface is primed to prevent the appearance of fungus and mold. The joints between the wallpaper strips and the plasterboard sheets should not coincide, otherwise the plasterboard seams will protrude through the paper. Experts recommend puttingtying the entire surface of the plasterboard sheet, since without this procedure the rolls can stick tightly to the plasterboard sheathing.
They are difficult to remove, being removed along with the plaster layer. Also, wallpaper sticks to drywall very quickly, so any flaws will be difficult to correct.
What wallpaper can be glued to drywall without putty?
How to hang wallpaper on drywall yourself
The first drawback that manifests itself visually is the appearance of dark spots through the wallpaper. This does not happen if you stick thick finishing materials or wallpaper intended for painting:
- fiberglass;
- non-woven;
- paper
Kirill knew finishing materials quite well. He immediately concluded that the remaining shortcomings would not be noticeable. All wallpapers are thick and heavy.
- The wallpaper is thick and durable. They do not stretch and hide small irregularities.
- Even paper ones can be dyed up to 4 times. Non-woven fabric can withstand significantly more color changes. Fiberglass wallpaper up to 15 layers of paint, without changing the properties and surface topography. This means that the finish will not change for at least 10 years, then you won’t mind stripping them and the drywall and leveling the walls again.
I promised my nephew that I would select orders from my company for gluing wallpaper onto drywall, and he would be my assistant.
What material should I use?
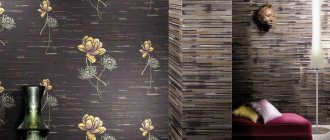
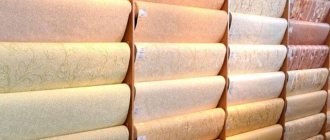
There are special products produced by domestic manufacturers. These finishing materials are presented only in white, but with a variety of reliefs on the front surface. Such wallpaper cannot be painted or washed, which is its disadvantage: over time, dust settles on the canvases and they acquire a yellowish-gray tint.
To decorate the ceiling, dense products intended for gluing walls are also used:
- non-woven fabrics - non-woven fabrics made of cellulose fibers, with a smooth or embossed surface, of various colors;
- vinyl - wallpaper consisting of two layers: a base (non-woven or paper) and a polyvinyl chloride film with patterns, reliefs or a plain coating applied to it;
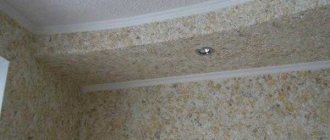
- liquid wallpaper - are natural materials in powder form: cellulose and cotton fibers, mica, various dyes.
Finishing with such materials does not require careful preparation of the base: thanks to the dense structure of the canvases, minor defects in the ceiling will be perfectly masked. In addition, these types of wallpaper can be washed and used for painting if necessary.
Preparing drywall for wallpaper
My company had an order for finishing a two-story house. There are many rooms in the building. The client was in no hurry with deadlines, he wanted quality work. I drew up a work schedule in such a way that the frame and frame made of metal profiles, walls and ceiling would be sheathed during the working week. Over the weekend, Kirill and I were preparing drywall for wallpaper.
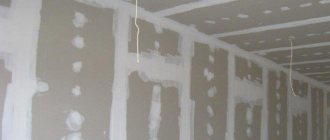
- The first thing my nephew did was seal the joints between the sheets of drywall at the top, and I at the bottom. He is younger, an athlete, it is easier for his mind to jump on ladders. First, putty was applied with a spatula, then serpyanka was laid - a strip of mesh for strength, and the layer of the composition was leveled.
- Before sealing the places where the sheets were attached to the profile, we went through and tightened all the screws and recessed them into the walls. Then a special varnish was applied to the caps, protecting the metal from moisture and oxidation. After that, they were puttied with cross-shaped movements.
- Gypsum putty dries quickly. We managed to clean up the protrusions and coat everything with acrylic primer. It is waterproof and protects against fungus. The next day, we cleaned the walls of dust and applied a second coat of primer.
- When everything was dry, cover the entire surface with a thin layer of putty.
- The already dry walls were rubbed down with fine sandpaper and primed again.
- Under the wallpaper, the second layer of putty was the finishing and last one. To paint, you need 2 thin layers of finishing putty with sanding and 2 layers of primer.
How to glue wallpaper onto drywall
Putty protects the surface of the plasterboard from destruction and creates a surface similar to plaster. As a result:
- Even through the thinnest wallpaper spots do not show through;
- During the next renovation, the wallpaper can be easily removed, just like from plaster;
- adhesion improves.
Now the rooms were ready for wallpapering and painting. Although the corners were set using a level and a square, we placed cardboard corners in them. On the outside - plastic, they are more susceptible to destruction. Taking into account possible shrinkage, we waited for all the compositions to dry thoroughly.
Features of working with meter material
Using canvases of this width will allow you to reduce the number of joints, creating the effect of a seamless ceiling. The process of gluing wallpaper also requires less time than when working with conventional rolls. Wide finishing materials will save the budget : despite the high cost of the products, their consumption will be less than standard paintings.
Before starting work, be sure to calculate how many stripes you will need to decorate the ceiling and mark the base.
Advice
It will be quite difficult to do the gluing alone, so worry in advance about who will help you.
In the process of applying wide wallpaper to the ceiling, immediately smooth it with a pressing spatula: thanks to this procedure, you will not only get rid of excess glue, but also air bubbles, as a result of which the adhesion of the material to the base will be better.
Wallpaper on drywall
I took a regular pencil for drawing on whatman paper and marked a vertical line near the door using a laser level. You can take a simple plumb line. Then I marked the horizontal upper border with a thin line. We unrolled the wallpaper and carefully studied the drawing. It was necessary to cut so that the lines coincided at the joints.
- We counted the number of whole stripes on each wall. Cut with an allowance according to the design, but not less than 5 cm.
- We coated the drywall with glue, about a meter wide area.
- We aligned the side edge and top of the wallpaper strip according to the markings and glued it, carefully smoothing it with a clean roller and rubber spatula, expelling the air.
Wallpaper on drywall
While I was adjusting and gluing a strip of wallpaper, Kirill was applying glue to the drywall under the next one. Over the course of the evening, the two of us quickly hung wallpaper on drywall in a large room. The next room took longer to cover. Kirill inquired in advance about how to glue heavy vinyl wallpaper onto drywall. A special glue is selected and applied to the wall and strip of wallpaper. Let it sit for about 5 minutes and only after that the wallpaper is glued to the wall. Vinyl is heavy, so the strip must be held and smoothed until the glue sets, 15 minutes.
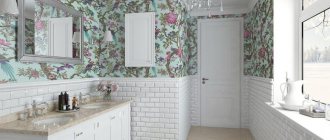
Therefore, while I was working on one strip, Kirill was applying glue to the next one and the wall. It took a lot of time. It took a long time to glue the trim. An arch separated the kitchen from the living room. It was necessary to putty in 3 layers, so that moisture resistance would be ensured in the future; a starting cement composition with the addition of polymer additives was used. For the second and third layers, we used a ready-made composition of moisture-resistant putties for damp rooms, a base of gypsum and cement. The composition we need is freely available in the store and there is a large selection from different manufacturers. We calculated how much we need based on the area and thickness of the layer.
We marked and first glued the bamboo bottom - panels. There was a wooden floor in the living room, and a self-leveling, moisture-resistant floor in the kitchen. Kirill already had experience working with bamboo panels. We made a dacha with him, a bungalow-style interior. Above the panels, gluing glass wallpaper did not take much time. Fiberglass adheres well and does not shrink or warp. When we finished gluing, we waited for a week so that the adhesives were completely dry and the walls were painted properly. Now for cleaning you can use any chlorine-free washing powder for walls and floors and quickly get it clean.
The working process
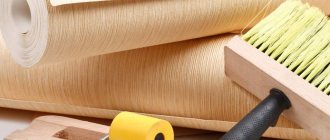
When you have mixed the glue, take a piece of wallpaper based on your speed at work. Then apply the glue in such a layer that the wallpaper does not stretch or tear because of it. Give them time to soak in the glue. Fold the sheets in half or into an envelope.
When the wallpaper is saturated with glue, stick the wallpaper onto the surface and align the panel along the joint, and remove excess air with a plastic spatula. This way, wrinkles will not appear, spoiling the entire appearance.
To start, use entire panels. In places where there are sockets or switches, wallpaper is glued in whole sheets. And then make a crosswise cut and bend the edges so that you can later return the socket or switch it in place. When the main work is completed, move on to complex elements. For example: under a window sill or doorway. Painstaking work characterizes you as a master.
Plasterboard ceiling
There was a two-level ceiling in the living room. It zoned the rest area, lowered over the bar and rose in the center. The design was complex, but the suspended ceiling profile made it possible. In the center they prepared everything for PVC film, there they made a tensioner with lighting around the perimeter of the protrusion. The wallpaper had to be glued only at the bottom. Kirill putty the ceiling for the first time. He was a little surprised when I added not 5% to the calculated amount, as for the walls, but 20%. Only when the compound falling from the ceiling covered him thickly did he understand why I took more putty and made him wear glasses.
First, he applied the compound along the joints and secured the serpyanka. I walked over the entire area of the gypsum board and sealed the screws. Then I attached paint corners to the inner and outer corners so that the transition lines were clear, the corners were sharp and straight. After that, I began to putty the entire surface of the ceiling, except for the area under the film.
We cut the holes for the light bulbs when the second finishing layer of the composition had dried. This allowed us to calmly level the surface, all the transitions. They sanded and primed the same way as the walls. Only the plasterboard sheets were thinner - 8 mm. They do not carry any load other than the weight of the wallpaper and a layer of paint.
Paintable wallpaper for the ceiling: choice, features of gluing and painting
Fiberglass is considered the best base; these wallpapers can withstand up to 5 - 7 layers of paint; the only disadvantage of such a product is the high price
Duplex two-layer paper wallpapers for coloring look good, but they are susceptible to swelling, and most importantly, they can be painted no more than 2 - 3 times
The non-woven fabric is quite high quality and durable; such wallpaper has an optimal price-quality ratio
- Preliminary preparation is carried out - cleaning the entire surface. If there is whitewash, it is completely removed. All major defects and cracks are covered with putty. It is mistakenly believed that non-woven or glass wallpaper can hide surface imperfections, but this statement is only true for minor imperfections.
- A primer is required.
- affordable price category - the product has a reasonable price, which does not limit the popularity of wallpapering surfaces;
- a wide selection of textures allows you to create surfaces that are amazing in nature;
- The process of cladding and painting does not require special tools or special professional skills, although experience is required.
Photo gallery of finished works:
Step-by-step instruction
The order in which the work is performed directly depends on the type of coating chosen. Non-woven wallpaper is glued in the following sequence:
- the foundation is being prepared;
- a layer of primer, putty and primer is applied successively so that the base does not show through the decorative base;
- glue designed specifically for non-woven wallpaper is purchased and prepared according to the instructions;
- The strips are glued according to the manufacturer's instructions.
Vinyl wallpaper is glued in almost the same way:
- prepare the base;
- cut to the size of the wallpaper;
- apply the adhesive composition to the floors and wall surfaces;
- fix the decorative material on the surface of the base.
Attention! For high-quality work, you should use an adhesive composition recommended for vinyl wallpaper. The universal one should be resorted to only in cases of extreme necessity.
Wallpaper for painting is glued to a pre-primed base. The canvases are placed end-to-end. This assumes that the base is perfectly level to begin with.
Paper wallpaper can be glued directly to the base, having previously sealed the joints and fastening points with paper tape or sickle tape. If this is not done, characteristic defects will appear on the surface when smoothing the canvas. In this case, there are no special requirements for the composition of the glue.
To obtain the best result, it is better to glue paper wallpaper onto a primed base. this will reduce the intensity of moisture absorption from the adhesive composition. The canvas will be securely fixed to the surface of the walls. Paper ones are placed end-to-end and overlapping. The procedure depends on the type of finishing material chosen and the manufacturer’s recommendations.
If you decide to decorate a wall with photo wallpaper, you should first select a finishing material, and then carefully prepare the base. The procedure will depend on the type being mounted. There is a model with a 3D effect that forms an LED coating. The detailed instructions for each variety describe the procedure.
In the most general case:
- the base is reinforced, primed, puttied, and carefully leveled. The presence of even minor defects is unacceptable, as they will clearly show through the decorative coating. In some cases, the perception of the photographic image will change;
- the glue recommended by the manufacturer is selected and diluted according to the instructions;
- When installing LED wallpaper, electrical wiring is carried out according to the electrical diagram;
- Direct gluing of photo wallpaper to drywall is carried out.
We invite you to watch a video describing the technology for performing the work:
Preparing drywall for gluing
First, the flatness of the drywall is checked. The screws should not protrude too much, but they should not be too deep into the coating. Paper fringe is eliminated in areas where the sheets were cut with a knife. It can be cut or sanded. The evenness of the joints and the presence of a chamfer are checked. If it is not there, then over time, due to changes in temperature and moisture, the entire surface will deform.
Sealing seams and screw heads
- The screw caps are treated with paint to prevent rusting.
- Serpyanka is glued to the seams to strengthen the junction of the sheets.
- The putty is rubbed into the joint using a narrow spatula through the serpyanka.
- Self-tapping screws, cracks, and minor defects are sealed with putty.
- A day after applying the first layer, a new layer of putty solution is applied with a wide spatula. It is used to level the base and does not allow the serpyanka to show through.
- After complete hardening, the putty is rubbed down first with coarse and then fine sandpaper.
At the same stage, it is necessary to strengthen the outer corners of the gypsum plaster walls.
The sequence of actions will be as follows.
- A reinforcing corner is applied to the gypsum board.
- The position of the corner is marked on the wall on all sides.
- An indent of 3 mm is made from the marks made and a vertical line is drawn along the entire height of the wall.
- An incision is made with a knife along the drawn vertical line.
- The cut strips of gypsum board are removed.
- Using a chisel, the gypsum base is hollowed out to a depth that is 0.1-0.15 cm greater than the thickness of the corner.
- The treated corner is filled with a thin layer of putty.
- The reinforcing corner is pressed into the putty so that it does not protrude beyond the formed surface of the walls.
- The gypsum composition must dry well.
- The corner of the wall is brought out with putty into the same plane as the plasterboard surface.
Drywall primer
Before priming, remove debris and dust from drywall with a brush or broom. The soil is diluted in the proportion indicated on the packaging.
You can quickly and efficiently process drywall with a roller. If you don’t have a tool, you can use a brush or a regular clothes brush.
When the first layer dries, the primer is reapplied. Puttying can be started only after the soil has completely dried.
Plasterboard putty
- Dry starting putty is poured into a specially prepared container. Dilute with water in the proportion indicated on the pack and mix thoroughly with a mixer.
- Using a wide spatula, apply a layer of a couple of millimeters over the entire surface of the drywall, including sealed seams and reinforced external corners. The spatula is held at an angle of 45° to the wall, this makes it easier to control the quality of application.
- When the first layer dries, the surface is rubbed with sandpaper. Lumps, tool marks, dried drops, and small cracks are removed.
- The finishing mixture is being prepared. You need to cover the base in 3-4 layers. Each subsequent layer is applied only after the previous one has completely hardened and sanded down.
Finishing primer
Modern materials can weigh a lot, so to improve their adhesion to the wall, it is advisable to cover the putty gypsum board with a finishing primer before wallpapering. Additional priming will extend the life of the finish.
The finishing primer is selected for a specific type of finish (wallpaper, paint, etc.).
Sealing cracks between plasterboard sheets
To remove cracks at the joints of sheets, a serpyanka is used. This material is a fiberglass or lavsan tape that looks very similar to a medical bandage. The serpyanka must be glued tightly to the joints of the drywall, and no cushions should appear from the air.
After the seam is sealed with sickle tape, putty is applied to the joint, which is subsequently thoroughly leveled. After such treatment, the joint becomes almost invisible, as it merges with the surface of the sheets.