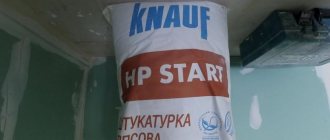
What is a rotband
One of the oldest manufacturers of gypsum powders for the construction industry in Europe, the Knauf company, mastered the production of dry mixes (SS) intended for plastering walls in the last century.
In addition to gypsum, the mixture contains modifying additives, thanks to which the solution not only becomes more plastic, but also does not set longer and adheres more reliably to the base.
Practical Germans began to depict a red ribbon on the packaging of new products as a symbol of the brand. The SS itself was named accordingly - RotBand (red ribbon translated from German).
Gypsum plaster marked rotband is a universal material. Suitable for many types of substrates, not only for dry rooms or indoor conditions, but also for leveling walls in rooms with temporarily increased humidity.
In the latter case, it is necessary to use a coating that protects the plaster from moisture. You can level the wall with a rotband on a glazed loggia or veranda, since the coating can withstand 75 freezing cycles without loss of strength.
Possessing high adhesion, Knauf Rotband is especially suitable for manual application on dense concrete and ceiling surfaces, with which other compounds do not work well. The tenacity and strength of the composition allows the mixture to be applied to vertical surfaces in one layer up to 50 mm thick.
The plaster mass is easy to prepare and apply even to hard-to-reach areas, since the material is highly plastic. This increases the productivity of plasterers and reduces fatigue.
Other advantages include:
- ease of processing;
- non-flammability;
- the ability of the created coating to maintain a microclimate;
- the ability to achieve a smooth surface suitable for painting by simple processing.
In order for the coating to be durable and last a long time, plastering the walls with rotband should be carried out in accordance with the guidelines developed by the company’s specialists. Instructions are located on the packaging.
How to prepare the mixture
So, everything is ready to start working. All that remains is to prepare the mixture and arm yourself with the tools.
I would like to remind you about the rapid setting of rotband, and therefore the lifespan of the solution usually does not exceed 25 minutes. Therefore, it is necessary to knead the mixture little by little in order to have time to work it out.
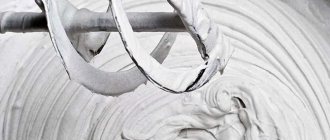
I advise you to immediately decide on the areas where you can apply the residue. It is more convenient to knead the mixture in a container with rounded corners. A plastic bucket is ideal for this. Pure water is poured into it and then the dry mixture is added in a ratio of 2:3.
But it is better to use a smaller amount of dry plaster and, if necessary, add it at the end. And there is a nuance here. Your solution will last longer if you use colder water. The consistency of the mixture should be such that it does not fall from the inverted trowel. You can quickly and easily mix the plaster with water using an electric drill and a mixer attachment. After this, the solution matures for 5 minutes and is mixed again. Now you can’t add either water or dry mixture to it. Having finished cooking, you need to very quickly wash the mixer or other tool used with water, since the rotband instantly sets and hardens. Otherwise, cleaning the tool will be problematic.
Rotband: step-by-step instructions for use for beginners
The instructions for use suggest that the sequence of plastering a room when Rotband plaster is used is similar to the procedure for working with other plaster compositions.
The order of work during plastering of the entire room:
- ceiling plaster;
- processing and leveling of walls;
- finishing of slopes, columns.
Next, we will consider in detail each stage of plastering with rotband.
Preparing the base
Regardless of the newness of the walls, before plastering the surface of the base is prepared, since conditions must be created for a strong connection of the two materials. The second purpose of preparation is to cleanse stains of a biological nature - to protect the plaster coating from the appearance of mold, rot or fungus in the future. And removing rust prevents brown spots from bleeding through the layers of finish.
Another task of the preparatory stage is to strengthen the weak near-surface layer and repair defects. In addition, if the base has a porous structure, then the open pores during plastering will take away the water needed by the solution, disrupting the hardening processes of the plaster. Therefore, the pores need to be clogged before starting work.
Before work, you should de-energize the wiring and protect sockets, windows and doors from damage.
In the room being renovated, plaster, wallpaper, paint, peeling, unusable old plaster are removed from the walls. The resulting cracks and deep potholes are repaired. Remove old metal fasteners (nails, screws, hooks) from the walls.
If hardware needs to be left, they should be insulated (for example, painted) to prevent rusting. Stains of efflorescence, formed rust, grease, soot or any biotic growth are removed.
In a new building, preparation is also necessary. In brickwork, the seams are deepened to a centimeter and unstitched. The surface of the brick is scratched with steel brushes. Traces of grease are removed from the concrete, and notches are applied to smooth walls. Nodules and large protrusions are cut down. At the joints of plasterboard sheets, chamfers are cut off and screw heads are recessed. Before plastering, they are covered, for which a serpyanka is applied to the joints.
Primer
Before priming, be sure to remove dust from the surface and dry the base. The correct choice of primer for Rotband Knauf determines the result of all subsequent work.
The instructions indicate the brands of primers used for different substrates:
- easily absorbing water (cellular or expanded clay concrete, cement-lime plasters, brickwork) - primed with Tiefengrun or Mittelgrunt (dries in 6 hours);
- Dense materials that do not absorb moisture (concrete, polystyrene foam, cement plasters, tongue-and-groove slabs) are treated with Betonkontakt and dried for 12 hours.
Mittelgrunt (can be replaced with Knauf-Multigrunt, dilution proportions are given in the primer manual).
Displaying beacons and corners
To level the surface of a wall that has only slight deviations, you can do without beacons. When walls are littered or have a surface with large differences, beacons are used to create landmarks.
Before using them, ceiling and wall surfaces are weighed, the most protruding points are found, and the location of the auxiliary plane is determined. A mark (plaster) with a thickness of at least 5 mm is made on the site with a solution. They navigate by it by installing the slats. There is a detailed article about installing beacons on our website.
In addition to beacons, profile corners are mounted on protruding corners, aligned in the same plane with the beacon strips of adjacent walls.
Preparation of the solution
The instructions for use provide scant information about how rotband plaster is prepared for use. There are only four lines that may not be entirely clear to beginners. Therefore, we describe the process sequentially.
To dilute one (30 kg) package, you need to prepare a clean (without remnants of the previous batch, which is important) plastic container and pour 17 liters of water into it. So, out of the 18 liters specified in the instructions, there remains a liter of water, which will be needed if the resulting solution is too thick.
In the latter case, at the end of mixing, the density is adjusted by adding liquid. The capacity of the vessel depends on the number of plasterers involved in applying and leveling the mixture on the wall. If plastering is done alone, then a 90-liter container is enough to have time to work out the entire mass before setting begins (there are only 20-25 minutes left from the end of mixing).
The temperature of the air, as well as the base, is not lower than +5°C, not higher than +30°C.
Open the bag, scoop out the powder with a dry trowel, pour 8-10 portions into water, and begin to knead the mixture with a mixer.
Mixing a small amount of powder creates a solution, which will take a couple of minutes. During this time, additive substances pass into the water, facilitating the correct flow of the subsequent chemical process.
After this, the rest of the material in the bag is gradually poured in. This is done while continuing to stir, after which the solution is left, allowing 5-7 minutes to soak. Mix thoroughly and add water if necessary. If the solution mass comes out a little liquid, add dry powder from another package. Naturally, stored water is not added to such a mixture. After the second mixing, the mass is used for plastering, and SS can no longer be added to it.
Mixing is performed at low mixer speeds.
Tightening and leveling
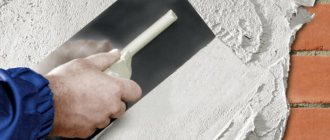
The solution is applied in the same way as cement compositions. Use a spatula with a wide spatula or a wide grater. The mixture is used to fill the space from lighthouse to lighthouse. Having filled an area about a meter long, the solution is leveled along the beacons using a rule with an h-shaped profile.
If the thickness of the leveling coating is more than 15 mm, the plaster is applied in two layers. At the same time, having applied the first mark, it is “combed”, covering the surface with combs (for which a spatula with a comb is used). A day later (not earlier), when the applied mass has hardened, apply the next layer, which is leveled along the beacons.
The instructions warn that applying a second layer over a freshly laid one is only possible if another half hour has not passed since the start of its application. If they do not have time to meet this period, the layer is allowed to harden for a day.
To align, the tool bar is usually guided, leaning on the edges of the beacons, with small zigzags across the longitudinal line. The solution that accumulates on the rule is removed with a spatula, transferring it to unfilled areas. The rule is to do it one or two more times. After which they continue to fill the space between the beacons.
The slopes are plastered, maintaining the “dawn angle”. The correct plastering sequence is: the top one is plastered first, followed by the sides. For leveling, you can use a cut (short) rule, a wide spatula, or a specially made tool.
After approximately 45-60 minutes from the mixing time, the condition of the applied solution is checked by pressing it with a finger. If the set dough does not stick to your fingers, cut off the protrusions using a trapezoidal rule (the same can be done with a wide spatula). On slopes this is done with a “kantenhobel” (plane).
The result is a finish that has small (up to 3 mm) unevenness in the form of tool marks, scratches or burrs, as well as sagging up to 2 mm. A rough finish of this quality is suitable for decorative plaster (with a filler fraction of more than 2 mm), as well as gluing tiles.
Second contraction and alignment
If you need a better quality surface, wait 15-20 minutes after the first trim and perform a second trim. To eliminate unevenness, use a wide spatula.
Removing beacons and sealing grooves
The procedure for removing beacon profiles is carried out after the mortar mass has set and pulling out the metal parts will not cause the mortar to slide. Remove the planks by clearing the area near the end with a chisel. The edge of the lighthouse is clamped with pliers and pulled away from the wall.
After removing the profile, a groove is formed on the wall - a groove. Dust is removed from it, the inner surface of the groove and adjacent areas are primed. Then fill it with mortar, which is leveled flush with the wall with a wide spatula.
Grouting plaster
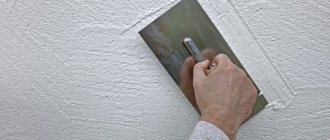
A special quality of smoothness can be achieved by grouting rotband plaster, performed 15-20 minutes after the second trimming. The plaster coating is moistened generously using a sponge grater (you can use a felt trowel).
Moving the grater in a circular manner, smooth out the marks left by the spatula or rule. Allow moisture to be drawn into the solution (this can be seen by the wall becoming dull), then smooth it with a spatula. This achieves a finishing quality suitable for gluing structural wallpaper, applying texture paint or decorative plastering with finely graded compounds.
If after another 2.5 hours (or within 24 hours) we wet the wall again with a sponge, we will pull out the gypsum milk from the surface layer. It will fill the remaining pores under the influence of the smoothing iron. This creates the basis for painting the wall with matte paints, making the Venetian.
How to prepare the mixture
So, everything is ready to start working. All that remains is to prepare the mixture and arm yourself with the tools.
I would like to remind you about the rapid setting of rotband, and therefore the lifespan of the solution usually does not exceed 25 minutes. Therefore, it is necessary to knead the mixture little by little in order to have time to work it out.
I advise you to immediately decide on the areas where you can apply the residue. It is more convenient to knead the mixture in a container with rounded corners. A plastic bucket is ideal for this. Pure water is poured into it and then the dry mixture is added in a ratio of 2:3.
Create a structure (if necessary)
Fine-grained gypsum plaster rotband is suitable as a material for creating relief patterns on the wall. You can create a unique decoration with your own hands, since the gypsum composition is harmless to the skin. You can experiment with gypsum plaster to achieve different effects. Wanting to change the interior design, they use shaping techniques, a description of which can be found in the Decorative plasters section.
To create a pattern after leveling the mass, a relief roller or any other forming tool (hard brush, trowel, brush, crumpled plastic bag, shaped spatula) is usually used. When the mixture has hardened and completely dried, the decorated ceiling is painted.
Brief history of Knauf
The Knauf Gips KG company itself (until 2003 - Gebr. Knauf Westdeutsche Gipswerke) was founded in 1932 by the brothers Alfons and Karl Knauf (mining engineers). Initially, the factory was located on the banks of the Moselle in the German city of Perl, and the mine was located on the other side of the river in Luxembourg in a place called Schengen. The Knauf company commissioned its first gypsum stone mine in 1938 in a place called Stadtoldendorf (in 1972, the plant in this city began producing plasterboard sheets; Knauf has been producing gypsum boards themselves since 1958). After World War II, it was decided to move the head enterprise to the territory of the American occupation zone, to the city of Iphofen (Lower Franconia in Bavaria), where it is still located. Knauf is a family business that is still owned by members of the founding family. In Russia, Knauf's current activities began in 1993 with participation in the capital of the Thermal Insulation and Gypsum Products Plant (TIGI).
Features of ceiling plaster with rotband
There are some differences between finishing the ceiling and leveling the walls with a do-it-yourself rotband:
- If a layer of up to 50 mm can be applied to the wall with a rotband, then a layer of up to 15 mm can be applied to the ceiling. Therefore, if the height difference on the ceiling is more than 30 mm, it makes no sense to plaster it to level it. You need to use other means, for example, drywall.
- If during leveling the walls the movement of the tool when applying the plaster mass is directed from bottom to top, then when plastering the ceiling it is directed towards itself.
- After plastering and smoothing, the gypsum thickness along the perimeter of the ceiling (without gaps) is cut to the base with a Stukzege saw. The use of such a constructive technique prevents the formation and development of shrinkage cracks, which otherwise can originate near the walls, developing towards the center of the ceiling.
Preliminary work with the base.
Cleaning from previous coating.
The surfaces to be processed are pre-dried, the required temperature is + 5 degrees Celsius. This contributes to less plaster consumption and better application. It is also necessary to clean off the previous coating (whitewash, plaster, paint, tiles or wallpaper). Remove uneven surfaces and protrusions from the base. Be sure to treat metal elements with anti-corrosion liquid. Otherwise, corrosion may appear.
Primer.
- Substrates with increased moisture absorption must be coated with a primer. This is done to ensure uniform adhesion of the plaster to the base. Primer can be applied using brushes, rollers or sprayers. According to the instructions, it is recommended to use Knauf-Grundimittel primer.
- Surfaces that, according to their technical characteristics, do not absorb moisture should be coated with Knauf-Betokontakt primer. This is done to increase adhesion.
Displaying beacons and corners.
Apply Rotband plaster to the wall with gaps of 40 cm. Press the beacons into the moldings and align them in one plane. The leveling rule should be 20 cm longer than the pitch of the beacons. Corner profiles are aligned in the same plane, with the beacons. The moldings are applied to the side inside the profile. Rotband plaster, consumption per 1 m2 with a layer of 10 mm.
- Knauf Rotband plaster – 30 kg; consumption 8.5 kg per 1m2.
- KNAUF-Betokontakt – 30 kg; consumption 0.3 kg per 1m2.
- KNAUF-Grundirmittel – 30 kg; consumption 0.1 kg per 1m2.
You can make detailed expenses using the calculator on the manufacturer KNAUF website.
Subsequence.
Kneading
Pour 18 liters of water into a metal or plastic container and add 30 kg rotband plaster to it. First, put 6 spatulas of the mixture and stir everything until completely mixed, only then pour the entire bag into the water. Mix the entire mixture with a construction mixer until all lumps disappear. The mass should be homogeneous. If the composition is too liquid, add more dry plaster. After mixing everything, you need to wait 5-6 minutes, then stir again. The technical characteristics take a little time to mature.
Application.
Apply the matured mixture to the surface to be treated for 20 minutes. On the ceiling you need to work like a “falcon”, making movements towards yourself. The surface is covered with a spatula. This does not affect consumption, since everything evens out in the future.
Note: If you bought plaster for machine coating, you should use special stations to simplify and automate the process.
After sketching, everything is leveled with a tool - usually making wave-like movements.
When it is necessary to increase the thickness of the coating, repeated layers are applied, having previously created roughness on the first layer. Which will serve to adhere the layers. The second coating can be done only after a day. This is the drying time for rotband plaster.
Leveling and grouting.
The setting period according to the technical specifications is 50 minutes, after which it is leveled with a large spatula or metal lath. Excess is removed by covering up all irregularities. In this way, lower consumption is achieved. The wall for painting or wallpaper is additionally rubbed with a tool - a grater. To do this, they are moistened generously with water and made in a circular motion, this makes the surface perfectly smooth.
Creating a structure.
If relief is needed, it can be easily achieved; to do this, simply on a soft surface (after leveling with the rule), you need to run a roller with a relief on the wheel over it. Structures can also be created using a trowel.
Recommendation: Rotband plaster dries faster if you create a ventilated room. To do this, simply open the windows and doors to allow air to pass through.
Do not forget that the dried structure is very difficult to remove, so wash the tool you are using in advance.
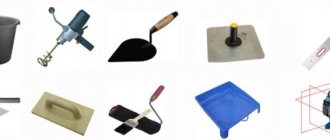
Necessary tool
Before work, prepare the necessary tools:
- h-shaped and trapezoidal rule;
- wide spatula;
- corner spatulas;
- trowel;
- level and other devices for installing beacons;
- mixer;
- half;
- ironing board;
- rollers (for priming and applying patterns);
- brushes;
- sponge or felt grater;
- capacity (90/200 l);
- masking tape;
- cord, plumb line;
- clean rags.
A special feature of the tools used to work with gypsum mass is that the metal spatulas and trowels must be stainless. If you use tools made of rusting steel, black marks will remain on the wall.
Storage periods and methods
The manufacturer KNAUF recommends storing Rotband dry mixture in undamaged packaging for no more than 6 months. Since gypsum is used as the basis for the plaster, it is advisable to choose a dry place for its storage, because This natural material has high hygroscopicity (moisture absorption), under the influence of which it loses its properties. If the packaging is damaged, it is better to store the remaining mixture not in a bag, but in a hermetically sealed container or in special containers.
Cheap gypsum mixtures are available for sale, but their use will not provide a high-quality plaster solution, like Knauf Rotband.
How long does it take for the solution to dry?
The drying time for rotband plaster is indicated in the instructions for use for optimal conditions:
- humidity up to 60%;
- temperature - +20°C;
- layer thickness – 15-20mm.
It is 7 days. In fact, plastered walls may have a thicker or thinner coating, and the temperature conditions of the room may differ. With good ventilation, the drying time may be a couple of days shorter.
The manufacturer recommends priming the surface of the rotband after drying with Tiefengrund primer, the film of which will protect the gypsum material from moisture and increase adhesion to water-dispersed paint or wallpaper.
If the Knauf plaster that you used to renovate your apartment is already familiar, then when building a house there is a high probability of using this material again. We hope that the article “Rotband plaster: instructions for use” will help beginners achieve “German quality” guaranteed by the manufacturer.
Meet us in a new format!
New packaging design for KNAUF-Rotband
Quality standard Finishing mixtures Rotband.
Rotband is a brand of building materials loved by both finishing professionals and private craftsmen around the world. For many years, Rotband has been considered synonymous with true German quality.
The assortment of the line is represented by KNAUF-Rotband universal gypsum plaster, thin-layer putties for finishing surface preparation for decorative finishing KNAUF-Rotband Finish and KNAUF-Rotband Pasta Profi. The use of these products allows you to solve a wide range of tasks for finishing premises, such as sealing cracks, leveling walls and ceilings, and decorating surfaces.
All products of the Rotband family were developed by German specialists, are fully compatible with each other and adapted for Russian conditions. The mixtures are characterized by ease of application, low consumption, high drying speed and durability.