Puttying is an integral part of quality repairs. This is the easiest and most convenient way to level the surface. The process of applying putty requires some skill, but it is not that difficult to learn. When carrying out repair work yourself, do-it-yourself ceiling putty is performed in several stages and largely depends on proper surface preparation.
DIY ceiling putty
Materials for putty
For puttying, there are two types of gypsum-polymer putty mixture. They are called "Start" and "Finish". The starting putty contains coarse-grained fractions. Therefore, it is designed to apply a rough and thick leveling layer. With a very large leveling layer, “Start” is applied in several passes, allowing each to dry. The thickness of one layer is up to 1–2 cm.
“Finish” putty is very soft and is intended for applying the finishing layer to the finished surface. There are no coarse-grained inclusions in it, so with its help you can get a very even and smooth plane.
Please note that modern putty mixtures contain gypsum. Therefore, hardening after applying the mixture occurs very quickly. And complete drying occurs in 12 hours or more. The exact time depends on the size of the layer, temperature and humidity in the room.
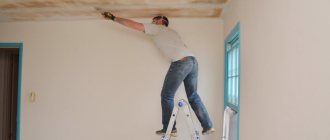
Post-processing of the wall
After all the necessary coating has been completed, the surface must be treated. Especially for this purpose, the following step-by-step actions are performed during arrangement:
- a sufficient amount of time is previously allocated for the surface to completely dry;
- the next step will be to remove excess putty applied to the structural element;
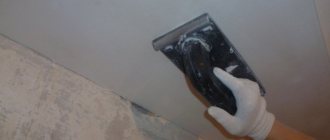
- Next, you need to properly sand the coating to create a uniform, smooth layer on the surface;
- also, depending on the subsequent arrangement, it may be necessary to apply a certain primer.
As a rule, this treatment option is used to ensure that the substance applied to the surface does not begin to crack and crumble under the influence of harmful factors. These kinds of events make it possible to eliminate those excess compositions that are not required.
Important. When sanding the coating, it is recommended to use soft sandpaper with a minimum value so as not to damage the base layer of the coating.
Preparing a concrete ceiling for puttying in a new house
How to properly putty a concrete ceiling? First you need to do a flaw detection of the ceiling surface. You should see where the deepest or convex parts are. For this you will need:
1. Tools:
- nylon thread;
- marking thread with colored powder;
- laser or regular level;
- rule;
- pencil;
- hammer drill
2. Materials:
- metal beacons;
- plaster or alabaster;
- quick installation.
You will need to use a laser level to mark the horizontal plane of the ceiling. This must be done if you want to get a plane clearly in the horizon line. If you don’t face such a difficult task, then use a regular level. And, by the way, you will have to do all the preparation with someone together.
We choose putty, taking into account all the nuances
Putties are distinguished by release form, type and composition. On the shelves of construction stores they can be found in powder and paste form. Based on their composition, putties are divided into gypsum, polymer (acrylic), and cement.
Plaster
Gypsum mixtures are easy to work with because they are environmentally friendly, quick drying, sufficient ductility, not susceptible to shrinkage, and have good heat and sound insulation. In addition, they are perfectly applied, processed and sanded. After drying, gypsum mixtures give a white color. However, it is worth remembering that this type of mixture is not suitable for use in rooms with humidity.
Cement
Cement putties have excellent resistance to low temperatures and have good moisture resistance. Therefore, you can work with them in cold and damp rooms, such as a balcony, entrance, basement. Cement putties can shrink significantly. Often such putty behaves strangely and unpredictably, because... in very damp rooms, even cement plaster can peel off the surface and become moldy.
Important! It should be remembered that cement putty after drying has its own gray tint, which may appear if the ceiling is painted white. And you shouldn’t wait a couple of days until it’s completely dry to sand it. Over time, it hardens more and more and it will take a lot of effort to finish grinding.
Polymer (acrylic)
They can be produced either in dry or paste form, and have a wide range of applications. They are characterized by increased strength, elasticity, a high degree of adhesion, and the ability to withstand different temperature changes. The only disadvantage of this material is its high price.
Finishing
Finishing mixtures are used at the final stage of finishing work, mainly for painting. With their help, the smallest defects are eliminated. After application and hardening, a silky white structure is obtained, which requires light grinding with a p240 sanding tool.
We recommend acrylic finishing putties in paste form; they are well suited for finishing ceilings and walls and slopes for painting.
Universal mixtures
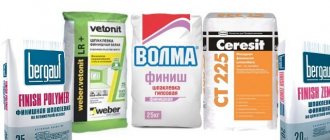
Universal dry putty mixtures come in both gypsum and acrylic. They do not crumble during operation and are easy to sand. Initially, they can be starting and finishing at the same time; they are used for sealing drywall joints and are not bad for finishing under wallpaper, or so it is written on the packaging. For example, on the knauf Fugenfuller putty it is written that it is well suited for both drywall joints and ceiling putty. The second example, sniezka acryl-putz start-finish, is well suited for starting and finishing wallpaper, but is not ideal for finishing with high-quality painting. Practice shows that such mixtures cannot perform different functions equally well. Therefore, we recommend using appropriate materials for each type of work.
It is worth knowing that in addition to the main types of putties, there are also mixtures of a more specific nature:
- adhesive;
- oil;
- oil-glue;
- façade acrylic;
- latex;
- acrylic;
But in this article we will not consider these types because they require special attention. And for good quality repairs, we have more than enough basic types of putties.
Preparing a concrete ceiling for putty
This option considers the most complex method of preparing a ceiling for putty. Typically, modern ceilings are made of plasterboard. But, elements of ceiling preparation using concrete plaster are present in all work related to plastering of ceiling surfaces.
1. Tools:
- primer roller;
- narrow spatula 100 mm wide;
- wide spatula 400–600 mm wide;
- plastering buckets 2 pcs.;
- low-speed drill with a whisk.
2. Materials:
- metal beacons
- putty "Start"
- abrasive mesh
Work order
- Prime the surface of the ceiling. This must be done very carefully. The plaster should adhere very well to the ceiling.
- Choose one of the walls as a base.
- Make two or three horizon marks to draw one horizontal line. This line will be the start for marking the plane.
- Draw a horizontal line on the base wall below the ceiling using a marking thread. To do this, the two of you pull the thread along the marking points. Now pull the thread one by one and release it sharply. A colored mark will remain on the wall.
- Transfer the base's horizon line to two adjacent walls. Use the ends of the line at the corners of the room as starting points. As a result, you should have a drawn perimeter of the lines of the horizon plane.
- Take a nylon thread and together do a flaw detection of the ceiling surface. One person holds the end of the thread against one wall, the other against the opposite wall. Guide the thread along the lines in one direction. Your task is to determine the locations of maximum depressions and bulges.
- If the marking needs to be raised higher, then simply add the same number of centimeters to the top of the marking made and redraw the line.
- Mark the deepest places with a pencil. In these places, fasten the quick installation so that the head of the screw gives you the level of the ceiling. Instead of quick installation, you can use plaster or alabaster. To do this, stick pieces of the thick mixture to the ceiling and level them with a horizontal plane using nylon thread according to the level of the markings on the walls.
- Attach the beacons using alabaster to already prepared marks made from quick installation or plaster.
- Mix the dry mixture of starting putty in water and apply the first rough layer of plaster along the beacons.
- Apply as many layers as needed to level the surface.
- Be sure to reinforce the entire ceiling plane with fiberglass mesh. To do this, use reinforcing fiberglass mesh with a density of 140–160 g/m2, since you need to achieve high strength of the plaster. The mesh must be embedded in the last layer of leveling plaster. Make the mesh overlap by at least 5 cm. 11.
- When the plaster has dried, be sure to clean the surface from traces of the spatula with sandpaper or an abrasive mesh.
You have prepared the ceiling surface for putty. How to properly putty ceilings prepared with leveling plaster on a concrete base, see further in the text.
Ceiling putty for painting
If paint is used as a finishing material, then puttying walls and ceilings has a number of features. Sometimes unpleasant problems arise during work - for example, when painting the ceiling, pieces of putty may stick to the tool. Of course, as a result, unevenness will appear on the surface of the ceiling - and the point of putty is precisely to eliminate such imperfections. It is not possible to simply glue the fallen putty back into place, so you need to look for other ways to solve the problem.
To paint the ceiling without any problems, putty should be carried out as follows:
- The final finishing must be done using a special waterproof putty. A distinctive feature of such materials is reliable protection from moisture, which is part of the paint. If necessary, you can add a special primer with water-repellent properties to the regular dry mixture. Of course, you need to add it when mixing the working composition. The mixture must be stirred in the same way as usual - the main thing is that there are no solid pieces in it. The composition dries completely after an average of three hours, so it must be worked out before this time.
- To make your task even easier, you can apply a waterproof primer to the ceiling after applying putty, but before painting. Thanks to the primer layer, the ceiling putty will not be destroyed during the finishing process.
- When painting, you need to very well control the degree of pressure on the roller. In addition, it is not recommended to go over one area several times - monotonous movements can cause the coating to peel off, and after some time you will have to repair the ceiling again with putty.
Preparing plasterboard ceilings for puttying
To prepare this ceiling, you need to properly seal the joints between the sheets of drywall. You don't need to do anything else. The ceiling is already leveled to the horizon and it is very smooth. For putty you will need:
1. Tools:
- narrow spatula 100 mm;
- wide spatula 200–250 mm;
- knife.
2. Materials:
- reinforcement mesh tape;
- special putty for sealing seams;
- abrasive mesh.
The sequence of preparing a plasterboard ceiling for putty
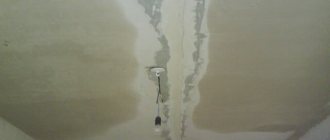
- Apply the putty mixture to the seam with a narrow spatula. Make a layer of any thickness.
- Apply reinforcement tape. At the joining points, be sure to overlap the tape by at least 5 cm. Cut off the excess tape with a knife.
- Level and remove excess mixture with a wide spatula. Wait for it to dry.
Note! Reinforcement using a special putty for seams prevents the appearance of cracks and tears at the joints. If you use regular gypsum-polymer putty “Start” or “Finish”, there will definitely be cracks.
Technology 3: creating a finishing texture
In this technique, puttying with a roller involves creating a finishing texture. The relief will depend on the chosen roller.
They can be:
- rubber;
- fabric;
- leather;
- plastic;
- fur, etc.
You can use a homemade roller. To do this, thread is wound around the roller or wrapped in other textured material.
Required materials and tools
To work you will need:
- relief roller;
- putty knife;
- primer;
- dye (if necessary to add color).
The entire puttying workflow
After sealing the seams and all irregularities, the wall is treated with a primer. When the base layer is dry, putty is applied. It shouldn't be liquid. The construction mixture is applied with a spatula. Its layer on the wall should be about 3 mm. If it is smaller, you will not be able to make an even impression.
After 10-15 minutes, when the putty begins to dry, you need to go over the wall with a roller. To understand whether the texture can be applied, you should press with your finger on an inconspicuous area of the wall. If the trace is not deformed, they begin to create a relief. You should move the tool evenly to get the same pattern.
When the putty dries, it is covered with primer and then painted.
Putty technology for prepared ceilings
Tools:
- Set of spatulas with widths from 100 to 600 mm. As a rule, you definitely need a narrow spatula 100 mm wide, medium and wide.
- Low-speed drill with a whisk for kneading.
- Two plastic buckets for plaster with a volume of at least 10 liters. More is better.
- Plastering ladle. It is convenient for them to pick up dry mixture.
- “Falcon”, “plane” or “trowel”. The names are different, but the essence of the instrument is the same. This is a metal plane with a handle attached to one of the planes. The second plane is working. Some craftsmen make do with spatulas. You can work with both a spatula and a “falcon” at the same time.
Materials:
- gypsum polymer putty “Finish”;
- abrasive mesh.
Personal protective equipment: anti-dust fabric mask or respirator.
The video can tell you a lot more about how to properly putty a ceiling.
Ceiling putty technology:
- Fill both buckets with water. One is completely, the other is about a third. In a full bucket, you will wash the whisk after each batch. If this is not done, a layer of hardened mixture will very quickly grow on the whisk. It can break off and get into the working solution. And this greatly interferes with quality work.
- Pour the dry mixture into the second bucket. Do exactly this sequence: water and then the dry mixture. This way you will avoid the appearance of semi-dry lumps at the bottom of the bucket.
- Using a drill and whisk, stir the mixture to the level of thick sour cream. A very thin solution will slide off the spatula. Thick ones will be hard to work with.
- Take a narrow spatula in one hand and a wide one in the other. Use a narrow scoop to scoop the mixture and spread it over the blade of a wide spatula in one confident motion. You can use a “falcon” instead of a wide spatula.
- Now apply the mixture in one layer to the ceiling. Level it out. Continue applying the putty to the ceiling, spreading it evenly in a thin layer.
- Ignore the spatula marks. You are unlikely to be able to completely remove them from the damp layer.
- After applying the first coat, allow it to dry completely. This may take 12 hours or more. The lower the temperature and the higher the humidity, the longer the putty will take to dry. Please take this into account.
- After the first layer has completely dried, take a medium-sized abrasive mesh and clean the entire surface from traces of the spatula. That's why it wasn't necessary to do it over the wet layer. You can level dry putty with a mesh much faster.
- Apply a second layer of putty. You will see that it turns out very even and smooth. Give it time to dry.
- Use a fine abrasive mesh to clean the entire surface. If there are strong defects somewhere, carefully apply a thin layer of putty to them.
- Once all the modifications are dry, do a final cleaning of the surface.
Your ceiling is ready!
Pros of putty
Putty is considered one of the most popular building materials, without which no modern renovation can take place. And it doesn’t matter whether the layer remains as a decorative component, or serves as the basis for further wallpapering, painting or other facing material. Puttying the ceiling in an apartment or house with your own hands has a lot of advantages. For example:
- Low cost of work performed. This is especially true for dry rooms, for which gypsum mixtures can be used. They have affordable prices. The same applies to other tools and materials that will be required in the future.
- Although not everyone knows how to properly putty a ceiling, however, with instructions and the availability of tools and materials, even a beginner can cope with this task. The tools do not require high qualifications; they are simple and affordable.
- Ceiling putty is sold in a wide range. Everyone can find an option for themselves. This applies to price, quality, the main component in the composition and the texture that will remain after applying the putty to the ceiling. In addition, depending on the design, the surface can be painted in any color.
- The putty is environmentally friendly, does not harm health, resists moisture (not gypsum putty) and withstands use well in different rooms. The ceiling looks decent. Puttying and subsequent painting of the ceiling is acceptable even in children's rooms (if you choose a safe water-based paint and varnish material).
- A ceiling with putty will resist fire, since the material does not burn and does not support combustion.
- Excellent decorative qualities. If you read the instructions and recommendations before puttingtying the ceiling, and be careful and precise, then this is one of the best options for decorating the ceiling. It will be smooth, beautiful, in no way inferior to a stretch ceiling. And this is important, given that the latter will cost more.
- If the finished ceiling putty dries quickly, then all the work can be done in just 1 day. This means that the family does not need to be evicted for an indefinite period.
- Long service life. Since there is practically no load on the ceiling (no one touches them with their hands, it is impossible to catch it with something, as happens with walls), then putty is the best option in terms of price and quality ratio. It will last a long time, and if you also treat the surface with washable paint, the ceiling can be cleaned of dirt.
It turns out that if you putty the ceiling, you can get a lot of positive aspects. However, there are also negative sides. For example, putty will not provide the required quality of sound and heat insulation. And gypsum mixtures cannot be used at all in wet rooms. How should you properly putty a ceiling before painting? To do this you need suitable tools and materials.
Some useful nuances of puttying ceilings
- It is recommended to watch how to putty a ceiling, video lessons on the technique of applying putty. With the help of such master classes, you will master basic knowledge of puttying techniques, which will help you when working independently.
- Always wash all work tools if you leave them unused for more than 15 minutes. The gypsum included in the mixture dries quickly and is very difficult to clean from the blade and handle of the spatula. The same as with a kneading whisk.
- Be sure to use dust masks. When sanding with an abrasive mesh, all the flying dust will be on your face. Take pity on your lungs.
- Use spatulas of different sizes. Experiment. For example, it is better to make corner junctions with medium-sized spatulas.
Conclusion
Making an original finish on your own is much easier than it seems at first glance; choose the most suitable solution and use all the tips from the review. The video in this article will help you understand some important nuances, and if you have questions, write them in the comments below.
Did you like the article? Subscribe to our Yandex.Zen channel
October 29, 2021
Tools and materials, Plastering and wall putty
If you want to express gratitude, add a clarification or objection, or ask the author something, add a comment or say thank you!
Required Tools
Before starting work, you need to prepare everything you need, including tools:
- a tray and a roller with 1 cm pile for soil;
- container for mixing putty;
- construction mixer or electric drill with a whisk attachment;
- metal and plastic spatulas of different lengths, including an angle spatula;
- a plastic grater with attachments of various fractions or sandpaper;
- a flat wooden lath, a bubble or laser level;
- reinforced tape, sickle tape, abrasive mesh or fiberglass;
- backlight;
- container with water for washing tools;
- water for mixing putty;
- trestle, stepladder or scaffold;
- protective equipment - glasses, cotton-based rubber gloves, respirator, hat, workwear.
Tools you will need to putty the ceiling
Builders with extensive work experience buy a grinding machine to quickly level hardened putty. For a one-time use, this purchase is not worth it. It is better for a novice craftsman to spend a little more time using a grater or sandpaper.
What kind of ceilings can be puttied?
Large differences in height, curvature and bumps cannot be leveled using putty. It will help level out unevenness of no more than 3 mm, which means it can be used on a fairly smooth surface.
If the ceiling is only slightly “imperfect” and the differences are no more than 3 cm, it is recommended to plaster it using fiberglass mesh. Reinforcement increases strength and prevents the formation of cracks. In more serious cases, only a suspended ceiling or plasterboard covering will help. Then you can hide even large defects by first laying communications and installing mortgages for lamps.
The final layer of putty: how and what is best to apply
Finishing ceiling putty can eliminate existing defects in the starting layer, improve sound insulation, and increase strength and adhesion between materials. Mixtures of elastic and homogeneous structure are placed in a thin and even layer of 1–2 mm in 2–3 layers on the starting layer or web. Which one to choose? The modern market offers a wide range of polymer, acrylic, and gypsum finishing putties. We recommend using finishing putty from the same company as the starting putty. In any case, you need to choose the material that will:
- effectively eliminate even minor defects;
- have a small particle size;
- after drying, give a pure white color;
- do not form lumps;
- easy to smear and no need to reach for the tool;
- hold tightly and do not crack due to temperature changes.
All these properties are revealed during the use of the mixture; based on our experience, we recommend such brands as Caparol, Knauf, Sniezka, Sheetrock
What is the best way to putty? During puttying work you will need:
- small spatula 10 cm - for taking the solution;
- corner spatula - NOT NEEDED! useless tool, don't waste your money.
- a large spatula 35 cm or larger - for evenly distributing the solution over the entire surface.
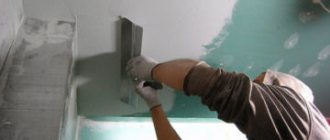
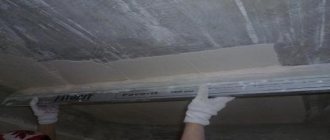
A wide spatula is pressed by hand onto the base to be treated at an angle of 20 degrees, the solution is placed from top to bottom. Overlapping strokes help avoid bumps and sharp transitions. Stripes left by a spatula can be easily removed with sandpaper. When leveling the putty, you should wipe the tool with a damp sponge more often to remove dried particles of the solution. With practice, everything becomes more clear what we are talking about.
Nobody can teach you how to putty in words!!!
Sanding and priming
The ceiling is sanded after the starting layer has dried, first with a coarse-grained trowel, then with a fine-grained grater, and the final time - after the finishing putty has dried. The last layer is sanded only with a fine-grained nozzle. They process it very carefully so that the starting application does not show through the bald spots.
After drying, the dried putty surface is sanded with a fine-grained grater.
Ceilings are primed three times: on the original base, on the starting coating and before painting. Priming cannot be neglected, because it guarantees adhesion and protects the surface from mold formation.