���� �� ������ � �������� ��� ����, ��� ������� ������, �� �������� ��������� ��������� ������. � ���� ��� �� ����� �������� � ���, ��� ����� ��������� ���� ������� ���������������. �� � ���� ����� ������� ������ ��� ������ ��������. ���� ���� ������� ��������� ��������� �������� ������� ����������� ����������. ���� �� ������� ������� ���� ����������� ��������� ������������� �����������, ��������, �� ������������ ��� ���, �� � ������ ���������� ����� ��� �� ������. ��� �� ������ � ����� ������? ��� �������� ������: ���������� ��������� ������� ������, ���� ����� ��� ������� �������� ���������. � ������ ������ �� ��� ���������, ��� ������������ ����� ������ ��� ������ ��������� ��������, �������, � ����� ��� ���� ���������� ��������� �����. �������� ���� ��������, �� �������, ���, ���� ��� ������ � ���������� ��������� ������� ����� �� ������, ��� ����� ���� ���� �������.
������� ������� �� ������������ ������� ������ ������: ��������� ���������:
When carrying out repair work, there is often a need to use putties to level various surfaces. The ceiling is also subject to treatment with putty mixtures, but before starting such work, you should familiarize yourself with the basic rules for puttying a horizontal surface significantly removed from the floor level. How to level the ceiling with putty is described in detail below.
In what cases can the ceiling be leveled with putty?
Leveling the ceiling with putty is carried out when deviations from the horizontal do not exceed 50 mm (if the differences are greater, leveling should be done using other methods, for example, using plasterboard sheets). To determine the size of the drop, you need to find the lowest corner of the room and draw the perimeter of the room along it.
You can’t do without puttying the ceiling even with shallow cracks.
If the plane satisfies all the requirements for a base for puttying, then you can begin finishing work.
Method number 3. Leveling by installing a stretch ceiling
A stretch ceiling is an aesthetic solution to the problem of an uneven ceiling with old plaster. The advantages of this method are a magnificent appearance, reliability of the coating and the ability of the tension material to withstand moisture in large volumes (which can even save your house if the neighbors above you accidentally decide to flood you), in addition, the tension covering can
wash. Along with all of the above, you have the widest choice among colors and textures, from matte, plain surfaces to gloss in the boldest colors.
Stretch ceilings are of two types:
- Film , made from PVC film. This material has an affordable price and a wide choice of colors.
- Fabric . Here we have a narrower choice of color palette, but the fabric can be dyed, moreover, it is more environmentally friendly and durable.
The process of stretching the fabric can be done hot or cold. In the first case, the PVC film is stretched using a heat gun, which heats the material to the desired temperature. As it cools, the film stretches, and you watch the process of transforming your ceiling.
The cold method is suitable for installing a fabric covering and consists of fastening the material to a frame, similar to the installation of plasterboard sheets discussed above.
In order to hide the seams, decorative ceiling plinths are used.
Leveling the ceiling is a labor-intensive, but not complicated process; moreover, it will transform the room beyond recognition, giving it zest and a touch of luxury.
Advantages and disadvantages of puttying
The advantages of this method include the following:
- Relative cheapness of work. To level the ceiling, you do not need to purchase a large amount of mixture, and the working solution is applied to the base in a thin layer, which also reduces initial costs
- The puttying process is simple, so you can level the surface yourself
- This leveling method does not lower the level of the ceiling surface, which is especially important for low ceilings
- Another advantage is the speed of filling work. It does not take much time for the working solution to completely harden, so you can start painting the surface the very next day after finishing the puttying
Disadvantages of puttying the ceiling:
- Labor intensity of the process
- Putty may crack as the building settles
- Too large unevenness of the ceiling surface cannot be eliminated by puttying
Despite these disadvantages, this leveling method is used quite often, especially in cases where it is necessary to save space with low ceilings.
Calculation of materials for the ceiling
There is no direct relationship between the type of frame and the cost of leveling the ceiling. Both types of frames are quite strong and reliable, so you should choose the option that is better suited for a particular situation.
To arrange the frame in accordance with the markings, the following quantity of materials is purchased:
- UD profiles - the total length must correspond to the total perimeter of the room, increased by 20%;
- CD profiles - these parts must have a total length that matches the number of lintels on the ceiling, increased by 20%;
- Suspensions - purchased in the quantity required for installation in increments of 60 cm.
Plasterboard sheets usually have dimensions of 2.5 x 1.2 meters. For a simple plasterboard ceiling, the calculation of the required number of sheets is carried out in accordance with the drawing, on which all structural elements should be displayed before work begins. The number of screws is also calculated simply - one sheet requires 100 fasteners. The total amount of dowel screws is equal to the sum of twice the number of hangers and the cost of fastening UD profiles in increments of 40 cm.
How to choose the right putty for leveling
Depending on the operating conditions, putty mixtures of different compositions are used. If it is necessary to level the surface in a humid room in which the temperature will constantly change, then it is necessary to use cement-based putty mixtures.
For residential premises, the best option is gypsum putty. This mixture is the most hygienic to use and allows the ceiling to “breathe”.
Putties are also divided into two types - starting and finishing:
- Starting mixtures are used for initial application and serve to level out significant differences in plane. These mixtures can have a granular structure with a particle size of up to 0.6 mm
- Finishing putties are intended for final leveling of the ceiling surface. They have a very fine fraction and allow you to apply a thin layer of putty during final finishing and leveling the ceiling
Ceiling leveling methods
There are several known methods for leveling the ceiling surface. The choice of method depends on your skill, the type of decorative surface finishing and the height of the room:
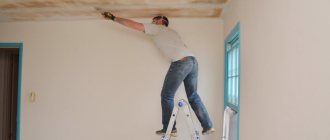
- leveling using drywall - dry method. Suitable for rooms with high ceilings. This will require installing a profile for drywall, so the height of the room will decrease by 10-20 cm;
- leveling with plaster – wet method. A layer (or several layers if necessary) of plaster is applied directly to the surface and leveled. Suitable for rooms with any ceiling height.
Both methods are quite labor intensive. The choice depends not only on the height of the ceiling, but also on its original condition.
Ceiling preparation
Before leveling the ceiling with putty, prepare the working surface. The work is performed in the following sequence:
- The old finishing coating is removed from the base surface;
- If there is a suspicion that there are voids under the plaster layer, then it is necessary to clean the top layer to eliminate hollow areas;
- The surface is thoroughly cleaned of dust, dirt, grease stains and other contaminants that will prevent the working solution from securely attaching to the ceiling surface;
- A primer intended for use under putty material is applied to the surface;
- If there are cracks and potholes whose depth exceeds 50 mm, these areas must be leveled using plaster.
At this point, the preparatory work can be considered completed. You can begin to strengthen the ceiling surface. Strengthening the ceiling surface with a reinforcing mesh will avoid deformation and cracking of the putty, even if the building gradually “sits” over time.
The mesh on the ceiling under the putty is installed in the following sequence:
- A layer of special glue is applied to the surface where the reinforcing mesh will be installed;
- The square of the reinforcing mesh is pressed against the prepared area and fixed in this position, the working solution should set;
- The next squares of the mesh are overlapped by about 2 cm. Thus, the reinforcing mesh is applied to the entire surface of the ceiling.
When the mesh is fixed over the entire plane, a primer or remnants of the adhesive composition that was used to fix the reinforcing material are applied on top.
Leveling with plasterboard
pros
- Allows you to eliminate any differences in the ceiling surface;
- This ceiling “breathes”;
- It is possible to hide communications;
- Possibility of design solutions.
Minuses
- Conceals the height of the ceiling;
- Requires power tools to operate;
- The frame will require additional financial costs;
- Need an assistant for installation.
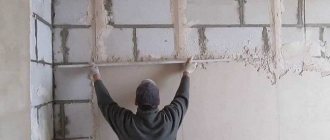
If you are still wondering how to level the ceiling before painting, we suggest you consider the option of finishing the ceiling with plasterboard sheets. They came to the market quite a long time ago, one might say, they have been tested by time. This ceiling is mounted on a suspension system, which will remove any unevenness and differences in the ceiling, and will also help hide ventilation ducts, electrical wiring and other communications.
- Along the perimeter of the room, at a given height, a guide profile is mounted to the wall using dowels. The level of its installation is measured quite simply:
- Using a tape measure, measure the height from floor to ceiling in the corners of the room, and find the lowest point.
- We transfer this mark to all corners using a hydraulic level.
- By stretching a chalk cord between points, we make a level line.
- The profile is attached so that its upper corner is aligned with our mark.
- We attach straight hangers to the ceiling with dowels. For a panel ceiling, use a hammer drill, and to a wooden ceiling, hangers can be screwed using self-tapping screws.
Fixing the gimbal
- We insert the supporting profile into the guide, and, aligning it on a plane, screw it to the hangers. The step between the supporting profiles should be 60 centimeters.
Profile alignment occurs as follows:
- On opposite walls, self-tapping screws are screwed into the profile.
- A construction line is stretched between them perpendicular to the direction of the supporting profile.
- All profiles must be installed and aligned with the fishing line.
Line alignment
Installation diagram of a single-level frame for a plasterboard ceiling
- Don’t forget about wiring and communications, because after screwing the sheets in place you will no longer have access to them. Therefore, immediately connect power to all lamps and check their functionality. If you are not completely confident in your skills and abilities, it is best to call a qualified electrician.
- Drywall sheets are screwed with self-tapping screws to the supporting frame. At transverse joints, use a knife to remove the chamfer for subsequent filling with putty.
- All joints are filled with putty and covered with sickle mesh.
- The surface of the flow is puttied with a thin layer and then sanded with sandpaper.
- Painting is carried out using the same technology described above.
There are many different ceiling design options. You are free to decide for yourself how to level the ceiling for painting. Take the choice of finishing seriously, and your home will shine with new colors.
Installation of beacons
In order for the putty surface to be perfectly smooth, it is necessary to install beacons. This procedure is performed in the following sequence:
- A level is set along the surface using a thread, which is attached at a distance from the ceiling equal to the thickness of the putty;
- A small amount of starting solution is mixed, which is applied in a path along the stretched thread;
- Such paths must be made over the entire surface in increments of about 90 cm.
You can begin applying the putty mixture only after the lighthouse paths have completely dried.
Ceiling markings
Another stage of work is marking the horizontal plane of the ceiling. The main task at this stage is to bring the ceiling to the general level, to which all sections of the floor need to be lowered. The first step is to find the lowest angle of the ceiling. It is best to perform this operation using a laser level. This device is installed in the center of the room, leveled and rotated. On each wall you need to make one mark, from which the distance to the ceiling is then measured. The discovered lowest point is the same level at which the new ceiling will be located.
If a laser level is not available, it can be replaced with a water level. In extreme cases, even a simple transparent hose will do - the water in it will always be at the same level on both edges. Regardless of the devices used, the point of measuring the level is to transfer one mark to all other walls of the room.
To be able to visually monitor the future level of the finished ceiling, you need to drill holes around the perimeter of each wall in increments of 50 cm. Self-tapping screws are screwed into these holes, on which cords are pulled, forming the frame of the ceiling. If, during the process of tightening the laces, areas of overlap are found that are located below the expected level of the finishing structure, then it is necessary to either cut off these elevations or lower the general level of the cords.
When the contour of the ceiling is marked, you need to measure the maximum thickness of the coating layer required to fully level the structure. If the thickness is too large (over 3 cm), then it would be best to use the services of specialists. In other cases, you can level the ceiling with your own hands, using cement and gypsum compounds.
Preparation of the solution
Gypsum putty for ceilings has the form of a powder. A solution is made from the dry mixture immediately before the puttying work.
The solution is prepared in the following sequence:
- The dry mixture is poured into a container with warm water;
- The solution is thoroughly mixed until a homogeneous mass is obtained;
- The finished solution is allowed to stand for 10-15 minutes;
- Then the solution is thoroughly mixed again.
To speed up the mixing process, you can use a special attachment on a drill.
The working process
Ceiling preparation
Before leveling the ceiling with putty, prepare the working surface. The work is performed in the following sequence:
- The old finishing coating is removed from the base surface;
- If there is a suspicion that there are voids under the plaster layer, then it is necessary to clean the top layer to eliminate hollow areas;
- The surface is thoroughly cleaned of dust, dirt, grease stains and other contaminants that will prevent the working solution from securely attaching to the ceiling surface;
- A primer intended for use under putty material is applied to the surface;
- If there are cracks and potholes whose depth exceeds 50 mm, these areas must be leveled using plaster.
At this point, the preparatory work can be considered completed. You can begin to strengthen the ceiling surface. Strengthening the ceiling surface with a reinforcing mesh will avoid deformation and cracking of the putty, even if the building gradually “sits” over time.
The mesh on the ceiling under the putty is installed in the following sequence:
- A layer of special glue is applied to the surface where the reinforcing mesh will be installed;
- The square of the reinforcing mesh is pressed against the prepared area and fixed in this position, the working solution should set;
- The next squares of the mesh are overlapped by about 2 cm. Thus, the reinforcing mesh is applied to the entire surface of the ceiling.
When the mesh is fixed over the entire plane, a primer or remnants of the adhesive composition that was used to fix the reinforcing material are applied on top.
Installation of beacons
In order for the putty surface to be perfectly smooth, it is necessary to install beacons. This procedure is performed in the following sequence:
- A level is set along the surface using a thread, which is attached at a distance from the ceiling equal to the thickness of the putty;
- A small amount of starting solution is mixed, which is applied in a path along the stretched thread;
- Such paths must be made over the entire surface in increments of about 90 cm.
You can begin applying the putty mixture only after the lighthouse paths have completely dried.
Preparation of the solution
Gypsum putty for ceilings has the form of a powder. A solution is made from the dry mixture immediately before the puttying work.
The solution is prepared in the following sequence:
- The dry mixture is poured into a container with warm water;
- The solution is thoroughly mixed until a homogeneous mass is obtained;
- The finished solution is allowed to stand for 10-15 minutes;
- Then the solution is thoroughly mixed again.
To speed up the mixing process, you can use a special attachment on a drill.
Puttying process
How to apply putty on the ceiling with your own hands so that the surface remains smooth and the mixture holds firmly enough?
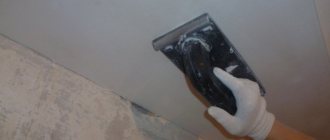
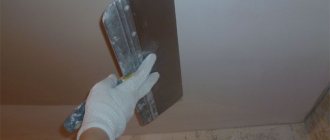
First, a layer of starting putty is applied. To correctly apply the first layer, use a large and small spatula. Using a small spatula, the prepared solution is taken from the container where the working mixture was prepared and applied in an even layer onto a large spatula. Then, using a large spatula, the solution is evenly applied to the ceiling surface.
Afterwards, primer is applied to the applied surface of the starting putty, and the working mixture is kept until completely dry.
When the starting putty layer is completely dry, the finishing coat is applied. The solution of the finishing mixture is made much thinner than for the starting putty.
The final layer of putty is applied with a spatula in a very thin layer. You should not make multidirectional movements with the working tool, and also do not return to those places where a layer of putty has already been applied previously.
When the topcoat is completely dry, it is recommended to apply a second coat of finishing putty. In this case, it is better to use a special sprayer to completely eliminate the formation of streaks on the ceiling surface.
Grinding
It is mandatory to treat the putty layer after finishing work on applying the topcoat. During grinding, a large amount of dust is generated, so it is recommended to use goggles and a cotton-gauze bandage to protect the respiratory system and eyesight.
With minimal time, this procedure is performed using a grinding machine. If it is not possible to use it, then the entire ceiling area is rubbed with sanding paper.
When the sanding process is completed, the ceiling surface should be primed again.
You can paint the leveled surface or glue wallpaper after the primed coating has dried.
Puttying process
How to apply putty on the ceiling with your own hands so that the surface remains smooth and the mixture holds firmly enough?
First, a layer of starting putty is applied.
To correctly apply the first layer, use a large and small spatula. Using a small spatula, the prepared solution is taken from the container where the working mixture was prepared and applied in an even layer onto a large spatula. Then, using a large spatula, the solution is evenly applied to the ceiling surface.
Afterwards, primer is applied to the applied surface of the starting putty, and the working mixture is kept until completely dry.
When the starting putty layer is completely dry, the finishing coat is applied. The solution of the finishing mixture is made much thinner than for the starting putty.
The final layer of putty is applied with a spatula in a very thin layer. You should not make multidirectional movements with the working tool, and also do not return to those places where a layer of putty has already been applied previously.
When the topcoat is completely dry, it is recommended to apply a second coat of finishing putty. In this case, it is better to use a special sprayer to completely eliminate the formation of streaks on the ceiling surface.
Peculiarities
When leveling the ceiling with putty with your own hands, you should remember that the finishing material should be applied to the surface in a layer no thicker than one millimeter. Otherwise, the finished leveling layer will begin to crack over time.
Before finishing work, it will be necessary to carefully prepare the ceiling surface for processing. During the preparatory work, using a wide spatula, the old plaster is first removed from the ceiling surface, after which not only the whitewash, but also the chalky stains remaining after its removal are washed off from the ceiling.
In addition, before leveling, it is advisable to treat the surface with a primer, which will ensure better adhesion of the finishing layer to the surface. The type of primer used generally depends on the condition of the surface and the level of humidity in the room. Thus, for finishing a bathroom or kitchen, a primer with waterproofing is usually used.
Grinding
It is mandatory to treat the putty layer after finishing work on applying the topcoat. During grinding, a large amount of dust is generated, so it is recommended to use goggles and a cotton-gauze bandage to protect the respiratory system and eyesight.
With minimal time, this procedure is performed using a grinding machine. If it is not possible to use it, then the entire ceiling area is rubbed with sanding paper.
When the sanding process is completed, the ceiling surface should be primed again.
You can paint the leveled surface or glue wallpaper after the primed coating has dried.
Preparing and cleaning the ceiling
It is easiest to work in a new apartment; all stages can be completed in a shorter time. There is no need to remove the old coating - just apply priming, and then you can apply putty. Repairs will require more time. The coating should be cleaned as much as possible using a sander, spatula or sandpaper. Next you need to remove the dust and prime the base.
A deep penetration agent is best suited as a primer, and for large irregularities, “Betonokontakt”. For wet rooms, primers with antiseptic additives are chosen, and acrylic ones for drywall. The primer is poured into a convenient container and applied to the base with a terry roller or a wide brush with a long handle. You can start puttying only after the primer has completely dried.
Tips and tricks
Many home craftsmen are concerned with the question “How to make a beautiful ceiling with putty.” Correctly puttying the ceiling takes a lot of time, so this type of finishing work is more expensive than when working with vertical wall surfaces.
In order not to be disappointed with the result, you need to choose a high-quality putty mixture.
You should not purchase material from random people and at a price significantly lower than the market price. It is recommended to purchase primer and putty from the same manufacturer for the job. In this case, you can expect better adhesion of the solution and the ceiling surface, as well as the starting and finishing layers of putty.
It is also recommended to thoroughly clean the ceiling surface from old paint and an easily removable layer of plaster before applying the starting coating.
After completing all the work on puttying the ceiling surface, the home craftsman may be concerned with the question “How to check the evenness of the ceiling after puttying.” This is not at all difficult to do; it is enough to apply a building level to the surface to make sure that there is or is not a deviation of the plane from the horizontal.
How to cover a ceiling with putty is described in detail in this article, but correct puttying of the ceiling is only possible if all the recommendations described above are followed. If you have doubts about your own abilities or do not want to do this work, the puttying and leveling of the ceilings can be done by professional builders who, for a certain fee, will putty the ceiling according to all the rules.
Liked? Share on social media networks!
Choosing putty as a finishing material for the ceiling allows you to get a perfectly flat surface, ready for painting or other finishing work. This procedure requires the person who performs it, first of all, to be attentive and comply with all technological aspects, which we will talk about later.
Flat stretch ceiling: advantages
Please note that there is a huge selection of both glossy and matte films. You can choose a design that interests you on the Internet and bring it to life on the ceiling. This is an excellent opportunity for parents of small children who want to make the nursery quite interesting and unusual. At the same time, installation of suspended ceilings takes a minimum of time. This is especially true if there are already special grooves that are installed around the perimeter of the entire room. The craftsmen can do the work itself in just a few hours. That is, without dust, without dirt and endless cleaning of floors, you will get a completely flat ceiling.
Using stretch films, you can create the illusion of a perfectly flat, white whitewashed ceiling. At the same time using a white matte film. The advantages of such ceilings are that they do not deteriorate when water flows onto them; it will be enough to drain the water through the hole for the chandelier and re-stretch the film using a gas burner. In this case, the surface is completely restored and does not deteriorate. In fact, stretch ceilings are not as expensive as it seems at first glance. If you compare it with the amount of putty spent on leveling a crooked ceiling, then the use of suspended ceilings allows you to save significantly.
Stretch ceiling
As you can see, it makes sense to level the ceiling on your own if the curvature is small, up to one centimeter. You can use a small amount of putty and level the ceiling on your own. Otherwise, if there are significant differences in height, we advise you to contact specialists and get a stretch or suspended ceiling.
Ceiling putty - features and benefits
Among the advantages of choosing putty as the main or additional element in finishing the ceiling are:
- affordable cost for materials used in the work process;
- saving on hiring specialists to carry out these works; it is quite possible to carry out all the processes yourself if you follow all the instructions and buy high-quality materials;
- a variety of materials and putty mixtures allows you to choose exactly the composition that is ideal for the characteristics of the room;
- the ability to choose environmentally friendly materials used in children's and sanatorium-medical institutions;
- fire safety of the material - since putty is a composition with very low flammability;
- the attractive appearance of the flow, ultimately carrying out finishing work, is the main advantage of choosing putty.
Among the disadvantages of putty when finishing the ceiling, one should note its inability to act as a heat and sound insulator. Therefore, before applying it, if necessary, sound insulation and reduction of heat loss are compensated with special materials.
Do-it-yourself ceiling putty - choice of materials and tools
In order for the ceiling coating to be of high quality and durable, you should be especially careful when selecting the materials that are used in its finishing.
You will need not only putty, but also paint, as well as materials that help improve adhesion between all applied layers.
First you need to choose a quality primer. It will be required for processing a previously cleaned ceiling, also after each leveling with a putty mixture.
If it is necessary to level the old ceiling, a special putty mixture on a plaster base is required. It is distinguished by the presence of a starting putty composition. Please note that when choosing materials, you should give preference to one manufacturer in order to avoid incompatibility between the compositions of mixtures with different purposes.
Next, you will need a starting and finishing putty. These compositions are easy to apply, apply and distribute over the surface.
However, the starting mixture has a coarser grind and is used during the initial stage of finishing work. If necessary, it is applied in a layer whose thickness exceeds 1 cm. This material is intended solely for leveling the surface.
With the help of finishing putty, a surface that is rough to the touch acquires the smoothness it needs.
This can be achieved due to the fact that the material is finely ground. The finishing putty is applied in a layer of up to two millimeters. Next, it is sanded and further painted or installed decorative elements.
When choosing materials, you should take into account the individual characteristics of the room, such as high humidity, temperature changes, etc. There are special compositions that are intended for use in rooms with high humidity; they are marked LR +.
There are several types of putty mixtures that are used to finish the ceiling. In relation to consistency there are:
- ready-made putties are located in a plastic container or bucket, immediately after opening they are ready for use, do not require independent mixing;
- dry formulations - diluted with water immediately before use.
If we compare these types of putty, we get:
- the price for ready-made formulations is higher than for dry ones;
- preparation time for dry mixtures will be required more, since they require diluting them with water, special equipment for mixing and bringing the composition to the desired consistency; ready-made mixtures are suitable for use immediately after the container in which they are stored is opened;
- undiluted powders are stored much longer than the finished mixture.
Please note that the putty is dry, but diluted with water, it should be completely used within two to three days, while the finished compositions are stored longer, they are suitable for use for two months.
To complete all work at the proper level you will need:
- an electric drill and a mixer attachment, with which the putty mixture will be prepared;
- a roller with a long handle - it is used to apply primer and paint, if necessary;
- main spatula for working purposes – width 400 mm;
- additional spatula, width 80-100 mm;
- a narrow spatula, the width of which is no more than three centimeters, with its help it will be possible to putty hard-to-reach or corner areas;
- stairs;
- flashlight - with its help they detect defects in work;
- rubber spatula;
- trowels;
- graters, abrasive meshes or sandpaper with which each layer of putty is leveled;
- building level;
- nylon cord - it is used to make straight lines;
- a tank in which the solution will be mixed;
- a tray in which the primer or paint will be located;
- brushes that will help tint hard-to-reach areas or the perimeter of the ceiling;
- a respirator or protective mask that will protect the person carrying out the work from unpleasant odors.
Useful video
In the video we'll see how to properly level the walls and ceiling using finishing putty:
Ceiling putty corrects defects and is the basis for subsequent finishing. High-quality putty depends on proper surface preparation, priming, choice of materials, tools, and adherence to putty technology.
Beginners are advised to clean and prime each layer. It will turn out slowly, but efficiently. All this comes with experience, but if there is a desire to learn and understand the process itself, then putty can be done by a beginner.
How to level a ceiling with putty - preparatory stage
In order to obtain a perfectly smooth and, most importantly, durable coating, a series of preparatory work should be carried out to remove old whitewash, paint or plaster.
If there is a previously whitened surface, care should be taken to remove this material using plain water. First, the surface is soaked generously with it, and then left for half an hour.
Next, the whitewash can be easily removed from the ceiling. If you have problems removing the whitewash, you should soak the ceiling again. To complete the work, you will need a spatula or sponge dipped in water.
Removing the paint will require more effort, as it sticks quite firmly to the surface.
However, if there is paint, it must be removed. Otherwise, the putty will simply peel off over time. To remove the paint, use a spatula; if you cannot get rid of the coating, you should use a hair dryer, and then clean the surface with sandpaper fixed on a grater.
To remove wallpaper, it is enough to have a wide spatula. To make removing old wallpaper easier, first moisten it with water and leave for 10 minutes.
If, upon completion of the process of removing the whitewash, areas with falling plaster were found on the ceiling, then they should also be removed. To carry out this procedure, you will need a medium-width spatula made of dense metal.
When the ceiling is cleaned and looks consistently healthy, care should be taken to seal all the cracks on it. If this is not done, then after a while, after puttying, they will appear on the ceiling.
For deeper penetration of the sealing material into the inside of the crack, care should be taken to expand it as much as possible. For these purposes, use a spatula or a grinding machine with a circle-shaped attachment.
In addition, it is possible to use a hammer and chisel. Before sealing cracks, they are treated with a primer. This will improve their adhesion to the sealing material.
If the cracks and openings are quite massive, then it is recommended to use polyurethane-based polyurethane foam. If there are small cracks, it is enough to use a cement-based sealant or putty. After the sealing material has completely dried, the ceiling is cleaned and leveled.
If the crack was large, then a mesh is installed on its surface, which strengthens the ceiling and prevents the appearance of new cracks.
Preparation
The method that will be used to level the ceiling with your own hands does not affect the amount of work on preparing the surface; everything is determined by the previous finish of the ceiling.
To remove whitewash or a layer of water-based paint, you must thoroughly moisten the surface with water, using a brush or spray bottle. When the coating swells, it is removed using a metal spatula. Special compounds or weak alkaline solutions help remove the whitewash layer more efficiently and quickly. These compounds can also be used to remove contaminants from the surface. Upon completion of work, rinse the surface with clean water and a sponge, and then apply a layer of primer. The primer binds dust particles and increases the degree of adhesion between the working surface and the plaster mixture. The surface is primed in several layers with the obligatory drying of each layer. To apply the primer, use a roller or wide brush.
Removal of persistent paints and enamels is carried out mechanically, using an angle grinder with an abrasive attachment. The process of cleaning the surface is accompanied by the release of a large amount of dust, but as a result the surface becomes clean and smooth. When sanding a ceiling to clean paint or enamel, you must wear protective clothing, a respirator, and safety glasses. A vacuum cleaner hose connected to an angle grinder helps reduce the amount of dust generated. After removing the old coating, sweep the ceiling with a brush, wash it with water and a sponge, and apply one or more layers of primer.
If the ceiling was covered with wallpaper, this should also be removed. To facilitate the process, the material is moistened with water or a special compound using a brush, roller or spray. Swollen wallpaper can be easily removed with a spatula, but try not to tear the canvas.
If pieces of wallpaper remain on the ceiling, you can re-wet them with water and remove them with a spatula. Using the same tool, remove the remaining glue and putty, and then wash the ceiling with a sponge dipped in water. The dried surface is covered with a layer of primer and dried again.
Puttying a concrete ceiling - priming, preparing mortar and leveling
After sealing all cracks and drying the solution, the procedure for applying a primer follows, which has an antiseptic effect and increases the adhesion of the putty to the surface.
The primer should be applied in at least two layers. Each layer must be applied after the previous one has completely dried. In addition, the primer is applied before each puttying.
The primer is selected according to the type of ceiling; for example, there are compositions for concrete or plasterboard ceilings. Pour the primer into a special tray, from which it will be convenient to apply it using a roller. Use a terry roller or wide brush.
After the second or third layer of putty has completely dried, you should prepare a putty solution for applying the starting layer. If you plan to use a dry mixture, then first of all you need to read the instructions for mixing it; it should indicate all the necessary proportions of water and putty.
We suggest that you familiarize yourself with the instructions for mixing dry putty yourself:
- Pour water into the tank in which mixing will be carried out, according to the manufacturer’s instructions;
- gradually pour in the required amount of dry mixture;
- Prepare an electric drill and a mixer attachment, mix the mixture at medium speed until it reaches a homogeneous consistency;
- if leveling is planned, then the density of the solution should be denser than when applying the starting and finishing layers.
Please note that if the putty has a gypsum base, then it should be diluted in portions, since the composition dries out very quickly and becomes unusable.
Before purchasing materials for work, you should carefully inspect the ceiling for flaws and irregularities; if they are not corrected, they will still be noticeable after puttying.
To determine this parameter, you will need to determine the lowest corner of the room, between the ceiling and the wall, and mark it on the wall. Using a level, draw the perimeter of the room according to this mark. In addition, it is possible to use a colored nylon thread, which is installed on the ceiling; the presence or absence of curvature is determined according to the line.
If the differences in the ceiling are no more than one centimeter, then starting putty is used for leveling. Otherwise, you will need to use putty with the addition of plaster mortar. If the ceiling has flaws of more than two centimeters, then the installation of a suspended ceiling made of plasterboard or glass-magnesium sheets will be required.
Please note that laying putty on a concrete ceiling in a layer of more than 2 cm will lead to its peeling under the influence of moisture. The most popular way to level the ceiling is to use a traditional cement-based plaster composition. After drying, apply a primer to it and wait until it dries.
Applying putty
Having prepared all the necessary materials, tools and the working surface itself, you can begin to putty the ceiling.
The process can be roughly divided into several stages:
- Before leveling the ceiling with putty with your own hands, you should prepare a working mixture from dry powder. To do this, you need to add a certain amount of dry putty starting mixture with water according to the manufacturer’s instructions and mix thoroughly with a construction mixer. The solution is left for 15 minutes to mature.
- Using sickle tape with a special adhesive layer, seal the joints between the floor slabs and existing cracks. Seams and cracks are covered with the prepared putty mixture directly through the sickle tape. If the crack is of significant size, then first fill it with putty and wait for it to dry. To do this, you should wait several hours; the manufacturer of the composition indicates the specific time on the packaging. Large protrusions and irregularities are cleaned with sandpaper, then glued with sickle tape and additionally coated with a thin layer of putty.
- After the treated areas have dried, using a wide spatula, apply the putty mixture to the entire ceiling in a thin layer. For a more even application, a control line is drawn on the walls. In some cases, the putty is applied several times, and it is important to ensure that the thickness of one layer does not exceed 5 mm. Each subsequent layer is applied only after the previous layer has completely dried.
- As for the finishing putty for leveling the ceiling in an apartment, the preparation technology is completely similar to the previous option. Before applying the finishing mixture, the surface is cleaned with sandpaper, trying to remove as much excess starting mixture as possible. The thickness of the finishing putty layer should not exceed 2 mm. When applying it, use a wide spatula, level the solution well, and remove excess.
- The dried finishing putty must be rubbed with fine-grained sandpaper. The result of the work is assessed using portable lighting devices. The incident light of the lamp should not form shadows or small reflections.
After leveling the ceiling with putty, you can safely apply whitewashing compounds, coloring compounds and stick thin wallpaper onto the surface. If the final stage is gluing embossed thick wallpaper, then leveling with finishing putty may not be necessary; the material can well mask minor surface defects.
It should be remembered that when using paint or wallpaper in light colors, it is better to treat the ceiling with a finishing putty, which after drying becomes white.
Starting ceiling putty for painting
The first layer of starting putty is applied to the leveled and dried base. The solution has a paste-like consistency and is in a special container, from which it is scooped out in portions using a narrow spatula.
Starting from the corner part of the ceiling, the mixture is distributed on it with a large spatula or trowel.
Please note that the spatula should be pressed against the surface as tightly as possible in order to close all the recesses. The first layer is quite thin; the main part of the ceiling should be visible through it. This layer of putty helps hide small flaws on the surface.
Please note that the mass should be well leveled on the surface. Take care to correctly place the joint between the wall and the ceiling.
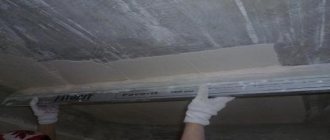
After the first layer of putty has dried, it is sanded using a grater on which an abrasive mesh is installed. Rub in a circle, counterclockwise.
To make sure that the ceiling is even, each of its sections is illuminated using a flashlight or light bulb. If defects are still present, then to eliminate them you need to apply another layer of starting putty. The total thickness of the two layers should not be more than 1.3 cm.
The second layer also requires time to dry, after which it is rubbed over with a mesh. After grouting, use a clean brush to remove dust from the ceiling and apply a primer.
Requirements for ceiling putty
By putty we mean a building mixture of pasty texture, which is used to prepare surfaces for finishing. Preparation includes leveling the walls and ceiling, eliminating cracks, holes, and other defects. After puttying, the base will be perfectly smooth and suitable for applying paint or wallpapering. It is necessary to plaster and putty the ceiling in the following cases:
- the house, apartment are old, due to time and temperature changes, cracks appeared on the surface, the rough layer began to crumble,
- the previous layer has obvious unevenness, is rough, requires application of a finishing coat,
- in the new house there was shrinkage of concrete walls and ceilings, cracks appeared due to movement,
- The ceiling is made of plasterboard, which has seams and joints that need to be puttied properly.
When hardened, the putty becomes strong, hard and very reliable. The putty layer does not fall off and is firmly connected to the surface. Such properties are imparted to the mass by its components. The dry or ready-made mixture contains:
- mineral binders,
- fillers,
- modifiers.
The main difference between putty and ordinary plaster and grout is plasticity and elasticity. These properties are achieved by introducing modifiers that ensure ease of smoothing, do not allow the mass to flow off the spatula, and prevent detachment. Thanks to a certain amount of modifiers, after applying the putty there are no drips, unsightly joints or seams.
Depending on the additives, the putty may take different times to dry. This indicator is very important, because drying too quickly makes it necessary to quickly use a new portion of the solution. Thus, solutions with gypsum dry in half an hour to an hour, with cement - in 2.5 hours or a little more, acrylic and other polymer solutions do not harden until 48 hours, provided the container is tightly closed.
A good putty must meet a number of requirements, which are taken into account when choosing:
- uniformity, elasticity in appearance,
- absence of large particles in the composition,
- moderate curing speed, sufficient for comfortable application of the material to the ceiling and adjustment of the layer,
- no cracks or crumbling particles after drying.
To obtain the desired effect, it is better to maintain a room temperature of +5...+30 degrees, humidity - 50-80%. The sun's rays should not affect the work surface.
Finishing ceiling putty - technology
The consistency of the finishing putty is more plastic, since the ceiling, after finishing, becomes incredibly smooth. Therefore, this composition should not be too thick.
The putty is applied using a spatula, but not pressing too hard onto the surface. If after the first layer small defects remain, then after it has dried and grouted, a second layer of finishing putty is applied.
The last layer is sanded using a fine mesh. In order for the ceiling to achieve perfect smoothness, it is recommended to use acrylic-based putty rather than gypsum-based putty. This composition is applied with a semicircular spatula, and the layer thickness is 1-1.5 mm.
After all layers have been sanded and completely dry, another layer of primer is applied. Next is painting, whitewashing or further finishing of the ceiling.
Frame installation
The algorithm for assembling a frame for a plasterboard ceiling includes the following steps:
- First you need to install UD profiles around the perimeter of the room at the desired level. After this, hangers are attached to the ceiling surface in accordance with the markings. After installing the CD profiles, the edges of the hangers will be bent to fix the jumpers.
- The connection of individual frame parts is carried out using a “crab” type fastening. To connect parts along the length, you can use either a similar fastening or conventional joining - the profiles simply overlap each other with an overlap of about 10 cm and are connected with self-tapping screws.
If the ceiling surface is initially flat, but not smooth enough, wooden beams can be used instead of profiles. In this case, the installation technology is increased by one stage - all wooden elements must be treated with an antiseptic and a moisture-resistant compound before installation.