Whatever the putty mixture used to polish the ceiling, its surface cannot be completely leveled. All kinds of tubercles and irregularities remain, which are a consequence of working with a spatula. The question arises - how to rub putty on the ceiling and what kind of sandpaper to sand the ceiling before painting. After a day or two, the surfaces are usually sanded. Then they start priming.
Materials and tools
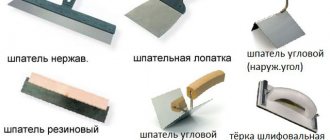
Be sure to prepare the necessary tools:
- Special block
- Sandpaper or abrasive mesh
- Sanding sponge
- Elevation
- Lighting device
- Putty knife
- Eye protection glasses
- Respirator
It is also advisable to cover your hair with a hat.
Advice from the experts
To avoid having to redo the work, you must adhere to the following tips:
- There is no need to prime the surface before sanding. During sanding, a significant layer may be removed and the primer will be removed.
- The plaster and putty must be completely dry.
- The surface cannot be re-treated with just one abrasive; for example, if you get a hole, you need to carefully sand the area, trying not to touch the finished area.
- Work in good lighting from a point light source.
By following the advice, you can properly process the surface.
About abrasive mesh and sandpaper
Good results are obtained by using a special grinding machine, but are often limited to the manual method. The second method, if the ceiling needs to be grouted after puttying, is what professionals resort to most often, since this is the easiest option to remove roughness in areas that are difficult to access. The choice of machine polishing is logical if you need to process a large area. But even after such work, there may be a need for manual processing - anyway, during inspection, tubercles of different sizes are found.
Before purchasing material, inspect the treatment surface. Then you will understand how to sand the ceiling after puttying without interruptions. If it seems difficult and uneven, more coarse mesh will be needed.
Let's see what you can use to sand the ceiling for painting.
Abrasive mesh
Grinding mesh is a material with many advantages. Dust does not clog the cells that make it up as much as sandpaper. The removed putty passes through it. If it is worn out, it is easy to understand by its appearance, and then it is better to simply replace it. The sanding mesh is waterproof.
At retail, the mesh is sold in block sizes. It is better to choose materials that match in size. The block should be smaller than the mesh. Curved edges are secured using nails. Stores also sell a special holder.
The sanding mesh is available in several cage sizes. When working with a normal surface, two types will suffice.
The main disadvantage of abrasive mesh is its high cost.
Sandpaper
Sandpaper is different in that its surface fills with dust faster. It needs to be replaced more often. But the cost of the material is significantly less. It is also easier to sand corners with sandpaper than with a mesh.
When choosing which sandpaper to rub the putty on the ceiling with, you need to focus on the grain size - it is this indicator that will tell you what type of work can be carried out. Understand the labeling. Our country has a special GOST, and the FEPA and ISO 6344 standards used abroad also apply. The degree of “graininess” is indicated by a number. The larger the abrasive, the lower the indicated figure.
You can save money by choosing rolled emery - the material consumption is not small, and sandpaper cut into a block is more expensive (although the price is worth the time saved, which you will not have to spend cutting paper).
Sandpaper is divided into categories:
- sandpaper size and grit
- scope of use
- release form
There are a certain number of abrasive particles per square inch of sandpaper. They are indicated by the sandpaper numbers. According to this indicator, the material is divided into several categories:
- Coarse grain
Sandpaper that cleans surfaces from old coatings (varnish, paint) and traces of initial processing. It consists of coarse abrasive, large fractions, and after removing the top layer, grooves and scratches remain on the material. Further processing is required. Using this material, the surface can be ground well, but achieving final evenness is very difficult. With its help, the first grinding is performed. Numbers 12-80.
- Medium grain
Multilayer processing becomes smoother and better quality. The surface can be smoothed and leveled, but marks will still remain. Numbers 80-160.
- Fine grain
Necessary for removing defects from previous polishings, when the surface needs to be prepared for final processing (for example, before applying paint). A suitable option is zero. Numbers 160-4000.
Each material has differences, but the order of work is the same for them. When deciding which sandpaper to sand the ceiling before painting, it is important to remember that sandpaper with the coarsest particles is used first. Then they move on to using paper with a finer abrasive, and the final stage is polishing.
What is needed for the work
First of all, you need to decide what to sand the ceiling with.
There are many different solutions on the market, all of them can be divided into two groups:
- Special equipment for grinding;
- Hand tools.
Let's look at each option in more detail.
You are also quite capable of achieving such an ideal state.
Special equipment
Let’s say right away that if the volume of work is small and you will perform it only once, then there is no point in buying a power tool - it costs a lot, so you will incur unjustified costs. But if you constantly putty walls and ceilings, then you cannot do without a special device.
There is another good option - if you don’t want to process the surface yourself, you can rent a sander. Renting costs a little, but you will simplify your work and reduce the time it takes to complete it. The main thing is that there is a company in your region that provides similar services.
As for equipment options, two main types can be distinguished:
- Pneumatic options;
- Electric grinders.
Let's look at each type separately and start with pneumatic devices.
Their main features are:
- The most affordable option is compact eccentric sanders. They are a device with a soft sole, which has Velcro for securing the abrasive wheels. The equipment is small in size and weight, and is easy to use. One of the disadvantages is that working on the ceiling is not very convenient - you will have to constantly stand with your hands raised;
Compact version of the pneumatic tool
- A special machine for leveling the putty layer. Professional builders call it “giraffe” for its long handle, with which you can sand ceilings and walls while standing on the floor. This is a convenient option, which provides the ability to remove dust from the room, and the device itself weighs very little;
Very light and comfortable design
- The equipment runs on compressed air, and this can be considered both an advantage and a disadvantage. The advantage is that the tool is very light and easy to use, but the disadvantage is the need to use a powerful compressor, which weighs a lot and creates a lot of noise. That is why such options can only be found among professionals.
Electric sanders for walls and ceilings come in four types:
- Draw machines - they are distinguished by very high power and productivity. The main working element is the tape, which is put on the rollers. It rotates at high speed in one direction, so it is quite difficult to control the grinding process. Such equipment is well suited for processing the starting layer, but for finishing it is better to choose something else;
The draw machine must be equipped with a dust collector
- Vibratory surface sanders work by vibrating the soleplate on which the sandpaper or mesh is attached. The sole can have a rectangular shape (great for flat surfaces) or triangular (with its help corners and junctions are processed). When choosing, it is better to find an option that has the ability to change the sole so that you can perform different types of work;
The ability to change the sole is a big plus in such equipment
- Eccentric sanders are distinguished by the fact that the disc rotates in a circle with small displacements, due to which the quality and efficiency of work significantly increase. The sanding wheels are secured with Velcro and the handles are ergonomically designed for ease of use. This option is perfect for both finishing and rough sanding of the ceiling.
The eccentric option is great for work
- Special machines with a barbell and a handle extension (giraffes) on an electric drive are more mobile and create less noise than their pneumatic counterparts. But they are much heavier and cost from 20,000 rubles. This option is chosen by finishers who work in apartments and houses and do not want to carry a compressor with them. An excellent solution with good performance and high quality work.
Special electric version for walls and ceilings
Power tools have the following advantages:
- High mobility - there is an electrical network in every room, so there will be no problems with connection. But it still won’t hurt to stock up on an extension cord;
The extension cord will allow you to reach the farthest corners with the tool.
- Good productivity - work takes much less time, and the quality is quite high;
- Availability of equipment - each option sells its own abrasive elements. You just need to name the brand and type of equipment, and you will be offered everything you need for the job.
Hand tool
This option is used much more often, as it has a number of advantages:
- Very low cost - the price starts from 100 rubles, so everyone can afford such a device;
- Ease of use. Figuring out how to carry out the work is as easy as shelling pears, below we will analyze the workflow, and you will see for yourself;
- Availability of equipment. On the bars you can use either paper or a special abrasive mesh of different grain sizes. All features of each option are described below;
- High quality work. Many craftsmen work by hand; although it is slow, it is possible to achieve a perfectly smooth ceiling.
The easiest sanding solution
There are several options for this tool on sale:
- Classic version with handle and hand clamps on the sides. A simple design that has been used for decades. The handle is comfortable to hold, so you can work with great pressure. The biggest disadvantage is that the sandpaper replacement process is not very quick: you need to unscrew the wing nuts, carefully insert a new piece, and align the pressure plates before fastening;
The simplest grater option
- Sanding block with automatic fixation of the abrasive element. A more modern solution in which the process of replacing paper or mesh is greatly simplified. When working with the tool, you need to hold it by the recesses on the sides, some people don’t really like this, but in general the device is convenient and practical;
The whetstone is a modern tool for grinding
Advice! Always check that the clamps are working properly. Often they do not work well even on a new device, especially if it is inexpensive. Open and close the system on each side to make sure everything is fine.
- Grinding floats with a holder for a telescopic handle. A very convenient solution for ceilings, allowing you to treat a much larger area from one place. You can even work from the floor if the length of the handle is suitable and you can clearly see the surface. Most often, such designs use convenient automatic latches, as in the option above. As for the handle, it is sold in the same place as the grater;
Option for telescopic handle
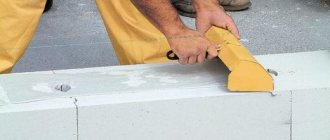
- Special grinding sponges are rectangular elements with a beveled edge. With their help, you can perfectly align corners that are impossible to reach with a regular grater. They are used as an additional element for better quality work. Also, such elements are convenient for cleaning chandelier junctions and other difficult areas;
The sponge allows you to create perfect corners
As for the abrasive material, two main options can be used on graters and bars:
- An abrasive mesh on which small particles are applied. This option is good because it does not become so clogged with dust and putty particles. But, as practice shows, mesh wears out noticeably faster than sandpaper, and its price is higher. Many people prefer it because it requires less cleaning of the block, and it’s easy to do - you just need to lightly hit the tool;
The nets are immediately produced to fit the size of the graters, which is very convenient
- Sandpaper comes in rolls, which is very convenient, because you can buy at least one meter, at least ten, it all depends on your need. This option is inexpensive, but gets clogged with putty faster, which is why you have to periodically replace the worn-out element with a new one. In general, if you purchased high-quality sandpaper, it will not clog very quickly. Therefore, if you have a choice, then take the cheapest one.
How to plaster before painting a wall
And one more important note - sanding walls and ceilings covered with putty is done with an abrasive mesh or paper with a grain size of P120-P150. If you are processing the first layer and there are significant irregularities on it, then you can use the P100 option.
And if you need to bring the plane to the ideal, and it is quite even initially, then use the P180-P220 abrasive.
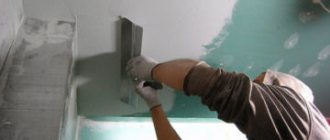
How to clean the ceiling after puttying: the grinding process
So, how to properly sand the ceiling after puttying? At the first stage, they calculate how much sandpaper or mesh will be needed. They clog quite quickly and need to be updated frequently.
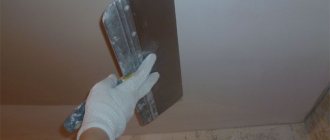
In the second stage, we directly sand the ceiling before painting. Using smooth movements, with light pressure, we begin to sand the surface of the ceiling. It is important to distinguish between an area that has already been sanded - there is no need to process it a second time.
If a large depression is found, it can be skipped. Once you've finished the entire ceiling, come back and refinish it, and when it's dry, sand it individually.
Having wiped the entire surface with a coarse-grained abrasive, we repeat everything using fine-grained sandpaper. If scratches remain, choose a lighter abrasive.
Useful tips for sanding walls after puttying
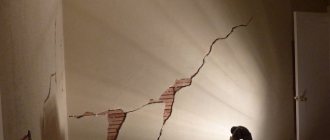
The puttying process, no matter how well it is performed, does not allow obtaining a perfectly flat surface.
There are traces left on the wall from the spatula, transitions between layers, small irregularities, bumps and depressions are visible. You can't do it without sanding the surface. Sanding is the final process that prepares the surface for final finishing.
Any person with the desire, patience and perseverance can perform sanding after puttying. The main thing is to choose the right tools, consumables and accessories, and know the technology for doing the work.
Sanding is performed dry or wet. Wet sanding is advisable on plasterboard, normally plastered walls. The main advantage of wet grinding is the relative purity of the process. You will not be bothered by the dust that is necessarily present during dry sanding. The subsequent cleaning process is forgiven.
Dry sanding is more commonly used in home renovations.
Rule 1 Sanding after puttying is carried out no earlier than 24 hours after applying the putty layer.
Sanding with a sander
A very practical sander. A large area is processed in a short time, and the high cost of work is justified by productivity.
After processing with a sander, you will still have to work with your hands at the end, but when figuring out how to sand the ceiling after puttying, you can still stop there. And even at heights, working with a grinding machine will not be difficult.
An abrasive mesh is put on the machine (for starting grinding - from No. 60 to No. 80, for finishing - No. 100). You will also need a stepladder or table. We process the ceiling in a circular motion, starting with the largest defects. We don’t stay in one place for a long time, because of this, unevenness may appear. We remove the dust, correct small errors with a spatula and perform the final grouting with fine-grained sandpaper.
Grinding procedure
Sanding the ceiling after putty should be started only after the layer of previously applied leveling material has completely dried. Taking into account its characteristics, as well as the conditions in which the work is carried out (room temperature and humidity), it may take from one to several days for the putty to completely dry.
To reduce drying time, it is recommended to keep the windows and doors in the room open.
The moment the surface is ready for grinding is usually determined by the color of the primer. If the dark spots on it have disappeared, and it has acquired an even matte shade, you can begin the main work.
The procedure for carrying them out (using a grinding machine) is as follows:
- First of all, an attachment with sandpaper of the required grain size is installed on the tool (during the first “pass”, “coarse” sandpaper is used, and at the final stage of grinding it is changed to fine-grained sandpaper).
- After this, you can proceed to the grinding itself, which consists of uniformly and smoothly moving the rotating attachment along the processing surface (preferably along a circular path).
- This procedure should be continued until the surface acquires a sufficiently even and smooth appearance.
Before carrying out grinding operations, you should familiarize yourself with the advice of professionals regarding some details of the organization of work:
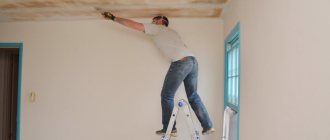
- First of all, you should make sure that the area where grinding procedures are performed is well lit.
- The level of illumination should allow one to distinguish all the irregularities on the surface being treated.
- You can start sanding the ceiling with your own hands only after you have completely protected yourself from dust. To do this, you should use all the personal protective equipment at your disposal.
First we prepare everything
You can't start working if you don't have the right tool and need to buy it or borrow it from friends. You will need to find the following things:
- A lamp - a carrying lamp, a spotlight or something else that you will use to illuminate yourself during the process.
- A brush, rag or other type of device for removing dust - there will be a lot of it.
- To cut off small protrusions you will need a sharp, flat object - a spatula will do.
- The main tool is a grater with a mesh or with an attachment for sandpaper.
Important: sandpaper is only needed on a textile basis, since the abrasive that will be used to rub everything down will stick better to it.
It’s also worth preparing a vacuum cleaner right away - you need to remove dust not only from the surface, but also from the floor, as well as from everything around you. Eyes should be protected with goggles, and hands should be wiped with a rag or rag.
Fighting fungus on the ceiling
Fungus and mold are the enemy of finishing, and their spores are extremely harmful to human health. The cause of these phenomena is increased humidity. Initially, it is necessary to provide ways to eliminate it in order to eliminate the prerequisites for the development of pathology. Another approach is the use of antiseptics, which are applied to concrete, starting and finishing putty.
Adding a primer to the solution makes it waterproof after crystallization and eliminates hygroscopicity.