Many people, when moving to a new home, try to save money on repairs. Initially, plywood or chipboard can be used to level the walls. And what to do next? Is it possible to put wallpaper on top of chipboard? Of course you can. Plywood is an excellent base for any finishing work. It is enough to know some tricks and rules for gluing wallpaper onto plywood.
Before you start gluing, you need to dry the chipboard thoroughly by opening the windows and doors wide on a sunny day.
How to treat fiberboard before wallpapering. Is it possible to glue fiberboard to wallpaper and how to do it correctly
Today's:
- In such a small smart apartment we managed to place an almost full-fledged kitchen.
- Homemade repair from our subscriber:
- Small two-room apartment.
- My husband and I decided to renovate our bedroom using this project.
- From a subscriber: “My interior is a dorm room.”
- Here is an option for a budget kitchen update.
- The first repair experience from our subscriber.
- How to treat fiberboard before wallpapering. Is it possible to glue fiberboard to wallpaper and how to do it correctly
- Gluing technology
- Preparation of materials
- How to treat fiberboard before painting. What primer is needed for fiberboard - preparing the surface for finishing
- Technical features of the material
- How to treat fiberboard before painting with enamel. How can you paint chipboard?
- Video on how to hang wallpaper on osb sheets
How to hang wallpaper on chipboard: features
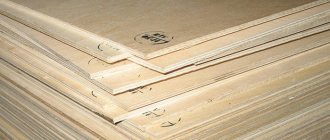
During construction and redevelopment of premises, chipboard is used very widely. This element is a composite material obtained from wood waste. For the manufacture of chipboards, the flat hot pressing method is used. The widespread use of chipboard as a building material has become possible due to its remarkable properties, such as uniformity, strength, rigidity, and ease of processing.
Wallpapering scheme.
Chipboard is easily machined, painted and glued. In some of its characteristics it is significantly superior even to wood. In modern construction, chipboard with increased moisture resistance is widely used even for finishing bathrooms. While renovating a house, let’s say you came across a similar partition and decided to put wallpaper on it. You're probably thinking about how to put wallpaper on chipboard
Chipboard board
This material has an extremely strong and even structure, and also, which is invaluable for self-repair, it is light and easy to install and decorate partitions or walls with it. But not everything is so simple with wallpapering it. There are a number of features that, if taken into account, will make the process more successful.
Since it is impossible to use the slab for finishing in one piece, you will have to cut it into several parts. Because of this, joints appear between the plates and fastening points with screws or nails. These problem areas can cause a number of unpleasant consequences in the future: swelling, cracks in the wallpaper and unflattering red spots (due to rust on the screws). To avoid this, you need to prepare the slabs in advance and very carefully for gluing wallpaper on them.
Preparation
- The first and most important step is to thoroughly dry the chipboard. To do this, you can open all the windows in the room, creating a draft. If you are carrying out repairs in the fall or winter, then before doing this you need to first warm up the walls twice (between the first and second time, wipe the surface with a damp cloth or rag).
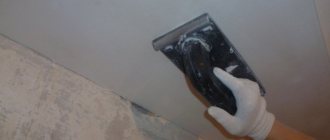
- After the slabs have completely dried, they need to be treated with a primer mixture and all joints formed during the finishing process must also be sealed with wood putty. Finally, when the surface is dry, it needs to be sanded with fine sandpaper and coated with white oil paint.
- The heads of the nails must be driven deeper into the slab and covered with drying oil or oil paint - this will prevent rust and, as a result, unsightly stains on the walls.
- The joints between the parts of the slabs must be sealed as follows: fill the cracks with gauze attached to them, and then apply paint. This will not only prevent swelling, but also strengthen the wall.
Of course, there is no need to explain that you must remove the old coating, if any, before gluing wallpaper on chipboard - this recommendation will save you from many unpleasant consequences.
Required Tools
How well you prepare for the wallpapering process determines how well the repair work will be completed. Therefore, do not do it carelessly - you are working for yourself. So, to finish the walls or partitions you will need:
- long ruler;
- well sharpened scissors;
- sharp paper knife;
- glue container;
- roller and/or brush for using glue;
- a simple pencil;
- cleaning material (soft rags).
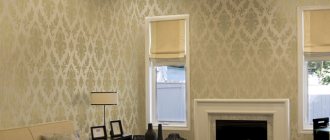
And, of course, the most important thing is the wallpaper. We advise you to choose non-woven or vinyl options for chipboard, as they are resistant to slight deformation and will perfectly hide any unevenness on the surface.
Process
So we have come to the point for which, in fact, everything was started. You also need to glue the wallpaper correctly and according to a certain sequence, namely, start from the corner closest to the window and move towards the door. We also recommend drawing two vertical lines on the wall using a plumb line along the width of the strip in order to glue it as evenly as possible. This can help guide you when gluing the remaining strips of wallpaper.
A separate topic is adjusting the pattern: in this case, cut off the strips gradually, allowing at least 10 cm for the ceiling and floor in order to avoid inaccuracies. If the wallpaper is without a design or pattern, cut the entire roll at once into strips of the required length.
The glue also needs to be carefully selected and applied in accordance with the material of the wallpaper you choose. For example, if your choice fell on non-woven or textile wallpaper, then the glue should be applied exclusively to the wall. If the wallpaper is paper, then glue is applied both to the wall and to the strip. Don't forget to let the glue soak in for about 15 minutes, folding the wallpaper surface inward. At this time, tackle the wall.
How to paste wallpaper on chipboard?
Step-by-step wallpapering of walls.
If the building is new and it is built to last, most likely all the walls will have the same length - cm in cm. But it also happens that the difference between opposite walls can reach up to 5-10 cm. Therefore, before gluing, be sure to measure all the walls and write down everything on paper so as not to mix it up and stick a short strip on the wall. If the pattern on the wall does not need to be adjusted, then you can immediately cut all the wallpaper into pieces, but if the pattern requires careful adjustment, then you will have to cut the strips gradually.
Next we apply glue. You need to dilute the glue with water, strictly following the instructions and your experience. For each glue there is a separate scheme and dosage of water. After you have prepared the glue, you can apply it to the wallpaper or wall.
If you use wallpaper on a regular basis (paper), then it is better to apply wallpaper glue to their back side. If the material is based on non-woven fabric or textiles, apply the glue directly to the wall.
Place the first strip of wallpaper from the corner, on the side of the room that catches your eye upon entering. This way, the central part will be perfectly covered, there will be no small pieces or wallpaper cut in half.
Try to wallpaper window and door openings last. At the end, glue the border, being careful not to wrinkle it, otherwise it will affect the appearance of the walls.
By following these simple rules, you can quickly prepare plywood for work and easily hang wallpaper.
Preparatory process
Before the preparatory stage, wallpaper is purchased, and then, based on its quality, tools and materials are prepared:
- Glue selected specifically for this type of material and a container for it.
- Brush or paint brush for applying glue.
- Roller for smoothing fabrics.
- Scissors, ruler, pencil, rag.
For wood-based panels, it is better to purchase vinyl, non-woven materials or silk-screen printing. It is these types that will hide unevenness and some deformations of the slabs in the future.
Plane preparation process:
- Treat the chipboard and seal the heads of nails, self-tapping screws and screws with putty.
- Putty the uneven surfaces of the planes with a special mixture for wood.
- Process and seal openings using special meshes.
- If there are old paintings hanging on the walls, then they must be dismantled.
If the old materials are firmly glued, then do not clean them, but coat them with a layer of adhesive solution.
- Prime the entire surface in two layers.
Preparation for priming:
- Thoroughly clean the surface from dust using a vacuum cleaner and damp rags.
- If there are any roughness, then go over it with fine sandpaper.
- Clean the plane again.
Priming is carried out before and after puttying. Each subsequent layer of primer is applied perpendicular to the previous one.
Properties of wood boards
Chipboard consists of wood processing waste.
Particle board (exactly abbreviated as chipboard) is produced from small wood processing waste (shavings, small chips), to which binders and special additives are added (6-18% of the total mass).
The resulting product has a sufficiently flat surface plane for installation of the casing.
Chipboard has its own characteristics in use:
- the stove is sensitive to excess room humidity, in such cases you need to choose moisture-resistant brands of products;
- unlike solid wood, its structure does not have the elasticity of the fibers - a re-screwed self-tapping screw is not held in place by squeezing the walls of the hole (for the same reason, it is better not to use nails);
- The basis of the material is wood, so preliminary exposure to humidity and temperature of the installation room (2 - 3 days), protective surface treatment with primers and sealing of joints, ends, and recesses from fastener heads with putty are necessary.
The practical distribution of chipboard is due to its performance characteristics: strength, uniformity, rigidity, ease of processing, and relative cheapness compared to other materials.
Rules for marking and gluing
In order to properly glue rolls of wallpaper, you need an auxiliary and working tool:
- plumb line;
- brush or roller;
- pencil with ruler;
- scissors and rags;
- container with glue.
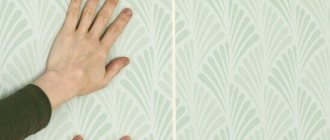
The quality of the work largely depends on how we glue the first strip. Therefore, this should be done strictly according to the rules. To do this, you need to draw a vertical strip on the wall along a plumb line. Next, take the wallpaper and measure its width. At this distance we draw another plumb line.
The first canvas should always be glued strictly along these lines. The rag is needed so that you can press the wallpaper strips tightly against the chipboard, moving your hand with it from top to bottom. This removes excess glue from under the wallpaper rolls and air bubbles. A clean rag does not leave marks, but allows you to apply more force to the wallpaper. When laying the next strip, you need to ensure that the pattern or pattern matches.
We develop options for solving problems
How can we carry out wallpapering despite all the shortcomings?
Painting the walls
The difficulty of hygroscopicity and the appearance of corrosion can be avoided if we prime our surface, which serves as the boundary between the adhesive and the base. The particle itself takes its place here, so there is no need to prime too deep into the surface.
Many people ask the question, is it possible to glue wallpaper onto fiberboard and for what reasons should this not be done? Let's go over its components. Most of the entire volume of primer is a water base. But we want to have less contact with her in general.
And if we take alkyd primers or paint material for our work, then they will work best. They will cover all fiberboard and fasteners with a thin film that has excellent waterproofing properties; its surface itself, after making small changes that we will make when preparing the glue, will give us the opportunity to ensure good contact with a clean surface.
In general, the design itself includes two points:
- We paint the entire surface of the fiberboard (see Painting walls in an apartment: what to do and how to do it). It is best to use white paint, since it is necessary that it is invisible under the wallpaper. It is better to do such work in two layers. We carefully paint the seams and fasteners themselves.
- We also pour PVA glue into the glue for our wallpaper (no matter what kind we purchased at the building materials store). We calculate it at the rate of half a liter per bucket.
True, we have a significant drawback, because the relief of the seams is clearly visible through the wallpaper. How do we cope with these difficulties?
Features of the use of fiberboard and chipboard
In principle, wallpaper can be glued to any surface. The only difference is their processing, choice of adhesive composition and fabric. To understand how walls are covered with fiberboard and chipboard, you must first become familiar with the main features and characteristics of these popular materials.
Particle boards
Chipboard is a sheet material made by pressing wood chips under a hot press. The layers are bonded together with polymer resins.
Important! Traditionally, sheets have a width of 3 mm in increments of 1 mm. They can be from 1830 to 5680 mm in length, from 1220 to 2500 mm in width. They are used mainly for the production of furniture and interior finishing work.
- Laminated chipboard - it is covered with varnish or melamine film at high temperatures. It is incredibly resistant to humidity changes, and is distinguished by high levels of practicality and aesthetics.
- Extrusion chipboard. In this material, the main components of wood are located perpendicular to the main surface. Due to low wear resistance and low bending strength, this option is not in great demand. On sale you can find strip, tubular, fireproof, soundproof extrusion plates. They have a rougher surface, so they do not require additional processing and coatings.
To understand how to glue wallpaper on laminated chipboard or other variations of chipboard, you must first clearly determine what specific material is in front of you. To cover this material with wallpaper, the main thing is to choose the right thickness of the slabs and use the correct installation method.
Is it possible to glue wallpaper on chipboard?
Share on social media networks:
Many people who come face to face with repair work experience a lot of inconvenience. Most of the problems are associated with leveling walls and installing partitions, because chipboards and fibreboards are often used for this. Chipboard is in great demand, even though it contains resins containing formaldehyde, which are harmful to health. Thanks to modern technologies, this problem has practically been resolved; today this material can be safely used even when renovating children's rooms. Often people who have started a renovation are faced with the question of whether it is possible to glue wallpaper on chipboard or fiberboard. Today we will try to answer this question and talk about techniques for performing such work.
Sequencing
So, the work itself includes several main stages. Here they are:
- First you need to remove all kinds of dust and other interference.
- After this, you need to prime and putty the working surface of the wall.
- After the putty has dried, apply an additional layer of primer.
- Only after this can you start gluing wallpaper over the fiberboard.
- And finally, we do the treatment with water-based varnish.
Some “experts” may say that it is quite possible to do without any of the above steps. However, if you want the work to be done efficiently, and the wallpaper to delight you and your guests for many years, you cannot neglect even the most seemingly insignificant action.
Attention! In order to apply a layer of primer, compositions such as alkyd liquid or alif are quite suitable. A primer is required, among other reasons, because without it you may need a significant amount of glue, since its consumption increases due to the absorbency of the fiberboard. The process is simple: heat the drying oil a little and apply it.
By the way, cleaning and leveling the joints between the slabs will not be superfluous. This is done so that the surface will be more even in the future.
Wallpaper sticker on fiberboard
As for fiberboard, although it is not such a thick slab material, it is often used to construct any architectural and design forms. For example, to form an arched opening. Here, as in the case of other materials (plasterboard, for example), it is necessary to carry out preparatory work.
The joints are sealed using putty and sickle tape. Metal fasteners must be painted over. After which the entire structure is leveled with putty mixture. And after drying, the primer is applied again. After which you can glue wallpaper onto the fiberboard.
If this slab material is used as a leveling layer, then the wallpaper gluing technology will depend on what kind of fiberboard was used for these purposes. If it is a soft type material, then it must be treated with a primer or drying oil. If it is hard, then you can wallpaper it without pre-treatment. The thing is that hard fiberboard is a smooth surface without defects.
But it is necessary to take into account one very subtle nuance on which the quality of alignment depends. Everything again depends on the thickness of the slab. When installing and fastening it to a frame, often (depending on the experience of the workman) a seemingly smooth wall, after laying the material, begins to warp under the influence of changes in humidity and temperature. The warping waves may not be very large. But after wallpapering, they will be clearly visible.
Processing plywood sheets before wallpapering
You can impart properties to ordinary, non-waterproof plywood that make it suitable for wallpapering using a special impregnation (primer).
Manufacturers offer many types of impregnation to suit every taste. Before purchasing any of them, ask if it can be used for indoor work.
One of the popular ways to make plywood waterproof is to treat it with drying oil. Drying oil is a time-tested material, it performs its function efficiently and with a guarantee, but it has one “minus” - drying oil takes a long time to dry. For those who have “yesterday’s” deadlines for completing repairs, I recommend the semi-synthetic drying oil “Oxol” - the quality is not inferior, and the drying speed is an order of magnitude higher. Before work, heat the drying oil to a temperature of at least 60°C - it absorbs much better and dries faster.
To simplify the process, it is possible to use nitro enamel. The paint does not penetrate the entire depth of the plywood, but creates a good waterproof layer on the surface of the sheet. You can use enamel to treat the inside of the sheet before installation.
Another common way to protect wooden surfaces is to treat them with an emulsion based on PVA construction adhesive. A PVA primer creates a water-repellent film on the surface of a plywood sheet and, in addition, increases the adhesion (adhesion) of other finishing materials - putty, wallpaper glue - with the treated surface.
If you are leveling the walls with plywood from scratch, be sure to prime the ends - they are most susceptible to moisture.