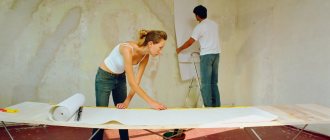
Many fans of wallpaper decor are well aware of the situation - the craftsmen seem to be very good, and the wallpaper is expensive, and after hanging the wallpaper on the walls, seams between the panels clearly appeared. Unofficially, every third case of renovation with walls decorated with trellises is faced with the problem of how to hide the joints between the wallpaper. It is almost impossible to disguise the stripes by changing the lighting, and re-pasting the entire room is expensive, so before taking radical measures, you can try to eliminate the problem using simpler means.
Defect options
Most often, owners blame both the craftsmen and the quality of the wallpaper. But if the masters are professionals, and before this room they managed to glue kilometers of canvases with high quality without any comments, why didn’t they take into account the peculiarities of the brand of trellises when gluing them. Indirect confirmation is the fact that the same problem occurs with both cheap paper and expensive non-woven wallpaper.
The answer to the question of how to make wallpaper joints invisible does not have a clear answer, since the defect itself at the joints can manifest itself in different ways:
- The neighboring canvases have separated, and a thin gap has formed through which the wall is visible;
- A lighter or darker uneven strip of glue residue appeared along the joint;
- The joints at the border of the wallpaper have risen like a “house”;
- At the joints, the difference in shades of the two canvases is clearly visible.
The last point is the most unpleasant. It often happens that when buying wallpaper in a company store, you can purchase rolls from the same manufacturer, the same brand, but belonging to different batches. To sell mismatched items and make the product attractive, salons collect leftover rolls from different batches into one and sell them at a slightly reduced price.
For your information! Even within the same batch, wallpaper may differ in shades.
Many manufacturers, due to the peculiarities of the technology for applying paints to the panel, are not able to ensure ideal distribution of the toner; as a result, one edge turns out to be slightly darker and more saturated than the other. It is impossible to hide such a defect, so an icon with two vertical arrows directed in different directions is placed on the roll. This means "reverse sticker sequence". To hide uneven coloring, each subsequent roll must be turned 180° before cutting and gluing. If you do not pay attention in time to the icon hidden in the text of the marking, the discrepancy in shades at the joints can only be corrected by painting the trellises.
Which glue to choose to fix mistakes
When repairing wallpaper, glue is carefully selected. The product used in the procedure must be:
- completely transparent;
- homogeneous;
- suitable for the type of wallpaper.
You can buy a joint sealer. It has a thicker consistency than regular wallpaper glue and has slightly different components.
Choose products from well-known brands (Metylan, Kleo, Quelyd, Flizilex, etc.). Tell the salesperson at the hardware store what kind of wallpaper you want to put on. Separate types of adhesives for non-woven, vinyl, and fabric wallpapers are sold, differing in composition and characteristics.
Pay attention to the shape of the packaging. It is better to choose a tube with a long spout - it will be more convenient to apply the glue.
Regular PVA also copes with gluing joints. But there is a risk of yellow spots appearing as a result of drying out. It is better to choose branded products rather than using PVA.
Five ways to hide joints
Correctly hiding a defect at a joint is often even more difficult than gluing wallpaper correctly. You can learn how to work with trellises from the instructions, while you have to come up with and look for ways to hide defects on your own.
You can hide joints using one of the following methods:
- Clean the edges of the wallpaper from any remaining glue;
- Shade or paint the walls to hide the background, revealing the gap between the joints;
- Try to flatten the wallpaper panels after first slightly moistening the trellis material;
- Paint the wallpaper or hide the joint using a special tinting paste.
Advice! Before trying to hide joints with paint or tinting compound, you will need to practice in a closed area, for example, behind a closet, where the furniture is covered by wallpaper.
The easiest way to hide revealing light spots is to try to paint over them with special paint or pencil. To do this, you will need to buy a special coloring composition.
To hide the white stripe between the panels, just apply a tinting color to the seam using a brush or ear stick. Wipe off excess paint with a clean napkin.
Unfortunately, hiding the joints in such a simple way is only possible with plain wallpaper, if you can choose the composition of a suitable color.
The riskiest way to hide seam problems is to use tinting paste. To prepare it, you will need to trim the wallpaper, from which the surfaces with paint are removed with a sharp knife or sandpaper. Colored paper dust is mixed with glue and the joint is rubbed. In this way, restorers restore old books and paper products; the method is complex, so it is not always possible to hide the problem.
In particularly difficult cases, owners decide to use polyurethane decorative strips that are glued to the joints. In this way, you can hide any defects, even if the shade of the panels is different.
How to repair seams that have come apart
Glue will help in repairing regular wallpaper with a pattern. And to disguise the joints on the wallpaper for painting, you will need paint of a similar shade and sealant.
Glue
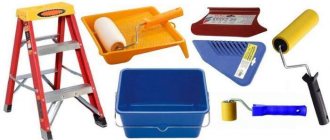
To repair broken seams, you need:
- glue;
- roller for rolling wallpaper joints;
- metal spatula;
- warm water.
The procedure is not easy, so it makes sense to entrust it to specialists. But if a person intends to cope on his own, the following order should be followed:
- Gently wet the seams with water. It is better to use a spray bottle.
- Use a spatula to turn the slightly soggy edges away from the wall.
- Remove pieces of putty and other debris. The inside of the wallpaper should remain clean and smooth.
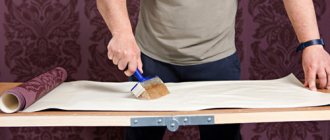
- Carefully apply the adhesive to the wallpaper and wall, leaving no dry areas on both surfaces.
- “Stick” the wallpaper sheets to the wall and attach cardboard (a thick rag) to them, covering the joint.
- Heat through the cardboard with a hairdryer for 15-20 seconds.
- Roll the roller several times towards the seam, “pulling” the sheets towards each other and removing air bubbles.
- Do not turn on the heating or allow drafts until everything is dry.
Dye
To repair wallpaper for painting you will need:
- paint of the required shade;
- high-quality sealant;
- roller;
- putty knife.
If the wallpaper is not yet painted, then the procedure is as follows:
- Make sure the wallpaper is dry from pasting.
- Seal the seams with caulk. Remove excess by leveling the material with a spatula to the level of the wall.
- Do not use putty over sealant. It will crack and begin to crumble.
- Paint the wallpaper along with the sealed joints.
When the seams come apart after painting, it will be difficult to correct the defect yourself. The services of a repair company will help you avoid completely repainting the room.
How to hide a joint contaminated with glue
Excess glue at a joint is the simplest case, but only under one condition, if you pay attention to the problem in time. If the wallpaper is glued by hired craftsmen, you will need to check the quality of the work in the first hours, while the glue is still wet.
On vinyl or non-woven wallpaper, it is enough to simply wipe the glue with a dry and clean napkin; on paper, excess adhesive material is blotted, like an ink stain, without rubbing on the canvas. After the wallpaper has dried, the joints must be checked again, since over time, glue stains tend to turn yellow and appear in the picture, after which it will be impossible to hide them.
On dark wallpaper, residual glue at the joints can be hidden using a retouching pencil. Before decorating the seams on the wallpaper in the photo, the marks are wiped off with a paper eraser.
Joints on different types of wallpaper
Depending on the type of wallpaper, the joints look and connect differently.
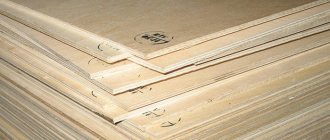
Paper
The paper stretches under the influence of the glue, and when it dries it returns to its previous size. This is a common cause of uneven reduction of panels and the appearance of tears and flaws at the joints. To avoid this, you need to glue the wallpaper to the wall immediately after applying the glue, before it swells.
Vinyl
Difficulties in this case arise when connecting the strips in the corners. The reason for this may be the unevenness of the walls and their insufficient preparation. Cutting the joint through will help. The wallpaper is pasted in the corner with an overlap of 3 cm. Then this place is cut through, creating a butt joint between two strips. The joint area is coated with glue and smoothed.
This gluing method is required for paper wallpaper.
To prevent joints from appearing on vinyl wallpaper, you need to glue the strips into a cape. For wallpaper with a non-woven base, an overlap of 2 cm is enough, with a paper base - 4 cm. After this, the joint is cut with a knife according to the level, and all excess is removed.
The cause of defects may be the wrong choice of glue, before using which you need to carefully read the instructions.
For wallpaper with a non-woven base, you need appropriate glue, which is used to smear the wall and wallpaper. The paper base involves applying it only to the wallpaper itself.
Non-woven
This type of wallpaper does not have any particular difficulties with the divergence of joints, since they do not stretch like paper. The main attention should be paid to the corners, which are covered with an overlap and then remove all excess. When gluing the outer corners, simply joining the strips is enough. If the angle is uneven, you will have to glue the sheets overlapping again.
The most difficult case
It is most difficult to hide joints with a gap when the edges of the panels have diverged so much that the wall is visible. To hide the unmasking seam, you need to try to move the edges and fix the canvas using proven glue. Many two-layer wallpapers react differently to moisture. Most trellises swell and become plastic when liquid glue is applied. After gluing to the wall and smoothing, the width of the canvas can increase by several millimeters, and after drying the reverse process occurs.
To hide the resulting gap, you first need to moisten the edges of the canvas using a spray bottle or spray bottle. After 10-15 minutes, the wallpaper will become soft, and you can lightly press the canvas with your hands and try to connect the edges of the panels. The seams are glued with PVA glue and rolled with a rubber roller.
If it is not possible to hide the joint in this way, for example, joints on paper wallpaper are very difficult to hide in this way, you can try to decorate the seams, as in the photo.
Colored stripes and individual fragments are suitable for decorating joints; you just need to stick them on the panel so as to hide the defect and at the same time distract attention from the problem area. Wallpapers of different patterns will help to ideally hide a frayed seam, since a brighter color always attracts the eye. Before you make a joint from different wallpapers, you need to plan an overlap transition. The glued new trellis does not even need to be cut.
How to eliminate joints, decorate or make them invisible
As in any other situation, it is easier to prevent trouble than to deal with the consequences of the problem. Therefore, those who like to glue wallpaper with their own hands try to do the gluing, adhering to a few simple and accessible rules:
- If possible, we use the widest possible panels; fewer joints mean fewer problems;
- The panels must be applied from the window corner; this will allow you to see the overlapping edges and joints in a timely manner in daylight. Often, the edge of each subsequent strip is higher than the edge of the previous strip by some fractions of millimeters. Such joints are practically invisible when the light is directly incident, but are clearly visible if the light is incident from a different angle. Therefore, it is often possible to hide such joints by correctly placing the main light source in the room.
- The first canvas must be glued plumb, as in the photo; it would be useful to check the subsequent canvases, especially if the wall is not completely flat. This will allow you to identify the defect in time, intervene and try to make a correction without delay;
- It is necessary to strictly maintain the quantity and quality of glue, the impregnation time of the wallpaper, selected during trial checks on sections, and do this for all panels without exception. This way you will ensure the same properties for all pieces of material without exception.
Advice! When gluing, it is important to make an exact alignment of the pattern, and if it is not possible to simultaneously align the edge and match the wallpaper pattern, it is better to do it with a slight overlap of the seams than to lose the integrity of the composition.
Fighting the edges that have risen up like a house
Not the most difficult, but quite common case when joints rise and twist, photo. Usually craftsmen in such a situation, in order to hide their imperfections, blame the quality of the wallpaper and poor glue. In fact, the problem lies precisely in the lack of professionalism of the workers. In the process of coating the cloth, experienced craftsmen apply glue to the edges twice, because the adhesive mass dries much faster along the edge of the cloth. To hide the raised joints, just apply an additional layer of adhesive under the seam line and roll the trellis with a rubber roller.
It is much more difficult to hide a defect at the joints in a situation where the seams have risen along with pieces of soil and whitewash. This means that the preparation of the wall surface was carried out extremely carelessly, and when shrinking, the wallpaper tore off the adhesive seam at the joint. In this case, you have to spend a lot of time soaking and removing the old glue from under the joint, and only then gluing and rolling the fabric. If you try to re-glue the seams as they are, the remnants of the old glue and whitewash will make the seam stand out, and under certain lighting the defect will appear in a new way.
Removing glue from the front part
Often the seams are visible due to the glue coming out.
Often the problem is the appearance of glue on the seams. Such residues do not need to be removed, but they begin to shine in the light and may change color in the areas of development.
To prevent the glue from oozing out at the seams, during gluing you should apply the composition in the optimal amount without excess.
If there is such a manifestation, then you need to try to wash off the glue with a clean, damp cloth or other method.
When removing defects, it is better not to apply any effort, so as not to spoil the canvas.
A detailed reading of the instructions for the adhesive composition will help you avoid trouble.
Curled edges
When using wallpaper, the base of which is made of paper, and the front side is made of fabric, the sheets often peel off at the joint and curl together with particles of plaster. The master is perplexed why such a nuisance happened. It turns out that the whole point is in low-quality finishing materials and the characteristics of textile wallpaper, which “shrink” a lot after drying.
This defect can be eliminated by additionally gluing the edges of the sheets with special glue for joints or borders, and then pressing well with a rubber roller.
Why does a seam appear between wallpaper sheets?
- The main reason for the appearance of a wallpaper seam is excessive wetting of the fabric. Yes, despite the fact that expensive wallpaper does not seem to get wet or swell, all the same, if the wallpaper is soaked too much in moisture, it can shrink when the glue dries and form a gap. To prevent this from happening, first dilute the wallpaper glue according to the instructions, and also do not allow the sheet to be heavily treated with glue.
- Also, the cause of the appearance of a seam between the wallpaper may be incorrectly selected glue. It’s not for nothing that manufacturers recommend using a certain type of glue for certain wallpapers. If you neglect this moment, you may end up regretting it.
- Another reason why a seam may appear between the wallpaper is poor contact of the wallpaper sheet with the wall. This can happen in two cases: either you didn’t prime the walls, or you didn’t smooth the wallpaper properly after sticking it on the wall.
How to trim in corners
In order for the joint in the corner to be even, the main thing is to trim it correctly. To do this, you need to use a sharp stationery knife with a thin blade and a plumb line. The cut must be made strictly vertically from top to bottom.
When making a cut, there may be a problem with the wallpaper tearing. If this happens, carefully move the knife back, make a new cut in a different area and continue down. If the wallpaper continues to tear, wait a bit for it to dry.
After finishing trimming, carefully peel off the top trimmed layer and remove it. If all operations were done correctly, you can easily join the wallpaper with an even seam in the corner of the room. To properly trim wallpaper in the corners, watch the following video:
What to do if there is a seam between the wallpaper
The first thing you need to understand is that it is almost impossible to make the wallpaper fall into place. You can try, but most likely your efforts will be in vain. Especially if you have more than one seam, it means that somewhere you have seriously violated the technology of wallpapering or preparing walls for wallpaper. Do not neglect the rules, because they exist for a reason, but are written based on the experience of masters. However, you can disguise the seams, but let's go one by one...
- You can try softening the wallpaper with water and try moving it. Of course, this method seems fantastic, but sometimes it can help. In this case, you can soften the wallpaper using either water or a steamer. True, this method has a big drawback - it is possible to completely ruin the wallpaper.
- You can purchase grout and use it to grout the seams between the wallpaper. The grout should be matched to the tone of your wallpaper. This method gives positive results, but has a big drawback. The grout often begins to crack after a while.
- You can use the remnants of wallpaper from pieces to assemble your seam. This option gives a good result, but its main drawback is that not all wallpapers look good after this. If you have wallpaper with a lot of texture, then this option will work for you. If your wallpaper has no texture, the seams will still be noticeable.
- You can use grout and paint. Those. you sand the seam and then paint your wallpaper a certain color. This option is very good, but costs time and money.
- You can use sandpaper and a utility knife to finely “plane” the top layer of wallpaper and mix it with PVA glue, which does not give a yellow tint when dry, and apply the resulting mixture to the seam. This option often gives the best effect, but again a lot depends on your wallpaper.
How to remove overlap
If during the gluing process a small overlap has formed and you want to get rid of it, this can be arranged. You should use two options to eliminate it:
- You can try to carefully trim the overlap. But you need to act very carefully so as not to damage the wallpaper. It is necessary to make a vertical cut along the overlap line;
- You can soak the fabric and join it so that there is no overlap. This method is mainly suitable for non-woven and vinyl wallpaper; we do not recommend using it for paper coverings. So, soak the surface along the overlap line and move the canvases in different directions.
Causes
Reasons for unsticking wallpaper joints:
- insufficient or excessively applied adhesive mass to the edge of the canvas;
- the wall was primed or puttied poorly;
- unsuitable brand of glue or incorrectly prepared composition;
- the coating dried at low temperature and high humidity.
As a result of such factors, the edges of the canvases move away, become uneven, and adjacent sheets receive different shades. By guessing why the wallpaper sheets are diverging, the situation can be corrected.
How to fit a drawing
Pasting wallpaper with a pattern is often accompanied by difficulties. For beginners, correctly adjusting the pattern when wallpapering will not be an easy task.
Remember that wallpaper patterns may sometimes not match in certain places. To minimize waste, unroll the roll on the table. Next, using a tape measure, measure the height of the wall and transfer the measurement to the wallpaper. The first strip must be cut off with a margin of thirty centimeters.
Then place the second strip against the already cut one and match the pattern. When it matches, you can cut the second strip and start gluing the first. Next, cut off the third strip, after matching the pattern with the second, and continue gluing. Thus, select until you have completely covered the room. To correctly select and match the pattern when gluing, we recommend watching the following video:
How to join wallpaper correctly
It is advisable to take into account certain nuances and follow the recommendations of specialists. Then you will get beautiful partitions with a homogeneous surface, on which it is difficult to find the connection lines of the rolled strips. In this case, it is necessary to take into account the characteristic features of different materials:
- single-layer paper ones are glued with an overlap, since after drying the paper “shrinks” slightly;
- vinyl wallpaper - end-to-end. When spreading the canvases, you need to give them time to soak in the glue a little (5-7 minutes);
- non-woven ones are attached end-to-end, and wallpaper glue is applied to the wall;
- When working with photo wallpaper, follow the manufacturer's instructions.
There are special subtleties when working with different textures, when it is necessary to join rolled sheets with stone, plaster, painted surfaces, and photo wallpaper.