Material characteristics
This composition is intended for decorative finishing of wall surfaces and ceilings, is made from components of natural origin, provides vapor permeability, does not emit toxins, and does not cause allergenic manifestations.
Everyone who has had the opportunity to use liquid wallpaper material notes its undeniable advantages:
- The glue included in the mixture, when dried, creates a protective layer against unpleasant odors;
- wallpaper fabrics are antistatic, have a positive effect on the level of air purity, and do not accumulate dust on their surface;
- the material is absolutely safe in terms of fire protection; after the first fire, the components go out on their own, without emitting smoke or harmful components;
- The composition includes cellulose fiber, which is not subject to the negative effects of a humid environment and provides a comfortable indoor microclimate.
There is one unpleasant factor - liquid wallpaper does not withstand direct exposure to a humid environment. However, this material is used to decorate kitchens and bathrooms, applying it away from water sources. As a last resort, the decorative surface is treated with colorless varnish, reliably protecting it from moisture.
What does the mixture consist of?
To prepare liquid wallpaper, three fundamental ingredients are used:
- a large share falls on the fibers of natural materials - cellulose, cotton or silk. The final choice depends on the consumer, because in the finished state the mixture has certain differences;
- a water-based coloring composition is added to natural fiber;
- the functions of the binding component are assigned to glue or acrylic dispersion, thanks to which the mixture is perfectly applied to the surface with a spatula.
What else can you add to liquid wallpaper if you prepare it yourself? Craftsmen use small pieces of marble, multi-colored flocks, and mica sparkles as decorative components. The choice is determined by the design features of the room being renovated.
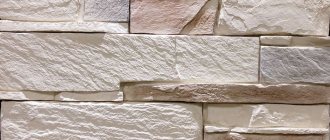
How to fix such brickwork on the wall
It is very easy to attach such masonry to the wall. The main thing is to properly prepare the wall surface. So, first of all you need to prime it well and let the primer layer dry. The bricks need to be attached to a bare wall - not to wallpaper or other coverings. PVA construction adhesive can be used as a primer.
Try to attach the bricks evenly and neatly
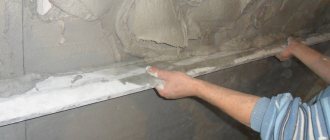
Then you can take the finishing putty - it should have the consistency of sour cream. Next, using a spatula, the putty is applied to the back side of the bricks, and the brick itself is glued to the wall. The space between the bricks must be sealed after drying. If the bricks are not painted before they are glued to the wall, now is the time to give them the desired color.
Advice! To make it easier to form a pattern on the wall, lightly mark the location of the bricks on it using a pencil.
Stone walls made of papier-mâché
Egg trays will help you create not only an imitation of brickwork, but also all kinds of other decor in your home - for example, stucco molding under the ceiling or the same vine on the wall. Everything will depend on your imagination and your desire. The only resource you waste is your time. But you can create a unique and inimitable decor for your apartment using waste materials.
How to make it yourself?
Beginner developers ask themselves: “Is it possible to make liquid wallpaper with your own hands?” The answer is yes, you will only need a little free time, but the money savings will be obvious.
Here are some of the best recipes that will help you make liquid wallpaper yourself.
From paper
Look through all the nooks and crannies of your home and collect all unnecessary paper products in one place. Old newspapers, magazines, drafts, packaging material, etc. are suitable for making wallpaper for paper walls with your own hands.
You will need a dye to match the color of the interior, PVA adhesive and gypsum powder.
To prepare a solution of liquid wallpaper from newspapers and other waste paper, we act in accordance with the following algorithm:
- We shred paper raw materials in any convenient way. The time required for production depends on the size of the pieces;
- fill the material with water at the rate of five liters per kilogram of component, leave for three to four hours to infuse;
- using an electric drill and a mixing attachment, knead the contents of the container until smooth;
- add a coloring compound to get the desired color. We introduce glue, giving the mass a soft, creamy state. Mix everything again;
- distribute the prepared mixture into plastic bags, tie the necks tightly, and leave for twelve to fourteen hours;
- on the second day, remove the mass, stir by hand, add decorative elements (if necessary to decorate the interior);
- knead the contents again with a drill with an attachment, adding gypsum powder in small portions. There is no specific standard for it - it ensures quick setting of the mixture. To determine the approximate consumption of the ingredient, a trial test of the prepared wallpaper is performed on a small section of the wall.
Making liquid wallpaper with your own hands is possible from egg trays. But you will have to wait longer for the cardboard material to completely dissolve in the total mass.
Sawdust based
What else is liquid wallpaper made from? It turns out that sawdust is an excellent substitute for waste paper. The ingredients are taken in the above ratios, and a mixture of sawdust is prepared with your own hands as follows:
- the main component is dried and weighed, poured into a container;
- water is added at a rate of one to five;
- swelling lasts from four to six hours;
- add paint and decorative elements, mix the mass, cover with a tight lid and leave for twelve hours to “ripen”;
- knead again, adding gypsum, and get to work.
Liquid wallpaper made from sawdust, prepared with your own hands, looks great on the wall surface.
Using fibers
How else can you make this decor at home? Other ingredients may be used in the preparation of the mixture:
- fibers from cotton or cellulose. Such components are carefully crushed; processing large areas will require a lot of raw materials;
- flax or synthetic winterizer - the material crushed into crumbs is easy to mix;
- yarn - threads that have not found their application are cut with scissors and used as a warp.
It is recommended to use an acrylic putty mixture, previously mixed with water, as the binding component. Dyes are chosen as for fabrics made from paper raw materials.
For those interested, we provide a recipe for making liquid wallpaper from textiles with your own hands, indicating the proportions of the initial components - fibers and glue (you can easily find a master class on making the material using the corresponding request in the search bar). These ingredients are combined in a one-to-one ratio. Everything used as additives is determined by experimental method.
Decorative bricks from egg trays
You will need:
- cardboard egg trays;
- water;
- polyethylene film;
- marker;
- ruler;
- gypsum;
- paper towels;
- putty knife;
- plastic bucket;
- finishing putty;
- acrylic paint;
- brush.
Decorative additives
Special components are added to liquid wallpaper material to help solve important technical and decorative problems.
For homemade liquid wallpaper, suitable options are selected, taking into account the similarity of the structural structure. They use high-quality components that do not enter into oxidative reactions and can resist the formation of mold.
Ingredients for decoration are added to the already matured wallpaper mixture.
The functions of color additives are assigned to water-dispersion mixtures that set a single shade. The highlighting of inclusions is achieved through particles of dried paint or small pieces of colored thread.
To protect natural raw materials from rotting, fungicides are mixed into the wallpaper mass. Resistance to fire is ensured by the addition of fire retardants.
The speed of hardening is ensured by plasticizer components and other thickeners. Due to the added components, the thickness of the canvas varies.
Maximum similarity between the wallpaper and fabric is achieved using textile thread. During the kneading process, the component is intertwined, reliably reinforcing the hardening mixture. With threads it is possible to change the texture and color of the material using golden, silver shades, lurex or mica.
Painting and binding the composition
PVA glue binds the fibers; in principle, regular glue will do, but construction glue will be better and cheaper. For 40 sheets (200 g) you need 200 ml of PVA, so for 1 g you need 1 ml of PVA.
Gypsum is needed for adhesion to the base. For 5 grams of paper you will need the same amount of gypsum. Gypsum is also replaced with gypsum putty or materials for sealing cracks. The setting time of gypsum depends on its brand, higher means faster, lower means slower, it is not advisable to use plaster that has been sitting for a long time. It is very easy to calculate using a baby food spoon: 1 spoon = 5 g. gypsum
Tinting - this step is chosen independently and shades are selected experimentally. Any color can be used: paste, dry or liquid. In dry and liquid form it is easy to dose and the calculations are 1 to 1.
When painting, you need to take into account the shades of the original paints, and if it is proposed to use brown cardboard, the color should be from yellowish to dark brown; for the rest, paper without color is used.
You can add almost any material, even glitter, broken glass or beads.
Coloring
The easiest way to achieve the desired result is to add a certain pigment to the snow-white base. In this case, it is possible to achieve any color. So that the work is not in vain, the color is introduced simultaneously with the addition of water.
Concentrated dyes are either organic or synthetic. The first option is less resistant to ultraviolet radiation, but has numerous color shades and resembles a paste or liquid mixture.
Dyes diluted with water and used in paints and varnishes are also suitable.
Before applying wallpaper, you can always change the shade of the mixture; the correction is carried out within three hours from the moment the composition is prepared, then the color is slightly distorted.
Remember that the tinted wallpaper paste, while in the container, looks several tones brighter than after application to the surface.
To use the dye correctly, follow these tips:
- strictly observe the proportional ratio of ingredients;
- dissolve the color with water, which is intended for adding to wallpaper raw materials;
- the crushed material is in the coloring composition for at least two hours;
- To ensure a uniform shade, the entire volume of wallpaper mass is painted at the same time. Otherwise, you will have to remember exactly the amount of pigment added to a certain portion of homemade product.
We have already looked at how to prepare the wallpaper mixture. We choose the simplest option and make liquid wallpaper ourselves.
How to make liquid wallpaper with your own hands
— A4 paper – forty sheets.
— Container for mixing.
— Drill with attachment.
We cut forty pieces of paper, you don’t have to cut it, but for convenience and quick soaking it’s better to cut it smaller. Pour all the cut paper into a container and pour 1.25 liters of water at regular temperature into it. Then leave to soak for about an hour and a half.
We check everything to see if it is wet and if the sheets are well saturated with moisture, and if everything is ripe, then we begin to grind it with a drill with an attachment. As soon as everything is kneaded to a solid mass, add the color of the desired shade and saturation. Then add plaster, forty spoons of baby food, and 200 ml of PVA. Now mix everything until a putty-type mass is formed and carefully apply it to the surface with a spatula. When the work is done, we leave it to dry for about a day.
Application Features
We learned how to make liquid wallpaper at home yourself. By following the above recommendations, you can achieve attractive wallpaper.
Now we suggest you figure out how liquid wallpaper for walls, prepared with your own hands, is applied to the surface.
The principle is similar to working with decorative plaster mortar; for this you will need a spatula and other tools used in painting and plastering work.
If you think about what would be better - liquid wallpaper paste or decorative plaster composition, many craftsmen will prefer the first option, which has undeniable advantages.
As in the case of applying plaster, finishing walls with liquid wallpaper requires preliminary preparation of the surface.
Required tools and materials
Before you make liquid wallpaper at home yourself, prepare everything you need for the job.
Materials needed:
- the main raw material from which the texture of the layer is formed;
- dye;
- adhesive composition;
- plasticizers;
- antiseptic.
Tools you will need:
- table or platform;
- electric drill with mixer attachment;
- a container of a suitable size for mixing wallpaper;
- measuring jug;
- scissors;
- transparent iron;
- putty knife.
Preparing the walls
Imagine that you have completed the process of making liquid wallpaper from paper with your own hands, maintaining all the proportions, and leaving the mixture to swell. The time required until a consistency suitable for application is obtained is enough to prepare the wall for finishing.
First of all, dismantle the old decorative layer. If no significant flaws are found on the plaster layer, the surface may not be treated with a primer. You should not spend money on putty - liquid wallpaper is applied immediately.
Priming will be needed if there is a concrete surface under the old covering layer. In addition, you will need to apply a thin layer of putty (you can use the starting mixture).
Application
Liquid wallpaper is applied with a spatula, like a thin-layer plaster mixture. Thickness – from two to five millimeters. Drawings are formed using multilayer technologies or stencils.
Recommendations
If you are faced with the question of how to make liquid wallpaper yourself for the first time, do not be alarmed - there is nothing complicated about it.
The liquid mass is easily removed, and when something doesn’t work out the first time, it’s easy to correct the situation.
Do not apply a layer more than four millimeters thick - it looks rough and not entirely neat.
When adding decor, stick to moderation.
If you accidentally violate the boundaries of the area intended for applying wallpaper material, give the composition time to dry and carefully remove it with a sharp knife.
The liquid material looks great on the ceiling, as a finish for niches and openings.
If you have determined a recipe for wet wallpaper for walls and decided to make it yourself, remember some rules:
- the fundamental component and the binder are combined in equal parts;
- adding gypsum and deciding to dilute the consistency a little, use heated water;
- After introducing the glue, let the mixture sit for several hours.
If you do not want to use dye when making a batch, you can paint the wallpaper in the desired shade after it has completely dried. The paintwork material of the required color is applied to the surface with a spray gun or brush.
When applying the mixture, do not press the tool too hard. When smoothing the finished surface, place the lower part of the trowel close to the wallpaper, and move the top slightly away. Perform smooth movements, slightly moistening the wall and wetting the instrument. Choose one direction - vertical or horizontal.
How to organize the care of decorative coating? It is best to remove dust with a vacuum cleaner using a soft bristled attachment. The texture of the wallpaper is delicate, does not tolerate friction well, and becomes deformed at the slightest pressure.
If acrylic varnish was applied as a protective measure, the wallpaper can be cleaned with a damp cloth using household detergents.
Stains that appear on the surface are removed with a simple paper eraser. Traces of rust are more difficult to remove - you will have to establish a point of contact with the metal element, remove the wallpaper layer, go over the wall with a special anti-corrosion agent, and apply a new sheet. To minimize differences in shades, it is recommended to leave a certain supply of raw materials and color pigment after repairs.
Advantages and disadvantages of homemade material
If all the tips are followed, you will receive a canvas whose quality is not inferior to mixtures sold in building materials stores. The main advantages of trellises are:
- providing a warm and cozy atmosphere in the room;
- the ability to retain thermal energy in a room;
- protection from extraneous noise;
- masking uneven sections of walls and other defects;
- lack of connecting sections;
- environmental safety for the human body;
- maintainability in case of damage from mechanical impacts;
- the ability to bring any design ideas into reality;
- ease of application, not requiring special skills;
- financial savings.
Unfortunately, there are also certain disadvantages of the finishing material:
- it will take a lot of time to prepare and apply the mixture;
- it is not easy to determine the need for material for finishing the entire room, which entails a violation of the proportional ratio of the components, differences in the color shades of your chosen range at the next batch;
- difficulties arising when finishing a plasterboard surface;
- long drying period, reaching two days;
- the amount of gypsum is determined practically;
- in the end, sometimes you get a result that does not meet your expectations;
- Wallpaper material is exposed to a humid environment.