Liquid wallpaper is good because it has excellent adhesion (adhesion) to almost all building materials. Whatever the walls of the house are made of, with proper preparation they can be finished with liquid wallpaper. They apply well to any surface (concrete, drywall, plywood, wood, chipboard, whitewash, paint), you just have to work with it first.
One of the characteristics of liquid wallpaper is its tendency to absorb moisture. That is, the surface of the coating will accumulate excess moisture from the air in the room. In itself, this is a positive quality of finishing - a normal microclimate will always be maintained in the house.
But an environment that is too humid interacts with other materials. The base of the walls and ceiling must be resistant to such influence, and moisture-intensive materials (plywood, wood, concrete) must be insulated as much as possible.
Features of the material
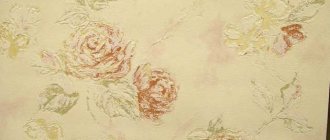
The decorative finishing coating, known as “liquid wallpaper,” is a mixture of an adhesive base and cellulose, cotton or silk fibers. The composition may contain additional decorations - sparkles, flocks, mother-of-pearl, metallized threads, mineral chips. For ease of application, plasticizers are introduced, and natural fungicides are used to prevent the material from being subject to biological destruction.
The surface finished with liquid wallpaper has a rough texture that is pleasant to the touch. The structure of the coating is very original. The fibers, randomly intertwining with each other, form a single fabric. In terms of tactile sensations, it is similar to textured paper wallpaper, and in terms of application technique, it is similar to plaster. The dry components are mixed with water and, after swelling, distributed over the wall with a spatula. In some sources, the coating is called Danish or silk plaster.
Advantages and disadvantages
Using liquid wallpaper, you can create drawings, paintings, or even entire panels on the wall. This gives room for creativity and allows you to get a completely unique interior.
Advantages of liquid wallpaper:
- ease of preparation and application;
- decorativeness;
- no visible seams;
- breathability;
- elasticity and crack resistance;
- additional sound and heat insulation;
- masking small irregularities;
- maintainability, the ability to varnish and paint many times;
- finishing of surfaces of any geometry - round, with corners, irregular shape.
- service life 10 years or more.
The disadvantages are few:
- they are afraid of water, in wet rooms they need protection, for example, with acrylic varnish;
- small selection of colors;
- higher price than regular wallpaper.
Silk plaster is becoming more and more popular among the population. The volume of production of this unusual material is growing every year, and the industry is working to create a more diverse palette of colors and interesting textures.
Protective varnish
To protect against accidental ingress of moisture during the operation of liquid wallpaper, varnish is applied to the wall. In this case, be sure to take into account the characteristics of the wallpaper. For example, after coating, the surface takes on a rougher appearance, and the color tone may even change slightly.
The charm of the softness and airiness of fabric upholstery disappears. The finish loses vapor permeability. Therefore, it is recommended to use varnish only where contact with water is possible (in the kitchen sink area, in the bathroom).
Finishers do not recommend varnishing materials from the Recoat 1 (2, 3) liquid wallpaper collections. This material contains wood and other adhesives that may cause stains.
Special varnishes are produced for varnishing silk plaster. You can apply regular acrylic varnish (it is advisable to do a test). Apply the varnish with a brush or medium-pile roller in two or three layers. After each pass, dry the varnish for at least 6 hours. Drying time for the last layer is up to one and a half days (according to the instructions).
How to prepare surfaces
Despite the fact that the wallpaper is easy to install and adheres well to any surface, the base needs to be prepared:
- Nails and old finishing - wallpaper, whitewash - are removed.
- Dust is cleaned with a brush or vacuum cleaner.
- To prevent fungal damage, the walls are treated with antiseptic agents and dried.
- Defects are smoothed out using putty or plaster.
- The surface is coated with a water-repellent, water-repellent primer.
- If the color of the base strongly contrasts with the finish, white water-based paint is applied.
- All metal and wooden parts, including plywood, OSB, chipboard, are coated with alkyd varnish or oil paint.
Allow at least 24 hours for complete drying. Only after this is the clean, dry surface ready for finishing.
Surface preparation
The durability of the coating, first of all, depends on the quality of surface preparation carried out before gluing liquid wallpaper. “Liquid” material is not intended for leveling the wall, so you need to take care of priming and cleaning the base in advance. It is possible that during the preparatory work circumstances will become clear that prevent the use of wallpaper material, and it will have to be replaced with decorative plaster or other finishing.
Depending on the condition of the walls, it is necessary to perform one or more of the following operations.
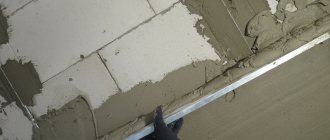
- Remove paper wallpaper from the wall and wash off the whitewash. Such coatings cannot be used as a substrate. The paint layer is checked for strength of adhesion to the walls; if peeling or peeling, the paint is removed.
- Examine the plaster. Be sure to tap the walls to look for peeling areas and other defects. If the paint and plaster are in poor condition, they are removed completely or locally, and the plaster is repaired.
- Small cracks in the plaster can be easily covered with wallpaper, while large cracks can be repaired.
- If the surface of the wall is too uneven, then you need to level the base with a layer of plaster along the beacons. Small differences will be covered with wallpaper paste.
- Places where mold or rot has settled are washed with mandatory treatment with fungicidal liquids. The rust is cleaned off. Metal products are painted over for insulation with oil paint or other insulating agent. The efflorescence is washed off and the cause of its appearance is determined. It may be necessary to waterproof the area.
- Since the wallpaper mass weighs little and is applied in thin layers, there is no need to reinforce the base. However, at the joints of structures, you can pre-glue sickle tape followed by putty.
The smooth paint layer is sanded to increase adhesion.
A primer is required before applying liquid wallpaper. For example, smooth surfaces are primed to increase adhesion. You cannot do without applying a primer in the case of wooden and porous walls.
Liquid wallpaper requires a primer with quartz sand. Typically these primers are white in color and do not require white painting. If the paint or other finishing on which a lot of liquid wallpaper is applied is not white, then for light wallpaper the wall must be painted with white paint or covered with white putty. The areas where the rust has been removed are also painted as a preventative measure.
The primer is applied in two or three passes. Each time the wall is dried.
The frames of windows, doors, sockets and switches are sealed with masking tape. The wiring is de-energized. The floor and abandoned furniture are covered with film. Although the wallpaper mass remains plastic for a long time and is washed off, it is better to take care of protection.
The most “successful” base materials:
- leveled plaster;
- fiberglass;
- clay;
- drywall (preliminarily putty the entire surface);
- primed polystyrene foam;
- concrete or stone.
Less “successful”, but also suitable after priming:
- metal;
- OSB;
- tree;
- Fibreboard, chipboard, MDF.
Liquid wallpaper compositions cannot be applied directly to plywood, since the top plywood layer “shrinks.”
Under what conditions can liquid wallpaper be used?
Cellulose and other fibers react quite sensitively to operating conditions. With high air humidity, they can swell and become affected by mold. Therefore, liquid wallpaper without any protective coating is recommended to be used only in dry, heated rooms.
The moisture resistance of silk plasters can be increased by using alkyd or latex-based varnishes, polyurethane or silicone paints. Surfaces treated with them can be washed, but without fanaticism. Direct contact with water is very undesirable, so it is better to choose more remote areas for finishing bathrooms or kitchens with silk plaster.
In dry rooms, water-based paints are used for painting. They do not tolerate direct contact with water, but are breathable. Since liquid wallpaper can be repainted many times, you can regularly refresh the interior without high costs.
What materials can be used at home
Having familiarized ourselves with the advantages of the described compositions, we can begin making our own. To do this, you need to decide on the base, binder and fillers.
What is liquid wallpaper made from?
What can serve as a basis?
Paper is the cheapest material. But it is important not to use glossy, as it is unable to disintegrate into the required fibers. It’s better to take toilet paper or egg trays, although old magazines and newspapers will also work. Ideally, this should generally be porous wallpaper.
Shredded paper is filled with water
Mixing components
You can also take padding polyester or cotton wool (250 g per 1 kg of base), be sure to finely chop it and split it into fibers. Without paper, these materials cannot be used.
Sawdust is good because you don’t even have to cut it. If you have a lot of old yarn lying around the house, then it can also be used as a base. Moreover, it also does not need to be crushed.
For liquid wallpaper you can use any cotton wool
Cellulose fibers derived from wood
Suitable fillers
In small quantities, yarn can be used as filler. Its fibers (of one or more colors) will look nice in the base. You can also use stone chips, colored threads, mica powder, glitter, tree bark, and small pieces of fabric. The required proportions are about 200 g of filler per 1 kg of paper.
Additives to liquid wallpaper
Remember: the finer the base with filler, the smoother the wall will be.
About binders
The best option is CMC wallpaper glue made from modified starch. It is inexpensive, but it prevents the development of fungi, which is very good for wet rooms. Approximate consumption – 130-150 g per 1 kg of base.
CMC glue
As an option, you can take PVA glue or Bustilat, and also an acrylic putty mixture. In the latter case, it will be more difficult to work, but the finished coating will be resistant to abrasion.
"Bustilat M-20"
What dyes should I use?
As for dyes, you need to use those from which water-based paints are made. The color must be added when mixing all the components - this way you will get a uniform color.
Powder paint
How to apply liquid wallpaper to a wall with your own hands: instructions for dummies
The material is produced in dry form, packaged. Before starting work, you need to calculate how many packs will be needed to finish a specific area - a wall or a small section of it. Manufacturers usually indicate the consumption of plaster in the instructions, so it is enough to measure your area and divide by the footage of one pack. You need to buy liquid wallpaper with a reserve. It may come in handy if repairs are needed.
Preparing the mixture
Silk plaster is prepared at the rate of 1 batch per wall, so that the boundaries of different portions do not appear. The dry composition must be filled with clean water at room temperature in the proportion specified in the instructions. Leave to swell for 12 hours. If desired, immediately add glitter up to 10% by weight.
It is recommended to mix the solution with your hands, straining it with your fingers. There should be no clots or lumps left. The process is similar to making dough from flour. Mixing the plaster with a construction mixer, as well as partial use of the mixture from one package, is not allowed.
Leave the prepared mass in a clean, closed container, for example, a thick plastic bag. If there are several diluted portions, before application they are mixed in a separate container to ensure uniform color. To do this, you need to take equal parts from each package.
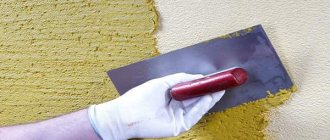
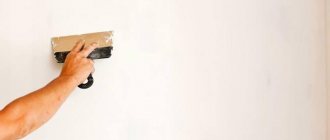
Application with a trowel
When the adhesive base has dispersed, liquid wallpaper can be applied to the wall. It is usually recommended to use a plastic trowel. It is quite durable, but soft and does not damage the material.
The mixture is applied to the wall in a layer of 1-3 mm in small portions. The trowel should be held at an angle of 10-15° to the wall so that a wedge forms between the tool and the surface.
After 1.5-2 hours, diagnostics are carried out using a lamp. Irregularities visible in side lighting are moistened with water and smoothed out again with a trowel.
Spray application
This method is much faster and more productive than using a trowel. It is especially good if the mixture contains mineral chips. Then it is possible to preserve the texture, which may be damaged when smoothed with a spatula.
The size of decorative elements is limited to 3 mm. The compressor must create a pressure of at least 4 atm with a nozzle diameter of 4 mm. The direction of movement when applying with a spray gun is from corner to corner. The material is loaded into a funnel attached to the gun. The consumption of the mixture with fillers is higher than usual, which must be taken into account when calculating.
The entire surface is carefully smoothed when wet with a special roller. This improves the adhesion of materials and increases the density of the coating, and the texture becomes more uniform.
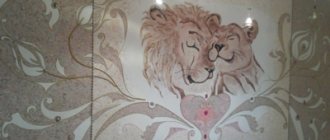
How to make drawings
Wall decoration using liquid wallpaper is widely used by designers to create unique panels or sketches. The technique is quite simple:
- Each color material is soaked separately.
- The contours of the drawing are applied to the wall. You can draw it yourself, using stencils or patterns.
- The main background is filled with silk plaster using a spatula or spray bottle.
- Within the boundaries of each fragment a different color is applied. To avoid mixing, the new composition is laid only after the surrounding background has dried.
To apply a thin, elegant design, craftsmen use a palette knife. This is a small spatula with a blade of various shapes, which painters usually use to mix paints or remove excess paints from the canvas. The colored mixture is applied in small portions and carefully compacted.
There are other known ways to create drawings - painting with paints or laying colored liquid wallpaper on the main background. To make the work easier, you can use a transparent trowel, through which the lines drawn on the wall can be clearly seen.
Special stencils are very convenient for creating decor. They are mesh covers that are fixed to the wall and filled with wallpaper. Next, the main background is applied. The strips of polymer tape that form the pattern remain glued into the surface. After finishing, they need to be cleaned of any remaining plaster.
Pictures can be very simple or quite complex. They are made in special workshops by applying polymer to a mesh base. You can select a drawing from any source, for example, the Internet, and order a stencil of the desired size.
Step-by-step application instructions
To finish the walls with a liquid mixture, you need to adhere to the following technology:
- Before starting work, the degree of density of the finished material is checked. If during storage it has lost a lot of moisture, you need to make a more liquid solution, for which water is added to the mass and mixed again;
- To successfully fix the wallpaper, the temperature in the room must be maintained at least +15oC;
- The mixture is first applied to the corner, gradually leveling the mass from the corner over the surface. To straighten the layer, use a transparent grater, and spread the mass with a trowel;
- It doesn’t matter which corner you start working from, but it’s more convenient to go from the lighter corner to the darker side. Thus, irregularities are identified more quickly;
- gradually, moving from the corner, the entire surface of the wall is covered with liquid wallpaper;
- The papered wall is allowed to stand for 60 minutes, after which they begin to check the quality of the work by illuminating the surface with directional light. Blemishes are corrected with a spatula dipped in warm water.
When working, you can ventilate the room, but without creating a draft. Heating with electric heating devices is prohibited.
How to apply liquid wallpaper to the ceiling? The technology of work is no different from finishing walls, but for the ceiling you need to properly prepare the base to ensure strong adhesion.
If the apartment owner has experience working with a spray gun, applying the material to the wall is much easier. The mixture is distributed evenly through the sprayer. The result is a surface that does not require additional leveling with a spatula.
Repair of liquid wallpaper
One of the important advantages of liquid wallpaper over regular wallpaper is the ability to repair a damaged area without global re-gluing. If the scratch is minor, just wet the surface, wait 5 minutes and rub it in with a plastic trowel. If there is a large area of damage, it is necessary to mix a new portion of silk plaster and distribute it evenly over the wall in the area of damage.
Difficult stains can only be removed together with the wallpaper. First, the contaminated area is soaked, the mass is carefully scraped off, the area is covered with fresh mixture and smoothed.
Do the same if you need to repair a surface on which varnish or paint has been applied. In this case, the paintwork will have to be completely renewed so that there are no visible boundaries left.
What surfaces can it be applied to?
The main condition for good adhesion of liquid wallpaper to the wall is the strength of the underlying layer, the absence of dust, whitewash or flaking paint. If any peeling is found, the surface must be thoroughly cleaned and coated with a high-quality primer.
On a painted wall
This base needs to be made rough, since liquid wallpaper does not adhere well to a glossy surface. To do this, grinding is carried out with coarse sandpaper, followed by treatment with a primer containing quartz. After such preparation, the adhesion of the painted wall to the finishing materials improves significantly.
For plaster
This is a good base for liquid wallpaper. It has the necessary roughness, but the porosity of the cement mortar is too large. In addition, when the components react with each other, yellow spots may appear on the finish.
To properly prepare the plastered surface, it must be completely puttied and coated with a water-repellent primer. Under light wallpaper, it is recommended to paint the plaster with white water-based paint.
Required materials and tools
To carry out the work, you need to purchase materials, buy, rent, or ask friends (neighbors) for tools and equipment:
- liquid wallpaper;
- putty;
- deep penetration primer;
- white water-based or water-dispersion paint;
- stepladder (can replace a strong table);
- two containers for stirring liquid wallpaper (one for each bag separately, from 12 liters, the second is large, for mixing several batches);
- primer cuvette;
- brush and roller for applying primer;
- set of spatulas;
- plastic transparent grater;
- ironer;
- trowel;
- a spray bottle with a large diameter nozzle (if you don’t want to apply the liquid mass manually).
Calculation of the amount of liquid wallpaper required
When working with conventional trellises, calculating the required number of tubes is not difficult - it is almost impossible to make a mistake. With regard to liquid trellises, this is a very important task, which, if done correctly, saves time and money. Practice shows that in approximately 60-70 cases out of a hundred, the consumer buys less than necessary amount of finishing material. This is explained by an incorrect calculation.
In reality, calculating the need for Danish plaster is not difficult. You just need to follow the instructions.
- The area of the walls is calculated (height multiplied by length), to which Danish plaster is applied;
- The area of the door and window openings is determined;
- The area covered with liquid wallpaper is found (the area of the openings is subtracted from the total area of the walls);
- Select the type of liquid wallpaper. Based on the inscriptions on the container, it is determined how many square meters one bag will be enough for. Manufacturers often simplify the task and immediately indicate how much area can be covered with the contents of the package;
- The area of the walls is divided by the flow rate, as a result of which the required number of packages of liquid trellises is found.
Just? Do not hurry. This is where the catch lies. This amount of materials is definitely not enough. After all, some factors that greatly influence consumption are not taken into account:
Layer thickness. Manufacturers indicate wallpaper consumption with a thickness of the applied layer of 1.5-2.0 mm. But only on perfectly smooth walls can these parameters be maintained. Since almost no one has such walls in their apartment (house), it is necessary to add about 15% more to the result obtained.
Experience. A beginner in finishing work, even knowing how to apply liquid wallpaper to a wall, will never be able to withstand a layer thickness of 2 mm. Therefore, the initial number of packages increases by another 15-20%.
The complexity of the wall relief. A large number of corners in the room, as well as hard-to-reach places, also dictate the need to increase the amount of purchased material by 15-20% (it is difficult to maintain the thickness of the layer in uneven places with a trowel).
In general, as experience shows, the number of packages of liquid trellises should be increased by 40-60% compared to the original number.
How to handle corners
The corners of the room are a critical part of the work, requiring precision and accuracy. On internal corners, the mixture is first applied with a trowel to one wall, then the other wall is processed close to the intersection line. To form a clear shape, you can use a medium-sized paint float or an angled spatula.
External corners are also designed in stages. First one face, followed by the second. The mixture is applied with a slight excess so that when smoothing it extends beyond the edge. Then, gradually, section by section, a corner is formed using a spatula or grater. The work is painstaking, but due to the pliability and plasticity of the solution, it is easy to do. Liquid wallpaper for walls video how to apply:
Can it be applied to the ceiling?
Liquid wallpaper adheres perfectly not only to vertical walls, but also to the ceiling. The technology is similar, but the labor intensity is slightly higher. You have to work in an awkward position with your arms raised.
Liquid wallpaper is applied to a spatula in small portions and distributed over the ceiling using smearing movements. The layer should be minimal - up to 1-3 mm, with good compaction. Before each smoothing, the spatula is moistened with water. This reduces friction between tool and material, making application easier.
What preparation needs to be done for plastered walls?
If the walls in the room are plastered, they must be puttied with a gypsum mixture. This will not only add hydrophobicity to them, but will also give them a uniform white color.
After the putty has dried, the surface does not need to be sanded - for high-quality gluing of liquid wallpaper, the wall must be rough. But applying primer in two layers is a mandatory procedure. Putty itself cannot reduce the absorption of walls, but primer can cope with this. When the surface has dried, you can apply liquid wallpaper.