Liquid wallpaper is a material based on cellulose, silk or cotton fibers and glue. This is not a classic wallpaper fabric, but a loose composition. If you know how to properly spread and glue liquid wallpaper on a wall or ceiling, you can give the surface not only a smooth texture, but also make it textured, rough, like silk or marble chips.
About the advantages and disadvantages
Advantages:
- environmentally friendly;
- fireproof;
- easy to apply, suitable for beginners;
- pleasant to the touch;
- do not emit a strong odor during application;
- from them you can create applications, patterns, panels;
- They are convenient for decorating arches, corners, niches, door/window openings and hard-to-reach areas;
- effectively hide minor defects and microcracks;
- have an antistatic effect and do not attract dust;
- have a long service life, do not lose color for more than 10 years, and are not subject to shrinkage;
- damaged fragments can be easily replaced with new ones;
- can be applied to walls or ceilings, suitable for use in living rooms, can be used in any interior style;
- if it gets on the floor or furniture, the mixture can be easily washed off;
- no joints, seams, air bubbles.
The disadvantage is that the wallpaper takes 48 hours to dry, but roll wallpaper takes the same time to dry completely. In addition, use in damp areas is not recommended, although there are examples of gluing in bathrooms and kitchens.
Other disadvantages:
- cannot be used on surfaces with metal parts, since over time rust will seep through wet trellises;
- cannot be washed, they can be dry cleaned with a brush or vacuum cleaner. If water gets on their surface, you just need to wait for it to dry without trying to dry it with improvised means;
- without applying a protective layer, liquid trellises quickly fade and become covered with yellow spots when exposed to constant sunlight;
- the material does not adhere well to a smooth base, it can only be applied to rough surfaces;
- installation takes a lot of time.
The material can only be glued to flat surfaces, since on curved bases, after the composition dries, flaws will be very noticeable. The base is made to match the wallpaper, otherwise it will show through the finishing layer. The main disadvantage is the high price. For finishing three sq.m.
you need to buy a package of the mixture for at least 1 thousand rubles.
What is special about liquid wallpaper?
The term “liquid wallpaper” means a unique finishing coating for ceilings and walls, which differs from classic wallpaper in the absence of rolls. However, liquid wallpaper perfectly covers and decorates all necessary surfaces. The composition can be very different, and therefore the walls end up not only smooth, but also embossed or rough, like silk or marble chips.
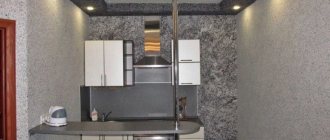
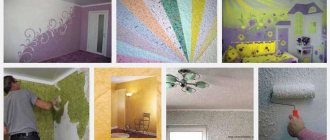
Liquid wallpaper in the interior
Drawings with liquid wallpaper allow you to create an atmosphere of novelty and uniqueness
The composition of liquid wallpaper usually includes:
- fibers of natural origin (more than 95 percent), for example, cotton, cellulose;
- acrylic-based water colors (necessary for adding color);
- additional decorative additives (for example, glitter);
- binding component (glue, thanks to which the composition is bonded and held on the walls - as a rule, this is CMC).
Palette of colors and textures
Color for liquid wallpaper
Liquid wallpaper
We also note that such wallpapers (if we consider them from the point of view of the prevailing basis) are:
- cotton (they are completely environmentally friendly, very pleasant to the touch);
- silk (characterized by the fact that they can be applied to concrete and drywall);
- cellulose (the cheapest option, such wallpaper is made from recycled wood).
Note! All of the described types of material do an excellent job of hiding small surface defects, and therefore are popular among both professional builders and home craftsmen.
Color range of liquid wallpaper
Manufacturers
- Leroy Merlin. Produces high-quality decorative plaster based on acrylic dispersion, which does not require a perfectly flat base. It has good sound insulation, is durable, and does not crack when the building shrinks. Diluted with water.
- Bioplast. Russian brand. The Belgorod representative office of the company produces high-quality products. Bioplast mixtures provide good heat and noise insulation, are easy to apply, and have a wide palette of colors.
- Silk Plaster. Safe mixtures that are resistant to sudden changes in temperature, high humidity and stress. You need to dilute with water and wait until the fibers get wet. The downside of the brand is the modest selection of colors.
Liquid wallpaper: structure and composition
This covering contains dyed fibers consisting of polyester, cellulose and cotton. Colored fibers give the original effect of the fabric covering. The coating contains decorative elements (marble chips, glitter and mother-of-pearl), this will give any room a new style and unusual shades.
liquid wallpaper may include components (mica, wood chips, dry algae, threads)
Acrylic and latex paints help add color to the composition. To achieve interesting and intricate effects, decorative “glitters” are added to the composition. Usually these are mother-of-pearl sparkles of various sizes, mica scraps, colored threads, and other components of natural and artificial materials.
In fact, it is impossible to buy liquid wallpaper ready-made. In the same Leroy Merlin or MaxiDom, liquid wallpaper is sold in a completely dry state. According to the instructions for use, you just need to add water to the dry composition. Semi-liquid wallpaper resembles a thick viscous curd mass, which is what is applied to the walls or ceiling.
Wallpaper consists of cellulose and cotton fiber. It is better to bring the dry mixture to liquid form using water in a special tray. The appearance of liquid wallpaper after drying resembles a cross between traditional wallpaper and decorative plaster. It takes 24 hours to dry completely. The coating is environmentally friendly with good heat and sound insulation.
The decorated surface acquires a single, seamless coating. Plasticity and the ability to use application techniques with different thicknesses help correct minor surface preparation flaws. Defects such as gouges or small cracks completely disappear. In addition, the same plasticity serves as a tool in creating the formation of a bas-relief pattern.
What they look like on the wall
If we talk about appearance, liquid wallpaper is something between plaster and paper wallpaper. From the store you bring the dry composition, to which you add a certain amount of water according to the instructions. The resulting semi-liquid mass is applied to the walls or ceiling. The coating is seamless due to the plasticity of the material; when applied, minor surface defects are corrected - notches, cracks, etc. Due to the same plasticity, it is not too difficult to form a drawing, even a picture.
Liquid wallpaper can be used to apply even complex patterns to walls... or paintings
So liquid wallpaper looks different on the wall. Another difference is the different composition. If it is silk-based liquid wallpaper, the surface has a characteristic matte sheen. This composition is also called “liquid silk”. The cellulose and cotton variation is matte; even in the same shade and with the same decorative additives, the wall looks different.
And there are also mixed compositions - cellulose-silk or cotton-silk, in which there is a certain degree of shine, but not so pronounced. In general, it’s hard to say what liquid wallpaper looks like on a wall. If you like decorative plaster, you should also like this finishing option.
Packaging of liquid wallpaper
The mixtures are sold in transparent sealed bags. Dry wallpaper can look like sawdust. They contain a special viscous wallpaper material, which is pre-impregnated with a special adhesive solution.
The mixture must be diluted with warm water and applied evenly to the wall surface. Special paints are required for tinting the wallpaper. The result is a monolithic surface without seams.
Various types of liquid wallpaper imitate silk, embossed paper or dense foam due to the fine fibers in the mixture.
Types of liquid wallpaper
How the liquid wallpaper appears on the wall will depend on the application technique. The drawing, as a rule, turns out individual, it looks different and is difficult to repeat. Repetition is complicated by various additives of uncertain consistency. For example, liquid wallpaper based on silk acquires a pronounced shine character.
Craftsmen call a variation of this finish “liquid silk.” The use of cellulose and cotton fibers gives the surface a soft, matte velvet structure. Because of this, with the same additions of different decor, the wall looks different.
There are mixed, formed into various models with different methods of application and achieving the best artistic and plastic effect - cellulose-silk and cotton-silk compositions. They also have a component of shine, but not a pronounced one. In a word, it is difficult to describe in words what liquid wallpaper looks like on a wall. There is an opinion that fans of finishing walls with decorative plaster will always like the “liquid wallpaper” option.
As mentioned above, liquid wallpaper differs in the composition of natural fibers. Let's clarify which fibers are more common than others:
1. Silk. This wallpaper contains silk fiber, which is the highest quality coating. These wallpapers have a long service life, they do not fade in the sun, and the price is more expensive. 2. Cellulose coatings are attractive due to their low price, but outwardly they do not look as impressive as silk ones, and the quality is much lower. 3. Silk-cellulose mixtures from different fibers, average in quality, price and beauty.
What is liquid wallpaper made of?
No matter what the skeptics say, liquid wallpaper is much more natural than usual. They are based on silk, cellulose and natural dyes.
In the composition of decorative and expensive species you can see a small content of mineral chips. Today we can separately highlight popular options:
- Cotton - contain a large amount of cotton fibers.
- Silk.
- Cellulose.
- Silk-cellulose.
The second option is the most expensive, since this material has high strength and is practically durable. The most popular is the latter, since it costs the least, but is no different in terms of wear resistance.
Cotton ones can be removed, soaked, mixed with glue and re-covered the wall; this option is more universal.
How to make liquid wallpaper with your own hands
What could be the basis
- Paper. It must be matte, the gloss is not able to disintegrate into the desired fibers. Suitable toilet paper, egg trays, old magazines, newspapers, that is, anything that can be used to create a porous fabric.
- Cotton wool padding polyester or cotton wool. To create 1 kg of base you need 0.25 kg of cotton wool. The material is finely cut, then split into fibers, but without paper it is still not used.
- Sawdust. There is no need to cut them.
- Old yarn. Also does not require grinding.
Suitable fillers
Any of the materials listed below should be taken no more than 0.2 kg per 1 kg of base.
- Yarn (you can use one or more colors, but in small quantities);
- stone chips;
- colored threads;
- mica powder;
- glitter;
- tree bark;
- small scraps of fabric.
The finer the base mixed with filler, the smoother the wallpaper layer.
About binders
The optimal binding component is CMC wallpaper adhesive, which is made from modified starch. It can be used in damp areas and prevents the development of fungus. This is a budget adhesive that requires 130-150 g per 1 kg of base.
The binding component can be PVA, Bustilat or even putty. It is more difficult to work with the putty mixture, but the finished wallpaper covering will be more resistant to mechanical loads.
What dyes to use
You can use a dye that is suitable for water-based paints. It is added when mixing all the ingredients to obtain a uniform shade.
Manufacturing technology
To prepare wallpaper at home, you need a lot of free time, but the batch itself is not difficult.
- The paper is torn into small pieces, the resulting mass is soaked for 12 hours in cold water.
- When using old periodicals, the mixture turns out to have a grayish tint, which is imparted by printing ink. The composition can be partially whitened with oxygen or chlorine bleach, which is neutralized with sodium thiosulfate.
- If necessary, bleaching is repeated.
- After bleaching, the base is washed, wrung out, and crushed with a drill with a special attachment.
- To facilitate the grinding process, water is added to the base in a 1:1 ratio.
- The prepared base is mixed with the other ingredients. First, a little water is poured into the bowl, then the paper base and glue are put in, and everything is mixed. Dye, glitter and other fillers are added to the resulting curdled mass.
- The mixture is mixed again and transferred to a PET bag.
- In a closed bag, the liquid coating matures for 7-8 hours.
If the base is sawdust, there is no need to soften it, just mix it with the adhesive component in equal proportions, add other fillers, and then gradually pour in water until the desired consistency is obtained.
How to work with liquid wallpaper. Master Class
Let's consider the stages of applying the store-bought composition. The example uses only one tool – a plastic grater. The walls are properly prepared in advance.
The process of applying liquid wallpaper
Table. Instructions for applying liquid wallpaper.
| Steps, photo | Description of actions |
| Step 1 | Pour the dry mixture into a plastic container and fill with warm water according to the manufacturer's instructions. Recommended water temperature is +40 degrees. |
| Step 2 | Stir the mixture until you get a homogeneous mass. Then cover the container with a lid or bag to prevent moisture from evaporating. |
| Step 3 | Wait 8 hours, then stir the mixture again. Make a small cake from the mixture and place it on a grater. |
| Step 4 | Apply the mixture to the wall using a back and forth motion. The thickness of the smoothed layer should be 1-2 mm. Try to apply one batch from one corner to the other. |
On a note! The advantage of liquid wallpaper is that it can also be further decorated. Let's talk about this in more detail.
Tools and materials
- Spatulas. Used for removing old wallpaper, filling, applying wallpaper and leveling it. Tools can be metal, plastic, acrylic. For beginners, it is better to use a spatula with a transparent platform to control the uniformity of the applied layer.
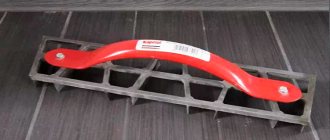
- Trowel. It levels the applied layer. It can be metal or plexiglass. The second option is more suitable for beginners.
- Angle spatulas. For applying the composition in corners.
- Transparent grater. It looks like a trowel with a different shaped handle. Using a tool, the layer is leveled 1-2 hours after gluing, when obvious flaws become noticeable. Before use, the grater is pre-wetted with water.
- Roller. A liquid sheet can be applied and leveled. Any short-nap roller will do. You need to pre-wet it in water or spray the walls with a spray bottle in advance. Walls that are too smooth are pre-treated with a relief roller. A homogeneous liquid mixture is applied with a thin-pile roller.
- Hopper pistol. Used for processing large surfaces. The liquid composition is placed in the tool bucket and applied under pressure of 2 atm in an even layer. In a day, an area of up to 200 square meters is covered with a gun.
Materials you will need:
- putty;
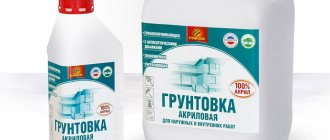
- deep-penetrating soil;
- water-based emulsion or water-dispersed white dye.
Auxiliary tool:
- stepladder, sawhorses or sturdy table;
- mixing container;
- ditch for soil;
- brushes, rollers for priming.
Application Tools
When decorating walls with liquid wallpaper, different tools are used. The choice depends on the area of the room, skills, and consistency of the mass.
Trowel
It is convenient to work with a transparent trowel made of plastic or plexiglass. Defects that need to be corrected are immediately visible under the tool.
Hopper
It is recommended to use the sprayer in spacious rooms.
Roller
Using a roller is ideal for applying and smoothing liquid wallpaper, the consistency of which is no thicker than sour cream.
Putty knife
It is convenient to apply liquid wallpaper with a non-metallic spatula up to 10 cm wide. The material is also smeared with it.
What can liquid wallpaper be glued to?
Concrete
Gluing onto a bare concrete base is impossible for several reasons:
- the wallpaper mixture will slide off smooth concrete;
- the dark base will be visible through thin trellises;
- A concrete wall absorbs moisture well, so the finishing material will not have time to adhere well to the surface.
The concrete must be made light and rough. “Betonokontakt” will give roughness to the base.
To dim the color, the surface is puttied with gypsum mortar, and then painted with water-based paint mixed with PVA in a 2:1 ratio.
A simpler option is to prime the concrete wall twice with a white primer mixed with quartz sand. The first layer of primer clogs the pores, the second makes the surface rough. The paint creates a light background.
Brick
Brick for gluing liquid wallpaper is prepared in the same way as concrete, with the only difference that in the brickwork you must initially seal the masonry joints. Gypsum plaster is suitable for sealing. After applying the mixture, the surface is primed and painted. You can also use "Betonokontakt".
Drywall
Conventional plasterboards are destroyed by moisture, so they cannot be glued directly to them. Moisture from the facing material will first soak the cardboard, then penetrate into the core of the gypsum board and make it brittle.
Gluing directly onto moisture-resistant drywall is possible, but keep in mind that their own color will show through the thin wallpaper layer.
Wallpaper can be used more than once, but if it was applied directly to a plasterboard sheet, when you try to remove the coating from the base, the paper shell of the latter will definitely be damaged.
The gypsum board is attached to the sheathing with metal screws. Under the wallpaper, the screw heads will quickly begin to rust, and the rust will eventually make its way to the finishing surface.
To avoid negative consequences, the plasterboard base needs to be prepared:
- the screws need to be screwed in one additional turn, and the top should be painted with white oil paint;
- the base is primed with a regular colorless or white primer of shallow penetration;
- the base is puttied with gypsum mortar;
- when the putty dries, the base is painted with white acrylic water-based emulsion mixed with PVA in a ratio of 3:1. Instead of dye, you can apply a second layer of putty, but after drying, its surface must be primed again.
Plywood
If you cover clean plywood, it may swell, ripple, or split into pieces. To prevent this from happening, the base is impregnated with waterproof varnish, which creates a barrier between the liquid and the wood material, without interfering with the reliable adhesion of the cladding to the wall. Then the surface is primed and painted.
Wood, OSB, MDF, chipboard
All wood-based materials absorb moisture well, so you must first create a moisture-proof film on the surface of the wood. Wood, MDF, chipboard or OSB boards must be coated with white oil paint. When the paint dries, the base is rubbed with sandpaper. Instead of using oil, you can prime the base twice and coat it with a water-based emulsion mixed with PVA.
If the chipboard sheets are not treated, they are coated with alkyd paint. Varnished surfaces are sanded with sandpaper or other abrasive material to create good adhesion.
Plaster
Wallpaper can be pasted on plastered walls, but the surface must first be restored. First, the lagging areas of the plaster are cleaned, the resulting potholes are sealed, the walls are cleaned of dust, dirt, and degreased. The plaster is primed twice. A layer of PVA or water-based emulsion mixed with glue is applied to the dry, primed walls.
Whitewashed wall
It is imperative to remove whitewash from the walls.
Due to the porous structure, whitewash will not be able to maintain the finish for a long time and, if not immediately, then over time it will fall off along with the wallpaper. The whitewash is removed and the wall is prepared as follows:
- The wall is treated with water. Use a wet sponge, rag or spray bottle.
- When the whitewash swells from water, it can be scraped off with a spatula.
- The cleaned base is washed with soapy water.
- The dried wall is primed.
- Any defects on the base are repaired with putty.
- The surface is re-primed.
Dye
Liquid wallpaper can be glued to any type of paint. Before gluing, you need to prepare the base:
- areas with loose paint are cleaned;
- the base is roughened by sanding;
- damaged areas are puttied;
- the surface is treated with a primer.
Subsequent finishing
The disadvantage of standard liquid wallpaper is that it is not resistant to water. Therefore, to use them, for example, in the kitchen or bathroom, you will have to resort to additional processing.
USEFUL INFORMATION: Design of a children's room for a newborn girl
To clog the pores and protect the material from moisture, use acrylic varnish. After impregnation, liquid wallpaper can be washed and not be afraid that it will become deformed due to high humidity. Varnishing the bottom of the wall is also often used, for example in children's rooms where there is a need for a durable coating. But at the same time, you need to remember that the surface will lose its “breathing” qualities, and there will also be difficulties if you need to restore the damaged area.
Sometimes you can find special impregnations for liquid wallpaper on sale. But their use is not always advisable due to their high cost and low prevalence in retail chains.
Surface Requirements
- Strength. There should not be even small areas of poorly secured areas on the base. Even small chips, cracks, peeling layers of the previous finish will lead to the fact that the wallpaper will need to be restored soon.
- White. The wallpaper is pasted in a thin layer, so any base color that differs from the color of the trellis will show through.
- Evenness. There should be no defects more than 2 mm deep on the base. Deeper chips and gouges will be clearly visible under the applied layer of trellises.
- Roughness. Wallpaper will simply slide off a smooth surface.
Preparing walls for applying liquid wallpaper
Probably many people know the expression: “as you sow, so shall you reap.” In construction it sounds a little different: “as you prepare, so will you stick.” For liquid trellises it is most relevant. After all, the surface of the walls should be:
- durable. If for ordinary wallpaper small areas with poorly adhering wall material are not critical - the tapestry will keep them from immediately crumbling, then for liquid wallpaper this is a sentence for a very quick restoration. Therefore, it is better to put the wall in order during the preparatory work;
- white, preferably ideal. Any color deviations on the wall will be visible through a thin layer of trellis;
- flat. Despite the ability of liquid wallpaper to hide minor wall defects (up to 2 mm), you still need to strive for a flat surface - Danish plaster is not a leveling material. And cracks and potholes of greater depth are generally unacceptable;
- homogeneous - everything unnecessary: screws, hooks, nails, etc. must be cleaned without fail;
- rough _ We must not forget that liquid trellises slide off a smooth surface.
To prepare the walls for high-quality finishing, it is necessary to perform a cycle of work in the following sequence:
- remove sockets and switches, remove all fasteners (screws, nails, hooks), remove door trim;
- remove the old finish if it was wallpaper or whitewash (the paint is left);
- carry out an inspection of the plaster - tap the wall with the handle of a hammer. In places where the plaster layer “bumps”, remove it and re-plaster;
- remove dirt and then degrease;
- prime in two layers;
- paint with white paint.
Attention: the finishing operations for preparing wall material for liquid wallpaper for each type are described in detail just above.
Surface preparation
- Preparing the walls begins with removing sockets and switches, removing all fasteners, removing door frames and baseboards.
- The old finish is removed. You can glue it on paint, but you can’t apply it to old wallpaper or whitewash, you need to rip it off.
- The plaster is inspected; it needs to be tapped with a hammer. Where a dull knock is heard, the plaster layer must be removed and re-plastered. If the surface is uneven, it can be leveled using putty. For brick and concrete bases, it is better to use gypsum mixtures that absorb less moisture. And when the surface is flat, you can do without putty.
- Dirt is removed and the surface is degreased.
- The base is primed twice.
- The wall is painted white.
What you need to apply it yourself
To work, you will need construction equipment and personal protective equipment (respirator, gloves, goggles).
Full list of tools:
- Plastic trowel - it is convenient to apply and apply material to the wall.
- Container for preparing the mixture.
- Spray bottle for water.
- If the room is large, it is advisable to apply liquid wallpaper using a spray gun.
Preparing the mixture
There are three forms of liquid wallpaper on sale.
- Dry mixture, hermetically packed in a transparent bag, weight 1 kg.
- Four plastic bags, each containing a dry ingredient for cooking.
- Wet mixture.
Each of the mixtures can be diluted yourself at home.
The cooking principle is the same for all types, the difference is in the amount of water required (5-8 l) and the ripening time (8-12 hours). The nuances of preparation are indicated by the manufacturer on the packaging.
- One batch is made from one package. You cannot immediately mix the contents of two packages in one container or, conversely, divide them into 2-3 parts. The contents of each package are mixed separately, and after acquiring the desired consistency, all mixtures, if necessary, can be mixed in one container.
- When the wallpaper is packed into bags, you first need to pour glitter into them.
- The already diluted mixture should be stored in a hermetically sealed bag for no more than 2-4 days.
Breeding algorithm:
- The dry mixture is shaken in the package and actively kneaded with hands to restore its fine structure.
- The mixture is poured into a bucket with a volume of about 12 liters, stirred thoroughly to obtain an equally colored mass.
- Heated water (25-35 °C) is poured into the mixture. You need about 5 liters, the exact amount is indicated on the package. If the wallpaper consists of several packages, then first, on the contrary, water is poured into a bucket, and then the decor and other components are poured into it. After each package, the solution is thoroughly mixed.
- The mixture in the bucket is kneaded by hand to the desired consistency.
- The finished mass is transferred into a container convenient for use.
- The next package is mixed and added to the first. Make as many batches as needed for gluing on one wall.
- When the required number of batches is made, the entire mass is mixed until smooth and placed into bags. Excess air is removed from the bags and they are hermetically sealed.
- Danish plaster matures in 8-12 hours.
- The ripened mass is placed in a large container for further use. If the composition turns out to be too thick, you can dilute it with clean water, mix thoroughly and start gluing.
DIY application technology
After 6-12 hours, check the mixture. If the mass is too thick, pour in a liter of warm water and stir. You can apply liquid wallpaper. The stages of wall finishing include directly applying the material, checking for defects, correcting defects and drying the surface.
It is allowed to apply the composition with the window slightly open, but without a draft. Sometimes liquid wallpaper comes off the walls. The reason is insufficient priming of the surface.
Step-by-step algorithm for installing liquid wallpaper:
- The optimal temperature in the room is 17-25 degrees.
- The mass can be applied horizontally, vertically, or in a herringbone pattern, depending on the desired design.
- Ideally, work best in daylight using artificial lighting.
- You need to apply the mixture from a bright corner, holding the tool at eye level at an incline of 15-30 degrees.
- To avoid joints, do not take long breaks between laying the mass.
- Liquid wallpaper should be applied in a uniform layer 2-3 mm thick.
- After each application, smooth the surface with a float.
- If the mixture sticks to the instrument, periodically moisten it with water.
- Apply liquid wallpaper carefully near the baguette, window sill and baseboards - the frozen mass is difficult to remove from surfaces.
- Spray the walls with water from a spray bottle and smooth the joints with a roller or spatula.
- The final stage (optional) is coating the walls with acrylic varnish to secure the material. The varnish should be applied in 1 or 2 layers.
Step-by-step instructions for beginners
Even a beginner can apply plaster on his own. When working indoors, the air temperature should not be lower than +15°C. Step-by-step instructions for different tools have a number of differences.
Application with a spatula
- The finished mass is applied to the wall by hand or with a small spatula using short movements in one direction. The tool can be iron or plastic, the main thing is that it is smooth. You can start working from any part of the wall, but it is easiest to glue from the corner closest to the window, or from sockets/switches. You can glue it to the ceiling according to the same principle as to the walls.
- Use a spatula to level the layer on the wall. Its thickness should be 1.5-3 mm. You need to hold the tool at an angle of 20°, lightly pressing it against the surface.
- When a section of the wall with an area of 1-1.5 square meters is covered with the mixture, it should be leveled with a transparent trowel or trowel dipped in water. This should be done with chaotic movements to give the wallpaper texture. Wallpaper should be leveled at eye level. If you stand on tiptoes or squat at the same time, flaws will appear. After leveling, the layer size should be no more than 1.5-2.5 mm. To see all the errors, the wall can be illuminated with a lamp.
- Danish plaster is applied to the next area, before this the edges of the adjacent already leveled and rubbed area are moistened with water so that the seam connecting them is not visible. The entire wall is covered using the same method. It should take no more than an hour to cover one wall, otherwise it will be difficult to even out the applied layer.
- The cladding must dry for at least 3 days, the time depends on the air humidity in the room.
After work, the room can be ventilated; liquid wallpaper is not afraid of drafts.
Spray
The method is mainly used by professionals, since not every beginner has such expensive equipment. Advantages of the method:
- material consumption is reduced by 2 times;
- gluing time is reduced.
The prepared wallpaper mass should have the consistency of liquid sour cream, so not 7, but 8.5 liters of water are added to the solution.
Instructions for spray application:
- The device is filled with the mixture.
- The tool is aimed at the wall, moves smoothly along its surface, without stopping at one point. There should be no empty areas on the base.
- The applied layer is smoothed with a grater or trowel.
- After the first layer has dried, the second is applied in the same way. This will prevent empty or transparent areas from appearing.
Drawings
You can lay out any pattern or design solution. It takes more time to implement a creative idea, and the process requires endurance.
- The outline of the future drawing is drawn on the base with a pencil.
- The area inside the contour is filled with the mixture. Layer thickness – 2 mm. The mixture may extend beyond the contour by 1-2 mm, which is then moved with a spatula until clear boundaries appear.
- When the drawing dries, the rest of the space on the wall is filled with wallpaper, not reaching a few millimeters from the drawing.
- Using a small spatula, the main layer of the trellis is moved towards the drawing to form a clear outline.
- The surface is leveled with a trowel.
To simplify the work, you can apply the design using a stencil or a special shaped roller.
Preparing the surface
To get exactly the shades of the coating that were planned, or to create a high-quality pattern from liquid wallpaper, you need to carefully prepare the base.
In general, preparation comes down to removing previous finishing coatings - whitewash, peeling paint, old roll wallpaper and others - as well as eliminating pits and cracks on the floors, followed by applying primer. Detailed step-by-step instructions for pre-treating walls and ceilings can be found here.
If you plan to finish a plasterboard surface with silk plaster, you will need to know some of the nuances. Recommendations for preparing plasterboards are described in this article.
Note! Liquid wallpaper does not require such careful leveling as for conventional roll material or paint. The viscous mass will fill small depressions and hide imperfections. However, it should be understood that the more uneven the wall is, the higher the consumption will be.
Protective varnish coating
Advantages of coating with a protective mixture:
- wallpaper becomes stronger, service life increases;
- the coating becomes moisture-repellent, which is important when using wallpaper in the bathroom or kitchen;
- The varnish fixes the original color of the wallpaper, so there will be no fading over time.
The protective coating is applied after the wallpaper layer has completely dried. For coating, use a wide brush, roller or spray. The varnish is almost invisible, the wallpaper looks natural.
Application instructions
There is nothing complicated in the manufacturers' recommendations on how to apply Danish plaster yourself. Everything is printed in detail on the packaging. For those who want to purchase products from foreign companies, where the packaging often does not have a translation of the manufacturer's recommendations, we will provide detailed instructions on how to make repairs with liquid trellises.
1. The contents of the bag where the mixture has matured are shaken out into a container and the density is checked (the thickened mass is difficult to use - it will not be possible to apply a layer about 2 mm thick). If necessary, add 1 liter of warm water. Everything is thoroughly mixed.
Applying liquid wallpaper to the wall in stripes.
2. Using a trowel, apply the mixture to the wall anywhere, although there are many recommendations to start from the corner near the window or from switches and sockets. When throwing, the edge of the trowel must be slightly raised in the direction of movement.
3. Using a spatula, distribute the wallpaper evenly over the wall. It must be applied at an angle of 20o, not pressing very hard.
Leveling the wallpaper with a spatula.
4. After applying the mixture to approximately 1 m2, the pasted surface is sprayed with water and rubbed with a plastic trowel or a special roller to a layer of 1.5-2.5 mm.
Rubbing wallpaper with a smoothing iron.
5. Before applying the next portion of wallpaper, the edge of the already applied wallpaper is wetted so that the connecting seam is not visible. It is advisable to complete work on one wall within an hour (if there are delays, difficulties arise when leveling the applied wallpaper).
6. The wall is illuminated with a lamp. Identified irregularities are rubbed with a grater.
Using a spray bottle to apply liquid plaster will simplify the process and save materials (the layer will be more even and thin). However, if you have no experience using such a tool, it is better to do everything manually.
If there is anything unclear in the instructions given, you can watch how liquid wallpaper is applied in the video at the end of the job.
How to properly remove liquid wallpaper from a wall?
If you are tired of the material or need to repair any defect, you need to know how to remove liquid wallpaper from the wall without damaging adjacent areas.
To remove the required area of liquid wallpaper, it is generously moistened with water using a spray bottle. To do this, use only clean water so that no stains from various solvents and detergents remain in adjacent areas. After the surface becomes soft, the liquid wallpaper is carefully scraped off with a sharp spatula into a previously prepared container. Typically, such work is carried out if it is necessary to replace electrical wiring.
After removing the liquid wallpaper, the clean and dried surface is treated with a colorless primer or enamel. When the primer dries well, the edges of the repaired area are also generously moistened with clean water using a spray bottle.
Liquid wallpaper that has been removed with a spatula is not thrown away, but reused. To do this, warm water is added to them, stirred to the desired consistency (heavy cream) and applied to the primed base in the same way as it was originally done.
You should try to rub all existing edges with the new coating so that this area does not stand out in any way after drying. It is in this case that the surface of the walls or ceiling will be uniform and uniform.
Now you know how to apply and remove liquid wallpaper - it's time to put your knowledge into practice.
Mixture consumption
The packaged mixture contains all the necessary components, so you can immediately pour it into a container and gradually fill it with warm water up to 40 degrees, stirring constantly. 1 package of liquid wallpaper weighing 1 kilogram requires 6 liters of water. However, these indicators may vary among different manufacturers, so before preparing the material you should definitely read the attached instructions. It will also be useful to read the article, liquid wallpaper at home.
IMPORTANT! For more convenient application to the surface, the solution must be left for 8-12 hours and thoroughly mixed again before starting work.
How to remove whitewash and paint
Most likely, the whitewash and paint that previously decorated the room will have to be removed. If this is not done, the appearance of the new wallpaper may suffer:
- It is better to clean surfaces containing whitewash. The lime mortar may turn yellow, then the stains will certainly appear on the liquid wallpaper and spoil the appearance of the finish. Wash off the whitewash with warm soapy water using a sponge or rag. Coatings are then applied.
- If the ceiling and walls were painted with water-based paint, it is not necessary to wash it off. Only when the color of the base is too different from the shade of the wallpaper is the surface repainted in a more suitable tone. Otherwise, the substrate will appear unattractively through the liquid wallpaper.
- Acrylic and latex dyes are easy to remove; harmless removers are sold for them. Paint that is not contrasting with the new coating does not need to be removed. Acrylic or latex can strengthen the base; in some cases, they are specially applied to the walls before installing liquid wallpaper.
- Cleaning oil paint is much more difficult, but this should only be done if the coating is weak, with bubbles and cracks. You will also have to remove paint that is too dark - it is very difficult to paint over it even with several layers of white. To remove oil-based paint, several methods are used: scraped off by hand or with a grinder, heated with an iron or a hair dryer, and washed off with chemicals. All methods are dangerous and harmful to health, so you need to act carefully.