In this article I would like to talk about my experience of laying ceramic tiles on the kitchen floor. I purchased tiles measuring 60×60, seven packs of eight pieces. In total, 17 thousand rubles were spent on installation. In principle, for a kitchen measuring twenty square meters this is an acceptable amount.
Choosing tiles: I am not a professional tile maker. You can say that I am new to this business. The main nuance of a kitchen floor is an uneven floor. Initially, there was no talk of a self-leveling floor in the kitchen.
What are the dangers of laying on an uneven surface?
- Cracks may appear on porcelain stoneware;
- as an option, sections of the floor will be pushed through;
- chips of slabs or divergence of seams are formed;
- some parts of the floor covering may come off.
Before laying porcelain stoneware and ceramic tiles, it is necessary to screed the floor. If there is no high-quality leveled floor, then the costs of materials will not justify themselves, and everything will have to be redone. It is much more difficult to screed when there is already furniture in the room, and it will have to be removed.
For such difficult cases as uneven floors, a self-leveling screed is suitable. True, it can raise the level of the floor in the room, which means you will have to adjust it throughout the house so that no one falls. Also, one of the disadvantages is that such a floor screed takes more than one day to dry.
The screed will help out when the floor is tilted. It may not completely level it, but it will be easier to glue the porcelain tiles.
Tips for initial selection of ceramic tiles
At the initial stage of choosing tiles, follow the advice.
- Consider the tile manufacturer. There are many manufacturers that have proven themselves in the market (both budget and “expensive”). If you liked the tiles, don’t be lazy to read reviews about the manufacturer. That's exactly what I did.
- Safety. Choose a matte surface, glossy - slippery.
- For myself, I learned the following: it is difficult to wash off the remaining dirt from ceramic tiles, especially if you have pets.
- When your order has been collected, check the article number and color of the tiles so that there is one batch. Measuring is also important. The correct measurement of the room determines how much excess material will remain. There should be a reserve in any case. What if you cut the tile incorrectly or a crack or defect appears during transportation.
- Pay attention to the size of the tiles, because for a small room, a large tile will look ridiculous. You are unlikely to like a wall made of two or three tiles and pieces. There will be a lot of cuttings.
- There are tiles that need to be matched with a pattern, just like when wallpapering a wall.
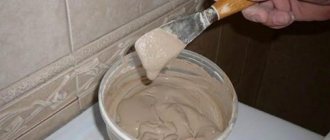
Which tile adhesive to choose
The adhesive mixture, depending on the installation location, room or open space, is selected in accordance with its purpose.
For example, outdoor glue can withstand temperature changes from +40 to – 40 degrees. Accordingly, such characteristics are not needed for the premises. The brands of glue presented on the market, in their total quantity, do not differ from each other, but for uneven surfaces it is advisable to choose glue with various plasticizers. Due to them, even a thick layer of adhesive base will not move apart during operation.
As a result, I would like to note that if you use a self-leveling mixture and prepare the surface, it will be somewhat cheaper than the cost of tile adhesive. And laying out ceramics will be easier, faster and more enjoyable.
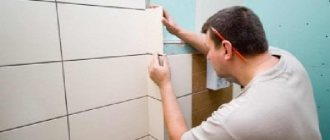
Tile laying sequence
Before you lay tiles on the bathroom floor, you need to familiarize yourself with all the nuances. The process of laying tiles on an uneven base is unique, therefore there are certain rules that must be followed when performing each stage:
- According to the standard, the tiles must be glued from the wall, but when laying on an uneven surface this does not make sense. In this case, it is best to glue the tiles from the largest elevation on the floor. Accordingly, measurements should initially be taken to determine the maximum height in the room.
- Once such a point has been identified, it is necessary to begin marking. It is worth taking into account such a nuance as the distance from the walls. This is important because in places that will be best viewed when entering a room or in a photo, solid tiles should be laid. In this case, the size of the seam between the tiles should also be taken into account. The discrepancy between the calculations and the actual laying distance may not be more than a centimeter, since an error may result in a poor connection to the wall, i.e. The tile will fit on the baseboard and will have to be cut.
- As for choosing the highest point of an uneven screed, this process is necessary in order to ensure high-quality installation. Since the tiles will be glued joint to joint, and a smooth surface created in this way can only be achieved through step-by-step leveling, it is necessary to do this by changing the thickness of the adhesive layer. If you start laying from a lower level, then when you reach the top point you may end up with no joint. In this case, the tiles laid at this point will be located much higher than the others, which will reduce the aesthetics of the coating and create a hazardous area in the room. If you go in the direction of lowering the height, but not from the top tile, then you will end up needing much more adhesive mixture in some place to complete the installation.
Preparing the base
The preparatory stage is the main part of any construction work. Ensure that the floor surface is level, otherwise it will not be possible to lay the tiles perfectly. A prepared base helps to achieve high-quality cladding.
A large layer of adhesive will not help hide unevenness. If there is an old coating, dismantle it, then form a screed and waterproofing. For leveling, you can choose any method: dry, wet or warm floor. An important point is to follow the work technology.
Dismantling involves removing thresholds, baseboards, old tiles and other irregularities from the surface that prevent installation close to the wall.
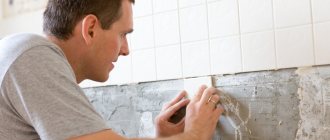
Tips and tricks for installation
Different from the process of tiling uneven walls, laying tiles on an uneven floor is done by applying most of the adhesive layer to the base. The tiles are only coated, evenly distributing a small part of the glue over the surface.
Most likely, it will not be possible to apply the required amount of adhesive mixture the first time, and therefore you need to distribute it not only under the tile, but also add several grooves nearby. When its position relative to neighboring tiles is adjusted, this glue will come in handy.
Leveling the floor under tiles: methods and features
Any floor finishing must be installed on a flat, dry and durable base. But it is a rare concrete surface that meets these requirements. Therefore, various methods are used to level the floor under the tiles with your own hands:
- Tile adhesive (ready-made dry mixtures);
- Self-leveling (leveling) compounds;
- Cement-sand composition (screed).
Each of the above methods has its own advantages and disadvantages. Let's take a closer look at them.
Tile adhesive
Leveling the floor with tile adhesive.
From a professional point of view, it is better to use specialized products - levelers, thin-layer finishing compositions. But since the adhesive composition contains all the necessary components (cement, quartz sand, plasticizers), it is actually allowed to be used for smoothing the floor for laying tiles. But there are several nuances here.
Firstly , experienced professionals recommend:
- If the floor is almost flat and a thin layer is required, then you need to mix the glue with a large amount of water until the consistency of liquid sour cream is obtained;
- Preparing the floor for laying with differences of 5-10 mm is carried out with a thicker mixture, optimally in 2 passes. That is, the first time a preparatory layer with a thickness of 3-6 mm is poured and stretched, and the second time a finishing layer, no more than 4 mm.
Secondly , many craftsmen prefer to use cheap mixtures for leveling, and when working directly with tiles or porcelain stoneware, use expensive, professional compositions with a high degree of adhesion and plasticity. In addition, they already contain special water-repellent additives, due to which preliminary waterproofing is not required. This is true for kitchens, balconies, hallways and other similar rooms.
Thirdly , there are no clear instructions. Each master develops his own work algorithm, but the principle is the same: cleaning, priming and applying a leveling mixture. The discrepancy is only in proportions, and most importantly - in timing. Cement needs at least 28 days to fully mature and gain strength, but the percentage of its content in adhesive mixtures is less than half of the total mass. In addition, the composition contains a variety of plasticizers, including hardening accelerators, increasing workability, etc. Therefore, it is worth focusing on such an indicator as the period after which full load on the ceramic flooring is allowed. As a rule, for internal work this period is from 5 to 7 days.
- The concrete base must be cleaned of dust, dirt, paint, oil and other stains, peeled and loose areas, and if necessary, deep holes, cracks and cavities must be filled with a repair mixture.
Filling cracks with repair mixture.
Self-leveling compounds
An incredibly convenient development that allows you to smooth the surface of the base with a layer from 2 mm to 10 cm is leveling compounds. They are divided into basic levelers (coarse-grained), universal and finishing (fine-grained thin-layer). Let us immediately note that all three types are suitable for our purposes (depending on the thickness of the layer). To form a durable coating, it is better to use cement or cement-gypsum compositions.
The advantages of bulk compositions are speed and ease of working with them. It is allowed to lay ceramic tiles, porcelain stoneware, artificial or natural stone within 3-5 days after pouring. You need to select the appropriate composition based on:
- Areas of application (indoor or outdoor);
- Method of use (manual or machine);
- Layer thickness.
Leveling the floor with tile adhesive
I would like to immediately answer a frequently asked question: is it possible to level a concrete floor with tile adhesive? If you have planned tiling work, then the glue is definitely at hand, so there is no need to run or go to the hardware store.
You can level the floor with tile adhesive in two ways:
Simultaneously with laying the tiles (read about this in this section). In this case, the tiles are laid “on a layer”; the layer of tile adhesive is adjusted individually for each tile.
If the surface is uneven, first lay the tiles on the floor without adhesive to see where the differences are and what layer of adhesive is needed. In this case, you need to constantly check the plane using a building level.
If you see that you have sunk a tile compared to others, remove it and increase the layer of tile adhesive. And if any tile protrudes, excess glue must be removed from the back surface.
Small filling using beacons. The lowest and highest points of the surface are determined, after which beacons are set. Along the beacons, the floor is poured according to the level. Due to the high cost of tile adhesive, it is logical to carry out such filling in a small area.
How to lay tiles on a wooden floor?
The work is carried out on logs - these are wooden cross members, which are characterized by a large cross-section. They serve as supports for the whole object or some structural elements. Wooden flooring is also in most cases mounted on top of the joists. If tiling is to be done, a rough base must be prepared. The condition of the floor may vary:
- The floorboards are completely dismantled due to their poor condition: extensive rot, cracks, and rot have appeared. If the flooring is damaged, you will need to remove all or only some of the covering elements. Having removed them, check the condition of the lags. If they are not damaged, installation work can continue. In the case where the logs are also exposed to negative factors, these elements are replaced or restoration is carried out: the crossbars are only partially replaced and treated with special compounds.
- Sometimes logs are covered with cheaper materials - chipboard, OSB, plywood. The next step is laying the cladding.
- If the joists are seen to be in good condition, the decking base is left in its original condition, but the floor structure is checked for damage. In this case, the tree has just been laid, or the base was installed not so long ago and has not had time to wear out. In both cases, the flooring is not replaced, but additional leveling may be required.
For each option, a different cladding technology is selected, since the process of preparing the base is different.
First method: dry leveling
To lay the tiles, prepare the base. To prevent the cladding from deforming during operation, its installation is carried out on slabs/sheets used to level the floor on the joists. Materials that can be used for this purpose:
- drywall, characterized by moisture resistance;
- gypsum fiber sheet;
- cement bonded particle boards;
- moisture-resistant plywood.
All these varieties are laid in 1 or 2 layers. The slabs can be fastened with self-tapping screws, and the installation step of the fastening elements should be small, otherwise the coating will “play” when walking. To make the rough base more durable, it is recommended to process the end sections using a special glue that is designed to work with the material.
If a wooden floor is installed in a bathroom, kitchen or other room where humidity regularly rises and there is a high probability of contact with water, the joints of the slabs are covered with membrane-type polymer waterproofing. It is important to protect the corner areas where the wall meets the floor. Here the waterproofing is applied with a slight overlap on the wall (up to 5 cm).
The preparation of the wooden floor for tiles is carried out before installing the cladding. For this purpose, a primer composition is used. They process the resulting coating. At the next stage, the painting mesh is laid. It is recommended to repeat the priming procedure on top. This measure will improve the adhesion of the adhesive and the base. An important point is the need to lay the subfloor slabs so that the joint joint falls in the middle of the wooden crossbar (joist).
Cement bonded particle boards should be laid on top of the plasterboard/plywood. They are the main structural element of a floor installed using dry leveling technology. This is due to the sufficient strength of such products and their durability. During the installation of the base, its surface is constantly checked for quality, for which a level is used. You cannot lay tiles on uneven floors.
Advantages of the dry leveling method:
- you can add a layer of insulation to the subfloor structure;
- due to the low weight of the floor, the level of load on the joists is reduced;
- high installation speed, because in this case there is no need to work with cement screed.
So that the process does not have to be interrupted, the necessary materials are first calculated: the number of slabs, fastening elements, and cladding is determined. This method also has disadvantages. For example, installing a multi-layer floor structure, which is also raised on joists, will help reduce the height of the ceilings. This means that dry leveling technology is not suitable for all objects.
Second method: wet screed
You can lay tiles on a wooden floor by first using the traditional leveling method using a cement screed, but in a lightweight version. By itself, a wooden frame (joists, flooring made of boards) will not be able to provide a sufficient level of strength. Its load-bearing capacity is low, so the tile covering will not last long.
It is recommended to use installation technology based on the floating floor principle. Here the screed will not have direct contact with the wooden frame and walls. It is separated from other structural elements of the object using a sufficiently dense waterproofing material. To level the floor, a polymer leveler or a cement-based mixture is often used.
The screed layer can be 10-30 mm. If the thickness exceeds 10 mm, a polymer mesh is used to strengthen the structure. Sequencing:
List of required tools
Tools for laying tiles
High-quality tiling depends on the chosen tool for laying tiles. Porcelain stoneware, glue and a hammer are not enough for the work. Professional tilers use special equipment. If you are planning one-time work and need to reduce the burden on your budget, rent a tool.
To cover an uneven floor, you will need basic equipment: a hammer drill with a whisk attachment or a mixer, a tile cutter, a grinder and wire cutters.
Additional accessories:
- rubber hammer for tapping;
- trowel and notched trowel;
- ladle for adding glue;
- scraper, construction knife;
- a set of plastic crosses or SVP;
- extension cord and pencils;
- roller for applying primer.
Auxiliary tools: tape measure, squares, water or laser level (spirit level), aluminum rules 2.5 and 1.5 m.
Grouting kit:
- bucket 2 l.;
- grout spatula;
- rubber and felt gloves;
- hard washcloth;
- foam rubber and 10 liter capacity.
When performing construction work, follow safety precautions. When using an angle grinder, wear glasses. A respirator will prevent dust from entering your respiratory tract. Use gloves to protect your hands from minor injuries.
What to do with uneven planes: solutions
As mentioned above, significant relief must be removed, otherwise the tile will
won't lie down. A self-leveling screed is useful for this. This product will make it possible to easily achieve a very smooth surface, although it does not take 1 day to dry. Specialized mixtures speed up the process, but the work stops for two to three days. You need to understand that this will cause the floor to rise and, as a rule, you will have to correct the surface level throughout the house.
Level control example
The screed will also be a lifesaver in case of a significant tilt. Unfortunately, it will also eat up space, but gluing the tiles will become much easier.
In general, the screed has its own positive qualities:
- perfectly aligns;
- fills open voids in the rough base;
- has an antifungal effect;
- makes it possible to hide the heated floor system;
- provides additional noise and heat insulation.
If this option is not very suitable, then it is possible to do without alignment. In this case, the tiles are laid on the floor according to special rules that differ from traditional tile laying options. Otherwise, you don’t need to count on a solid and good result: the first flaws will appear in the first month of operation. However, when implementing the recommendations, even on such a poor base, the tiles
will serve for more than a dozen years.
Tiles are cut before use
Type of tile: is it so important to consider?
Before laying tiles on curved floor, you need to think about its selection. Spending a lot of time so that after a couple of months the first cracks appear is a suspicious benefit.
First of all, make sure that the tiles are only needed for the floor! By default, such a material has the necessary strength and thickness, and also has good wear resistance. Tile
This kind of work will retain its artistic and practical qualities for quite a long time.
You only need to stick the option that is suitable for the possible operating conditions. In particular, it is necessary to choose the right product. Floor tiles can be:
- antibacterial;
- frost-resistant;
- with very high wear resistance;
- with a slippery surface.
All characteristics are indicated on the box. Tile
must be confirmed by a certificate - this is considered a guarantee of the quality of the product and, based on this, allows you to expect a long service life of the product.
Size Doesn't matter, but gluing large slabs is much easier. The thickness of the tiles is important - the higher it is, the stronger and better the floor will be.
It is very important to take these details into account if the ceramics are going to be glued in the kitchen - one of the very busy home spaces. Actually, here the most stringent requirements are put forward for the quality of the coating in terms of its strength, resistance to wear and aesthetics.