When it comes to decorating and arranging a children's room, all the nuances matter. The room must be safe and evoke only positive emotions in the boy or girl. Photos of plasterboard ceilings in a children's room confirm how aesthetically pleasing such a surface looks. Therefore, it is worth paying attention to this material for finishing the upper part of the room, having first studied the pros and cons of the solution.
Children's plasterboard ceilings: main advantages and photos
Why are plasterboard ceilings becoming more popular among parents who are renovating their child’s room?
The most important reason is its environmental safety. In addition, the main advantages of this type of ceilings are:
- Practicality is one of the main reasons for choosing such ceilings for a children's room. Plasterboard coating is highly durable and has a long service life.
- Acceptable price. Buying such a ceiling and installing it will not hit your wallet hard.
- Plasterboard ceilings provide ample opportunities for decorating a children's room. With this coating you can create various fancy images, shapes and colors.
- Suspended plasterboard ceilings are an excellent opportunity to hide wires. This makes the baby's room absolutely safe.
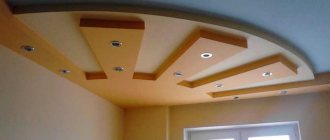
The simplest and most budget-friendly option for decorating a children's room is single-level ceilings. They are most suitable for a small room. However, despite its apparent simplicity, such a ceiling can be decorated with various designs. This design will please the eyes of any child. Multi-level ceilings are very popular in children's rooms.
Drywall is the most suitable material with which you can bring to life any ideas not only of the parents, but also of the baby himself.
A two-level ceiling can not only decorate a child’s room in an original way, but also visually divide it into zones using various shapes and figures. When choosing the design of such a ceiling, it is better to give preference to softer curves rather than sharp lines. This way the room will not look strict. When choosing a pattern, you can ask designers for help. They will offer a range of original designs and styles for both single-level plasterboard coverings and multi-level ceilings. Among the huge number of ideas, any parents will be able to choose the appropriate option for their child’s room.
Choice of colors
Until recently, there was a stereotype that it is better to choose a pink ceiling for a girl’s nursery, and blue for a boy. But such a distinction by gender is currently irrelevant and feigned.
After all, saturated pink colors are irritatingly acidic shades, while blue is cold and not conducive to activity. The choice of colors depends more on the age of the child, his character and hobbies . It is best to stick to sunny shades – orange or soft yellow. These color shades help to concentrate and are well used in areas where there is a work desk, sports or play corner.
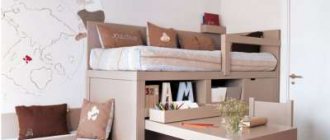
And the combination of green and blue shades helps relieve tension, and relieves irritation and fatigue. It’s good to decorate the children’s corner in which the child’s bed is located in this way. A children's room for two boys or girls has its own specifics. With the help of light or flowers, you can perfectly divide the room, giving everyone personal space .
By playing with the levels and colors of the ceiling, you can divide the rooms into play, study, and sleeping areas
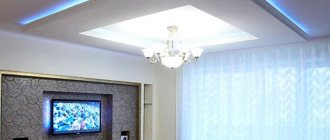
Plasterboard ceilings with lighting for a children's room: ideas and photos
Another main component of the design of plasterboard ceilings in a children's room is lighting. The atmosphere of the room and, consequently, the baby’s mood depend on the quantity and quality of light entering the room.
Here are a few different lighting options for a children's room:
- Open lighting is the simplest option. Most often it is installed on single-level ceilings. These can be either lamps built into the surface or chandeliers that are hung on the surface. For a children's room, pendant lamps with images of animals, the sun, cartoon characters, etc. are most suitable. But a large number of light bulbs built into the ceiling will create the effect of a starry sky, which will also delight the child.
- For a ceiling consisting of two or more levels, hidden lighting is the ideal option. Being directed not downwards, but at the ceiling itself, such lamps can create an amazing atmosphere of warmth in a children's room.
- Ceilings with LED strip lighting are a great solution for kids who are afraid of the dark. They can be left on at night, because the light emanating from such sources is warm and subdued. But to ensure high-quality lighting in the evening, it is necessary to install additional light sources in the child’s room.
It is not necessary to choose one type of lighting in the nursery. By combining different styles, colors and shapes of light sources, you can create a unique atmosphere of warmth, joy and harmony in your baby’s room.
Placing accents using photo wallpapers
Many children will be delighted with this decision, because kids love everything bright and colorful. The characters of your favorite cartoons seem to come to life in the children's room and look very realistic. Using wallpaper of this type will visually expand the space, which will also add a cozy atmosphere to the room.
Panel-type photo wallpaper has become especially popular lately. With the help of such products, you can easily create a bright accent in the room that will attract the attention of both guests and residents. Among the most common options are images of fairy-tale characters, pictures of blue sky and space.
Ceiling with photo wallpaper Source o-krohe.ru
Tips for decorating the ceiling in a children's room for a boy
When creating a room design for their son, parents need to take into account many nuances. Pink shades and patterns in the form of flowers or princesses are not suitable for the ceiling in the room of the future man. Boys' main hobbies are cars, airplanes, etc.
When decorating the ceiling covering in a boy’s room, you should pay attention to the following tips:
- Firstly, it is very important to consider the age of the child. The older it is, the simpler the shapes and patterns on the ceiling covering should be. A ceiling with drawings in the form of a car or a cartoon character is perfect for the room of a preschooler or elementary school student. But for a middle school child, it is better to avoid such images.
- It is not recommended to use ceilings in “girly colors” in a boy’s room. The best options are soft blue, beige, light green, etc. Undoubtedly, it is very important to take into account the tastes of the child himself.
- Designers do not recommend using bright, flashy colors for ceiling coverings. They can have a negative impact on the psyche and contribute to increased excitability of the child.
- Boys' preferences may vary. If a child likes a large number of details, then a multi-level ceiling is quite acceptable in his room. However, if your son is a minimalist, it is better to install a single-level cover.
Tips for choosing
For boy
Experts focus on the following recommendations:
When choosing a ceiling design, special attention should be paid to the age of the owner of the room. The older the young man, the simpler the ceiling pattern should look
Cars and cartoon characters are most suitable for preschoolers or older children. The color scheme of the ceiling covering must be agreed upon with the child. It is better, of course, to use light blue and light green tones. Avoid "girly" colors. Do not use bright colors - this can have a negative impact on the child and upset his psyche. Each child is individual. If a boy likes to have a lot of everything and gets along well with construction sets, then a multi-level ceiling with a lot of different decors will be suitable for him. Otherwise, you need to stop at a single-level ceiling.
7 photos
For girl
Girls grow up quickly, and along with this their view of the world changes. A change in the interior of the children's room also becomes inevitable. In this case, psychologists tend to say the following:
- The pink color should be changed to calm tones, the designs should be replaced with ornaments, and the decor should be allowed to be chosen by the young princess.
- It is necessary to carefully consider the zoning of the room using the color scheme of the ceiling surface, since young princesses are very sensitive to this step;
- Recommended colors are pastel. They do not irritate the eyes and do not irritate with their brightness. In addition to them, you can use shades of purple and lilac, which will make the room unusually cute and cozy;
- You can consider a color palette consisting of yellow and green shades. This approach encourages the child to take active action; the girl will easily wake up in the morning and quickly calm down after a hard, eventful day;
- To highlight special details of the decor, it is permissible to use dark tones: brown, gray, graphite or black.
9 photos
DIY plasterboard ceiling in a nursery: doing it right
Many parents take the initiative to make the ceiling in their child’s room with their own hands. It is important to know that the process of obtaining such coverage yourself is not easy. It requires not only the availability of tools, but also knowledge in this area.
In the process of installing a ceiling, you need to draw up a ceiling design on paper. Here you need to think through everything clearly and in detail, especially if you plan to install a multi-level ceiling. In addition, the room must be freed as much as possible from interior items.
The process of creating a plasterboard ceiling in a children's room consists of the following steps:
- First you need to carry out the marking process. It is very important, since it determines what the work will look like in the end. To do this, you need to draw the shape of the new ceiling on the old one.
- Next, a metal frame is created and assembled. The tougher it is, the more reliable and longer it will last. You need to start from the first level.
- Lighting wiring is in progress.
- The second level is being installed.
- After installing the frame, it's time to cover it with plasterboard. Subsequently, the material is puttied.
- Since the room is intended for a child, it is recommended to add a decorative element. When choosing, it is recommended to consult with your child.
How to prepare a ceiling for drywall installation
If the apartment is not new, and there is already wallpaper or paint on the upper floor of the nursery, then first of all you need to get rid of it. Then you should walk over the surface with an antifungal agent. But the most important point in preparing the coating for installing a plasterboard ceiling is the marking. This step consists of the following:
- From the lowest point of the ceiling you need to measure 3-4 ss. At this level, you need to make marks in all corners with a pencil or a special felt-tip pen.
This is a full-fledged marking of the first level of the ceiling; if you plan to install a complex structure, then at this stage it is necessary to finally decide on the location of the second row and also mark the fastening points with dots.
Design options for a plasterboard ceiling in a children's room
When choosing a children's room design, never rely only on your preferences. It is very important to consult with your child here. Children usually choose everything unusual. This is why drywall is a great option. This material is capable of turning even the most strange and non-standard solutions into reality.
Types of structures
The most common type of ceiling in a children's room is a multi-level ceiling. However, it is not suitable for small rooms. If the height of the walls is no more than 2.5-2.7 meters, then it is better to construct a single-level one. If the ceiling height is about three meters, you can design the ceiling in two tiers: the first layer of plasterboard will be continuous and cover the entire ceiling area, and the second is attached only around the perimeter in the form of a frame. You can install a quiet neon light under this frame.
A less common but more expensive option is a patterned ceiling. It will be difficult to do it yourself, so it is recommended to seek the help of experienced specialists. Simple figures like the sun, figure eight, and flower are popular here. There is an option with photo printing. Be very careful: there is a very fine line between an interesting picture and a tasteless image. You can use a picture of a cloudy sky or images of popular cartoon characters.
Choosing a ceiling design
The best option depends on the layout and personal preferences. Let's look at the most common ones.
Single-level
This type is suitable for low or small rooms. With the help of gypsum plasterboard it is easy to obtain a flat surface, and the height will decrease slightly. If the plasterboard ceiling in the nursery is decorated in neutral colors, it goes well with the original design of the walls.
Multi-level
If the room is higher than 2.7 (or preferably 3) meters, you can create a structure in several tiers. In most cases, they are limited to two.
There are many location options. The lower level can go along the perimeter of the ceiling, occupy one corner or divide the room into parts. Lines can be straight, arched or curved in different directions and combinations.
For kids, three-dimensional shapes are created: the sun, clouds, flowers and leaves, the crown of a fairy-tale tree, etc. Abstract shapes are suitable for older children.
Lowering the level can serve to divide a room into zones: sleeping, play, study. This is emphasized by lighting, integrating spotlights into the lower level or LED strip between tiers.
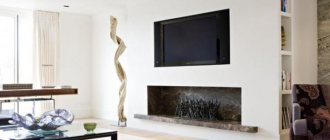
Combined
Drywall is used not only on its own, but also in combination with other materials. Most often, stretch fabric is chosen. This combination allows you to create multi-tiered structures with a combination of textures and make light windows.
Another option is to use wood (for example, in the form of lining or false beams). This material gives the room coziness and makes the atmosphere closer to nature.
Combined surface
Another common type of plasterboard ceiling design for boys and girls is a combination of plasterboard and stretched fabric. With the help of these materials you can bring any idea to life: a multi-level ceiling with a glossy base and matte edges, any geometric shapes, a combination of different contrasts.
Combined
An interesting effect can be achieved by combining plasterboard with other materials: for example, a stretch ceiling with lighting, covered around the perimeter by a glazed frame.
You can also use laminate, decorative plaster, mirror or plastic panels, and photo wallpaper in the interior. A combined ceiling design will help unite all the interior elements and give a complete, harmonious look to the room.
Advantages and disadvantages
So, let's summarize and consider all the positive and negative aspects of gypsum boards.
- The material is absolutely harmless to children due to its environmental friendliness.
- Price policy. The plasterboard option does not cost much to the owners of the apartment.
- Life time. A properly designed ceiling will last you more than 10-15 years.
- Even a novice master can work with them.
- Lightness of design. Due to its light weight, gypsum board will not place any noticeable load on the walls. And over time, drywall will not create any problems with dismantling.
- A suspended ceiling made from these slabs will hide all the unevenness.
- Electrical wires, plastic pipes, and the like can easily be hidden under sheets of drywall.
- It is possible to install spotlights. This will not only decorate the room, but also provide additional lighting.
- Absolute freedom for imagination. You can create as many levels and layers with any design as you like.
- A ceiling of two or three levels allows you to visually increase the space.
- One of the most important advantages is fire safety.
However, there are also disadvantages.
- Not very good moisture resistance. Drywall cannot be considered a material that is not afraid of water. If you install it in a bathroom, you will need a very good hood. Otherwise, the ceiling will swell, the plaster will begin to come off, and the putty will burst. However, in a children's room no problems should arise.
- Reducing the height of the room. With each new layer of plasterboard, the ceiling height decreases by 10-15 cm.
- Darkening. After 2-3 years it may lose its original color.
- The use of drywall is only permissible for old buildings. In houses that were built a couple of years ago, it is not advisable to install a suspended ceiling. In a year or two, the house may settle and cracks will appear in the ceiling.
Varieties of design
Finishing work is carried out using various materials. Plasterboard sheets are usually painted with water-based paint. However, today people are increasingly choosing to use acrylic or vinyl paint coatings.
You can add a third-party color to the paint, so you can achieve a non-standard color. In this case, the brightness of the ceiling will depend on the amount of pigment in the paint.
If you only use a water-based paint product, you will not be able to paint the ceiling in bright colors. The problem is that each new coat of paint will be a different shade. Typically, each subsequent layer is slightly darker than the previous one. If you still decide to use water-based paint to paint a plasterboard ceiling, then choose light, neutral colors.
For bright, cheerful, festive shades, experts recommend using an acrylic or vinyl-based paint product. There is no need to add additional color here. They are sold ready-made, you just need to shake the jar and mix. Next, you can safely take a roller and paint the ceiling. Designers also use special finishing putties. They are decorative and created for decoration only. After you apply them to the ceiling, they are able to form three types of surface: smooth matte, porous and rough.
You can use putty that contains beads or sparkles. There are often cases when wallpaper is glued to the ceiling. Pay a lot of attention to the seams here. The joints become visible after a couple of months if the wallpaper is not applied carefully. As you noticed, there are a lot of options for decorating a plasterboard ceiling. If you correctly combine light with a suspended ceiling, you can divide the children's room into different zones. For example, in an area with dim light you can place a bed, this will be the sleeping part of the room. The play area will be located in the more fun part.
In the modern world, many decorative elements are used to decorate the ceiling. These also include self-adhesives. They can represent anything: from mushrooms and flowers to castles and butterflies. These elements are attached to a previously prepared ceiling: fresh paint or glue. If the drywall is not painted, but simply puttied, then resorting to the use of self-adhesives is not recommended, since they have poor contact with plaster or putty.
Another interesting design option is the diagonal ceiling. It is similar to a ceiling in the form of a frame. Here, too, the initial layer represents a smooth, continuous surface. The bottom layer, that is, the diagonal, is a well-lit sheet of drywall. This ceiling design would be ideal for a teenager. After all, while the child is doing homework, there will be excellent lighting in the room.
To learn how to decorate a plasterboard ceiling in a children's room, see the following video.
Making figures on the ceiling
Much more requirements are placed on a room intended for a child to live in than on any other room. One of these conditions can be considered the use of only natural materials in finishing, which includes drywall.
And if you consider that with its help you can perform a configuration of any complexity, then it is the gypsum board that needs to be taken into service when designing a given room.
- Despite the fact that a suspended ceiling in a nursery made of plasterboard will take away at least twelve centimeters from the height of the room, this does not matter much to the child.
- In a children's room - as, indeed, in an adult's bedroom, low ceilings are welcome. The room where a person sleeps becomes more comfortable and cozy with such a ceiling.
- When choosing which figure will decorate the plasterboard ceiling in a child’s room, you need to take into account the child’s gender, age, and interests (read more here).
- A ceiling with a “cloud” pattern can be considered a win-win option. At the same time, it may well be the simplest: on one level.
What do you need for work?
Ceiling in a children's room made of plasterboard: “clouds”
This ceiling configuration, as in the photo above, is not difficult to implement, although there are two levels. It’s just that one level smoothly transitions into another. The ceiling plane here is slightly offset, made with a slope in one direction, covering the junction of the wall and the ceiling with a bend.
Making a curved part of the ceiling
- As you can see, in the example given, such a bend is made from a ceiling profile by making notches on it. This is done with ordinary metal scissors. To make various shapes and curved configurations, you can also purchase a special arched profile.
Arched profile
- When constructing ceilings in a nursery from plasterboard, you will need a certain set of tools. Almost every owner has a drill, a hammer drill, a screwdriver, and a hammer with screwdrivers. In any case, everyone knows what these tools are. With their help, a metal profile frame will be installed.
A little about tools and devices
To work with gypsum board sheets you need a special cutter; edging and roughing planes; circular saw, or knife-saw; needle roller. In addition to what we have already listed, you need a cutter, a building level, a square, dyeing thread, narrow and wide spatulas, and fine sandpaper.
A set of tools for working with gypsum boards
- To cut drywall in a straight line, you can use not only a cutter, but also a special knife for cutting drywall. It looks like a regular office knife, but at the same time, it has reinforced blades. To ensure a high-quality cut, it is necessary to control the force applied when pressing the knife.
- The blade of the cutter or knife should only cut the cardboard shell, and go deeper into the thickness of the gypsum core only a couple of millimeters. After the cut is made, the sheet is refracted and the cardboard shell is cut on the other side.
- A jigsaw is used to cut curved lines. Only in this case, the sheet should be cut through and not refracted.
- Ceilings for children's rooms made of plasterboard may require the creation of not only flat figures, but also three-dimensional ones. And then, in order to bend the sheet to the desired radius, you will need a template.
Template for bending gypsum boards
- The design of each ceiling is individual, so you can’t buy a template in a store. You need to make it yourself using available materials. The price of such a product will be minimal. Naturally, the size of the template must be carefully calculated. To understand all the intricacies of this process, watch the video.
How are sheets bent?
To bend drywall, two methods are used. Wet technology involves bending the sheet while wet. The compressed side of the wet sheet is perforated using a needle roller, and it is used to bend the template so that the center of the part coincides with its axis.
- After drying, the shape of the workpiece is retained. The thicker the sheet, the more difficult it is to bend, and the bending radius increases. Although, if you need to create a small radius bend, it is better to use the dry bending method.
- By the way, there is a type of gypsum board in which the core is reinforced with fiberglass. If you use it when making a ceiling for a nursery from plasterboard, then you may not need a template at all.
- Reinforced gypsum board is stronger and thinner, only 6.5 mm, and bends very well using the dry method. If this thickness is not enough to complete the structure, the sheets are simply doubled.
- When bending drywall using a dry method, the workpiece is not perforated, but cuts and cuts are made with a router on the convex side. Curved workpieces are first coated with primer, and then puttied and sanded. Finished parts prepared for finishing are mounted on the frame.
- To install the frame you will need two types of profiles. One of them, wall-mounted (guide) PPN, is mounted along the perimeter of the walls. On the other, PP ceiling profile, plasterboard will be fixed.
The first level of the ceiling coincides with the base base, and the second is lowered using hangers
. To ensure the necessary indentation, ceiling profiles are mounted on straight hangers. If the length of the suspension is not enough, use extension pins that can lower the ceiling even by a meter. And, of course, you need fasteners: dowels, and two types of screws - one for the profile, the other for drywall.
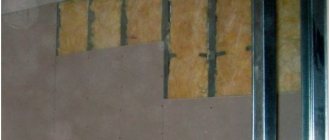
We mount the frame
After the ceiling is cleared of the old coating, the cornices and lamps are removed, we proceed to marking:
- We are looking for the lowest point on the ceiling, which will be the zero mark. Using a level, we transfer this point to the wall, and set aside from it the distance by which the suspended surface will recede from the base ceiling.
- A horizontal line is drawn along the entire perimeter of the walls - the wall profile will be mounted along it. If the ceiling has two levels, or a three-dimensional figure, their contours must also be drawn on the ceiling with a pencil.
- Sometimes plasterboard ceilings for children's rooms can be very interesting. For example: the figure also captures part of the wall, in this case, the markings should be applied to it as well.
- When the markings are finished, you can begin installing the PPN28*27 wall profile. If you want to purchase an imported profile, it may be called not PPN, but UD. And sizes may vary slightly.
- It is inconvenient to install a plasterboard ceiling in a nursery, or in any other room, alone, so make sure you have an assistant in advance. He will hold the profile, and you will work as a hammer drill. Yes, and you need two people to install the sheets, especially when they have a large format of 1.2 * 2.5 m.
- Having started installing the frame, apply the wall profile to the horizontal marking line, and use a hammer drill to drill a hole right through it for the dowel, which you then hammer in.
- If one level of the ceiling smoothly passes into another, as in the example where the “cloud” ceiling is depicted, then the markings on this side will have two lines. Accordingly, installation of the PPN profile will be carried out at the lower mark. Then these levels will need to be connected with the arched profile we talked about above.
- Next, in increments of 60 cm, a ceiling profile PPN 60*27 (CD) is mounted to the ceiling. Its ends must necessarily rest on the wall profile. And its fixation to the base ceiling is done using direct hangers.
- By the way, the distance between the sheathing belts is sixty centimeters not by chance. Most ceiling modules and panels have either the same size or a width that is a multiple of this number. GKL sheets are also available with a width of 60 cm, and there are also 1.2 m, so installation on such a sheathing is very convenient.
- If the room area is large and the profile length is not enough, it’s okay. Simply cut off the missing piece in such a way that it does not butt against the already mounted profile, but leaves a gap of one or two millimeters.
Single-level ceiling frame diagram
- In order to make a smooth bend of the profile in curved sections, you will have to trim its flanges on both sides and remove their segments. In the transverse direction, the profile is mounted in increments of 40-50 cm, depending on the curvature of the volumetric element. At the intersections of the profiles, “crab” type connectors are installed.
- Having completed the installation of the first-level frame, you can begin constructing the second-level frame, which, in fact, is the figure on the ceiling. Its installation can be carried out either to the floor slab or to the first level of the suspended ceiling already covered with plasterboard.
It depends on the complexity of the figure, the loads it will produce on other areas of the ceiling or wall. There is no single recipe here; you need to act according to the situation. If you are new to this business, do not jump into complex configurations right away. Try, first, to cope with a simpler design, as in the example with a rounded joint between the wall and the ceiling.
Plasterboard ceiling in children's room
This classic solution will fit well into the design of a small children's room. This type of finish looks laconic and stylish. A smooth surface, uniform color, and the absence of unnecessary protrusions and shapes can be an excellent background for any style solution: marine, classic, country, Provence. One of the most popular types of ceiling combinations can be called a combination of plasterboard and stretch ceiling.
This provides an excellent opportunity to make all the most daring design solutions and childhood dreams come true. For example, curvilinear and rectangular design options, multi-level compositions and the production of stylish tiers using plasterboard and a special tension form. If the overall picture of the room looks too simple, it can easily be diluted with bright photographs, pictures, original children's furniture and colorful curtains. The design can be changed if desired. Give the ceiling color with permanent paint, wallpaper, self-adhesive film, or even decorate it with stones or precious metals.
A single-level ceiling in a nursery is an excellent opportunity to create a comfortable dream room without cluttering up the space.1. Average moisture resistance. Drywall cannot be classified as a material that is famous for its high moisture resistance.
This becomes a minor drawback only in the case of the bathroom and kitchen, where a good hood would be the optimal solution. For other rooms this property does not create problems. The big advantage of combined ceilings for a children's room is that they can combine completely different colors, shapes and textures.
Such colorful contrasts and accents will appeal to every child and fill the room with the energy of joy. The design and atmosphere of the room will immediately become inspiring and pleasant for active pastime and peaceful relaxation - what every loving parent strives for.
Plasterboard ceiling in a children's room
- Made from environmentally friendly materials, that is, they do not contain any components harmful to health.
- Possess high fire resistance.
- Do not accumulate static electricity, do not attract dust and dirt
- Easy to clean without deteriorating its properties.
Loving parents always want to create a small and wonderful world for their child in his room, where he will grow up happy and joyful. Of course, for this, a lot of effort is put into choosing the interior of the room. This means that choosing a ceiling will require a serious approach. For a children's room, the choice should always begin with safety requirements for the child's health.
When choosing the number of levels and the shape of the ceiling, you should focus on the size of the room, its design features, existing furniture, the age of the child, and the general style of the apartment. The space between the sheets of plasterboard and the ceiling makes it possible to install electrical wiring for any variations of the lighting system without being visible to the eye. In the production of drywall, gypsum is used, which is a natural material; it is completely safe for health, non-toxic, and does not cause allergic reactions.
Requirements
Ceilings, like any other part of a children's room, must meet certain requirements:
- Made from environmentally friendly materials, that is, they do not contain any components harmful to health.
- Possess high fire resistance.
- Do not accumulate static electricity, do not attract dust and dirt
- Easy to clean without deteriorating its properties.
The following ceiling options currently meet these requirements:
- Wood
- Covered with water-based paint or covered with special wallpaper
- Plasterboard
- Stretch ceiling
Each of these types has its own characteristics, positive and negative sides. The choice will be determined by the style of the nursery, its size, budget, and the technical capabilities of implementing the chosen design.
One of the possible finishing options could be drywall. This material appeared at the end of the last century and quickly gained popularity due to its undeniable advantages.
In the production of drywall, gypsum is used, which is a natural material; it is completely safe for health, non-toxic, and does not cause allergic reactions.
Gypsum is a non-flammable material, which means this material has high fire safety.
Has good plastic qualities. It is possible to make both straight and curved profiles from plasterboard.
Allows you to hide most ceiling imperfections.
The space between the sheets of plasterboard and the ceiling makes it possible to install electrical wiring for any variations of the lighting system without being visible to the eye.
A large number of options for decorating drywall.
Possibility of replacing a damaged part of the ceiling without complete dismantling.
The material is low cost.
But there are no ideal materials; drywall also has disadvantages:
The main disadvantage is that such a ceiling will steal from 7 to 12 cm of the room’s height. For a small child such a loss is invisible. But if the room is low, you should consider other options or choose decor that visually adds height.
This is a fairly fragile material. It is necessary to work with it when installing ceilings with caution. To install a suspended ceiling with your own hands, you will need additional equipment.
The disadvantages include the need for additional processing of the joints between the sheets after installation.
The plasterboard itself is low in cost, but installation will require a metal profile, and this increases the price of the finished ceiling.
However, it can be noted that there are more advantages to using plasterboard, and therefore this type of suspended ceiling is popular.
Plasterboard ceilings
Two-level ceilings will look great in a children's room. Drywall makes it possible to build any shapes on the ceiling: a flower, a sun, an alien ship, a soccer ball. 175 photos of suspended plasterboard ceilings for the bedroom, living room and kitchen. Detailed help in choosing a ceiling for a small room. Laconic and convenient infographics on choosing a design style. Choose colors in warm, light tones.
And if you make the ceiling and walls the same color, then the boundaries of the room will seem to blur, and this will also create the illusion of a large space. Multi-level ceilings are usually placed directly above the bed. Avoid bright and eye-catching colors: the design should be relaxing! Ceilings in warm, light and muted tones will best cope with this task. An interesting design technique is the so-called “floating” ceiling.
The floating ceiling effect is achieved by installing the second level in the center without visible side walls. LEDs are placed inside this structure so that they are invisible, and only their light is visible. Check what you have in your arsenal, if you don’t have something, buy more. You will need: self-tapping screws, hangers, dowel-nails, profiles (minimum 4 mm). Do not clutter the room using very complex shapes or structures with many levels.
After all, this is only permissible for the design of different zones. To divide the room into an area for games, study and sleep: hang a large and bright chandelier in the center of the room, install several spotlights above the child’s desk, and above the bed, install lighting fixtures with a muted bluish glow. Thus, the play area will be flooded with bright light, there will always be additional lighting above your child’s notebook, and before bed he will be able to admire small lamps with a night light effect.
The design of the ceiling in a children's room needs to be approached with special imagination, because this part of the room will determine how comfortable the child will be in his personal space. By combining stretched photo canvas and plasterboard sheets, you can create on the ceiling the effect of a starry sky or a sunset on the embankment. These mixed models allow you to create a unique ceiling design. Unusual plasterboard forms in combination with colored and colorful glossy or matte surfaces, with or without patterns, look impressive and create a certain mood in the nursery.
A two-stage combined design, which is quite popular and in demand in the design of ceiling space. As you know, you can’t decorate a child’s room the same way for everyone. The design of a boy's room is very different from that of a little princess's bedroom.
There are several tips on how to decorate a room for children of different genders.
- Creating separate areas in the room for play, study, and sleep helps the child develop properly. He concentrates attention precisely on the activity for which a certain zone is intended.
- The child learns to have order, since every little thing is in its place.
- The uniqueness of the design arouses the child's interest, and he enjoys spending time in his room. And it will be very interesting for the friends who will visit it.
But it’s not just colorful characters that are popular. Parents are noted to be active in purchasing photo wallpapers of blue skies and cosmic landscapes. Tools you will need: hammer, hacksaw, electric drill, screwdriver, sandpaper, metal knife, hammer drill.
You also need a stepladder, a building level and a ruler.
Design options for gypsum board ceilings for a boy
Traditional blue color belongs to the light tones of the cold spectrum. Such shades visually expand the space, so they are perfect for decorating the ceiling in most rooms. The exception is apartments of the old foundation, from 3.5 meters in height.
The surface can be painted entirely blue or combined with other colors. The lightest and most airy combination is with white. In a stylish and modern room for a teenager, a combination with gray or metallic will look good. The combination with a little blue looks harmonious.
You can designate functional areas in different shades: sleeping, playing, sports. In multi-level structures, colors highlight and emphasize the tiers.
The stripes on the ceiling look interesting. The surface is painted, having previously marked the boundaries, or a multi-colored stretch fabric is ordered (using film soldering or photo printing).
For boys, ceiling drawings in the form of the sky with airplanes, space, world maps, superheroes, cars and other equipment are suitable. But it is better to take into account the tastes and interests of a particular child.