Many people, when starting renovation work inside a house or apartment, are faced with uneven walls. The best option here would be to use drywall to finish them with the assembly of a frame base.
But there are situations when the walls are quite smooth. Here you can also use plasterboard for wall cladding. But in this situation, you can do without a frame and a metal profile. Here the technology of fastening plasterboard slabs using a frameless method will come into play. This article will be devoted to this issue.
Mounting options
Today, there are two main ways to install drywall on walls:
- frame assembly. To assemble it, you can use various metal profiles or wooden blocks. The method is used in situations where the walls in the room are strongly curved;
- method without assembling the frame. This method involves attaching plasterboard sheets to the wall not with a frame, but with an adhesive. This method will be simpler and faster to implement than attaching a profile and completely lathing the walls.
Due to the fact that in the vast majority of cases there is unevenness of the walls, the first method of installing plasterboard slabs using a frame and different profiles is used most often. But fastening without a frame is much less common. The frameless method is also used when it is necessary to avoid a significant reduction in space in the room. In this article we will look in detail at methods for attaching drywall to walls in a frameless manner.
Possible options for laying plasterboard on a wall without a profile
There are several methods for laying drywall directly onto the surface, without using a frame or profile. Each method has its own nuances; methods of working for each method will be described below.
There are several methods for laying drywall directly onto a surface.
For self-tapping screws
This technique can be used for walls with differences of up to 30 millimeters. If you attach the sheets using only self-tapping screws, the result will be unreliable.
This is due to the fact that there will be empty space between the surface and the gypsum board, so it is better to combine this method with the use of polyurethane foam to fill the voids.
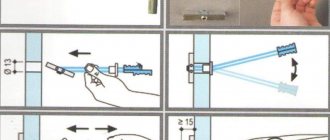
How to attach drywall to a wall without profiles using self-tapping screws, step-by-step instructions:
- The gypsum board is applied to the surface where it will be attached;
- holes for screws are made on the sheet itself; in order to securely fasten the sheet, ten to twelve holes must be made;
- the drywall is moved away from the surface, and the hole is enlarged with a large drill, and foam dowels are screwed into them;
- on the reverse side of the sheet, at a distance of 10-12 centimeters from the holes made, pieces of foam rubber are glued with tape, which are useful for installing drywall exactly according to the vertical and horizontal level;
- The gypsum board is placed again on the surface, and it is secured with self-tapping screws in the prepared holes, in places where the dowels are clogged;
- You can adjust the places where the sheets are attached using the same screws, by twisting and screwing in with different forces;
- new holes are drilled between the screws, through which the space will foam;
- After waiting for the foam to harden, the screws are either removed or screwed deeper into the sheets, and then these places are puttied.
This technique can be used for walls with differences of up to 30 millimeters.
Glue
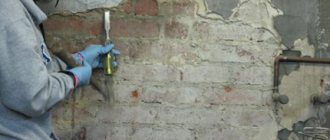
You can use special adhesives, including liquid nails, to attach sheets. These products have good adhesion.
Pros:
- fixation strength;
- after the solution dries, no deformation will occur on the surface;
- suitable for cladding almost all types of surfaces.
Minuses:
- careful preliminary surface preparation is required;
- difficulty in fitting seams;
- It is necessary to ensure that the sheets are fixed until the glue dries completely.
Stages:
- the wall is prepared, it is cleaned of old finishes or other types of contaminants;
- the surface is leveled, sandpaper is suitable for small defects, large protruding parts are removed with a chisel or chisel. Large recesses are puttied or plastered;
- try the sheets on the surfaces, see if there are any significant differences;
- the surface is primed, it is advisable to do this in several layers, the layers must dry before applying a new one;
- GCR must be degreased;
- glue is applied in increments of 100-150 millimeters;
- the sheets are pressed and fixed until the adhesive composition has completely dried.
You can use special adhesives, including liquid nails, to attach sheets.
For plaster
Plaster, like gypsum glue, is most often used when it is not possible to level the wall with other methods. Both materials have lower adhesion to the surface compared to adhesive solutions. But they have their advantages:
- there is no need to carefully prepare the surface before installation;
- there is no need to putty areas with a small depression;
- scrupulous adjustment of the seams between the gypsum boards in height is possible.
You can apply glue both to the sheet itself and to the surface. The thickness is determined based on the roughness of the surface.
If the walls are very uneven, and these flaws are more than 30 millimeters, then you need to glue beacons from strips of plasterboard (the width is 1 centimeter, leave a distance of 4-6 centimeters between them).
The work includes the following stages:
- clean and level the surface;
- the wall is primed;
- first the solution is prepared;
- then they are applied to the sheets or surface, if they were installed, then the beacons are smeared with glue;
- the sheets are attached to specially installed supports that provide a deformation gap;
- the sheet is pressed to the surface, usually tapped so that the solution is evenly distributed;
- check how correctly the sheets are positioned vertically using a level;
- if a defect is discovered, the correction is carried out by tapping the sheet with your hand;
- The sheet is fixed (you can support it with a board resting on the floor).
If you need to glue a cut piece of plasterboard sheet, then you should make chamfers on both elements, after which they will be covered with putty.
Plaster, like gypsum glue, is most often used when it is not possible to level the wall with other methods.
On polyurethane foam
If there are large irregularities on the wall, the repair of which will require significant expenses, then you can fix the plasterboard with foam to the wall.
Advantages of the method:
- there is no need to carefully prepare the wall;
- the foam dries quickly.
The downside is that the foam, when it dries, expands, so it puts pressure on the sheets and penetrates into their joints. This requires careful installation of the gypsum boards, and reliable fixation with spacers during drying. Also, after drying, parts of the foam that extend beyond the sheets must be cut off.
The stages of work are the same as with plaster, only foam is applied around the perimeter of the sheet and along its diagonal.
If there are large irregularities on the wall, the repair of which will require significant expenses, then you can fix the plasterboard with foam to the wall.
Implementation requirements
The method of attaching drywall to walls without a frame can only be implemented if certain factors are present. The most important condition here that influences the choice of fastening method is the curvature of the walls. The height of the walls in the room is of great importance for the installation of drywall.
Note! The technology for installing sheets of material without the help of a frame does not involve the formation of horizontal joints. Therefore, the height of the room should be the same as that of the sheets of material.
In addition, installation of slabs here is possible if the walls are perfectly even. Only minor irregularities are allowed, which can easily be covered with plaster, thereby finally leveling the working surface of the wall.
Determining the curvature of walls
You can determine whether there is a curvature in the walls by eye. But it’s better to use a level and calculate how much one wall falls in relation to the neighboring one. This way you will be sure that the distortions are insignificant and the installation of drywall can be carried out using a frameless method. Note! If the curvature of the walls is large enough (more than 5 cm), you should use the frame method for attaching drywall. The best option to determine the curvature of walls is to use a laser level. He will immediately provide information about the upcoming scope of work.
When you can do without a frame
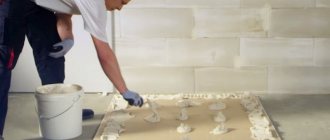
A visual process of attaching gypsum boards to glue.
I would like not to use guides, if possible. However, this is not always the case. In what situations can you reduce the amount of work by not creating the sheathing?
- If the walls are smooth. A curvature of 2 cm is allowed, because if it is greater, it will not be possible to level the surface without creating a sheathing. We will consider the option with good walls that do not need leveling.
- No communications. If you need to hide wiring, meters or other communication elements, then you need a frame. When walls are covered with plasterboard without a frame, the sheets are fastened in such a way that there are no gaps left for anything.
If both points coincide, it makes sense to think about a frameless method of fastening gypsum boards. Not only time is saved, but also space in the room, because installing a profile steals at least 5 centimeters.
The ideal situation would be when the house has smooth wooden walls. Then you can attach drywall without a frame using self-tapping screws, which fit into the wood very easily.
What you need
Adhesive mixture
To ensure the installation of plasterboard sheets without installing a profile, you need to stock up on the necessary set of materials. For wall cladding you need:
- special adhesive mixtures that will act as an alternative to metal profiles;
- plaster for smoothing minor distortions, as well as processing seams between sheets;
- plasterboard slabs.
For cladding from tools you will need:
- drywall knife or electric jigsaw;
- construction and laser level;
- rule;
- tape measure and pencil;
- paint roller;
- spatula.
Having such a set of materials and tools needed for wall cladding, installation will take place quickly and with very high quality.
Fastening methods
Let's return to the question of how to cover walls with plasterboard without a frame. This method is less common than the second - sheathing with a frame. With a frameless approach, the sheets are fastened using special glue.
Installation with a frame is more complicated; it involves assembling a structure from metal profiles. The expenditure of time, effort and finances is greater than in the first case. But then there is the possibility of additional insulation of the walls.
In addition, the use of metal structures allows you to hide large irregularities. If we decide to cover the walls with plasterboard with our own hands without a frame, we will no longer be able to remove the serious curvature.
Creating shelves, niches and partitions is possible only with the first method of fastening. And this, in turn, opens up great scope for the implementation of all kinds of design ideas.
Making calculations
The key to the success of any construction is correct calculations. Using a tape measure and pencil, measure the entire room according to the height and length of the walls, and also determine the perimeter of the room. Having made the correct calculations, you can think through options for placing sheets in such a way that they have to be cut as little as possible.
Note! When carrying out calculations, it is necessary to remember that the sheets must be placed with an offset. This way you can avoid the appearance of cross-shaped joints.
Doors in plasterboard partitions
How to reduce the size of the passage
When remodeling an apartment, we quite often encounter a situation where the width of the doorway is excessive and needs to be reduced. This operation can be performed using drywall, and below are instructions that allow you to do it yourself and with minimal time, effort and money.
Reducing door dimensions
Note! It is very important that on the wall next to the entrance there is a layer of plaster, the thickness of which is equal to or greater than the thickness of the gypsum board sheet. In this case, the new opening will be as smooth as possible!
We reduce the size as follows:
We reduce the size as follows:
We reduce the size as follows:
- First, remove the plaster from one side of the doorway 10-15 cm from the edge.
- Then we apply markings to the walls and floor of the room, outlining the contours of our future drywall frame.
- We attach fragments of the starting profile to the floor and ceiling according to the markings.
- We insert rack profiles into the starting profile and connect them with self-tapping screws or pliers for galvanized metal.
Advice! To provide the frame with greater rigidity, wooden beams can be placed in the profile - the so-called “mortgages”. The length of the beams must be equal to the length of the profiles.
- When the frame is ready, we cut out the pieces of drywall we need.
- Apply drywall adhesive to the areas of the wall that have been cleared of plaster. We attach the resulting sheets to the base, and after polymerization of the glue, we fix the edges of the sheets to the frame using self-tapping screws.
Reducing the width of the passage using plasterboard
We sew up the slope of the new opening with a gypsum board strip, after which we putty all the joints and prepare the surfaces for finishing.
This technology is the simplest. It is much more difficult to figure out how to make a door in a wall made of plasterboard, i.e. in a hollow gypsum wall.
Door in frame partition
Doors in a partition made of gypsum plasterboards should be designed at the stage of construction of the partition itself.
In order for the doorway to have mechanical characteristics sufficient for effective operation, it is necessary to adhere to the following recommendations:
Scheme of a door frame in a partition
- At the stage of marking in the lower part, we mark the planned location of the future doorway. Its dimensions should be slightly larger than we need, since part of the width will inevitably be “eaten up” by the finishing.
- According to the markings, we attach two sections of the starting profile to the floor, which will act as the basis for the vertical posts.
- We insert the vertical rack profiles into the starting profile and securely fasten them, after which we attach them to the same profile on the ceiling.
- As in the case of changing the dimensions of the passage, we place wooden beams in the rack profile. To ensure sufficient rigidity, we attach the beams to the profile with self-tapping screws in increments of 30-40 cm. The price of wooden beams on the market is low, so the increase in the cost of the structure will be insignificant - but the mechanical properties of the frame will seriously improve!
- We continue to assemble the door frame, connecting the vertical posts with horizontal profiles. The sequence of assembling the frame for plasterboard structures is shown in the instructions posted on the portal.
Joint of sheets when covering a door
The finished frame must be covered with plasterboard. When sawing gypsum plasterboard, try to ensure that the junction of the two sheets is located above the doorway - this way there is less risk of cracks.
Covering the frame with gypsum sheets and subsequent finishing is carried out in the same way as in the previous case.
Advice! If the door leaf planned for installation in this partition is of significant weight, then before sheathing the doorway with plasterboard inside, you can install additional wooden spacers. Covering the frame with plasterboard in two layers also gives a good result.
Surface preparation
Since the sheets will be installed directly on the wall surface without a frame, it must be properly prepared. The preparation is as follows:
- We clean all dust and dirt from the walls. You can use a wire brush for this;
- treat with a primer. This must be done if the surface is porous. Use only deep penetration primer.
After this, we prepare the material itself. We will need both whole sheets and their fragments. The required pieces can be obtained by cutting the material. It is best to cut the slabs into the required fragments before installation begins. Note! Before cutting and installation work begins, the material must lie in this room for at least a day and in a horizontal position. The technology for cutting drywall contains the following steps:
- applying markings to sheets;
- cut on one side. It is better to cut with a drywall knife;
- turn the material over to the other side and lightly hit it;
- cut the remaining layer of cardboard;
- If you need to cut out shaped elements, you must use an electric jigsaw.
Cutting steps
Now all that remains is to prepare the adhesive for the slabs according to the instructions. Drywall can be attached using different mixtures. But it is desirable that all materials are from the same company (for example, Knauf or Volma).
Note! Instead of adhesive, you can use building plaster or starting putty. But you will need to additionally add wallpaper glue or PVA to the solution.
Alignment of walls
Preparation and leveling of walls plays an important role in the long-term operation of plasterboard coating. The complexity of their preparation lies in the material from which they are made.
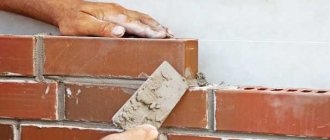
The most suitable and convenient option are brick walls, which will only need to be coated with a primer.
If the walls are plastered, it is necessary to remove this coating, as it may fall off over time and deform the slab from the inside.
All other coatings, such as whitewash, old wallpaper, paint, also need to be removed.
The surface preparation process should be carried out in the following sequence:
- Tapping walls to identify weak spots and remove them.
- Removing the old coating.
- Plastering the resulting pits during the tapping process.
- Cleaning the surface from dust.
- Prime the walls with a deeply penetrating compound.
- Plasterboard sheets should also be primed.
A primer is necessary in order to preserve the finishing material from the appearance of mold, since primers have antibacterial properties that prevent the growth of fungus.
Suspension for gypsum board
To hang furniture and household appliances on a gypsum board-covered wall, you must pre-provide embedded parts made of wooden beams or OSB in the frame. If the suspension point accounts for up to 20-30 kg, the mortgages can simply be attached to the profiles, as in the figure:
Embedded parts in a frame for plasterboard for hanging furniture and household appliances
If there is more weight at the suspension point or expensive equipment (TV, microwave) is suspended, then the mortgages must be framed with crossbars from the profile of the racks. Well, if the suspension point is less than 15-20 kg, then the suspensions can be attached through the skin, see, for example. video clip:
How to choose drywall
There is no bad or good material; all existing modifications of sheets are designed for specific purposes.
Advice! When choosing a material, pay attention to the manufacturer (for example, Knauf), plus the documents must contain a link to a specific GOST (Russian GOST 6266-97 or GOST 32614-2012, the European analogue of DIN 18 180). A reference to specifications (technical conditions) does not guarantee quality, since they are developed by the manufacturer himself.
Now there are many modifications of sheets, you just need to know the basic ones:
- GKL is the most common option, the sheet has a gray shirt and is marked in blue, it is quite affordable;
- GKLV is a moisture-resistant cladding option, designed for kitchens, bathrooms and toilets, also marked in blue, but the outer surface is green.
- GKLO - the sheet is declared as fire-resistant, its lining is gray, and the markings are red. Suitable for finishing fireplaces, the material is also recommended for lining the kitchen stove area, but there is no point in this, the temperatures there are low, so it’s cheaper to take gypsum plasterboard.
Advice! Now you can find GKLVO - this is a universal moisture-fire-resistant sheet, the material is expensive, if you take the household sector, then the only place where the costs will be justified is the accompanying bathhouse sector (GKLVO has a green shirt, red markings).
Which sheet of drywall is better?
The main types of drywall used for interior decoration in various operating conditions
- Ordinary drywall (GKL or, according to the Knauf proprietary classification - GSP-A) is used for rooms with normal humidity.
- Moisture-resistant sheets (GKLV or GSP-N2) can be used to level walls in bathrooms or bathrooms. After treating such a surface, ceramic tiles will fit perfectly on it.
- Fire-resistant sheets (GKLO or GSP-DF) are used for finishing walls around fireplaces, stoves, and chimneys.
- Fire- and moisture-resistant plasterboard (GKLVO or GSP-DFN2) is well suited for finishing walls in boiler rooms of private houses, in attic and attic spaces.
Here we can also briefly talk about cutting plasterboard slabs, which does not require much effort, experience or special tools - it is enough to have an ordinary sharp stationery knife on hand. The cutting process takes place in the following order:
Method No. 2 - fastening to wood surfaces
If you don’t know how to finish walls with plasterboard without a frame and profile with your own hands in a wooden house, then this technology is ideal, and you can attach plasterboard directly to the wood.
Materials for work
The list of materials is as follows:
Wall gypsum board with a thickness of 1.2 cm or more. It will be able to withstand high loads and ensure reliability during operation.- Plastic plates or pieces of wood - they are used to level the plane when uneven. If the walls are smooth, this will not be necessary.
- Wood screws with a length of 4 cm or more, you can use them to fasten sheets. The quantity is calculated simply - 20 pieces are used for every 1 m2; based on these data, calculate the volume of fasteners.
- For final finishing, use the same materials as described above.
Now let's talk about what tools you will need.
Tools and accessories
As for the device for work, their list differs from the option described above, and you will need the following:
- A screwdriver is the main working tool, since with its help you will attach drywall and also level the surface, if necessary. In addition, you will need a set of PH2 grinding attachments.
- You will also need a blade and a knife for cutting drywall; the requirements are similar to those described above.
- The mixture can be prepared using a mixer and a drill, or manually, at your discretion.
- You can’t do without tools for measurements - a building level, a tape measure, a pencil.
Also, to make perfect markings, use a construction angle.
Preparation
Before finishing walls with plasterboard, careful preparation should be done:
First, clear the room so that nothing interferes.- If there are gaps between the beams or boards, then seal them for good thermal insulation. To do this, you can use polyurethane foam and mineral wool, as well as traditional insulation materials - jute and tow. The main thing is that all the cracks are filled so that later there is no blowing from under the drywall.
- If you have not previously treated the base with a composition that protects the surface from pests and mold, then it is advisable to apply an antiseptic to the surface of the walls. this will make it possible to protect the walls from negative influences and make the structure last as long as possible. Prepare the composition as described in the instructions and apply to the wood.
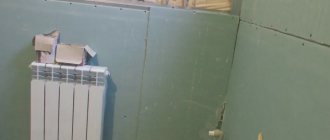
- Next, use a building level or rule to check the plane of the walls, and if necessary, attach slats or wedges of wood to obtain an ideal plane over the entire area. If the surface has large unevenness, as in the photo below, then it makes sense to use even pieces of drywall to level the surface, and when using them, create a flat plane and create reliable support for the exterior finishing.
Now let's move on to the work process, and you will learn how to finish walls with plasterboard without a frame and profile with your own hands.
Installation process
If the surface is properly prepared, the work will not take much effort and time, so follow a few simple steps:
- First, take measurements to determine the location of the sheets on the surface of the walls. It is important that the seams do not coincide with the opening line.
- Cutting drywall is also easy to do - first, mark the sheets, then attach a building level or ruler, and cut through the top paper layer using a construction knife. Next, we lay the sheet with a cut on a block of wood and carefully break it. Then cut through the paper layer from the inside, and the job is complete.
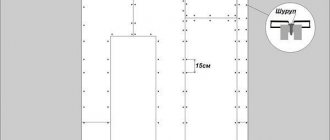
- The sheet is placed against the surface, and then we use a building level to check whether the sheet is level and, if necessary, lay additional elements. Fastening should be done using self-tapping screws; screw them in at the edges with an indentation of no less than 30 m from the end and at a distance of 15 cm from each other. In the middle, screws can be screwed in every 0.2 meters.
Please note that you should not forget to place plasterboard or wood under the bottom of the sheets so that there is a gap of 1 cm. The rest of the work should be carried out in the same way, do not forget to leave a seam between the sheets of 0.2-0.3 cm. It is important that everything is screwed in correctly, they should not stick out above the surface, but do not recess them too much. The best option is presented below.
As for the rest of the work, everything is the same as above. Finished walls can be finished with decorative plaster, wallpapered, or painted.
Note: if you are gluing ceramic tiles to the walls, use moisture-resistant green plasterboard. There is no need to apply putty on it; it will be enough just to apply a strengthening primer and you can paste over the tile.
Approximate installation diagram of beacons made of glue and drywall fragments
- Plasterboard sections can be square or in the form of strips - their shape and quantity will depend on the distortion of the wall surface. When identifying the areas and depth of unevenness, it is recommended to immediately mark them with chalk.
- Next, having found the highest and lowest point on the wall, the latter must be brought to the same level as the first, and then, focusing on them, the entire rest of the surface is pinpointed.
- All other installed beacons are adjusted with two main ones, fixed in the lowest and highest places on the surface. If necessary, up to two layers of plasterboard overlays can be fixed to the largest recesses on the wall. The smoother the main wall, the fewer beacons will have to be made, and they will have a small thickness.
The hardened solution and the drywall attached to it will become reference points for entire sheets of finishing material.
Using this leveling method, you need to use only whole sheets for further installation, and not cut out rectangles or small squares. Otherwise, you will have to level each of them, adjusting them to each other, and this is quite difficult to do, and as a result the wall may not turn out to be completely level, with “steps” or “fractures”.
Second way
This leveling method is carried out according to the same principle as the first, but using long self-tapping screws.
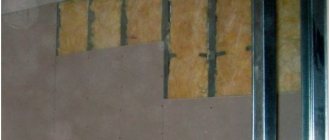
Plasterboard wall cladding without frame with insulation
Frameless plasterboard cladding can be done with insulation.
Everything is simple here. First, foam is glued to a sheet of drywall. After it dries, the sheet along with the adhesive foam is glued to the wall, using one of the three technologies listed above.
Some tips for frameless cladding
- Leave a gap of 10 mm under the sheet on the floor;
- Glue 3 sheets at once and align them at the same time.