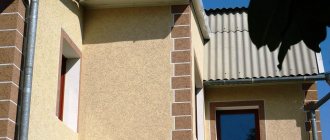
There are two ways to level curved surfaces - plastering walls along beacons or installing plasterboard sheets. Of these, plastering walls with your own hands has more advantages, although it may take longer, which makes it seem more difficult to a beginner.
Housing is not only our protection from unpleasant weather conditions, but also a place that we would like to make beautiful and cozy. The precise geometry and evenness of the surfaces of the room create an ideal basis on which any finishing fits easier and looks more advantageous. We will explain in detail how to level walls with plaster simply, correctly, quickly, and efficiently.
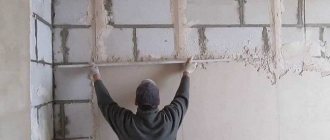
How to level a wall with plaster
First of all, beginners are interested in how to level curved surfaces with plaster with their own hands, and also how to properly plaster walls using guides.
Because there are various features:
- the structures themselves;
- materials from which the walls, ceilings and partitions of the house are made;
- plastering materials;
- degree of curvature of the base.
Depending on this, the appropriate technology is selected for leveling.
If the deviations are insignificant, do not exceed a few millimeters, they can be eliminated without the use of special measures, since the thickness of the leveling layer is small.
But if the wall plane collapses or the height difference is large, the leveling plaster layer can be more than 20 mm. In this case, they mainly use the technology of plastering walls along beacons - supporting guide strips installed on the structure being leveled.
Leveling with beacons does not require many years of skill from the plasterer; it allows you to achieve the evenness of the surface, which is required by the tolerances specified in the snip, with less effort, so it is quite feasible for beginners.
How to plaster walls on lighthouses? Almost any technology involves performing several successive stages. Plastering walls along lighthouses is also carried out sequentially, in stages.
Main stages:
- Removing old finishes, such as old wallpaper, plaster, cladding, paint (in case of renovation). If the old plaster finish turns out to be unusable upon inspection, it is removed completely or partially.
- The degree of unevenness is determined visually, as well as instrumentally.
- Prepare materials, tools, and equipment.
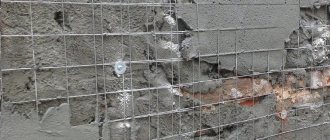
- Prepare the base (repair, clean, prime, reinforce).
- They mark the surface and install beacons.
- Spray and primer are applied successively, leveling the created wall surface along the beacons.
- The beacon strips are removed and the grooves are sealed.
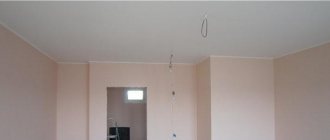
- Apply a covering (if you plan to paint or wallpaper).
- Perform grouting.
- Allow the plaster composition to dry.
- If necessary, polish.
- Clear the dust.
Surface cleaning
Checking for unevenness
Padding
Installation of beacons
Plastering a wall
Removing beacons
Grouting the plaster
Each of the stages also requires explanation.
Determination of wall unevenness
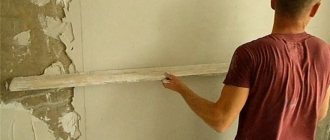
Most of the irregularities are visible to the naked eye. However, instrumental methods help to correctly assess unevenness or curvature, as well as decide where and how to level the walls. The unevenness of the plane is revealed by applying the rule. A gap is formed above the depressions and recesses between the wall and the rule, the size of which can be measured if necessary. A profile fracture is also detected by the rule.
The parameters of the collapse or oblique position of the wall (the geometry of the position in space) are identified and measured using simple tools (level, plumb line, square) or a laser level.
The verticality of the structure is checked using a rule with a level, applying the rule to the wall vertically (along the level) in several places, since the wall can “go screw”. When a wall is tilted inside a room, a deviation from verticality can be detected using a plumb line.
The angle of connection of the walls with each other is checked with a square or using simple geometric constructions.
The test using the Pythagorean rule is carried out in the following way: strictly horizontal lines are drawn from the inner corner on the adjacent walls. On one of them they lay one and a half meters from the corner, on the other - two. These points together with the third (corner) form a triangle. If the right angle is maintained, the length of the hypotenuse should be 2.5 meters. If the measured distance is less, the angle is acute; if it is greater, it is obtuse.
Constructions can be done directly on the floor (if the baseboards are removed). At the same time, the use of a square gives more visual results and allows you to immediately plan the correction correctly. Calculating the need for plastering materials and the minimum distance between the plane of the future top of the wall and the current existing surface will allow identifying the most protruding point of the base (zero).
Marking
For plastering along beacons, special guide profiles - beacons - are mounted on the base. These can be plastic or wooden slats. Plastering walls along beacons is often done using metal profiles that can be purchased. However, all these slats are removed after plastering the walls. The exception is profiles made from gypsum mortar on site.
Homemade plaster lighthouses
To install beacons, the base is marked by drawing straight parallel lines on the surface. If plastering walls on beacons with your own hands is being done for the first time, then it is better to choose the distance between the beacons within 1.0-1.3 m. Experienced plasterers place the beacons at a greater distance (not exceeding the length of the rule, reduced by 20 cm). The distance of the outer beacons from the corners of the walls is 15-30 cm, from the doorways in the apartment - 10-15 cm.
Base primer
Preparation of the base from any material before plastering includes priming. The primer composition performs several functions, the main one of which is to ensure reliable adhesion of the plaster composition to the base. The primer composition is capable of forming additional “roots”, penetrating deeply into the material of the structure, as well as a rough surface, allowing the plaster composition to cling to the roughness.
Additionally, primer compositions include antibiotic agents and fire retardant (fire-retardant) additives. Primers can also strengthen the weak, crumbling surface of the base material, increasing the strength of the material by adhesion of its particles. The sealing function of primers is also important. Primer particles fill the pores and seal them, preventing water from being sucked out of the plaster composition. Special primers are applied for the purpose of waterproofing and sanitizing (similar to waterproofing and sanitizing plasters).
The primer is selected according to the type of base material and plaster mixture so that, while forming an intermediate buffer layer, it does not lead to the appearance of technological defects. It is usually applied with a roller, and a brush is used where it is impossible to prime with a roller. More often, application is required in two passes; after each application, the product is allowed to dry for at least a day.
Installation of beacon profile
The profile must be installed on the wall, maintaining a certain distance between the surfaces of the wall and the plank.
The easiest one for a beginner is to install metal profiles on exposed screws.
- Mark the installation locations of the beacon strips using a laser level, and if it is not available, using a plumb line and a construction cord.
- On the beacon installation lines, retreating 20 cm from the floor (ceiling), drill holes in the base and install wooden dowels. In addition to them, 3-5 intermediate dowels are also made on each line.
- Self-tapping screws are screwed into the 4 corner dowels, after which the cord is pulled: horizontally (under the ceiling and above the floor), vertically, diagonally (in a cross). The most protruding (zero) point of the wall is marked with a cross.
- Using a screwdriver and a level, adjust the position of the screws so that the tensioned threads of the fishing line lie in the same vertical (zero) plane. There must be a distance between the zero plane and the zero point equal to the minimum permissible thickness of the plaster coating.
- Self-tapping screws are screwed into the remaining wooden dowels, ensuring that their heads are adjacent to the zero plane.
- Check the accuracy of creating the zero plane by applying a rule with a level to the caps. Remove the fishing line, using the rules established on the heads of the screws, and adjust the position of the first screws.
- We wrap the wire around the screws, leaving tendrils for attaching the strips.
- Along the lines between the screws, gypsum composition (grades) is placed in slides protruding above the zero plane. Place the beacon profile and press down with a rule until the beacons fit on the screw heads. Excess slide solution is squeezed out through the holes in the profile flanges. It helps fix the profile. If necessary, beacon strips are secured with additional mortar.
Marking the beacon installation using a laser level
Installation of dowels
Pulling the lace
Adjusting the position of self-tapping screws with a level
The screw head is adjacent to the zero line
Checking the zero line using a rule with a level
Application of the solution
The beacon strip rests on the head of the self-tapping screw
To ensure that the profile rests firmly on the heads, a “bedside table” with a flat top is made from gypsum mortar around the dowels with self-tapping screws - a mark.
For a better understanding of the beacon making process, watch the video.
Laying plaster mortar
As with plastering without guides, plastering of walls along beacons is also carried out in layers: spray, primer, covering. The difference will be the leveling of the top layer of soil itself. Proper plastering is carried out sequentially, filling the paths between the beacons one after another. The composition is applied in sections 1 meter long.
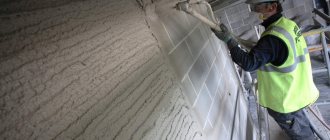
Spray application
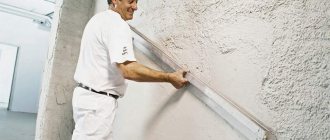
If it is necessary to make a plaster coating of large thickness, then the soil is laid in several passes, without leveling the top of the intermediate layers for the sake of greater adhesion. When the primer begins to protrude above the beacon strips during application, after applying the composition, the top of the plaster layer is leveled using the rule.
The rule bar is placed edge-on on the beacons, then, swinging from side to side, the tool slides from bottom to top along the edges of the beacons. Collected on a rule, the cut mortar is thrown into a container using a spatula or added in portions to areas where there is not enough mortar.
Usually, two or three passes of the rule are enough for leveling. To fix the composition on the base on a flat area, the solution is applied additionally from top to bottom. After this, the solution no longer tends to slide.
Alignment of corners and slopes
The corners are plastered after the entire wall is plastered. When leveling the internal corners, everything is done in the same way as along the entire wall, but when leveling, the rule is based on two lines of beacons on one side of the area to be plastered. You can plaster the corners even after all installed beacons have been removed from the plastered wall and the grooves have been sealed. In this case, level the mortar in the corner using the rule, resting it on the leveled wall. To level the corners, profile corners with a mesh are used - counters and a corner spatula.
Before leveling the slopes, protect window or door frames with masking tape. Next to the window, a vertical beacon is installed on the solution; at the corner, along the edge of the slope, a bar is strengthened to control the thickness of the applied layer. After applying the composition, it is leveled with a rule, resting against the bar and beacon and moving the horizontally located rule. After allowing the solution to stand for a while, leveling is performed, holding the rule vertically. The guides are removed, the groove is filled, and the slope is rubbed in the same way as on the wall.
Removing beacons
After the soil begins to set (before it gains strength or, less often, after the coating has hardened), the lighthouse strips are removed from the laid mortar.
This is done based on the following considerations:
- metal profiles begin to rust when moisture gets on them, rust appears on the surface in dirty spots, spoiling the appearance of the finish;
- Over time, the plank may move away from the base and pull the plaster along with it, covering a large area with cracks;
- When installing dowels, you can inadvertently hit the plank, which will lead to the formation of cracks along the entire lighthouse.
Read about how to eliminate cracks and other defects in plaster in the articles on our website.
No one has insurance against these situations, so it’s easier to remove the beacon profiles while plastering. Only beacons made of gypsum mortar or when walls are covered with ceramic tiles are not removed.
To remove the lighthouse profiles, you may need a magnet (if the planks are hidden by putty or a layer of decorative plaster), pliers, a chisel and a narrow scraper.
If the beacon strip is clearly visible, it is pryed off from the end with a chisel and lifted to be grabbed with pliers. The edge of the profile, captured with pliers, is folded over itself and removed gradually.
The grooves formed after removing the planks are filled with a solution of the same composition as the leveling coating. Using spatulas, level according to adjacent areas.
Grout
To level the setting mortar, grout is used. Rubbing the surface using graters. Before performing the solution, the area of the solution is moistened and a leveling circular motion is made with the tool. In this case, the tool is driven with pressure.
Over bulges, the pressure is increased, over depressions - reduced. As the tool moves, various lumps are cut off by the edge of the tool, and the milk that collects before the grater fills the pores. As a result, the surface is flat and smooth.
There are two grouting techniques:
- circular (circular movement of the hand, usually against the direction of the sun),
- acceleration (forward-reciprocating straight-line movement of the grater).
If the finishing is cladding, decorative plastering or wallpaper, grouting is carried out only by smoothing.
For painting, after such grouting, grouting is also carried out using the second technique, making vertical movements on the first pass, and horizontal movements on the second. When grouting, you can apply a little coating solution to the surface. After grouting, the wall is allowed to dry for a day, after which the top of the coating is sanded with sandpaper or a sander.
Installing profiles
Now everything is ready for mounting. For further work, you can use plastic beacons for plaster or metal products. Their fixation is performed in different ways. Before installing beacons under the plaster, you need to prepare a solution. Metal products are attached specifically to the plaster. It is applied along one line in small portions, after which the profile is recessed into the plaster to the desired size (stand flush with the screw heads). When all the profiles are level, you can unscrew the screws. But the plastic plaster beacon is installed on special fasteners.
You will learn more about how to install beacons for plaster using fasteners in this video.
A relatively new method is plastering on string beacons. The following video will show you how to do this:
Preparation of plaster mortar When the beacons are set, you can start mixing the mortar. Gypsum plaster mixtures are sold dry or ready-made. To work, you need to mix the dry mixture with water, and just open the finished solution and start working. As for the cement composition, it is made by hand. The creation is as follows:
- Cement M400 or higher is mixed with sand. Proportion 1:3.
- A little water is added to the mixture and the contents are mixed.
- The solution is brought to the state of thick sour cream and you can begin to plaster on the beacons.
Note! For plasticity and good adhesion, water is mixed with PVA glue. The fact is that ready-made mixtures already contain plasticizers and additives that improve the plaster.
Which plaster is better for leveling walls along beacons?
Those starting work for the first time are interested in which mixture is best to choose for leveling the walls. The choice depends on the position of the structure in the building, as well as financial capabilities. The volumes of the mixture for leveling are quite large (use a calculator). You can save money if you use inexpensive compounds.
This means using mineral materials based on cement, lime, clay or gypsum mortars.
Mineral mixtures are popular not only because of their low cost. They are environmentally friendly, fireproof, affordable (clay can be scooped up almost free of charge), and repairable. You can make up the solution yourself.
Types of mineral plaster
Along with the advantages, mineral compositions have their disadvantages. Thus, gypsum and lime compositions cannot withstand water, which is why they are not used when plastering surfaces exposed to moisture in the bathroom, as well as for leveling facades.
A cement composition is used on facades and in damp areas of the apartment. Cement mortar is also used to level surfaces that undergo increased loads during operation.
A common disadvantage of mineral solutions is their intolerance to building shrinkage, even small seismic impacts and shaking of a building located next to railway tracks. Therefore, the owners of a newly built house either need to wait a year until the main shrinkage of the building occurs, or choose more expensive compositions for leveling - polymer, acrylic, possibly silicone, which have good elasticity characteristics.
Types of plaster beacons
Plastering walls along beacons involves the use of different types of slats. They can be homemade or ready-made. Ready-made beacons are also divided into different categories; read more about this in our article. Ready-made ones include metal profiles made of aluminum or galvanized, as well as corner strips, which can be found in hardware stores. Homemade ones include guides made from plaster mortar, as well as even wooden slats (used when plastering wooden bases).
When constructing marks and beacons from mortar, follow steps 1-4 described in the section “Installing a beacon profile.” Then the solution is used to make “bedside tables” with a flat top around the screws. A rule is set on the hardened “bedside tables”, under which the solution is poured so that there is no gap left between the rule and the wall. Gypsum beacons are made when walls are leveled with gypsum plaster.
Excess mortar is cut off vertically with a spatula. In this way, under the rule, a rectangular edge is created from the solution. When the mortar edge begins to set, as a rule, it is first shifted along the vertical axis and then carefully removed from the edge. After the solution of plaster beacons has hardened, fill the recesses and pores on the upper side of the rib with a spatula, achieving the creation of a flat supporting surface (on which the rule will be followed when leveling with the beacons).
Surface preparation and priming
Before plastering on the beacons, a number of preparatory work is carried out. First, the room is cleared of everything that will interfere: furniture, decorative elements, curtains, etc. Next, the old wall covering, if any, is removed. The wallpaper is soaked with water and removed with a spatula; it is also convenient to remove the putty with a spatula. As for the old plaster, it is knocked off with a hammer drill and chisel. Solvents will help get rid of paint. At the end, the surface is tapped to detect lagging fragments. They are also deleted.
Plastering walls requires priming the surface for high-quality adhesion to the plaster. If the wall surface is non-porous and smooth, Concrete Contact is used, and hydrophobic walls require a deep penetration primer. A section of the wall is primed using a roller; hard-to-reach areas are treated with a brush. The composition is applied in two layers with a break for drying.
Using a building level, check the evenness of the wall. It is important to determine vertical deviations by applying a level. Using a long rule, all the depressions and protrusions are found on the wall. They need to be marked with a marker. Now you can make fasteners for beacons under plaster. This is the most important stage. To ensure the work is done correctly, markings are performed.
Preparatory work
Before you start plastering the walls using beacons, you need to prepare for the process. Remove old unusable finishing, clean the surface from stains of various origins, “heal” cracks and chips. This stage is important to ensure a strong bond between the leveling finish and the base.
Debris and dust must be removed from the surface. The preparatory work before leveling the walls according to the beacons also includes removing excess metal parts, for example, nails, and insulating those left behind. The cleaned surface is primed and then reinforced. Allow the base to dry.
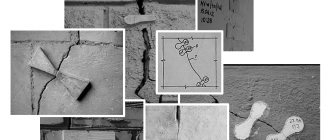
Repairing cracks
If there are cracks in the cleaned walls, they must be eliminated. Otherwise, the defect may appear on the new coating.
Repairing a crack in the wall
Cracks are eliminated as follows:
- A small crack is widened to its full depth, thoroughly cleaned of dust and treated with a primer. Then the defect cavity is filled with putty flush with the wall surface.
- Thin and not deep cracks can be filled with sealant or silicone. This is convenient thanks to the nozzle included with the cylinder.
- A wide gap is often sealed with foam or mortar.
Necessary tools and equipment
In addition to beacon profiles for plastering beacons, they prepare tools and devices with their own hands:
- mixer;
- containers;
- spatulas;
- rule (for a beginner, 1.5 m long is better);
- level;
- plumb line;
- fishing line (nylon cord);
- Master OK;
- grater or grater;
- roller;
- screwdriver (for self-tapping screws);
- pliers;
- brushes;
- masking tape;
- roulette;
- chisel;
- reinforcing mesh (shingles);
- stepladder (or scaffolding);
- rags;
- protective equipment;
- film to protect the floor of the room.
Of course, you need to prepare plastering materials in sufficient quantities.
Features of plastering surfaces made of different materials
The base material dictates some of the features of plastering:
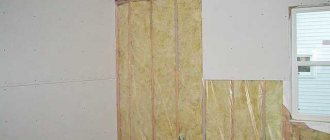
- Thus, wooden surfaces for fastening the plaster coating are covered with shingles.
- The surfaces of the brickwork are treated with a wire brush, and the seams are widened and deepened.
- Notches are applied to the concrete bases with a hatchet or chisel. These measures increase adhesion.
When choosing a composition, they are guided by the rule: the wall must be stronger than plaster. Each subsequent layer is less durable than the previous one. So, do not apply a cement mixture over the plaster.
Plastering walls using beacons is a fascinating activity even for beginners. When leveling walls according to beacons with their own hands, home owners gain invaluable experience and also significantly save money on construction or repairs.
Rules for mixing plaster mortar
If you plan to plaster the walls with your own hands, the video will help you do it correctly, quickly and in several stages, and the solution must be laid in three layers:
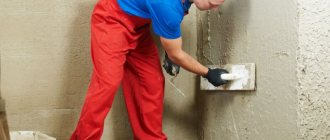
- The first layer is to throw the mixture onto the wall. The solution should be thick. This type of work is carried out using tools or by hand, after wearing thick rubber gloves. For walls made of concrete or brickwork, the plaster mass is applied 5 mm above the installed beacons. On a wood surface equipped with lathing, the layer to be laid should be 8-9 mm.
plaster first layer
- The second layer of plaster is called the ground layer. The solution made for this purpose must have a dough-like structure. It is applied using a trowel or spatula. The height of the layer is no more than 8 mm.
- The final, third layer is called the covering layer. In its production, fine-grained, purified sand is used, since it is necessary to exclude the presence of large inclusions. The finished solution should have a consistency similar to sour cream.
To eliminate the possibility of mixing errors, the mixture for each stage of plastering can be purchased ready-made. This is convenient because all components of the solution are selected in accordance with the technology and contribute to better adhesion to the surface.
For self-kneading, below is a table of proportions:
| Cement-lime mixture | cement 1 lime 1 sand 5 |
| Cement mortar | cement 1 sand 3 |
| Mortar | lime 1 sand 1 |
| Gypsum and lime based mortar | lime in a pasty consistency 3 dry building plaster 1 |
After the finished solution has “rested” for 5-10 minutes, you can begin application.