When is it advisable to level walls without beacons?
This technology is applicable:
- In an apartment on the walls where tiles are planned (bathroom, toilet) - plaster defects will be corrected with adhesive;
- Garage. A thin layer of plaster will hide visible defects and prepare the surface for painting or whitewashing;
- Workshop - the room will be insulated. In addition, you can apply paint or wallpaper to the walls;
- Boiler room. The main task is to hide the flaws of the masonry;
- When sheathing walls with plasterboard, this is done to protect them from exposure to unfavorable environments;
- To an internal brick partition, made very smoothly, but due to numerous masonry seams, cannot be painted or wallpapered, etc.
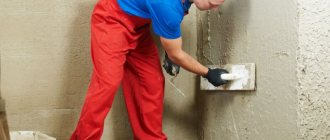
How to prepare the surface with your own hands?
Attention
All work related to surface preparation is carried out to strengthen the further adhesion of the wall and the mortar. The durability of the wall plastering work will depend on such actions. The main task of plastering is to level the wall horizontally and vertically.
Preparing the surface for plaster may vary in steps. Everything will depend on what the wall is made of (brick, wood, etc.). You will also need to resort to actions to check the curvature of the walls. A scale or other tools are suitable here.
Prepare tools:
- Putty knife. It is with them that the solution of plaster and putty is applied.
- A brush with needles to clean the surface from dirt.
- A hammer used to knock down coverings that have become unusable.
Before work, you need to make sure that the windows are glazed and the door frames are installed.
Actions:
- Measurement of the treated coating.
- It all starts with cleaning the walls from the old coating (why do you need to clean old plaster and how to quickly remove it?). Here you will need a hammer, spatula and brush. If you hear a muffled sound, it means the old material has fallen behind. It needs to be removed.
- Dismantling switches and sockets.
- Fill small cracks with plaster mixture three days before leveling the surface (how to seal holes and cracks on the wall and ceiling?).
- If the surface is wooden, then it needs to be sheathed with slats or shingles. There is nothing you can do with the brickwork. The plaster will cling to the seams between the bricks.
- Unevenness can also be removed using a mesh. Treat the entire surface with a primer.
Pros and cons of plastering walls without beacons
Leveling walls with plaster without beacons with your own hands has both positive and negative sides. The advantages include:
- Saving solution. Installation of beacons requires a minimum layer of plaster of 7-8 mm. An experienced master will lay a mortar 4-5 mm thick, a beginner will be able to plaster the wall with a layer of 5-6 mm. As can be seen from the figures given, 1.5-2 times less solution will be required. However, there is a pitfall here: in the absence of basic skills, at the beginning of work, part of the solution will end up on the floor, which will significantly reduce the expected savings;
- Reducing the cost of repairs. The cost of purchasing a set of beacons that do not need to be purchased will not save much on the repair budget. Inviting a professional finisher eliminates this saving altogether - plastering without beacons is more expensive (there are two factors here: a more labor-intensive process and a smaller area of plastering work). At the same time, performing the entire technological process on your own will give a good financial result in total;
- Higher quality plaster surface. The absence of beacons and a thin plaster layer help to avoid cracks;
- The ability to maintain the volume of the room due to the smaller thickness of the plaster layer;
- Saving on auxiliary materials - there is no need to buy beacon guides, screws and metal profile holders.
The method also has disadvantages, but they are relative, since when using it, the owners agree with them in advance:
- You cannot get a very smooth wall surface. Minimal defects will be present;
- Drawing a plane vertically and diagonally is problematic, especially without work experience;
- The technological process is labor-intensive;
- The work cannot be done quickly. There is one nuance here - most materials on the problem of plastering walls without beacons talk about saving time. The authors believe that eliminating the need to install beacons will speed up plastering work. But they do not take into account that leveling the plaster along the beacons and applying the mortar evenly, without auxiliary means, are not the same thing. In the second case, constant monitoring of the progress of work with a rule and a level is required. In addition, with beacons, the mortar is simply thrown onto the wall between the guides, and without beacons, plastering is carried out in small sections with constant monitoring.
Plaster with cement-sand mixture
Plastering walls with cement mortar requires certain skills
To perform the work, you need to prepare the following tool:
- 2 m rule;
- level;
- container for mixing the solution;
- 2 buckets;
- plaster ladle;
- Master OK;
- foam grater.
Preparatory work
Preparatory work for applying plaster without beacons is slightly different from similar work when working with guide profiles. This is due to the different status of the premises in which the work is carried out. However, here too, to ensure a long service life of the plaster, it is necessary to perform a step-by-step cycle of operations:
- remove from the walls, if repairs are being carried out, wallpaper, paint or whitewash, as well as the old plaster layer (in newly built premises this stage is skipped);
- inspect the walls and, if necessary, carry out work to seal microcracks;
- embroider masonry seams in brick walls to create good adhesion of the mortar to the wall surface, and on concrete walls, so as not to attach the plaster mesh, make notches with a hammer and chisel or bush hammer;
- clean the surface from dust and dirt;
- apply two layers of penetrating primer (when purchasing a primer, you should pay attention to the type of wall - brick, concrete or aerated concrete).
Serifs on the wall.
The technology for preparing walls for plaster is described in detail in the material “How to prepare walls for plaster?”
Procedure for plastering using beacons
Before starting the process, the dry gypsum mixture is diluted according to the instructions so that it is enough for about 20 minutes of work. After 25–30 minutes, the gypsum solution will begin to set and can no longer be used.
USEFUL INFORMATION: Step-by-step instructions for drywall work: making your own ceiling and walls
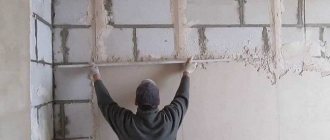
If you need to level a wall with defects without deviations from the vertical and horizontal plane, you need to perform the following steps:
- The recesses are filled with plaster in excess, extending beyond the boundaries of the marked areas.
- The solution is stretched using a rule that is placed in a vertical position. Thus, the recesses are filled with plaster, and on the ledges its layer remains minimal. If the solution is not enough, it needs to be added.
- The actions are repeated until the next corner.
- After the solution has set, a clean 45-centimeter spatula is used to cut off the sagging and correct any unevenness.
- A new solution is diluted, slightly more liquid than for the first layer, applied to the wall and stretched over the surface, but in a different direction, the rule is kept horizontal.
If there is a slope in a corner or in the area of the ceiling or floor plinth, you can proceed as follows:
- Apply the solution to a small area of the sunken part of the wall.
- Based on the rule on the main flat plane of the wall, stretch it along the mortar, cutting off the excess.
- Wait until the tubercle of solution dries. This way you will get a kind of beacon on which you can rely when leveling the problem area. If the area of the wall that will be leveled is large, several such beacons can be made from the solution.
The technology with control beacons made of plaster is used when one part of the wall is flat, and the other has deviations in level, or when the main plane of the wall does not require adjustment in level, and the corners are “sunk”.
Calculation of material requirements
At first glance, calculating the need for mortar components or dry plaster mixtures is not very difficult. Multiply the area of the wall by the thickness of the plaster layer, take into account losses of 10-15% and, using construction tables, calculate the amount of cement and sand required for the work. If you buy ready-made mixtures, then the packaging shows their consumption per 1 m2 with a layer thickness of 10 mm. Which also does not cause difficulties in calculations.
Problems arise when determining the thickness of the plaster layer. When hanging a wall to install beacons, a large number of measurements are used to determine the average thickness of the plaster. It is impossible to carry out such work here, since the plane of the plaster is not formed.
Experienced craftsmen get out of this situation simply: using a level and an even long board (slat) as a rule, they find the maximum deviation of the wall from the vertical. This figure is divided by two and 4 mm is added. The result is the approximate thickness of the plaster layer.
For those who want to more accurately know the solution consumption, we recommend hanging the wall. Detailed instructions for this technological operation are presented in the work “How to install beacons on a wall for plaster?”
Technology of plastering with gypsum mixture
First of all, you need to check the wall for evenness.
You should first prepare the necessary building material and tools:
- wide and narrow spatulas;
- rule;
- plaster mixture;
- cold water;
- drill;
- construction mixer;
- reinforcing mesh;
- mixing container.
All work on applying gypsum mixture without beacons consists of several stages:
- Preparation.
- Mixing the solution.
- Application.
Let's consider all these stages in sequence:
| Stages of work | Process description |
| Preparation | First of all, the surface is prepared, namely the removal of dust, dirt, greasy stains, areas that crumble, and the like. If the wall strongly absorbs moisture, then an important preparation step is priming. For this purpose, it is recommended to use related materials, such as Knauf Stuc-Primer.
If the surface does not absorb moisture much, for example it is concrete, then Knauf Betonokontakt primer is suitable. This primer contains quartz sand, which gives the wall roughness and increases the quality of adhesion. A primer before plastering without beacons is a mandatory requirement, otherwise the mixture simply will not stick. The next stage should be started only after the soil has completely dried. |
| Kneading | Unlike cement-sand mortar for plaster, gypsum should not be mixed in large portions. This is explained by the minimum viability period. The volume of the batch should depend on your performance. For the first batch, use about 10 kg and no more. You will be able to see how much time you need to make a batch and whether you can increase its volume. As for proportions, look at the bag.
Cold water is used for kneading. Mixing must be done with a drill with a mixer attachment. This will help prepare a homogeneous mass. After kneading, leave the mixture for 5 minutes, and then mix again and proceed to the next step. |
| Application | The application process is carried out using a wide spatula. The mixture is applied to areas of the surface where unevenness is expected. Afterwards it is leveled by the rule. At the beginning of the work, it is recommended to glue metal corners to the outer corners. A level must be used for installation. The corner is attached to the wall with plaster mixture. After it hardens, you can completely extend the angle along it. One edge of the rule is applied to the corner to see what the gap is along the entire plane. All voids are gradually filled. If the layer thickness exceeds 50 mm, then the second layer should be applied after the first has dried. Moreover, it is also recommended to use reinforcing mesh. It will completely eliminate the appearance of microcracks and will also give the plaster greater strength.
Depending on the type of subsequent finishing, additional finishing is carried out. For example, if you plan to paint the walls, then they must be puttied with finishing putty. |
Materials and tools
Leveling walls without beacons usually requires purchasing the necessary materials and providing workers with tools and equipment.
Materials. For cement-sand mortar you need to buy:
- Portland cement M400 (ready-made dry mixes);
- river sand (fine-grained), washed from clay;
- fiberglass fiber to prevent cracking of the plaster;
- deep penetration primer (Ceresit CT 16, Condor, Alpina Primer);
- PVA glue to speed up the hydration process or liquid soap to slow it down (it is recommended to add soap to the first batches - lack of experience can lead to the setting of the solution that has not yet been developed).
You will also need water.
Tools and accessories. The work cannot be completed without tools and devices. You will need:
- portable platform or stepladder;
- homemade metal trough for mixing mortar for 4-5 buckets;
- garden hoe - it’s convenient for stirring the solution;
- long flat board or rule 2-2.5 m;
- primer cuvette;
- roller or brush for applying primer;
- hammer;
- chisel;
- plumb line;
- spirit level (bubble level);
- plasterer's set (includes trowel, falcon, trowel, float, trowel and set of spatulas).
Types and choice of plaster
Rotband is often used for dry plaster
Although you can prepare the plaster yourself, there are many ready-made dry mixes on the market today. They contain all the necessary components and binders. It is enough to mix the composition with water with a construction mixer, and the plaster is ready for use. When choosing, be sure to take into account the following nuances:
- type of surface being processed;
- room features: humidity level, temperature, etc.;
- Are there any time limits for completing the work?
Thus, cement and gypsum dry mixtures are known. Let's compare them with each other:
| Cement | Plaster |
| The composition includes cement, fractionated sand and other additives. | Used at optimal humidity. |
| Low cost. | It is possible to level with a thin layer. |
| The plastered surface acquires high strength; as a result, the coating will last for many years. Even in conditions of high humidity. | Due to its plasticity, the mixture is easy to apply evenly on the wall. |
| Used to level out large uneven areas. It can be used for both external and internal work. | In a short time, the plaster sets, which allows you to quickly proceed to the next stage of finishing. |
| Drying time directly depends on the temperature and degree of humidity in the room. | |
| After applying the plaster layer, subsequent processing can begin no earlier than 10 days later. |
Video
Basic techniques for plastering without beacons
Every professional plasterer knows how to level walls without beacons. Moreover, each of them has their own favorite method (experts count 4 methods).
First. When applying primer, three horizontal strips of mortar are laid out along the entire length of the wall: one in the center, the other at a height of 10-20 cm from the floor, and the third along the top of the wall. Using a rule and a spirit level (bubble level), the future plane of the plaster is formed with a trowel.
The result is something similar to mortar beacons - in the language of professionals they are called landmarks. It is impossible to achieve high accuracy using this method, but the process is accelerated and the result is a fairly flat wall surface.
Work is carried out after the landmarks have completely dried. To speed up the process of hydration of the plaster, craftsmen add gypsum to the solution (only for guidelines, and not for the entire plaster) (1-2 trowels per bucket of cement-sand mixture) - improvised beacons will be ready for further work in 30-40 minutes.
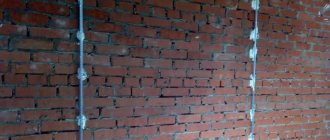
Second. Along the edges of the wall, at a distance of 5-10 cm from the corner, three holes are drilled for dowels: at the top, bottom and in the middle. Self-tapping screws are screwed into them so that their heads protrude from the wall by 5-6 mm.
Using a plumb line, each row of screws is brought into one plane, after which three strings of fishing line are pulled between the screws. These strings serve as guides when applying the second layer of plaster - primer.
Third. The most popular method is working with an “eye meter”. Let's see how to properly plaster walls without beacons with a cement-sand mixture.
Laying the first layer
Leveling walls without beacons begins with the installation of a preparatory or rough layer, which serves to adhere the surface to subsequent layers of plaster.
Before starting, you need to wet the wall with water. Then, using a trowel (trowel) or a plaster ladle, apply even portions of the mortar onto the surface with sharp movements, starting from the floor.
Check the level of the wall. If there is a distortion in one place, a thicker layer of plaster is applied.
Using a grater, lightly level the solution, without achieving excessive evenness.
Plaster without TsPS beacons
According to the “eye gauge”, work is carried out in situations where there are no blockages or height differences near the wall - you just need to level it for painting or wallpaper. In this case, cement, sand and fiberglass are used for the solution.
The first layer of plaster, spray, is made with a liquid (flowing) solution. They literally pour it over the wall, creating a very thin layer of plaster. Professional builders use hoppers for these purposes, powered by a compressor or manual drive.
If there is no hopper, the solution can be spread on the wall with a grater, trowel, spatula, or even a wide paint brush or paintbrush (used for whitewashing with chalk or lime). The technological process is similar to priming the surface with a primer. Here it is necessary to control the thickness of the layer - it should be as thin as possible and not allow gaps.
The second stage, the most difficult, begins after the spray has dried. The main thing here is not to miss the moment of applying the primer - with a dry layer it will not have the necessary adhesion: the second layer will either fall off or crack.
The cement mortar is mixed from M400 cement and sand in a ratio of 1:2 (when using M500 Portland cement, 3 parts of sand are taken). Fiber is added to the dry mixture (without water) in small portions (if you add it in one portion, you will not be able to stir it - the fiberglass fibers will bunch up into squishy balls).
After each addition of fiber, the dry solution is stirred. After this, water is added to the resulting mixture in portions until the plaster has the consistency of bread dough.
It is necessary to plaster the wall with such a solution in small areas. You should start from the lower left corner.
The solution is applied with a plaster spatula (trowel) and leveled with a trowel. During the leveling process, the surface is controlled with a rule and a spirit level - the plastered area is leveled vertically, diagonally and horizontally. The leveling is completed with a rule that removes minor errors left by the grater.
Having finished with the first section, proceed to the second. You can go up or along the floor, along the bottom. The completed sections serve as a guide when working on the second piece of plaster, making it possible to avoid curvatures and noticeable transitions. To help the eye, you must constantly use the rule and level.
At the final stage of plastering work, the surface of the wall is washed with a liquid solution (the process is called covering) - roughness, stripes from the trowel and rules, and other flaws are removed. Work on applying the covering begins when the second layer of plaster has dried - it will not be pressed through when pressed with your hand, but, at the same time, it will grind into sand when stroking, with force, with your fingers.
Attention: you need to check how dry the soil is sequentially, starting from the first section, since while work on plastering the wall was going on, the first fragment could have time to completely set.
Plaster mortar is made only from cement diluted with water. Apply with a thickness of 1-2 mm. Before application, the area to be treated is wetted. The coating is applied with a trowel and rubbed in a circular motion.
The process of applying plaster is completed by rubbing it, which can be done using a solution that is not completely dry and several days after applying the coating.
You can see the technological process of plastering walls in detail in the work “How to properly plaster a brick wall?”
If the wall has a deviation from the vertical, the fourth method .
Leveling stages without resorting to the use of beacons
You should start by priming the walls. Next, you need to take the rule and walk around the corners. The indentations are revealed, the outline is outlined with a pencil. It is important to check the floor skirting boards and joints.
The next step is to prepare the solution using a drill. The layers should be thin, so you should mix a small amount of solution at a time. It is used within the first 25 minutes after mixing. Further stirring is impractical, as the solution thickens and dries out. It is not subject to further use.
How to level walls using the rule without beacons further? After application, the walls are treated with the rule, the surface becomes smooth.
You can level the walls with “Rotband” without beacons, as with a regular homemade mixture. The techniques are similar, but the drying time of the layers will be reduced. Each layer will take about an hour to dry.
How to plaster walls without beacons when the wall is collapsed?
Here, the lines drawn on the floor, walls and ceiling, limiting the surface of the plaster, come to the aid of the eye. The correct algorithm of work is as follows:
- Using a rule or a long, even board, find the place that protrudes into the room against the wall;
- Having retreated 5 mm from it, a line is drawn parallel to the wall, which continues on the floor, the next wall and the ceiling;
- The first stage of plastering work is carried out - spraying;
- After the spray has dried, primer is applied, where the drawn line acts as a guide;
- A small area is plastered, then the next one, and so on in a circle. The surface is controlled by a rule and a spirit level. After the plaster strip is looped, the next part of the wall is plastered. The reference point is no longer the drawn strip, but the plane formed by the plaster.
Work should be completed in the center of the wall. The technology for applying the plaster layer is identical to that given above (see point 3). Note that there are no differences in plastering walls with gypsum and cement mortar.
Work on different walls
Before leveling the working surface, as a rule without beacons, it is moistened with clean water for high-quality adhesion. For these purposes, you can use a regular garden sprayer.
Depending on the composition of the wall, it is necessary to select the appropriate components of the solution
The plaster mixture is poured in random order using a spatula in several vertical stripes over an area no more than 1 - 1.5 m wide and leveled with a long rule to the same level. Leveling is done from the floor towards the ceiling.
The variety of wall material provides different methods for preparing them before using the building code.
plaster wall
Before applying the plaster composition, the gypsum coating is first coated with a primer.
Concrete wall
Concrete pavement is made up of a single concrete panel and is relatively flat on its own, so it is comparatively easier to achieve leveling on this surface. In addition, cleaning such a surface occurs with the least effort.
Before applying the plaster mixture, you need to make shallow notches of 2 mm for stable adhesion of the building material to its surface.
Foam block
Pre-treatment of the foam block consists of covering up the voids on its surface.
Monolith
When preparing the monolith, it is enough to coat it with a primer.
It is necessary to check the areas being worked on after moving through them, as a rule, for the presence of voids, if found, it is necessary to apply the plaster again and repeat the process.