Selection of plaster
Depending on the complexity of the future pattern, you can use inexpensive but high-quality putty for relief plaster, but a more correct and easier option is to use ready-made textured plaster, especially for creating panels. This plaster was developed by manufacturers specifically for decorative finishing; it is more flexible and easier to achieve the desired shapes and curves.
Textured plaster is usually sold ready-made, it does not need to be diluted with water, and even after opening it can be stored in a closed container for a long time (read the instructions on the product packaging). You need to dilute the mixture yourself for the entire room in strictly identical proportions, otherwise the pattern will not be the same, which will negatively affect the visual perception of the entire interior.
To make your own hand-made relief plaster look high-quality and professional, do not rush into purchasing the material. First, decide exactly what kind of wall or ceiling pattern you want to get, based on this, you will need to purchase certain materials and stock up on certain tools.
Relief plaster with a “wave” pattern
What is textured plaster and what is it used for?
Textured mixtures are distinguished by fine-grained filler, delicate consistency, and manageability during installation. They create flat (Venetian or Moroccan, concrete-like plaster) or relief surface finishes. Most types of textured plaster do not shrink when dry.
In the decorative effect of flat coverings, a significant role is played by the color and technique of applying strokes of plaster mortar. An original Venetian is a work of art that imitates natural polished stone, silk fabric or a surface that has been worked on over time. Such decorative coatings are multi-layered. The technique of applying decorative mortar can be complex and performed by professionals, or simplified, feasible for beginners.
Relief plaster protects the walls of the house, partitions, ceilings from moisture penetration and other influences. Hiding some surface imperfections, the decorative coating serves as a heat-saving and noise-insulating screen. Relief decoration decorates the walls, giving their surface unique combinations of color, light and shadows. It is a powerful design tool.
A texture can be created in various ways. To create a voluminous coating, special compounds are not always needed. Textured plaster is made from ordinary putty by many craftsmen.
Materials and tools
In addition to whether you chose dry putty or a ready-made mixture, you will need additional materials:
- deep penetration primer (for preparing the base and before painting the plaster);
- water-based paint (possibly several colors or shades);
- water-based varnish (for finishing panels).
List of main tools:
- small spatula;
- long spatula 50 cm;
- paint roller or brush for priming walls;
- chisel + hammer for surface preparation;
- roller with long pile for painting;
- paint tray for painting;
- a thin brush or sponge (for applying varnish) or a hard roller;
- tools for applying texture.
Variants of patterns with various objects
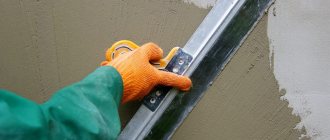
You can apply textured plaster with your own hands using various objects, your imagination will help here: sponges, polyethylene, brushes, spatulas, special rollers with a pattern, etc. You can create a relief with your own fingers, most importantly, wear gloves to comply with safety precautions. To create a panel, you will need a special set of tools for decorative artists.
Panel on the wall with plaster
Textured ceiling plaster
Ceiling decoration has its own nuances. Acrylic or polyvinyl acetate plastic materials are more suitable for ceiling finishing. Gypsum mixtures are also often used for ceilings. To prevent the ceiling from creating the impression of pressure and massiveness, the patterns of textured plaster for the ceiling are made more elegant, and the reliefs are less pronounced. Particular attention should be paid to ensuring high adhesiveness of the coating. The techniques for creating texture are similar to those used to decorate walls with your own hands.
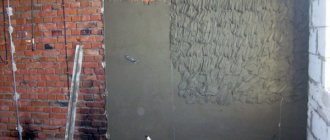
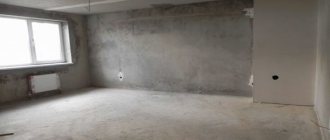
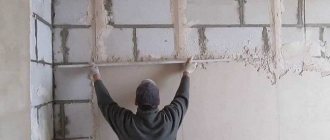
Surface preparation
In order for decorative plaster to last long and with high quality, the surface must be clean, dry, and even!
Before applying decorative plaster, you need to remove the old wallpaper. You can leave the paint, but make notches on it with a chisel. There should be at least a hundred of them per 1 square meter. If the old plaster is weak, remove it. You can partially remove it by tapping the wall with your fist, where the sound is dull, which means there is emptiness under the plaster and it should be replaced. We clean damp places and places with mold to the ground and treat them with special antifungal agents in several layers. For work we use a paint roller. Before doing this, eliminate the source of moisture, if any.
Mold repellent for walls and ceilings
We sweep away dust and debris from the surface.
Tools and accessories
Tools for creating texture and relief
To know how to make a three-dimensional drawing, you should select certain tools and devices; by processing the wall with them, you can get an original texture. So, in addition to traditional finishing items, the following elements may be needed in the process of creating a relief:
- the sponge will add a “bubbly” appearance or serve as the main tool for painting;
- a roller with a special attachment is used to obtain a textured print on a wet layer;
- rollers for creating a grass pattern or the formation of horizontal chaotic and even stripes;
- a plastic bag, a rubber glove or a simple brush will also come in handy when creating a volumetric effect.
Almost any item that has textured shapes will be useful. It is they that, when processed, will leave a characteristic imprint on the wet plaster. For example, if you want to imitate leather on a wall, then you need to use a roller with a special attachment. Many interesting designs can be achieved by working with a simple spatula. In this case, it is worth choosing several tool options with different widths.
Experts and psychologists say that relief plaster provides endless opportunities for the manifestation of imagination. Therefore, creative people love to do this process on their own to develop their talent and abilities. And parents involve their children in the work so that they can also contribute to the renovation of the house, especially when it comes to the children's room.
Apply a small amount of finishing compound to the wall and experiment with a variety of objects.
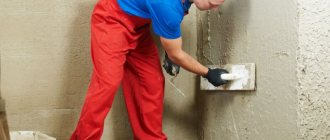
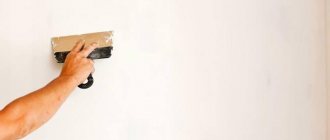
Primer and leveling
The primer is needed to increase adhesion (adhesion) between the decorative plaster and the base of the walls and as a protective barrier against the appearance of fungi on the surface. We treat the entire wall with a deep penetration primer; it is convenient to use a paint roller or a wide brush; The wall must be covered completely, but without drips. Let the primer dry for 2 hours.
Treating the wall with primer
We level the areas where the plaster was removed with a new solution. Its composition should be the same as the original one: cement-sand, gypsum, clay, or lime. Do not begin further work until the solution has completely dried; the process may take a day or more. Also treat areas with new plaster with a primer.
Types of decor, methods of applying three-dimensional images and photos
Drawings on the walls are made using a special material, that is, decorative plaster, which consists of synthetic ingredients and some mineral rocks. The main thing in its use is that when applying decorative plaster, you can hide defects on the walls, including cracks, unevenness or chips. The material is also quite moisture resistant and does not absorb unpleasant odors, so it can be used in the bathroom and kitchen.
People also choose decorative plaster because there are many options on the market, ranging from color to texture, thanks to which you can achieve different textures:
- crumpled paper;
- velvet;
- tree;
- even a palm leaf!
The decor can be anything you want, since nothing limits your imagination here. The most commonly used options are:
- flowers;
- waves;
- stripes;
- circles;
- frescoes.
We will tell you more about each of the options.
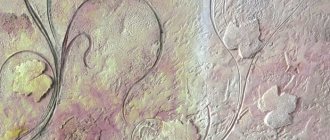
Flowers and leaves
Decorative plaster with images of flowers is chosen for ceiling decorations or images on columns. This type of relief is one of the most difficult, as it does not have clear lines. Its execution requires special skills and experience. One of the features is the preparation of the material for applying the pattern:
- A medium-sized ball is formed from thick crumpled paper.
- The finished paper ball is tightly wrapped in polyethylene. With its help you can start decorating the walls.
The color application technology is as follows:
- the resulting paper ball is applied to the undried plaster;
- holding it at the base, the ball scrolls, thereby forming the contours of the flower;
- the subsequent application of the pattern is done close to the previous one to create a continuous floral pattern;
- The final stage after the plaster has dried is painting it and applying glitter.
Attention
You can create a floral design from decorative plaster on a dry surface. To do this, a second layer of material is applied to the worn plaster with a special tool. Afterwards, the spatula gently rotates around its axis, thereby creating three-dimensional flower petals.
Wave
This composition is the most common, since its application does not require special professionalism, so even a novice master can cope with the application of waves. In this way, you can create the effects of sea waves in the interior, which, if done correctly, creates an unusual and original design.
Decorative plaster, with which the waves are applied, has a special composition: acrylic and latex, to which is added:
- marble flour;
- cellulose;
- thickeners
For those who like to stand out, you can add to the mix:
- glitter;
- powder;
- dyes.
This plaster is made independently or ordered from specialized stores.
To apply a wave, it is necessary to prepare the surface, which does not have to be perfectly flat:
- To begin with, the wall is puttied.
- Then, using a spatula, apply decorative plaster 1.5-2 centimeters thick.
- Afterwards you can begin to form the drawing. To do this, characteristic waves are applied using a trowel, but this must be done without delay, since after the mixture dries it will be impossible to correct the patterns.
- After a few days, you can begin painting the plaster, for which acrylic paints with increased wear resistance are used. The color is selected solely based on the preferences of the interior owners.
Stripes
If plastering “waves” does not require skills, then what can we say about stripes! These are the same waves, but without smooth bends, and made strictly to the level. It is better to use an acrylic substance for decorative painting, since it dries a little longer than its analogues, and therefore the master will have more time to correct unevenness and not spoil the texture.
Before starting work, it is better to prime the walls. When applying the “stripe” pattern, you must follow the standard scheme:
- Apply an even layer of putty.
- Calculate the distance of decorative stripes from each other.
- To create a texture, you can use a special brush, which, passing over the wet plaster, creates characteristic vertical or horizontal stripes.
- If desired, the walls are also painted and varnished.
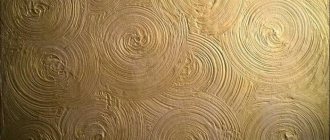
Circles
Decorative plaster made in the form of circles can give any room design an original look, since curved lines provide an unsurpassed highlight!
- Before starting work, the basis is the same walls leveled with putty, after which decorative plaster is applied to them in an even layer.
- Next, using a trowel or brush, circles are drawn, which do not necessarily have to be ideal sizes. Decorative plaster is different in that way - it has no specific standards, it is unique and inimitable in its own way. No master will make completely identical patterns, so be creative and don’t adhere to strict standards!
Paintings and frescoes
Creating paintings using plaster is a difficult job, but the result will not make you regret your decision. To do this, you will need a solution and a stencil, which can be made of cardboard or thick paper.
Important
It is important to know that the volume of the future painting will depend on the thickness of the workpiece, so think about this point before applying the mixture.
- Next, you need to place the resulting stencil against the wall, apply a layer of plaster on top of it, then peel the stencil off the surface and clean it for subsequent use or continuation of the complete picture.
- The resulting painting or fresco must be dried, after which it is varnished, painted with special paints and used for its intended purpose.
Applying plaster
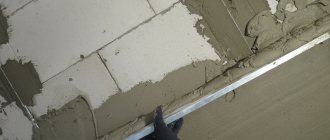
Base layer
This is the first mandatory layer of decorative plaster. Thanks to it, the relief layer will lie softer, and the base layer will hide defects in the base of the walls.
The layer is applied with a spatula in a layer of 2-3 mm evenly over the entire surface. Leave it to dry until completely hardened.
Each layer of plaster must dry completely before applying the next one.
Relief layer
Here, each wall drawing and panel creation has its own work process. But there are several rules that must be followed:
- The plaster is applied in a layer of 5, maximum 12 mm, and using the selected tool, a texture or a whole panel is created. Do not apply too thick a layer of plaster, as it may crack when drying.
- The relief must be created within 30-40 minutes after applying the mortar to the wall, so you only need to plaster the area that you will have time to process in that time. After this, the solution will lose its initial plastic properties, harden, and the pattern will become heterogeneous.
- Each section is overlapped, slightly overlapping the previous one, to avoid visible joints between sections.
- One wall must be plastered in one go, otherwise a visible joint will remain.
- Work with the adjacent wall only after the first one has completely dried, this way you will not smear the texture of the pattern on the corners of the first wall.
After the texture is formed, it must dry completely. Then, depending on the selected wall relief, you can lightly sand the texture with sandpaper, removing too protruding parts of the plaster.
Before painting, the wall should be primed again. Thus, the paint will not be absorbed into the plaster and the wall relief will not be washed away.
Decorating walls: the simplest way to create relief
With the advent of modern interior materials, although wallpaper has not ceased to be the most popular finishing option, especially when the task is to do it “cheaply and cheerfully,” it has significantly lost its position. Various decorative plasters are becoming increasingly popular; due to their versatility, they allow you to achieve a lot of effects when using the same composition. Most often this is an imitation of any natural surfaces, stone, fabric and even metal, and the severity of the relief depends mainly on the fraction of the abrasive present in the composition.
However, the cost of compositions with fillers, as well as certain difficulties in applying and creating a pattern, is a significant disadvantage that scares away potential consumers. But you can get the desired relief at a lower cost, and the application method is much more tolerant of amateurs.
Acrylic plaster and polyethylene
The use of expensive compounds on marble chips or marble flour, special stencils, impressions, rollers and trowels is rather the prerogative of professionals. And to decorate the walls in an apartment, room or even zone, you can get by with the simplest materials and tools.
- Acrylic finishing putty - ready-made in buckets is more expensive; If you have experience with diluting, you can take gypsum finishing putty and seal it with an acrylic primer (ready-made or diluted with concentrate).
- Primer - with deep penetrating ability, but without filler; putty adheres well to the surface without abrasive.
- Spatulas - you can also work with a trowel, but this is also not the cheapest tool, and to apply the base layer on which the relief will be created, two spatulas are enough (for one performer).
- Polyethylene - the area of the film should be approximately one and a half times greater than the area of the surface to be finished.
- Paints, waxes, mother of pearls - depending on the desired effect.
- Rollers, sponges, brushes - depending on the chosen decorative layer.
Surface preparation
Both the decorativeness and durability of the plaster directly depend on the quality of preparation of the base; it must be strong and even. All previous finishing layers are removed - old wallpaper and paint come off easier if you wet the walls with a weak primer solution, this is more effective than wetting with just water. After some time, the residue can be easily removed with a spatula. Cracks and potholes are pre-sealed with starting compounds, and the surface is thoroughly primed. After the primer has dried, if necessary, apply masking tape to the joints of the plaster with the already finished areas.
Applying plaster, creating relief
The plaster is applied from the corner, ending in the opposite one, the plaster is applied with a small spatula to a large one and spread over the wall with a large one. The entire wall should be covered in one go - leaving a piece or half for tomorrow is not recommended. If you still haven’t mastered it, make a “ragged” line with a descending layer - the last scratch strokes. This will make the transition between fragments less noticeable, but it is better to invite an assistant and complete the wall in a day. Perfect smoothness is not required, but the layer should be uniform, about 2 mm thick.
You can create a relief using film with just one hand, but it’s also easier with two people – one puts polyethylene on the applied plaster, the other holds the rest so that it doesn’t stick randomly. They begin to form a pattern, just like plastering - from the corner, applying a film and creating folds on it, a heavily crumpled film will give a pronounced texture.
You should not use polyethylene that is too dense, it is more difficult to work with, but if you need a slight “clumsiness”, it is just right. It is convenient that under the film the plaster remains wet longer, and there is enough time to carefully work out the relief; you can first go through the entire surface, and then add “frost” in the right places. Depending on the type of plaster used, the wall will be partially ready in 12-15 hours, after which the film is removed. If the layer is thicker in places and the plaster has not yet dried, the finishing touch is postponed until it is completely dry.
Another option for creating a relief using polyethylene is not to apply film over the entire wall, but to cover the entire surface with prints using a crumpled plastic bag or a crumpled piece of film. The relief turns out to be less uniform, with characteristic “spines” formed when the plaster layer is pulled behind the film when torn off. In its original form it does not look very attractive, but if you slightly smooth out the texture, it turns out interesting.
Finishing
There are a lot of decorative options for such plaster - it is coated with wax, painted in one or several tones, and lightened in fragments. The wax is applied with a roller or sponge; if the plaster was painted in mass, use colorless or glossy; if the plaster is white, it is first painted. An interesting effect is obtained by painting in two approaches - first with a relief roller, and then with a smooth roller. The first pass will allow you to fill all the potholes with paint, and after processing with a smooth roller, the paint will remain only on the relief. To achieve the effect of antiquity, first the plaster is painted in a rich color, and then, before the paint has dried, it is carefully removed from the protruding folds with a rag, or after drying, it is lightly sanded over, resulting in characteristic abrasions.
When it comes to major renovations, sealing cracks may not be enough and more careful preparation will be required; read how to level walls. For lovers of smooth, marble coatings - an article about the Venetian. Interesting minimum budget and presentable appearance - find out how to make liquid wallpaper with your own hands. The video contains ideas for original interior design from a famous exhibition.
Painting
Typically, relief plaster is painted with water-based paints. Use a roller with long pile and paint the wall with a base color, and after drying it, either rub it with fine sandpaper to add depth to the design, or apply a second color of paint with a sponge or dry brush with light movements only on the protruding parts of the relief.
Painting decorative plaster in 2 shades
Remember that when the paint dries, it becomes 1-2 shades lighter.
Selection and preparation of composition
The choice primarily depends on your taste preferences. Decorative plaster in relief is divided into two more types: textured and structural. Textured mixtures have excellent plasticity; the creation of relief occurs with the help of special tools; it is textured mixtures that create bas-reliefs from plaster. Take a look at the textured relief plaster in the photo below.
Related article: How to lay a baseboard on laminate flooring: some useful tips (video)
Structural mixtures create a relief on the surface of the wall due to crystals of various sizes in their composition. When these mixtures are applied to the surface of the wall, the minerals, under the action of a grater, draw fancy patterns and thereby decorate your room.
The structural variant includes such a well-known mixture as bark beetle. Minerals make channels on the surface of the cladding similar to the paths of a bark beetle in wood, hence the name. This is what relief plaster looks like:
The preparation of textured and structural compositions should only be carried out strictly following the instructions on the packaging. In most cases, the amount of one portion of decorative cladding solution is calculated based on its setting time. So, for example, if the same bark beetle, after mixing, begins to harden after an hour, then you need to prepare the plaster solution in such quantity as to use it up in 60 minutes.
The hardening time of decorative plaster depends on the type of binder. Gypsum dries the fastest; cement-based compositions require 10 hours or more.
Varnishing
To make the color of the plaster look brighter and the relief to stand out more visually, the wall is coated with water-based varnish. This should be a special varnish for decorative plaster.
The varnish is applied in 2-3 thin layers with a paint brush, sponge, or a hard roller will do. There should be no leaks. Each layer is applied after the previous one has dried. Usually the varnish dries quickly; check the drying time of the varnish on the product packaging.
The process of creating a particular relief can be found on the Internet for each type separately. There are many detailed video instructions.
Before working on the wall, you can first try applying decorative plaster on a square of plywood or plasterboard.
Finished coating option
Do-it-yourself relief plaster is not an easy task, but if you do it well, you will get an expensive-looking interior, and people with artistic talent can even create a beautiful panel with natural, animal and other motifs.
Step-by-step instruction
Plastering surfaces with this material consists of several stages:
- Preparatory. At this stage, it is necessary to thoroughly clean the surface to be treated using sandpaper or a sanding machine from old paint and wallpaper glue. After this, you need to check whether the old plaster is holding firmly. If it cracks and separates into small fragments, it should be removed too. After this, you need to tap the entire working surface with a hammer to check for defects. All dents that form should be filled with putty and wait until it dries.
Preparing walls for plastering - Applying primer. Some people skip this stage, as a result of which the plaster begins to crumble within 3-4 years after repair. Therefore, it is simply necessary to apply this composition in order to increase adhesion, which in turn will lead to closer contact between the plaster and the wall surface. A mineral primer is better for concrete walls, and an acrylic primer for bricks. Before purchasing, you need to consult the seller, and during work follow the manufacturer’s instructions, which are indicated on the packaging. Apply the primer in a thin layer using a roller. Then let the wall dry.
Surface primer - First layer of plaster. First you will need to apply a layer of starting solution. It is necessary to level the working surface. To do this, prepare a solution in proportions specified by the manufacturer. After that, a small amount of the mixture is collected on a wide spatula and applied to the wall. It is recommended to regularly check the building level to obtain a perfectly level surface. Small spatulas are used to process the joints between the wall and the ceiling and floor covering. After completing the work, you need to let the plaster dry. 12-24 hours is enough for this. Leveling walls with starting plaster
- Application of decorative plaster. The easiest way is to buy a mixture that, after drying, will take on a certain texture. It is enough to apply such material in an even layer and wait for it to dry, and then begin painting.
Creating a relief surface - Completion of work. A day after applying the layer, when the texture has already been drawn, you need to paint the wall. The paint is applied with a special roller, and the technology is no different from painting a regular surface. After the paint has dried (see manufacturer's recommendations), it is necessary to treat the surface with wax or varnish to make it glossy. If you don’t need this effect, you can just stop at painting.
Painting embossed trim
Venetian plaster application technology
This type of work is the most expensive in terms of cost characteristics of the material. Wealthy owners can experience this pleasure, since renovating with Venetian plaster is equated with luxury. Both dry and liquid formulations are sold. It is better to buy the first type in order to control the consumption of material yourself, diluting small portions of the bulk mass. You need to prepare it according to the instructions. Usually, this process is not difficult. The mixture is poured out of the bag and diluted with water. If the soul requires it, some people add coloring pigments to the resulting liquid in accordance with the planned interior. In order for the composition to take on a homogeneous structure, it must be kneaded with a construction mixer or an electric drill with a special attachment.
When preparing the mixture, it is important to observe the temperature regime. The room should not be cool. The air temperature is not lower than 12 degrees.
Finishing sequence:
- The first layer is applied. It should be very thin, without forming empty spaces or “bald patches”. The entire perimeter of the room is treated with the base layer.
- To obtain a Venetian pattern, use rubber spatulas. Movements should be made semicircular, in the shape of a rainbow.
- For a decorative effect, the walls are treated with several such layers, and each previous one must have time to dry. To do this, take breaks and pauses while working.
- An important condition is that each new application must be different in color. This is the only way to create a beautiful pattern. Colors should be chosen in contrasting colors, which will be completely different shades. A good combination of red-yellow-brown.
- A coating of wax completes the job.
Drying time for each layer can take no more than 6 hours. Sometimes, this period ranges from 20 to 40 minutes - it all depends on the characteristics of the selected material.
Application instructions
As with mixing the composition, to apply it you also need to adhere to a certain algorithm, which in a simplified version consists of 4 points.
- Preparation of the surface to be decorated;
- Applying the first layer;
- Relief formation;
- Painting or polishing decorative cladding.
Surface preparation
As you know, to create something new, you need to get rid of the old. So in this case, to apply a new cladding you need to remove the old one and prepare the surface. Therefore, the first thing you need to do is remove old wallpaper, paint, and sometimes the old layer of leveling cladding from the wall.
Do I need to remove old plaster? This can be determined in this way: tap the wall over the entire area. If you hear that there are many voids under the cladding, then it needs to be removed. If there are few of them and they are small, in this case the old finish can be left.
Related article: How to install sliding partitions
But regardless of whether you tore off the old plaster or left it, after removing the cladding, the walls need to be inspected for damage and repaired as soon as it is identified. For example, cracks are covered with a small amount of mortar, chips and potholes are eliminated in the same way.
After the wall has been rehabilitated and the solution has completely dried, it must be treated with a deep penetration primer. Select primer mixtures based on the material from which your walls are made. Which primer is applicable for specific materials is indicated on the packaging; for example, acrylic primers are used for brick.
Do not forget that the prepared wall must be completely free of dirt and dust before priming, otherwise adhesion will be significantly reduced.
It would be useful to additionally treat the surface with an antiseptic to reduce the likelihood of mold. Next, after the wall has dried, you can begin applying the first layer.
First layer
If you did not remove the old layer, then you can immediately apply a decorative composition to it, but if not, then the first layer will be an updated leveling composition. It is not used as a decorative composition, as it is impractical and meaningless. Relief plaster is applied exclusively at the finishing stage of wall cladding.
For the first layer, conventional leveling compounds with various binders are used. I do not recommend using mixtures based on gypsum and clay; they do not tolerate moisture and are quite fragile. The ideal option for the first layer would be cement-based plaster.
It needs to be mixed and applied to the wall, leveling it at the same time. It is advisable to use ready-made mixtures purchased at a hardware store, since if you do not have experience in construction, you will not be able to create a well-balanced composition, which will certainly affect the quality of the cladding.
Related article: Small sinks for the toilet
If the surface to be treated is very uneven, then the first layer should be quite thick, from two to six centimeters. In this case, it must be applied in two passes, guided by the beacons to create a flat plane. If the evenness of the surface is satisfactory, the thickness of the first layer will be much less and it can be applied using a long tool called a rule.
Making relief
As soon as the first layer has dried, you can begin to apply the final decorative ball of cladding and form its relief. The composition is applied in the same way as the leveling layer, using a trowel and floats.
The relief can be formed in several ways. As already mentioned, textured cladding gets its relief through manipulation with tools, such as wooden and metal graters, various brushes, etc. When creating a relief wall structure, you can even work with your hands, giving free rein to your imagination.
By using plasters interspersed with minerals, the relief is created by itself; you only need to smooth the surface with a special tool, as a result of which a unique structural pattern is formed.
Painting or polishing
What to choose? Painting, polishing, or maybe both. It all depends on your ideas about the appearance of the walls of your home. Facade paint is used to paint relief plaster. With its help, you can emphasize differences in heights on a relief surface, painting deeper places with dark shades and lightening the hills of the wall.
I recommend polishing relief walls using wax-based products. This treatment will give the surface a glossy sheen. This effect looks especially good on textured cladding, and polishing makes the bas-reliefs more pronounced.