The surface of the walls occupies the largest area in an apartment or house; it is their arrangement that plays a huge role in the design of the interior of a home and allows for one or another interior decoration. Therefore, when performing repairs or finishing when building a house with your own hands, rough plastering of the walls is of utmost importance.
What is rough plaster?
Upon completion of the construction of houses, apartments, cottages or any residential premises, rough plastering is required. And it doesn’t matter whether this structure will be built from brick, aerated concrete or concrete panels. Even if the wall surface is smooth, plastering work is still carried out. This makes the base suitable for further decorative finishing. It is more practical to make rough plaster based on a cement mixture. But you can also use gypsum building and cement-lime mortars.
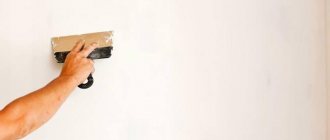
Rough plastering of walls is one of the long and difficult stages of repair. Therefore, during the process of its implementation, you should be patient and listen to the recommendations of professionals.
You should apply the rough plaster correctly so that upon completion you will have a smooth wall surface both horizontally and vertically. This is especially important if the cladding is done with tiles.
If the plaster is made with a defect, then over time the finish will simply begin to crumble, which will lead to additional costs of money and time.
Types of rough finishing
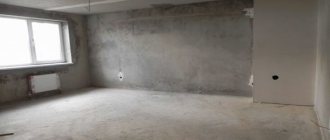
Starting wall finishing is the creation of the main surface for finishing decorative finishing, that is, it is the leveling of walls and the elimination of defects. This stage of repair begins when all hidden communications have been laid (electrical wiring, water supply, small sewer pipes) and a flat floor has been installed. There are two ways to level walls: plaster and plasterboard.
If the house is made of brick, monolithic reinforced concrete or concrete slabs, then both methods of rough finishing are used in such premises. Primary plastering with cement, gypsum and polymer mixtures provides a more durable supporting structure, but the process itself is very labor-intensive, dirty and time-consuming. Using plasterboard sheets, you can level the walls much faster, and there is no dust or dirty waste during work.
If the house is frame type and made from SIP panels, then the surface is leveled with OSB boards on which gypsum boards are installed. Finishing can be very varied:
- putty with painting;
- wood trim;
- putty and wallpapering;
- ceramic tiles, etc.
Types of solutions
So, you should pay attention that before starting repair work you need to decide which mixture is suitable for a given room. If the renovation will take place in the bathroom under tiles, the rough plaster of the walls should consist of cement. You should consider in detail what materials are needed for this work. The plastering solution contains the following components:
- binder - cement, lime or gypsum;
- water;
- river sand, although quarry sand can also be used.
Cement mortars are mainly used when rough finishing of walls is carried out. Plastering can also be done with gypsum mixtures.
In recent years, gypsum mortar has begun to be used more often in this process than cement mortar. This happened due to the properties of gypsum that it possesses:
- It is lightweight and has excellent adhesion (tenacity to the surface).
- The original appearance is retained after drying.
- There is no need for reinforcing mesh if the concrete base is smooth.
- Gypsum material is very plastic, which allows it to be easily applied to the wall.
- It is unlikely that cracks will appear after drying.
- Good sound and heat insulating properties.
The mortar, which is made on a cement base, is not so elastic and is susceptible to large temperature changes. However, it is more durable and resistant to adverse conditions in wet rooms. Cement mixtures are also used for exterior work.
Other rough finishing options
OSB boards are also used in utility or utility rooms. Their structure is such that when temperature changes, the sheets do not become wet and do not warp like gypsum boards. Partitions in the house are made of magnesite slabs and chipboard sheets.
Structure of glass-magnesite plate
The walls of cottage-style houses are decorated with wooden panels or timber, but the wood must first be treated with antiseptic and other substances so that it does not collapse.
Types of wall finishes
There are two types of wall finishes. You should consider them in more detail:
- Chernovaya. This type of finishing involves working with plaster if the building is built from brick, putty walls, reinforced concrete, the cladding is made of plasterboard or OSB. The purpose of rough plaster is to guarantee a high-quality foundation for further work with decorative finishing.
- Finishing. One of the techniques is finishing plastering the walls. Rough work at this stage allows you to add special touches to the interior design.
Thanks to this method, the base takes on the desired appearance. After completion of the finishing work, the premises are ready and can be put into operation.
Tool
Before rough plastering the walls, prepare the necessary construction equipment. It must be collected in advance. This will reduce the time spent searching for it if necessary.
Required tools for plastering walls:
- crosshead screwdriver;
- perforator;
- rules;
- steel ironed;
- plumb line;
- building level;
- metal scissors;
- putty knife;
- poplar (wide brush);
- beacons for plaster;
- hammer;
- dowels;
- grater;
- plaster spatula;
- container for mixing the solution.
Preparation stage
When repairs are carried out in an already used premises, such a procedure requires more preparation time, financial costs and effort.
When renovations are carried out throughout the apartment, this is a fairly large volume. Rough plastering of walls, regardless of what material is chosen for this, is a sequence of certain preparatory work. Let's look at them:
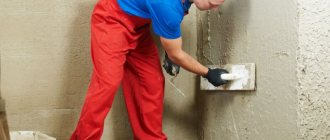
- Initially, you should remove the old layer of plaster if it does not adhere well. This is checked by tapping the wall with a hammer, and if an empty sound is detected, it is imperative to knock down the finish.
- Then remove dust and dirt. This is done using a popcorn and water. After drying, be sure to treat the surface with a primer. This will significantly increase adhesion.
- Next, a notch is applied to the concrete wall, the length of which should be 1.5 cm, depth 0.3 cm. Usually 250 of them are applied per square meter.
- If the wall has a wooden base, then a chain-link mesh is stuffed onto it, which is fixed to the planks.
- For a brick wall, in order to increase adhesion to the base, you need to deepen the seams between the blocks.
When they begin to make rough plaster on the walls, the base must be wetted. To do this, you can use a brush, but it is most convenient to use a garden sprayer (spray).
And it is very important that the walls are impregnated with primer before starting work. This will significantly increase adhesion. If the base is brick or aerated concrete, a deep penetration primer should be used.
It is important to consider: if the wall is brick, then before starting the plastering process it is necessary to remove the old layer, because this material is weak. It can't handle a new rough finish. Especially if this is a bathroom, where tiles will then be laid on top.
Preparation of the solution
When the base has been prepared, you can proceed directly to the rough plaster of the wall. Finishing requires the preparation of a solution. It should include:
- cement;
- water;
- sand.
The last of these ingredients must be sifted through a large mesh. This is a necessary, mandatory procedure. If the sand contains clay or any debris, it is removed by sifting. You should also pay attention to the brand of cement. The proportions of the mixture depend on it.
If the cement is M400, then, as a rule, cement and sand are diluted 1:4. With M500 the proportion is already 1:5. If the cement has been in storage for a long time, more is added when mixing. But the shelf life according to GOST is 3-4 months.
Then the components are mixed in a container, where water is added and mixed well until an elastic mass is obtained. The solution is checked for quality of preparation during operation. Therefore, you should initially apply a small layer to the base and make sure that the resulting consistency does not spread or slide.
Recommendations should be followed when preparing the solution, otherwise failure to comply may result in the following:
- if the composition contains too much cement, cracks may occur;
- if there is excess sand, this can lead to crumbling of the plaster.
If you don’t want to bother with mixing cement and sand, you can purchase ready-made mortars packaged in bags at hardware stores.
They just need to be mixed with plain water. A huge range of similar products is presented here: gypsum, cement-sand compositions, cement with lime. Any type can be chosen for rough plastering of walls.
The prepared mixture, whether purchased or made yourself, needs to be left for about five minutes. During this time, it undergoes a ripening process.
A short list of materials for rough finishing of a house and apartment
The list of draft or general construction materials usually includes the following items:
- Expanded clay (expanded clay gravel)
- Cement-sand mixture or self-leveling floor (manufactured by Perfekta, Unis, Vetonit or analogues)
- Reinforcement mesh
- Beacon strip 6-10 mm
- Foam concrete block (foam block)
- Tongue and tongue block
- Sand concrete M-300 (manufactured by Perfekta, Rusean or analogues)
- Alabaster
- Primer "Deep-penetrating"
- Tile adhesive (manufactured by Unis, Perfekta, Atlas or analogues)
- Waterproofing (Gidroizol)
- Drywall (including moisture resistant) (manufactured by KNAUF, Volma or analogues)
- Metal profile (manufactured by KNAUF and analogues)
- Concrete contact (on concrete before plastering)
- Plaster mixture (KNAUF-Rotband, UNIS-Teplon, PERFEKTA)
- Putty (made by Sheetrock, Vetonit, UNIS, PERFEKTA or PVA based)
- Painting mesh
- Wallpaper adhesive (for paper, vinyl, non-woven, paintable and glass wallpaper)
- Insulation (manufactured by ROCWELL, Penoplex, ISOVER, USRA or analogues)
- Junction boxes
- Electrical (power) copper cables of required sections from 1.5 to 10 (VVG, NYM)
- Socket boxes
- Corrugated hoses
- Metal-plastic or polypropylene pipes
- Sewer pipes
- Glue “liquid nails” (manufactured by Makrofix, Titebond or analogues)
- Polyurethane foam (manufactured by MAKROFLEX or analogues)
- Silicone sealant
- TV (shielded), Internet (shielded category 5) and TF cables (2-4 wires)
- Electrical terminal blocks
- Dowel-nails, self-tapping screws
- Polyethylene film
- Consumables (roller, brush, tray, spatula, drill, bit, sandpaper, crepe, diamond disc, crosses for tiles, etc.) and much more...
A more detailed list and volumes of draft materials can be found in the example of a contract for repair and construction work
In the process of renovating an apartment or cottage, only the highest quality and proven materials are used, which are provided with a multi-year guarantee and which have all the necessary documents:
- Certificate of conformity "RosTest"
- Fire safety certificate
- Sanitary and epidemiological report
- Radiation certificate
Application technology
There is nothing complicated about the application technology.
It consists of several stages, which are divided by time.
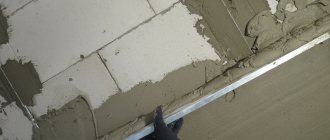
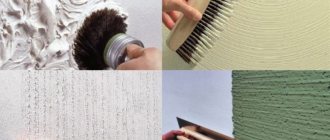
- Spray. To carry out this work, the solution needs to be made more watery. For a brick base, it is recommended to apply the first layer up to 4 mm, and for a wooden base it is applied to one centimeter. Apply the mixture evenly using a trowel. You can also apply the first layer by hand. But this method is considered less effective and longer. When applying the mixture, the trowel is brought closer to the wall. The solution is rubbed over the base with slow movements.
- Padding. With this method of application, the mass of the solution looks like dough. The work is carried out after the spray has dried. The plaster is poured onto the base. Using rules or a wide spatula, it is leveled from bottom to top. This removes excess solution. Over time, when the work is completed, the defects should be smoothed out with a trowel.
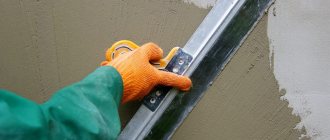
- Covering. Work continues only after the previous layer has completely dried. The solution should be diluted to the consistency of sour cream. The covering is made 2-5 mm thick. It is better to use a lighthouse for this job. Rough plastering of walls will be easier with it. Moreover, this stage is intended to eliminate mistakes after priming.
For high-quality work, the solution should be applied to a damp base. Then the grouting stage is performed. You should wait until it dries.
Plastering walls
When renovating a bathroom, you need to take into account that only cement mortar should be used for rough plastering of the walls. There is a peculiarity here. Since this room has high humidity, gypsum solutions are strictly prohibited.
For rooms in which such conditions are observed, it is best to use mixtures with sanitizing properties. These solutions already contain special plasticizers and additives that resist a humid environment. Sanitizing plaster has certain advantages:
- has an excellent waterproofing effect;
- prevents the appearance of efflorescence;
- it has high vapor permeability;
- completely environmentally friendly, does not contain any toxic additives;
- low pricing policy, as for such a product.
The process and technology are similar to the work in other rooms. So in the bathroom all the same steps as mentioned above apply.
Cement plaster
Cement plasters are universal, they have excellent water and frost resistance, and are suitable for strengthening the internal and external walls of a house. Cement plasters are divided into two types: for applying a thin and thick layer. Thin-layer plaster is used for final leveling of relatively flat walls (no more than 30 mm of vertical misalignment). If the wall distortion is more than 50 mm, then thick-layer plaster is used. It costs significantly more than the first one.
Cement plasters are much more difficult to apply than polymer-modified plasters. The process of plastering walls with cement mortar can be long and tedious, since the rough surface will require subsequent multi-layer leveling with putty.
Recommendations from professionals
To ensure high-quality plastering of walls in an apartment with a rough finish, you need to follow the recommendations of specialists.
You should consider some nuances that will help speed up the production process and make the worker’s work easier when renovating apartments and houses:
- It is recommended to work with mixtures at above-zero temperatures, and to perform similar actions from 5 to 30 ºС and humidity that does not exceed 60%. Although it is worth noting that there are mixtures on sale that are allowed to work at -5 ºС.
- At the end of each stage of work, you should wash the tool that was involved in the process and clean it of construction mixtures and additives.
- When rough plastering is performed, the surface of the base should be watered.
- You should also read the instructions from the manufacturer of the material used to perform the work.
- Typically, the arrangement of a room begins with the ceilings.
- You should also wait until the applied layer dries completely. It can be easily checked by pressing with your finger. If no trace remains, it means that the layer of plaster is completely dry.
Gypsum plaster
Gypsum, unlike cement plaster, is only suitable for the interior walls of a house. Gypsum is suitable for both thin and thick layers; some mixtures even out distortions up to 70 mm. Without reinforcement, the recommended layer of gypsum plaster is 15 mm. Gypsum is a plastic and warm material, easy to work with, resistant to cracking, it does not shrink and can be applied to any surface, even curved ones. The finished gypsum wall does not need to be puttied. In addition, gypsum plaster creates a special favorable microclimate in the room, absorbing excess moisture from too heavy air and releasing this moisture when the air becomes too dry. A kind of natural conditioner! True, in order for the walls to “breathe”, the finishing coating must be vapor-permeable.