Smooth and smooth walls are an integral part of the interior of any apartment, regardless of what they are covered with: wallpaper or paint. The smoothness and evenness of the walls is achieved using putty technology. Puttying walls is quite easy and simple, even for a non-professional. All that is required is to understand a few simple points.
A little information. Sometimes wall putty is also called gesso. It is not clear who and when introduced such a term, because it has nothing to do directly with wall decoration.
In general, gesso is an iconographic primer made from fish glue and linseed oil. Purpose: primer for wood. Icon painters covered the base of the icon with this composition and then painted on it.
Types of putty mixtures
Putty (correctly “putty”, from the word “spatula”) is a mixture that is used for leveling and finishing, eliminating defects on surfaces. It is also used as a base before painting or wallpapering (the so-called gesso).
There are several types of mixtures. For each stage of finishing, a specific type is used.
- Cement mixtures. Such mixtures are very resistant to moisture, which is why they are often used for bathrooms or kitchens. After drying, such mixtures become especially durable, but over time their elasticity is lost, which is why cracks begin to form on the surfaces. The shrinkage of cement mixtures is also quite high, which requires repeated puttying of the walls.
- Gypsum mixtures. They do not shrink and are perfectly leveled, but are not intended for rooms with high humidity or sudden temperature changes.
- Polymer mixtures. Today there is no more ideal option for puttying walls and ceilings. They do not shrink, are resistant to moisture and allow you to create an ideal surface. In addition to their composition, putties are divided into starting, finishing and universal.
Starting putties are intended for initial leveling of walls. Due to the fact that the particles of these mixtures are large, they make it possible to hide noticeable flaws in walls and surfaces.
Finishing putties allow you to get a perfectly smooth and even surface, hiding only small flaws. Therefore, they are recommended to be applied on top of the starter ones.
Universal putties combine the properties of starting and finishing putties. They are used to treat walls with minor flaws. For example, for the usual leveling of walls before wallpapering. If you have thick non-woven wallpaper, you just need to apply a layer of this universal putty before gluing.
Also, putties are produced both in the form of dry mixtures and in the form of ready-made solutions. The latter, accordingly, are more expensive. But they also cause greater shrinkage, which affects the consumption of such mixtures.
How to apply the mixture
Apply the putty using a spatula. Among the large assortment, choosing one that is convenient for you will not be difficult. But not everyone will get the job done using these tools. Working with a spatula is difficult and requires skill rather than experience.
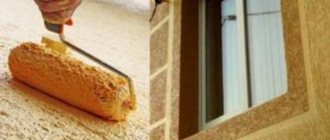
Therefore, they wonder whether it is possible to apply the mixture using a conventional roller. Puttying with a roller is possible, although, of course, it is difficult to level the walls using this tool.
More often, a roller and brushes are used to prepare walls and ceilings. For upcoming and subsequent painting, covering with a decorative layer or wallpapering.
To perform such a task, you need a roller with a pile, the length of which is 2-3 mm.
Puttying with a roller is done in a similar way to painting - periodically dip the roller into the solution and then roll the mixture over the area of the walls or ceiling.
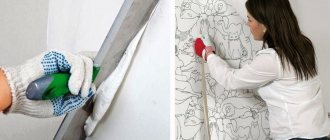
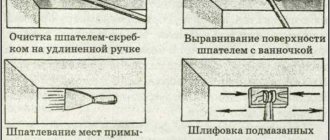
After finishing work on a small area, take a spatula and use it to scrape off the mixture from the surface. Hold the tool at an angle of 90 degrees relative to the surface. In this way, the pores and unevenness on the surface of the walls and ceiling are filled with the mixture, leaving a thin layer of putty.
Cleaning wet putty
Then allow the surface to dry and repeat the operation again. It is enough to carry out a similar procedure 1 – 2 times. The number of repetitions depends on how satisfied the builder is with the result.
Each repetition is performed taking into account that the direction of movement of the spatula is the opposite from the previous time. In other words, if the first time the user walked from left to right, then the second time they peel off the layer from right to left.
What tools are needed for putty?
In order to putty the walls, you will need special tools: spatulas.
- Painting spatula. This is a metal trapezoidal plate. It is made from stainless steel and is very flexible. Its width is from 5 to 15 cm. You will need such a spatula to seal small cracks and depressions on the surface and joints in plasterboard sheets. It is also used to apply the mixture to a large facade spatula.
- Facade spatula. This is a trapezoidal plate with a rigid carbon steel blade, 30 to 60 cm wide. Used for applying the mixture to large surfaces.
- Angle spatula. This is a steel plate bent at a right angle. It is needed to putty external and internal corners.
- Sandpaper and sanding block. It is needed to level the walls after puttying. It differs by grain size numbers. For grouting the finishing layer, No. 100 is usually used; for grouting the starting layer, No. 60 is also suitable.
Sanding walls after puttying
So we figured out how to properly putty the walls, now we will answer the question of how to sand the walls after puttying. There is nothing complicated in grinding, there are only a few small nuances, which I will talk about now. Hand sanding
In manual sanding, a “hand grater” is used - this is a tool for sanding walls after puttying; I recommend purchasing one made of white plastic because... black ones leave streaks in the corners when sanded. It is better to use sandpaper that is not the cheapest. The most important thing and the very first thing to say is to remember to use a respirator!
Sanding the walls after puttying occurs exclusively in circular movements and under the illumination of a spotlight!
If we use a household vacuum cleaner, there is a possibility of damaging the equipment. Therefore, we first remove large debris with a spatula and sweep. And we vacuum up the remaining dust.
| Surface | Abrasive |
| under the wallpaper | 80-120r |
| for painting | 180-240r |
| for decorative finishing | 120-180r |
Mesh for grouting putty
Personally, I don’t use mesh; the ones sold in my region are of poor quality and scratch the surface. As far as I know, it can be used with special graters that are connected to a vacuum cleaner. You only need to connect industrial devices, for example, bosch gas50.
How to remove old putty from a wall
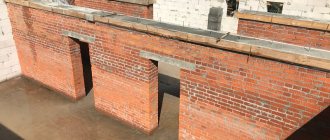
Before you putty the walls, they need to be prepared. All old finishing materials are removed from the surface: old putty, paint, all falling layers of plaster, etc.
Old paint is removed using a hammer drill with a spade attachment.
To remove old putty from the wall, you need to carry out certain manipulations. There is no need to try to chisel the entire wall “dry” with a spatula. Even if the putty comes off easily in some places, in others it can “sit” tightly. You are unlikely to be able to handle an entire dry wall with a spatula.
How to clean walls before puttying
Classic way
- Wet the surface with water. This can be done either using a spray bottle or a roller. We wait 5-10 minutes for the mixture to become soft. Then, using a spatula, scrape off the layer of old putty.
- If the above does not bring a significant result, we prepare a destructive mixture of water and starch. For one liter of water, take 2 tablespoons of starch (any starch of your choice). Stir and apply the mixture to walls or other surfaces. You can also apply either using a spray bottle, or with a roller or brush. We wait 15-30 minutes and also begin to remove the old putty with a spatula.
Radical way
If nothing helps, you should already use the tools. This is either a hammer drill with a shovel-shaped attachment, or an angle grinder with a diamond wheel. They will definitely cope with the harmful coating!
After you have cleared the wall of old putty, you need to go over it with sandpaper to remove small irregularities, and then with a wet rag to remove dust.
Now you can start priming. Apply the primer with a roller and let it dry. The manufacturer usually writes the drying time on the packaging.
How to putty walls: technology
The technology for puttying walls is no different from the technology for puttingtying ceilings. The only difference is that it is much more convenient to putty the walls than the ceiling.
Preparation of putty
If you choose a dry mixture to level the walls, you must first prepare it. Follow the manufacturer's packaging instructions. Usually the mixture is mixed with water using a drill or a hammer drill with a mixing attachment until it reaches the consistency of sour cream.
Pour water at room temperature into a container (it can be a bucket or basin), then gradually add the mixture and stir well. Let the mixture sit for 10 minutes, then mix well again.
You can check the quality of the solution in this way: scoop up a small amount of the mixture with a spatula and turn it over. The mixture should flow smoothly from the spatula. If the mixture does not fall or run off, the solution is too thick. This putty will have poor adhesion to the surface. You need to add more water to the container.
If the mixture flows from the spatula or drips, then it is too liquid. There will be sagging on the walls. In this case, you need to add more mixture to your container and mix well.
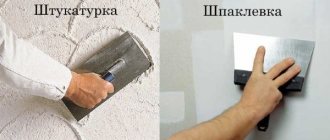
Putty technique
Now we take our mixture with a narrow spatula and put it on a wide spatula.
Next, placing the spatula against the wall at an angle of approximately 30 - 45 degrees, smoothly move the spatula along the wall until the entire mixture remains on it. It is better to start in the middle of the wall from the corner and move from left to right; we do the upper part of the wall from top to bottom. We make the lower part of the wall from bottom to top.
Again, place the next portion of the mixture on a wide spatula and apply it to the next area. To ensure a smooth surface, the layers must be overlapped. When sanding, then you will not get bumps or depressions on the wall.
The thickness of the starting putty layer on the wall can reach up to 1.5 cm. This depends on your walls and their initial evenness.
To putty the corners, it is better to use a corner spatula. Apply putty along the entire height of the corner and level it with a corner spatula.
The spatula must be periodically cleaned from adhering mixture and lumps. To do this, do not forget to rinse it in water.
After completing the work, leave the layer to dry. The manufacturer also indicates the drying time of the mixture on the packaging.
How to sand walls after puttying
Once the mixture has dried, you can begin sanding.
The starting layer can also be sanded with coarse sandpaper. For this purpose, a special device is used - a grinding block. Using smooth circular movements without strong pressure, we rub over all the unevenness on our surface. It is advisable to illuminate the surface with additional light. This will allow you to see even the smallest flaws.
Remember to use protective masks and goggles as sanding is a very dusty job.
After sanding, if you are going to apply a finishing coat, the surface needs to be primed again.
How to putty walls with finishing putty
The purpose of finishing putty is to make the surface perfectly smooth and beautiful. The puttying technology is no different from the starting putty. To achieve perfect smoothness, puttying is done with additional light. As a rule, this is a portable lamp. It is applied in a very thin layer - up to 2 mm thick and is designed to eliminate small cracks and pores.
Which putty to choose
So, which putty to choose? A few words about the composition and frequently asked questions.
Selecting putty based on composition
Here I will tell you what putties come in composition and which of the above mentioned types I can classify them as. At the same time, I will answer frequently asked questions. I think everything will fall into place here.
Gypsum putty
The main composition is gypsum, the rest is plasticizers and all kinds of additives. Gypsum itself has a coarse fraction compared to other types of putties. Therefore, it belongs to the type of starting finishing materials, well suited for preparation for wallpaper, cobwebs and rough decorative finishing.
Acrylic putty
Acrylic is such a multifaceted material that can be used in the production of putties of any kind, both starting dry and finishing in buckets. Acrylic putties are also widely used in wood processing of automobile bodies, etc. Therefore, it is probably not correct to use the term “acrylic putty” for a specific application. In this case, it can be either the start or the finish. Very often used in the production of wood putty.
Latex putty
Think about it, latex is rubber. Therefore, putty for finishing walls cannot be rubber; it simply contains a latex component. This putty is very flexible and can be used in damp rooms, although it all depends on the manufacturer.
Polymer putty
Basically these are all finishing putties, except gypsum. Acrylic and vinyl are also polymers, so acrylic and vinyl putty can also be called polymer.
Dry putty for walls
This is a starting material, mainly gypsum and acrylic. Again, suitable for preparation under wallpaper, cobwebs and decorative materials.
Which putty to choose for painting
The wall is prepared for painting as follows:
If there is plaster on the wall - 2 layers of starting gypsum putty, prime, if necessary, glue cobwebs or reinforcing mesh and 3 layers of finished finished putty, grind and you're done. If you are interested in specifics, then I use acryl-putz starting at the beginning and rotband pasta or sheetrock at the finish. This is about quality painting. If high-quality painting is not needed, then you can fill 3 layers with starting putty, grind and paint.
Which putty to choose for wallpaper
Under the wallpaper I use starting putty, which comes dry in bags. If we putty the plaster, then 3 layers of gypsum or acrylic starting putty are usually enough. I can recommend acryl-putz, prospectors, typhoon, knauf. (if they are sold in your regions). Pay attention to the price, cheap material is almost always bad. We'll talk about how to putty walls under wallpaper a little later.
Start-finish putty
Positioned as a universal putty. Very well suited for preparing wallpaper, cobwebs and rough painting. This mixture is not suitable as a finishing putty for spider webs, and I also do not recommend it for finishing the painting of ceilings and slopes. The finishing putty should be prepared in polymer-based buckets, not dry. There are no universal putties that perform their function well everywhere.
The best finishing putty
For a long time working in the finishing industry, I tried to work with different brands. I used them in different conditions and on different surfaces. As for the finishing putty, I can safely say that you need to take Knauf rotband pasta, sheetrock, Bostik finspakel (hardens very much). Finishing putty is often called “ready-made putty for walls”
Summing up the choice
A short selection of putty. For those who are too lazy to read the whole article, who just need to know the number of layers and what putty to buy:
| Type of preparation | Work order |
| under the wallpaper | 3 layers starting |
| for painting | 2 layers starting, web, 3 layers finishing |
| for decorative coating rough | 2 layers of starter, mesh reinforcement, 1 layer of starter |
| finely dispersed for decorative coating | 2 layers starting, reinforcement, 3 layers finishing |
| slopes | 2 start, web, 3 finish |
| GKL for painting | finishing of seams with special putties, cobwebs, 3 layers of finishing |
| GKL for wallpaper | finishing seams, finishing seams with finishing putty |
| loggia | 3 layers of façade (if you really need to putty and it’s damp on the balcony) |
| basement | if it is very damp façade putty 3 layers. |
| bathroom | although not recommended, I use conventional technology, as in other rooms. But you can paint it with moisture-resistant paint. |
We'll talk about this in more detail in the following chapters.