Why do you need to putty walls under wallpaper? Is it possible to do without it?
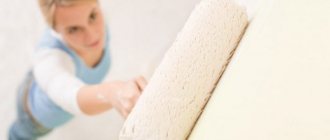
Before pasting, the walls must be leveled, even if they are previously plastered.
Applying plaster creates a certain base where there are minor defects in the form of cracks or voids. They do not create height differences and do not violate the vertical, but they can appear on the wallpaper, especially if it is thin or has striped decor. Creating a putty layer will allow you to:
- increase adhesion;
- remove microcracks;
- reduce glue consumption;
- prevent cracking of plaster;
- improve sound and heat insulation.
Sometimes putty can be neglected. For example, if you plan to glue wallpaper with floral or plant patterns onto high-quality finishing plaster. But, if the pattern is geometric, all the slightest irregularities will become visible, then puttying will be a mandatory procedure.
What happens if you glue it to plaster without decorative putty?
Paste the wallpaper onto a cement base. This has consequences:
- the water from the glue will be absorbed into the base - the wallpaper will not last long and will fall off;
- When cement absorbs water it turns dark gray. Then heights appear on it - they will appear on the trellises. The appearance will be spoiled;
- Old plaster often has chips and cracks. If a finishing coat is applied to them, after drying the trellises will tear or there will be emptiness in these places, visible on the surface.
Which putty to choose for walls under wallpaper
First, decide on the material. The putty is produced both in dry form in bags and as a ready-made solution, packed in buckets. Each release form has its own characteristics.
Dry mixture is cheaper, it lasts longer, but it cannot be stored in damp areas. This will worsen its properties or completely render it unusable if the integrity of the package is compromised. Before use, you need to study the instructions in detail so that the working time of the solution does not turn out to be a surprise.
Ready-made mixtures are easier to use, just open the package and you can start working, but there are pitfalls here too:
- shelf life is significantly lower;
- they are more expensive, and with large volumes this greatly affects the overall cost.
Putties vary in composition, and when choosing, pay attention to the humidity of the room, complexity, amount of work, and cost.
Polymer, cement or gypsum - which is better?
The most budget-friendly ones are cement putties. They have high strength and good moisture resistance. But they have disadvantages:
- difficulty in application - even masters work with it rather slowly;
- When drying, shrinkage may occur and microcracks may appear;
- poor adhesion to a smooth base and long drying time.
All these qualities make it possible to use the cement mixture in bathrooms and external cladding. It is recommended when leveling under thick wallpaper of bright colors or dark tones. Even if imperfections appear over time, such coatings will mask them.
Gypsum mixtures are convenient for do-it-yourself puttying of walls under wallpaper. They are more expensive than cement ones, but prices may vary.
Advantages:
- Even with a little experience, you can create an even and smooth surface.
- The solution dries quickly, but does not shrink or crack.
- After drying, it remains soft for final sanding.
The disadvantages are low strength and lack of moisture resistance, which is why gypsum mixtures are not used for bathrooms. However, they perform well in heated, dry rooms, which makes them an excellent base for puttying.
Polymer mixtures are expensive, but at the same time they create a perfectly flat, almost mirror-like plane. The polymers included in the composition are varied, which makes this putty almost universal. This allows:
- apply it to almost any base;
- Can be used for both wet and dry areas.
Polymer putties guarantee a flawless finish. The release form allows even beginners to work with them. However, they are rarely used for plastering walls under wallpaper. One reason is cost. Another reason is that such coverage is rarely required.
Preparing surfaces for putty
When the materials for the work have been chosen, the foundation is prepared. First, the area is cleaned from dust, decorative coating residues, and foreign particles. Old wallpaper will be removed better if it is pre-wetted with a roller, and oil paint comes off well when heated with a hairdryer.
If the old coating is being puttied, then you need to pay attention to the seams and cracks - they are cleaned, repaired with a thick solution, and then dried. It is possible to treat with special compounds that prevent the formation of mold or sealants.
After drying, the surface is primed. This is done to degrease, improve the adhesion of the mortar to the wall and prevent the formation of mold, since most primers contain antiseptics.
What primer is best to use when plastering walls under wallpaper?
When choosing soil, pay attention to the composition and penetrating ability. For interior work, mineral or acrylic primers are more often used, while epoxy primers are suitable for wet rooms. The properties of the base on which the soil will be applied are also taken into account.
- For a concrete wall, a special shallow penetration soil is used. Since the absorbency of concrete is relatively low, it needs to be dust-free and improve adhesion. A special concrete contact is used.
- Plaster has high porosity and increased absorbency. It is treated with a deep penetration acrylic compound.
- For drywall, you will need a deep penetration acrylic primer, which will increase water repellency and also improve adhesion.
Moisture-resistant drywall is not primed - it is already impregnated, and the soil simply will not stick to it.
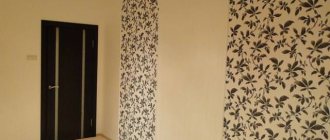
Is it possible to glue wallpaper onto putty?
The wallpaper installation instructions mention that the surface to be covered must be flat, dry and clean.
Putty surfaces are not suitable for wallpapering.
Ceilings and walls with peeling putty. Swollen and cracked areas after wallpapering will appear as bumps and cracks on the panels.
Surfaces leveled with putty mixtures of various colors. Areas of different colors will appear as light or dark spots. This will be especially noticeable on paper canvases in light colors.
Poorly cleaned surfaces. Flaws in the form of strokes from a spatula and lumps of foreign bodies appear very noticeably. Moreover, even putty tubercles protruding a fraction of a millimeter stand out against the general background of walls and ceilings more than millimeter-long depressions.
Wet ceilings and walls. Even slightly damp segments of wall and ceiling spaces promise that the wallpaper will sag due to uneven drying. This phenomenon is most harmful at the joints of sheets.
Unprimed surfaces. The majority of modern wallpaper manufacturers do not provide for treating walls and ceilings with an adhesive mixture.
Surfaces not treated with primer unevenly absorb glue from the panel, which results in incomplete gluing and open seams.
The sequence of preparing ceilings and walls for wallpapering using putty mixtures:
- Cleaning ceilings and walls of old wallpaper, peeling paint and peeling plaster;
- Priming of surfaces with deep penetration soil;
- Applying a layer of starting putty;
- Cleaning the dried starting mixture;
- Primer of the cleaned surface;
- Puttying with finishing mixtures;
- Cleaning the finishing layer;
- Thorough priming of the surface;
- Checking the quality of the surface prepared for pasting.
Calculation of the required amount of putty to level the walls
To create a cost estimate, you need to know how much materials are required. Although there are different methods, and online calculation calculators can be found on the Internet, the result will be approximate, since only a master can take into account all the factors.
Information about the material, which reports the consumption for puttying a square meter, will help you make the calculation. After installing the beacons, you can approximately determine the thickness of the coating. Based on the available data, a calculation is made.
Starting putty consumes an average of 1-1.5 kg per square meter. m with a thickness of 1 mm. Therefore, one bag weighing 30 kg should be enough for 20 square meters. m. Knowing the thickness of the layer, the calculation is made proportionally.
The consumption of finishing putty is calculated in the same way. Costs per 1 sq. m with a thickness of 1 mm will be 1.2-1.5 kg. By multiplying the resulting volume by the thickness of the final coating and the size of the area, the quantity is calculated.
Wallpapering after plastering. Deadlines?
The plaster layer is 3 cm. After how many days can I putty and glue the wallpaper?
1st day putty, 2nd pasting. This is about 40-50 sq.m.
in about a week
After the plaster has dried, usually one and a half to two days. The putty dries in 1 day (if there is not a large layer). Wallpapering after the putty has completely dried on a flat surface. Good luck to you Alya.
If the plaster is fresh, it will take 5-6 days before wallpapering
Wait a week to make sure everything is dry, in some places the depth is greater.
What plaster, what base surface? If you don’t know, you can tell by the fading of the plaster layer: wet plaster is darker, dry plaster becomes lighter. For most gypsum plasters, the average drying time is approximately 4-7 days, depending on the density of the plaster solution, ambient temperature, atmospheric pressure, and room convection parameters.
Depends on room humidity
The plaster drying process takes 7-10 days at 20 degrees. then putty 1 layer, 1-1.5 mm thick. honey mushrooms 1-1.5 days drying process. and then you can glue wallpaper or paint it.
after 5-6 days, otherwise there is a risk of cracks, after puttingty 24 hours, sand it, be sure to prime it and glue it to health
as soon as the wet spots disappear and the color of the plaster becomes uniform
After complete drying. It could be 2 days or maybe 2 weeks.
Thanks everyone for the answers!
The plaster dries for at least 48 hours
The plaster dries for at least a week, if there is good ventilation. One cm dries in about two days, and if you have as much as 3 cm, you can count it. Shapaklevka also dries up to 2 days and only then (if everything is dry) there will be no wet spots, you can glue the wallpaper.
Three days on a little damp is possible
After the walls have completely dried, you need to prime them, dry them again, and then glue the wallpaper. And plaster dries depending on the material used and temperature, for example Rotband 1-3 days, while cement plaster can take a week to dry.
Pip. masters I'm shocked. Only one person asked WHAT PLASTER, etc. and so on.? THIS SHOULD BE THE FIRST QUESTION! And there are so many empty opinions, this is how your repairs are done. And many also have ABM status. SHAME COMRADES.
Thanks for your comment. Rotband plaster. 1.5 weeks have passed. Not only did it not dry out, but it started to grow mold. Now I’ve forced the would-be masters to film it completely. Losses: 40 bags for 366 rubles. Total 12000! When they removed it, I saw that they didn’t even remove the previous layer of paint and putty. Now hire other workers and stand behind and LEAD.
Good afternoon. Yes, old layers must be removed. The mold appeared most likely from poor ventilation (high humidity in the room). When drying, Rotband releases a lot of moisture; if there is no inflow and outflow of air from the room, mold will certainly develop. As a rule, everyone installs plastic windows and metal doors with seals, thereby preserving the premises. There is no air flow, and on top of everything else, the ventilation ducts are clogged (old stock). The moisture has nowhere to go, resulting in mold. Don't stand behind your back, contact a good repair company that has a reputation. Cheap and high quality are not compatible. All the best, please contact us.
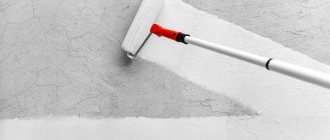
How to properly apply putty on walls with your own hands
The application technology consists of dividing the process into stages:
- Starting - involves rough leveling, applied in a thick layer, removes the largest flaws.
- Finishing – fills small pores, evens out small scratches. Provides the most smooth, even coating and is the final stage before the decorative layer.
For different stages, different mixtures are used, differing in the size of the component fraction; for the start, a coarser one is used, but the composition is the same. There are also universal putties; they are used for coatings that do not require serious leveling.
Technology of applying solution under wallpaper for people without experience
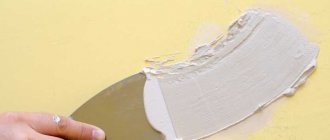
To get a good result, you need to perform the work step by step, following a certain algorithm. It’s enough to figure out how to properly putty walls under wallpaper without any experience with your own hands, and you can get started.
- First, the relief is leveled - holes and cracks are rubbed with a thick solution. Using a medium or wide spatula, apply the mixture in a crisscross motion.
- When the imperfections have been filled, a base layer is created to cover the wall. The starting composition is distributed with a wide spatula using cross movements. It is important to maintain an angle between the spatula and the surface of 20-30 degrees, to ensure uniform pressure on the tool. Maintain a thickness of 2-4 mm to avoid the formation of lumps or torn edges. The resulting layer requires good drying, after which the next one can be applied.
Finishers recommend strengthening the entire layer with a special mesh at this stage - painting mesh, serpyanka or fiberglass. It will provide additional strength, adhesion and delay the formation of stress or strain cracks. The reinforcing mesh is located between the initial starting layers and is attached to the wet material.
Similarly, a second layer is created, and, if necessary, a third, each of which is well dried. The resulting layer is cleaned with a grater or sandpaper to remove random drops.
After rough leveling, finishing putty is applied under the wallpaper, eliminating final imperfections. This is a rather delicate work, and it is almost impossible to correct defects. Therefore, the master begins leveling only when he learns to work with the finishing composition.
For training, you can use a small area, hidden later, in case the area is damaged. After obtaining the necessary skills, you can begin to finish the entire area. The completely dried finish should be additionally coated with primer for better adhesion to the wallpaper.
How many layers to apply
According to the standards, putty must be applied in several layers of minimum thickness. You can only decide how many layers to cover a wall individually, depending on the degree of its unevenness. It is not recommended to exceed the maximum layer declared by the manufacturer.