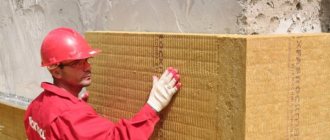
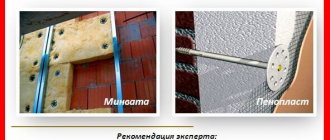
Features of foam plastic and mineral wool that are important to consider when insulating a plaster facade
Expanded polystyrene (FOAM)
MINERAL WOOL
High resistance to moisture. Expanded polystyrene, due to its high density, practically does not absorb or allow water to pass through.
Low thermal conductivity . The fibrous structure of mineral wool boards retains heat well and protects supporting structures from dampness and freezing.
Low thermal conductivity. Expanded polystyrene retains heat well due to the presence of a large number of sealed cells. Each has a size from 2 to 8 mm and is 98% air.
Resistance to high temperatures . Basalt fibers melt at 1100 degrees Celsius. Thus, the wall insulated from the outside creates a barrier to the spread of fire.
Light weight and good strength characteristics. Despite its lightness, the foam has a tensile strength of at least 100 kPa.
High vapor permeability . Water vapor passes through the fibrous structure of the material, does not accumulate and is removed outside.
Good technology. Expanded polystyrene boards are easy to process and install on the facade of the house .
Noise absorption . Mineral wool blocks strong noise from the street.
Environmentally friendly. Modern varieties of polystyrene foam do not contain substances harmful to health.
Environmental friendliness . The material is made from natural rocks of the gabbro-basalt group.
Reasonable price. Finishing walls with foam plastic for plaster significantly saves the construction budget.
Resistance to deformation.
Resistance to deformation.
The disadvantages of polystyrene foam include low vapor permeability, low noise absorption and low resistance to organic solvents. The disadvantages of mineral wool insulation are heavy weight and high price.
Facade insulation technology for plaster
Work on thermal insulation of the external walls of a house includes the correct selection of the necessary plaster mixtures, primers, and glue, which is used to fix the insulation on the facade of the house. To finish an insulated wall, several types of finishing coatings are used. The basic rule: when working with mineral wool slabs, it is necessary to plaster the walls in the house with solutions with low vapor barrier properties.
What kind of plaster is used with insulated facades:
- Mineral decorative plasters. It is based on cement and various additives that increase the characteristics of the composition - adhesion to the surface, elasticity and others. This is the most inexpensive type of finishing mixture.
- Acrylic mixtures. This is essentially a solution of acrylic polymer with added mineral fillers. The main advantages are elasticity and durability. Insulating the outside of the house with acrylic plaster allows you to implement interesting solutions for textured finishing - “bark beetle”, “pebble”.
- Silicate-silicone plaster Ceresit CT 174/CT175 is used to create decorative thin-layer coatings on brick, concrete and other wall surfaces. The materials are characterized by good vapor permeability, resistance to pollution, frost resistance and low water absorption. Available in ready-to-use form - 25 kg buckets.
The fourth type is silicone mixtures. Silicone-based facade plaster has absorbed all the positive properties of previous compositions. The coating has high elasticity, which allows it not to react to wall shrinkage. Another plus is the self-cleaning surface. A good coefficient of vapor permeability ensures the removal of condensate from supporting structures.
Having decided on the materials, you can choose the technology for insulating the house from the outside. Let's consider the main stages of work:
- Preparing the base. Before insulating the walls in the house, they must be cleaned of old mortar and any unevenness must be repaired with a cement mixture. If mold and fungi are present, the surface should be treated with an antifungal agent.
- Installation of insulation. The technologies for attaching foam plastic or mineral wool are similar. The only difference is in the glue for fixing the slabs to the surface. For mineral boards, Ceresit CT 180 is used, and for foam plastic, Ceresit CT83 is used. First of all, a support profile is mounted along the perimeter of the external walls - a plinth for the first row of sheets. Next, beacons are placed in the corners, and a cord is pulled to control the plane.
- Fixing the slabs. The adhesive mixture is stirred to a puree consistency and applied to the mounting side of the sheet. After which the slab is mounted on the wall. Laying begins from the corner. During installation, it is necessary to ensure that the vertical joints of the next row are offset by 10 cm relative to the joints of the previous one.
- Mechanical fastening of sheets using disc dowels. Fasteners are installed at the corners of the joints and one or two in the middle.
- Reinforcement of insulation with mesh, leveling. Before applying decorative plasters, the surface of the heat-insulating layer is reinforced with a special mesh. According to the technology, the mesh sheets should be laid on glue with an overlap of 10 cm between each other, so that when the solution dries, the finish does not crack. If the surface has unevenness, they are carefully eliminated by rough plastering and priming.
- Decorative finishing. The final stage of work with the insulated facade of the house includes the application of decorative plaster. If necessary, the plastered surface can be painted. The finishing mixture is applied after the primer has completely dried.
The insulation of facades under plaster must be approached taking into account a number of features. First, you should decide on the thickness of the thermal protection layer of the house. For example, in areas with a temperate climate, a slab thickness of 50-70 mm will be sufficient for facade insulation. For regions with severe winters these values will be higher. Secondly, it is necessary to choose the right finish and always with good vapor conductivity characteristics.
In addition, the technology of thermal insulation of external walls for further plastering should be strictly observed. To work independently, you will need experience and skills, but the best option is to immediately turn to professionals and save time and money.
Installation of the selected optimal insulation on the wall
Installation of insulation is carried out in dry weather at temperatures from +5° to +30°. This range is most favorable for adhesives and for people doing installation.
NOTE! It is undesirable to work under the scorching rays of the sun. Mineral wool must have a density of 150 or more, and PPS must be marked “F” (facade). The best options are polystyrene foam or basalt slab mineral wool.
In terms of physical properties (strength, size, etc.), both materials are close to each other, so the installation procedure for them is almost the same:
The best options are polystyrene foam or basalt slab mineral wool. In terms of physical properties (strength, size, etc.), both materials are close to each other, so the installation procedure for them is almost the same:
- The facade is cleaned of external lights, slopes, drainpipes and other hanging elements.
- Old paint or other coating is removed.
- The wall surface is inspected. Detected cracks, dents or other defects must be puttied; in particularly difficult cases, leveling plastering is used. The maximum size of the “wave” of the surface is 1 cm per 1 m of length. If there are crumbling areas, a deep penetration primer is used.
- Installation of insulation begins. It is recommended to install a special profile as a support for the bottom row of slabs, which will make it easier to fix the insulation and ensure horizontal alignment. The slabs are installed using a special adhesive, which is applied to the wall and immediately leveled with a notched trowel. Then the insulation board is pressed against the wall for tight contact and fixed with special dowels - fungi.
- The laying of the slabs is done as tightly as possible; there should be no cracks or gaps between the slabs.
- The next row is laid unevenly so that the joints of the slabs of the first row overlap the entire slab of the next one.
IMPORTANT! Sometimes, to facilitate the subsequent application of plaster, a metal profile is used for installing gypsum boards. The plates are tightly installed between the profile strips on the adhesive layer, the gaps between them (if they appear) can be sealed with the same glue. Subsequently, the metal profile will serve as guides for the plastering rule and ensure an even surface of the coating
This method is used on large facades, where the possibility of errors when applying plaster is very high.
Subsequently, the metal profile will serve as guides for the plaster rule and ensure an even surface of the coating. This method is used on large facades, where the possibility of errors when applying plaster is very high.
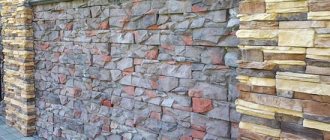
Sectional structure
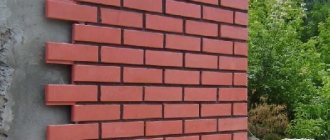
Laying technology
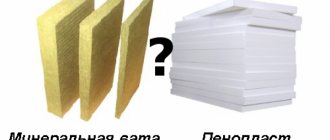
Which insulation to choose for facades under plaster
For a private house, mineral wool is better, and for an apartment - polystyrene foam.
Today, only two materials are used for these purposes - polystyrene foam and mineral wool. You've probably noticed that the first option is more common. But before insulating the facade with foam plastic under plaster, you should carefully study and compare the characteristics of both materials. If we are talking about a private house, then mineral wool will be much better, if we are talking about insulating the walls of a multi-story building - only polystyrene foam.
Let's compare these materials according to several criteria:
- thermal conductivity;
- flammability;
- vapor permeability;
- density;
- environmental friendliness;
- price.
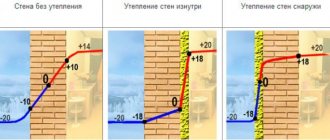
The first criterion is thermal conductivity. For foam plastic it is lower by 0.004 W/m*K, which is not critical, so this factor cannot be decisive. The fact that the polymer burns, but the mineral wool does not, is also not very important, since the thermal insulation on both sides is covered with non-flammable material - mortar or a stone wall. But if the house is wooden, then this characteristic is significant.
Polystyrene foam does not allow steam to pass through (almost), while mineral wool is a breathable material. For wooden structures, the vapor permeability of the insulation is very important. For brick rooms this is not so critical, but it is still better if the steam leaves the walls.
The facades of multi-storey buildings are insulated with foam plastic only because it is simply unrealistic to hang heavy mineral wool.
The weight of mineral wool is much greater. Thus, to insulate the facade with mineral wool under plaster, a material with a density of 130 kg/m is used. cube or more. Foam is suitable with a density of at least 25 kg/m. cube Marking PSB-25 means that the density is up to 25 kg/m. cube, although it may well be only 17 kg/m. cube Therefore, either check the weight when purchasing, or take insulation marked PSB-35. It is easier to work with lightweight foam plastic than with heavy mineral wool slabs.
Both materials contain a small amount of phenol-formaldehyde, so in terms of environmental friendliness we cannot single out the best insulation. But we can compare their price - mineral wool is three times cheaper than polystyrene foam. It is this factor that becomes decisive when purchasing thermal insulation.
Basalt insulation Basvul is produced in the Russian Federation.
The popularity of Knauf mineral wool, according to reviews, is explained by its high quality. Continued here.
How to calculate the thickness of insulation
Calculating the thickness of insulation is not an easy task.
First, the thermal resistance of the outer wall is determined using the formula:
R ex.=(1/α (in)) + R1 + R2 + R3 + (1/α (n))
R1, R2, R3 are the heat transfer resistances of all layers of the wall (we conventionally assume that there are three of them, although in practice there may be more or less).
α(в) and α(н) - the amount of heat transfer from the inner and outer surface of the wall, respectively.
Then the minimum value of thermal resistance is calculated using the formula:
R min = δ/λ
δ—layer thickness.
λ is the thermal conductivity of the material.
After this, the results obtained should be compared. If Rmin is less than (or equal to) Rpr, then the wall does not need insulation. If it turns out the other way around, the minimum value is greater than the calculated value, then the difference - ΔR - is the determining value for determining the thickness of the insulation (δS), which is found by the formula:
δS = ΔR · λу, where λу is the thermal conductivity of the insulation.
The calculation method is quite complicated due to the need to look for specific data and values for each region, use SNiPs or other reference materials. All this is quite difficult for an unprepared person, which gives rise to errors that reduce all efforts to nothing.
It’s easier to turn to online calculators, which will quickly give the required value; you just need to enter a few data on the wall material and the selected insulation.
If you have absolutely no desire to engage in such calculations, then you can resort to the simplest (and most commonly used) method: simply use insulation 5 cm thick. This value is the most common, it is suitable for almost all regions (with the exception of the northern ones or those characterized by severe frosts).
Method of insulating facades under plaster
A base profile must be installed.
To make an insulated facade for plaster, you need to prepare the working surface. Ideally, it would be necessary to level it, but this is too expensive, so we limit ourselves to removing the falling off elements, cleaning off dust and priming. After this, the base profile is installed.
The insulation must not come into contact with the ground, as this will inevitably lead to capillary rise of moisture into the thermal insulation layer. The base profile is installed at a height of 40 cm from the ground. For fastening, dowels are used, which are drilled every 10-15 cm. It is necessary to install different sections of the profile not closely, but with a gap of several millimeters. When the metal heats up, it will expand, a gap is needed so that the structure does not move.
Then thermal insulation boards (foam or mineral wool) are installed. Important points:
- the plate is glued to the wall;
- the plate is secured with plastic dowels;
- Thermal insulation is laid according to the principle of brickwork.
A layer of plaster is applied over the thermal insulation, fiberglass mesh and corners are laid, and then everything is covered with a second layer of plaster. After 1-2 days the facade can be painted. For more information about insulating the facade with mineral wool under plaster, watch the video:
Methods and technology of working with mineral wool for plaster and siding
At the moment, there are several common methods of insulating the facades of private houses using mineral wool. Among them, the most popular are:
- “Wet” facade (under the plaster layer). Initially, the mineral wool must be attached directly to the building itself. After this, plaster is applied to it, which is subsequently painted or decorated in other ways, depending on the preferences of the building owner.
- "Ventilated facade. Often used for insulation under siding. In this case, an air gap is created between the mineral wool fixed to the wall and the outer cladding layer. Its thickness must be calculated using the appropriate formula. To create a gap, an appropriate metal or wooden structure must be attached to the house. Its main purpose is to fix facing materials. This could be lining, tiles, stone, fiber cement boards, etc.
“Wet” façade
Ventilated facade
Penoplex is often used in combination with mineral wool. For example, the base is insulated with penoplex, and the walls with mineral wool.
Insulation of the facade of a private house with mineral wool can be done independently without the help of specialists. In order to do this, you need to take a responsible approach to the procedure, prepare all the tools in advance and understand the most important nuances of the work.
Preparation when working with mineral wool with your own hands
The preparatory stage involves performing certain work on the surface of the walls. Be sure to:
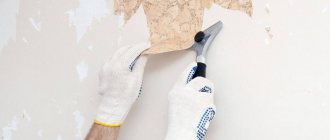
- remove peeling plaster;
- remove paint;
- get rid of solution build-up.
Places that have been affected by mold or mildew must be thoroughly cleaned. After this, they need to be treated with appropriate substances.
Preparatory work involves removing window casings, drainpipes and additional decorative elements of facades. After this, the walls must be primed. To do this, use a deep penetration primer.
Surface marking
In order to carry out the insulation process efficiently, it is necessary to mark the surface of the facade. To do this, you should install sags: horizontal, vertical and diagonal. First, pins or nails must be secured at different points on the facades. A nylon cord should be pulled between them as a weight gain. In this case, you should use a level. Weights allow you to identify wall unevenness and install insulation evenly in such places.
Installation of profiles for mini-slabs
Base profiles (or strips) are used as a guide that supports the first row of mineral wool on the facade. In addition, such elements help protect the insulation from rodents penetrating into it from below. For installation of profiles, driven dowels are most often used.
Fixing mineral wool boards
In order to install mineral wool on the facade, you need to use a special construction adhesive designed for such purposes.
It is prepared in accordance with the instructions. The substance should be applied to the mineral wool using a comb spatula. The glue should cover the entire surface of the sheet.
If we are talking about a ventilated façade, then before installing mineral wool on it, you need to secure special brackets in advance, where the guides will subsequently be attached.
The mineral wool itself is attached to disc-shaped dowels or mushroom dowels. Afterwards, holes are cut in the mineral wool so that it can be easily placed on the brackets. And finally, disc-shaped dowels are attached so that the “head” of the dowel holds a couple of mineral wool slabs at once.
For 1 square meter it is necessary to use up to 5-7 disc dowels. It is best to hammer them into the corners of the slabs.
Final work
The roll of mounting mesh must be fixed at the top of the wall. This can be done using pins or mortar. The material sheets must overlap each other by at least 10 centimeters.
It is allowed to perform rough plastering with a thickness of 3 to 5 millimeters. 2-3 days after this, you can begin applying the decorative layer.
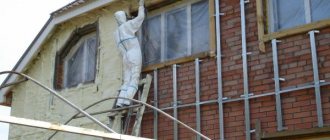
Insulating the facade with foam plastic
It is polymeric materials that have become insulation materials with the longest periods of successful operation in difficult climatic conditions. Research and special testing were carried out, which confirmed excellent results: the foam does not lose its original technical characteristics even under conditions simulating 80 cycles of temperature changes.
What are the unique performance characteristics of foam? After all, almost all builders know: foam type insulation cannot boast of serious resistance to external influences. They do not tolerate the influence of ultraviolet rays well, they can dry out quite quickly, lose their original structure and even completely collapse. But the façade of the building is directly exposed to ultraviolet rays.
Insulation of facades with foam plastic
It turns out that the main secret to the effectiveness and practicality of polystyrene foam as insulation is its combination with a layer of plaster. The material must be plastered in full accordance with technological principles. Then it will acquire excellent performance characteristics.
- A layer of plaster will protect the foam from the negative effects of moisture. The insulation itself takes a long time to dry, and when left in a humid environment for a long time, it becomes too fragile, completely losing its performance properties. Plaster completely eliminates this negative factor, turning polystyrene foam into durable insulation that is resistant to atmospheric influences.
- Polystyrene foam is a rather fragile material. A layer of plaster prevents the formation of dents, scratches, cracks and other damage to the insulating layer. Together with plaster, the foam is already quite reliably protected from mechanical influences.
- When plastering polystyrene foam, the fire safety level of the facility increases. The foam insulation catches fire on its own, and the plaster prevents the spread of fire. However, builders note that the professionalism of the plasterer will matter here: the layer must be even, continuous, and of sufficient thickness.
- Exposure to sunlight is detrimental to polystyrene foam, since ultraviolet radiation destroys it and makes it brittle. But the foam + plaster option completely solves this problem.
It is obvious that when plastering an insulating foam layer, builders are primarily guided not by aesthetic, but by practical goals. The combination of polystyrene foam with plaster significantly improves the performance properties of the latter.
How to check quality
There are a number of tips that will help determine whether the work on installing thermal insulation is progressing correctly:
- At the preparatory stage, the walls are cleaned of dirt, previous coatings, and stains.
- Without deviating from the instructions, work is carried out with the adhesive composition.
- The insulation boards are fixed evenly.
- There is no unevenness at the joints between slabs or blocks.
- The dowels do not stick out above the insulation.
- The reinforcing mesh is laid in the base layer of plaster.
- Breathable materials are used, the plaster “breathes”.
- From the drains and from the roof, water will not get onto the façade finishing.
- There are no bulges on the surface of the wall, the façade is not covered with bumps.
- There are no cracks on the wall, in the corners of window and door openings.
Installing thermal insulation at home increases the lifespan of the building, significantly improves living conditions and reduces the cost of annual heating costs for the building in winter. It also protects walls from exposure to weather conditions, fungus and shock-absorbing destruction. Under sustained conditions and proper care, good thermal insulation of the external wall of a building can last 25 years.
Similar articles
- Fur coat facade
Facade
plaster
fur coat is the optimal solution for cladding a house.
...
Universal technology
for plastering
facades
using insulation
. Read more - Insulation for exterior walls of a house under plaster
Heat conservation is an important task for residents of private houses in most regions of Russia. Read more
- Bark beetle plaster on the facade
Bark beetle
plaster on the facade.
If, when finishing a building, it is necessary to preserve ...
of insulation
was previously fixed to the wall , it is necessary... Read more - Features of using façade plaster…
Features of using façade
plaster on
polystyrene foam.
...
This porous lightweight material is used as
insulation
under
plaster
for... Read more - Facade plastering technology
To decide on
insulation
for
plaster
, read the article.
...
Facade
plaster on
aerated concrete. Read more - Facade plaster: features and types
In addition, such
plasters
cannot be applied to all types of exterior finishes.
If polymer insulation
and surfaces are used... Read more
Types of insulation for plaster
When using this cladding method, insulation boards are mounted on the outside of the wall, and plaster is applied on top. It protects the thermal insulation material from precipitation and other influences, and also creates a reliable base for painting. Today, kits of materials are sold that are designed for the design of wet facades. This type of plastering system can be supplied without insulation. Therefore, it should be selected and purchased separately. Each type of insulation has its own set of materials. To create a wet facade, the following thermal insulation materials are used:
Mineral wool slabs
Mineral wool slabs are made from stone wool using a synthetic binder. The result is a good thermal insulation material with the following properties:
- vapor permeable;
- mechanically strong;
- environmentally friendly;
- non-flammable;
- durable.
The insulation is treated with water-repellent compounds. Mineral wool boards are heavier than polystyrene foam. High-density slabs (more than 120 kg/m3) are used as insulation for the walls of the house outside under plaster. Plastering over mineral wool insulation is carried out using special vapor-permeable compounds. Thermal insulation boards are a breathable material.
Extruded and regular polystyrene foam
The main advantage of insulating the facade of a house with expanded polystyrene is its resistance to moisture. They do not get wet, and polymers are not destroyed under the influence of water. Due to its light weight, the insulation does not create a large load. Material impregnated with fire retardants does not burn on its own, but only in the presence of an open flame. This treatment gives the insulation the ability to self-extinguish. This releases toxic gases.
Extruded polystyrene foam has a more uniform fine-porous structure, better thermal insulation properties, and also costs more than regular polystyrene foam (but is cheaper than mineral wool insulation). This material is vapor-proof and unstable against the influence of ultraviolet rays (it gradually collapses under their influence). It is also adversely affected by bitumen-containing materials. Typically, external wall insulation is done with slabs of extruded polystyrene foam. A reliable stucco system performs better when it uses extruded polystyrene foam.
The finishing of the facade after insulation with foam plastic differs from the finishing technology when insulating with mineral wool. Mineral wool is installed above windows, entrances, at a height of several meters from the ground and in the area of interfloor ceilings. According to the requirements, penoplex should not be located in these areas.
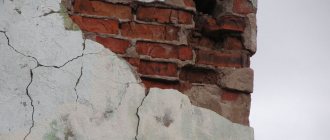
Nuances of finishing technologies for facades
The technology for plastering facades is not much different from interior decoration, but for street work the influence of environmental factors should be taken into account:
- seasonal temperatures;
- precipitation;
- wall material.
The inadequacy of the material to weather conditions is indicated by peeling pieces of paint in the spring and slipping of the layer with the formation of cracks after prolonged rains. The problem arises as a result of using gypsum mixtures for external work. Gypsum is elastic, easily lays on any surface, but is not suitable for street work.
The plaster layer cracks or crumbles if:
- reliable adhesion of the solution to the surface is not ensured;
- the proportions of the components are not met;
- the plaster mixture does not meet the requirements.
There are many modern materials for cladding facades, but for finishing uneven walls it is most economical to use lime mortar.
For facade work the following mixtures are used:
- acrylic;
- silicate;
- mineral;
- silicone.
Cement-based mixtures are considered the most inexpensive and reliable. They are beneficial for finishing uneven walls with a large consumption of material and preparing the facade for decorative plaster.
Why choose which insulation?
When solving the problem of which insulation to use, one must be guided not only by the basic properties of the material (fire safety, moisture resistance, durability). The characteristics of the load-bearing walls of the building should also be taken into account. It is impossible for the insulation of the facade and plaster to negatively affect the positive parameters of the material from which the walls of the house are built. For breathable surfaces (gas silicate, wood, frame, cellular foam concrete, aerated concrete, etc.), which are characterized by low thermal conductivity and high vapor permeability, the technology of facade insulation with mineral wool under plaster is used. Thus, thermal insulation is performed with a vapor-permeable material.
Base plaster layer
The first layer, reinforced with mesh, will replace the frame on which the entire wet facade insulation system will be supported. The solution consumption is 15–20 kg/sq.m., the dry mixture is mixed according to the manufacturer’s requirements. The solution is applied with a special pump or spatula, periodically pressing the mesh to the inner layer.
If the mesh is deformed in some places and comes out of the solution with bulges, you need to correct the mistake and fix the problem area with a special nail. To reduce such accidents, it is better to apply the solution from the bottom up. The thickness of the first layer should be the same over the entire surface of the wall.
After applying the base plaster layer, it is recommended to maintain optimal humidity on the wall surface. In dry weather and high air temperatures, the plastered area will have to be moistened.
Plaster systems
When the insulation for the facade under plaster is selected, it is necessary to purchase the appropriate plaster system. Different manufacturers offer their own unique sets of materials, which include: glue, primer, coat, facade paint, fasteners. The composition of the materials included in a specific kit is assembled by manufacturing companies in such a way as to ensure the best compatibility of parameters, strength, and durability of the plaster on the insulation. Therefore, it is always recommended to use all elements of the plaster system of the same brand. It is desirable that it be from a reputable manufacturer. Collecting different materials from different brands can be cheaper, but very risky.
From the instructions that come with a specific plastering system, you should clarify the requirements for the characteristics of thermal insulation boards that can be used with this kit. Before gluing the walls on the outside, the mineral wool surface is primed.
Briefly, the technology for insulating a facade with mineral wool under plaster or with expanded polystyrene looks like this: insulation boards are mounted with special glue, then they must be additionally secured with disc-shaped dowels. When installing heat-insulating material to hollow walls (frame and others), dowels with a screw-in core are used. Depending on the type of material from which the house is built, fasteners of different sizes and designs are purchased. If the building has solid load-bearing walls, then driven dowels are used. Before the plaster composition is applied to the insulation, the surface is reinforced. A reinforcing mesh is glued onto the heat-insulating material (fiberglass is selected with cells whose size is 3-6 mm). First, the insulation boards are covered with a uniform layer of glue, into which it is pressed. The same glue is applied to the mesh to level the surface.
Plaster systems from individual manufacturers require priming of the reinforcing layer with a special composition before a fur coat or bark beetle is applied to it. In addition to the materials listed above, always, starting (located at the bottom of the wall), finishing (located at the top, under the eaves) and corner strips (special for securing all corners) are used.
Installation of the plaster layer
First, the reinforcing mesh is installed. Before work, cover doors and windows with film to protect them from damage. It is necessary to make sure that all hooks are installed at an angle of 30°, no less. It is recommended to stretch the mesh in vertical sections equal to the width of the roll, which is unrolled from top to bottom. The overlap of stripe on stripe must be at least 50 mm.
The mesh is secured with a locking pin. Can be secured by installing two fixing plates on top of each hook. The plates must not be pressed in so that the thermal insulation of the facade does not deform, which is especially dangerous for gas-filled plastic called polyurethane foam. Plastic spacers are attached between the mesh and the insulation surface so that the mesh becomes part of the first layer of plaster.