Brick is one of the most durable and sought-after building materials. But during operation, the wall is destroyed under the influence of natural influences and as a result of violations of construction technology.
Timely repair of brickwork walls in separate places helps to extend the life of the building and protect it from moisture penetration and further destruction. Restoration work can be done with your own hands, following the technology described in this article.
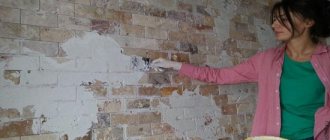
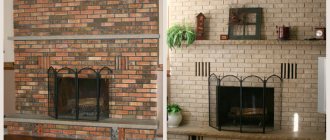
Repair of brickwork seams
Seam cleaning
Using a plumber's chisel, cut out the mortar in the joint to a depth of about 16 mm.
To ensure good adhesion, clean the surface of the bricks at the joint. Thoroughly clean the joint with a brush to remove dust. Attention: be sure to carry out this work wearing safety glasses
Laying the mortar
Wet the seam with a brush and water or a hose with a spray gun. Place a 10 mm thick layer of mortar on the falcon (a wooden board with a handle to hold the mortar while working). Using the bottom plane of a cutting blade, which is smaller than a regular trowel, cut a thin piece of mortar and press it onto the seam. Since you are pressing the solution away from you, pick it up with the bottom plane of the cut. To fill long seams with mortar, you can use a flat surface jointer.
If you need to repair a large area, fill no more than two square meters with the solution at a time. meters of wall. Work from bottom to top and from left to right, being careful not to stain the bricks with mortar.
Types and classification of defects
The most common defect in a brick wall is the appearance of so-called “salting out” on the surface of the brick, in the form of white streaks appearing on the red wall. Although they are not a prerequisite for the destruction of brickwork (they are called a cosmetic defect), in some cases they indicate a violation of building codes and technologies, in particular the use of low-quality cement mortar.
Destruction of the front, finishing layer of brickwork is a more significant and insidious type of defect. Mainly facing hollow bricks are subject to this type of destruction. This type of defect usually appears after the end of the winter season and leads to a change (not for the better) in the thermal insulating properties of the enclosing structure as a whole. At the very beginning, these may be minor chips and cracks, but after a couple of seasons, the destruction of the brick can amount to more than a third of its thickness. Atmospheric moisture penetrating through opened cavities and pores actively contributes to the further destruction of the brickwork.
“Chipping” of cement mortar is a fairly serious type of defect, leading, in some cases, even to the collapse of the brickwork structure. This defect may be due to violation of building codes and technologies during the construction of the wall.
One of the most common types of defects is the appearance of cracks on the walls of brick masonry houses. Although the appearance of such defects is not always due to the destruction of the brick structure, the location of the appearance of cracks and how quickly the process of their increase is of no small importance. Thin (hairline) cracks can also be a consequence of uneven natural shrinkage of the house; they can also appear during the construction of an additional extension to the main building, directly between the walls of the buildings.
How to strengthen a brick wall - advice from experts
Construction of the façade of a private house made of brick.
Options and technology of cladding Reinforcement of a brick wall with metal overlays
If, after the building shrinks, cracks that are not too large form, they can be secured with metal bolts. To do this, they are placed inside and outside and strengthened. Strengthening the brickwork of walls: emphasis on the supporting part When it turns out that it is the supporting side that is damaged, it will be reinforced with masonry. Here you will need:
- directly existing support;
- material for new masonry;
- strip type steel;
- concrete and steel corners.
A certain order of work must be followed. It will be as follows:
- The supporting part will be reinforced with brickwork. Moreover, additional reinforcement will need to be done every four seams.
You can also reinforce it with steel corners. And then everything is lined with concrete. Sometimes the support is changed completely. For this purpose, all structures that transfer the load to it will be strengthened with a rack with braces. Only after this will it be possible to disassemble them. Subsequent laying of the new supporting part will be carried out again with reinforcement laying every three (maximum five) rows.
How to fix it?
There are several ways to reconstruct a brick wall. Cementing will help to strengthen masonry with small cracks. However, before such a procedure, you should carefully inspect the surface of the wall, clean the cracks from dust and construction waste, and then remove the old layer of plaster.
Another solution to the problem is to groove holes in the brick and then fill them with steel fibers.
Strengthening the wall is another method of eliminating defects. This method is performed in two ways: clips and cords.
Other methods are also used (installation of internal anchors, installation of reinforced concrete belts). However, they are used extremely rarely. Even less common is the installation of floor connections.
Larger defects will require drastic methods, including replacing individual sections of the structure. To carry out this procedure, the places to be replaced are tightened with metal ties and supported with inclined supports. Next, new bricks are laid, starting from the edge of the wall.
If the damage is not so great, it is enough to fix the structure with steel brackets covering the entire thickness of the wall. The holes are then filled with mortar.
To remove cracks wider than 1 centimeter, it is recommended to use partial dismantling of the brickwork. It involves removing at least one brick wide and half a brick deep. The resulting cavities are cleaned and filled with a solution with ligation of the seams, and the cavity of the resulting crack is filled with a cement solution.
If you had to deal with a wall displacement, the best option for its reconstruction is to use high-quality steel ties.
Therefore, every builder must be able to promptly identify defects in brickwork walls and choose a way to eliminate them. The future condition of the building depends on this.
Selection of materials for repairs
Facade painting technology
Repairing the facade not only increases the durability of the entire building and gives it a well-groomed appearance, but can also completely change the appearance of the house through the use of modern finishing materials. The most popular types of coatings are:
- different types of decorative plaster.
- wood, plastic, vinyl, metal siding.
- finishing tiles (fiber cement, ceramic, brick, artificial and natural stone, fiberglass).
- porcelain stoneware
Plaster mixtures are most often used when making the facade of a house with your own hands. Nowadays the following plasters are widely used: silicone, acrylic, with insulation, decorative. Thanks to plaster, the walls have a uniform coating, and its durability depends on the material of the main walls (concrete, brick, wood). The only drawback of this finishing method is the large amount of work and the duration of the repair.
Plaster facade is a common way to give a house a finished look
Often used in repairs are materials such as porcelain stoneware, various types of tiles, and finishing bricks. Such coatings are classics, although they are expensive materials. Tiles imitating wood, brick or stone have a very presentable appearance and are not difficult to care for, since most types have a dust-repellent coating. A wide range of colors, different sizes and shapes of tiles allow you to create a unique home exterior.
House facade after reconstruction with decorative stone
Finishing with siding panels is also the most common option when renovating a building. Most often you can find houses finished with fiber cement, aluminum or vinyl siding. Such panels not only protect the building from the influence of the external environment, but also provide good ventilation of the walls and act as insulation. In addition, siding is quickly installed; if the walls of the house are brick or wooden, then the siding is attached directly to the base itself.
External restoration of a building is a whole series of repair work that requires certain skills and practice. Minor finishing work during cosmetic repairs can be done independently, relying on your experience and advice from craftsmen. But if your house has been severely “damaged” due to mechanical influences, as a result of negative natural influences (snowfall, hail, partial flooding), or simply collapsed due to the age of construction, then it is better to use the services of craftsmen. In this case, you will be sure that in a year you will not have to correct your mistakes and “patch” the facade of the house again.
Types and technology of brickwork repair
Puttying cracks
Technology for creating a ventilated facade
The resulting defect can be puttied.
When cracks up to 5 mm in size appear on the wall, the resulting voids are sealed with a solution. Before this, preparatory work is carried out:
- cleaning the treated areas from dirt and dust;
- removal of fungi and old masonry mortar;
- polishing damaged areas;
- preparation of a special mixture.
To seal cracks, you will need a cement-sand mixture in a ratio of 1:3. Repairing cracks in brickwork is done using a special construction gun with a sharp tip. The tool is placed inside the voids, after which the solution is squeezed out and distributed evenly. If the mixture leaks out, it is recommended to use a special beam when pouring
When the cracks dry out, it is important to monitor their condition. If the destruction has not stopped, it is important to find out the reasons, then begin to eliminate them
Sealing seams
First, the seams are cleaned of old mortar. If there are disconnected areas on the old masonry, you need to knock out the pieces, this will be done with a hammer. Next, the seams are weathered. To prevent the brick from absorbing moisture from the new mortar, as well as to improve adhesion, damaged areas are well treated with a special liquid. Next, take a trowel and jointing, with their help a new seam is formed, which is filled with an adhesive mixture. Restoration and repair of seams will help protect the masonry from further destruction.
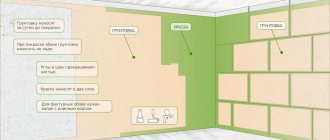
Priming before painting
Before painting, the finished wall must be primed.
Repairing a brick wall can damage the layer of facing paint, so when the restoration is completed, it will be necessary to repaint the walls, but first the surface is primed. To do this, the wall is carefully leveled, cleaned of dust, dirt and old pieces of mortar, then a primer is applied.
Waterproofing
A common cause of damaged walls made of red or facing bricks is water. To prevent further increase in cracks and deformation of the seams, waterproofing is carried out. The damp wall is thoroughly dried, after which the surface is treated with a special water-repellent liquid. According to the technology, waterproofing work is recommended to be carried out in warm and dry weather.
Possible damage to masonry
To repair brick walls, you need to know what types of damage occur and their causes:
| № | Type of damage | Cause |
| 1 | Potholes, cracks, chipped corners | Formed under mechanical stress. |
| 2 | Damage and peeling of paints, plaster, cladding elements | Occurs due to destruction or deformation of brickwork. |
| 3 | Buckling of bricks in external masonry | Occurs as a result of shifts due to freezing and sudden thawing of groundwater or rupture of vertical intermediate connections. |
| 4 | Rust stains inside or outside | Indicate processes of corrosion of reinforcement or embedded parts in the wall. These factors lead to loss of solidity of the structure. |
Repair of brick walls must be carried out in a timely manner, this will prevent further damage to the integrity of the wall.
We repair 5 types of brickwork damage
Good brickwork will last a very long time. But in order for it to maintain its excellent appearance and perform all the functions assigned to it, the masonry must be periodically repaired. Even through very small cracks, moisture can penetrate a wall or slab, and when it freezes or thaws, it will destroy the laid brickwork.
Moisture is the main, but not the only pest of masonry. Depending on the deformation and problems encountered, repair of brickwork can be carried out in several directions.
Sealing cracks
Be sure to clean any existing cracks from dirt and dust. Then fill the cracks with liquid cement mortar with finely sifted sand (in a ratio of 1:3). It must be poured inside using, for example, a syringe.
If the cracks are more than 5 mm, then to repair them it is necessary to install an anchor or beam. In other words, shift the surface of the wall to a depth of half a brick and a width of 1-2 bricks. Then fill the crack with cement mortar and install a beacon.
If cracks appear in this place again, then measures will have to be taken to establish and eliminate the causes of its formation.
Seam repair
- First you need to get rid of the old solution. Loose pieces of masonry are removed using a chisel and an entrenching hammer. You will need a brush to sweep away crumbs and dust from the seams.
- Next, you need to moisten the seams and the bricks themselves with a spray. This process is necessary to prevent the bricks from absorbing the new mortar. In addition, this treatment will provide good grip.
- At the next stage, a pointed trowel and jointing are used. They will give the same type of seam as the old one.
- All that remains is to fill the prepared seam with a new solution and remove the excess with a brush.
Priming before painting
If the brickwork was painted, then the surface was probably damaged as a result of repairs. To restore its former beauty, the repaired areas should be primed again.
As a rule, no primer is required when painting new masonry. But after artificial intervention, a primer is needed so that the paint lays evenly.
Waterproofing
Water most often causes the destruction of brick walls
Therefore, if you decide to put the masonry in order, then at the final stage pay increased attention to waterproofing so that new problems do not arise. A highly specialized cement-based material is suitable
At the same time, during the processing process the surface of the brick must be absolutely dry.
The brick is crumbling and destroying the wall, let's fix it!
To correct masonry defects caused by crumbling bricks, use plaster over a fine-mesh metal mesh.
- The place where the brick crumbles must be cleaned to a solid base.
- Then use bolts and dowels to strengthen the mesh.
- Next, thoroughly wet the surface of the wall and apply a sand-cement mortar of medium viscosity.
- For one part of cement, take three parts of coarse river sand. When the wall is dry, all that remains is to wipe down the surface.
Brick is a durable material for construction. This is confirmed by the many surviving castles that have survived more than one century. But, like any building material, brick needs constant care and repair as necessary.
Timely repairs will help preserve the structure for many years. The types of repairs depend on the specific problem areas. If a problem occurs repeatedly in the same place, you should definitely look for and eliminate the causes of the defects.
What causes masonry to collapse?
Often masonry is destroyed due to incorrect calculations of the foundation.
To prevent the destruction of a building, you need to know why its integrity may be compromised.
Reasons for the destruction of a brick wall:
- violation of construction technology and incorrect calculation of foundation loads;
- different densities of the soil under the building;
- absence of expansion (temperature) joints;
- close proximity to groundwater;
- shrinkage of the foundation, insufficient or excessive depth of its foundation;
- beam deformation
- under the influence of moisture.
If there is a large layer of snow on the roof, this significantly increases the load on the supporting structures, which can lead to their shrinkage and destruction. To extend the life of the building, you need to promptly clear snow, drainpipes and repair the roof.
Inspection, preparation, repair of damaged areas
When starting to repair the facade of a cottage or country house, the first thing you should do is carefully inspect the facade and assess the damage. There is a high probability that the coating was destroyed not only in those places where it is visually noticeable.
The easiest way to identify hidden damage in the plaster on a wall is to tap it with a rubber hammer. In places where such damage is present, the sound will be dull, indicating the presence of a cavity under the coating or its partial peeling.
Work on major or current repairs should begin with the careful removal of loose and loose plaster. You can leave only those fragments that have a strong adhesion to the wall and have obvious strength characteristics. The foundation must be strong. If you leave fragments of plaster that do not have adhesion to the wall surface, then the layer of the new facade may crack and simply fall off.
After removing fragments of the old facade, the base must be thoroughly cleaned of dust and dirt. A good solution would be to use a medium pressure washer for this purpose.
The plaster mixture is applied to the cleaned areas and completely smoothed with the main surface
After drying, all areas with removed coating are carefully treated with a suitable primer emulsion. For this, depending on the area of the surface to be treated, rollers or brushes can be used. For large areas, it is worth using a sprayer. The purpose of the emulsion is to reduce the absorbency of the base and improve adhesion. It is necessary to use a primer to ensure proper adhesion of the new layer of plaster to the remains of the old one and the base of the wall.
Next, the cavities are filled with a leveling solution according to the standard method using a spatula
Pay special attention to the elimination of all irregularities on the wall and the absence of transitions on its surface
After the initial setting of the mortar, depending on its type, weight and weather conditions, from 30 to 90 minutes, the filled space must be carefully rubbed and smoothed. After this, at least 24 hours must pass before the start of a new stage in the facade repair. Regardless of weather conditions, the façade wall must be protected with a film: either from possible moisture ingress or from drying out too quickly in the sun.
Repair technology
Before repairing a crack in the wall, you need to determine the stabilization of the damage. If the split continues, then eliminating the problem will only be a temporary measure. Therefore, it is recommended to carry out repairs only on stable areas.
You can do the test yourself. The dynamics of faults are checked using beacons made of plastic materials, with a special scale or made of gypsum. Stability is indicated by a small cement screed in a damp room or in a dry paper sheet with silicate glue. If the landmarks remain unchanged during the month, then repair work is permissible. Otherwise, you need to wait until the end of the destructive process.
The next step is the choice of restoration filler. The solution to repairing cracks in the wall inside the house can be a repair composition for dry or wet rooms. Outside, only mixtures that are resistant to moisture and frost are allowed.
Preparatory stage
Before repairing a crack in a brick wall of a house, you need to prepare the necessary materials and a set of tools. The table provides a list with explanations of what is needed for what.
| Metal bristle brush | Rough cleaning of the crevice |
| Stone scarpel and hammer | Processing stone, cement plaster |
| Stone scarpel and hammer | Elimination of dust and priming of the working surface |
| Trowel and spatula | Plastering or puttying |
| Sandpaper | Removing plaster from the work area, sanding the leveler for finishing. |
| Capacity | Mixing the working solution. It is more convenient to work with plastic, since the mixtures have weak adhesion to polymer materials. |
To fill voids, plaster or putty is more often used, less often polyurethane foam is used due to its relatively short service life and low strength. However, the latter reduces the consumption of mortars when repairing splits with a width of 1 to 8 cm. The masonry mixture is made on the basis of cement, therefore, to restore joints in brickwork, craftsmen use materials based on the same binder.
To prevent destruction of the work done, it is necessary to strengthen the surface. To do this, use plaster reinforcing mesh or rolled metal with hardware. The latter include a channel, anchor bolts, dowels with self-tapping screws, reinforcing bars, ties, and wire.
Methods for eliminating damage in brickwork
Since the cracks have different natures and sizes, the methods for repairing cracks in the wall vary. Let's look at 5 methods that are relevant for brick walls.
- The simplest option is to fill the voids with sealant, putty or repair compound. But this approach is only relevant for splits up to 5 mm wide. At the same time, monitoring of the condition of structures is mandatory.
- Metal staples are placed along the split in increments of up to 50 cm. This is enough for shrinkage cracks. An alternative can be steel plates or mounting perforated tape with fastening in the form of dowels and nails.
- For through slots, you can use steel plates. They are fixed on both sides of the wall at the same height. Then they are additionally tightened with a bolted connection.
Each of the methods involves subsequent repair of the cracks. This process begins with complete cleaning of the damaged area from dust, dirt, loose elements of brick and masonry mixture. After preliminary wetting with clean water, first fill the deep areas with elastic sealant (acrylic, latex) or foam from a gun. After drying, the excess is cut off with a slight inward slope.
The best option for repairing a crack on the outside of a brick wall in winter is to use tile adhesive based on a cement binder with frost-resistant additives. The main thing is to comply with the operating conditions recommended by the manufacturer. Manufacturers also offer repair compositions with similar properties.
Types of repairs
The appearance of the facade of any building is very important for creating a harmonious impression of the architectural object
Therefore, the quality of repair work is very important. Basically, repair work to restore facades comes down to plastering work
Finishing facades with plaster has not only an aesthetic function: modern plaster compositions can protect a building from moisture and increase thermal insulation and fire retardant properties. Plaster protects the walls of a building from the adverse effects of atmospheric factors, and the strength and stability of the plaster layer can extend the life of the building.
There are two main types of repairs: partial and major.
Partial repair of the facade involves performing restoration work on individual sections of the wall. In this case, the correct selection of materials for repair in terms of compatibility plays a special role; for example, cement compositions can be repaired using similar cement-sand mortars. This way, further cracking can be avoided in the future.
Major repairs of the facade are necessary when the damage accounts for more than 30% of the entire surface of the wall. In this case, the old plaster layer is completely removed, the wall is cleaned and re-plastered.
Brick facade repair
Buildings made of brick practically do not need facade repair work, since brick has excellent strength and stability. In rare cases, due to design errors or violation of construction technology, the need to repair the facade of a brick building still arises. In such cases, large cracks are repaired and the façade is restored - the destroyed bricks are replaced with new ones. It is advisable to carry out diagnostics of brick facades - tapping - annually.
Repair of panel facade
The bulk of houses in our cities are panel houses, and they are the ones that most often need repairs and restoration of facades. In houses of this design, damage begins primarily in the interpanel seams, where moisture accumulates. As a result, damage is caused not only to the appearance of the building, but also to the interior - cracks, condensation, and mold spots appear on the walls. Such defects are eliminated by sealing the interpanel seams. But the panels themselves are also capable of destruction under the influence of atmospheric influences. Restoration work for panel facades consists of plastering over reinforcing mesh, restoration of cladding or mosaics. Currently, decorative facade plasters are widely used.
Repair of ventilated facades
Currently, ventilated facades are becoming widespread: buildings are faced with composite materials and porcelain tiles. Cladding gives the building not only a modern and attractive look, but also allows you to not only effectively insulate the building, but also protect it from external influences and extend its service life. Decorative panels are mounted on metal structures. In some cases, it may be necessary not only to replace or restore the cladding, but also to repair metal guides.
You can order all types of facade repairs by phone or using the feedback form on the website of the company TEPLOSHOV.PRO. You can get advice on the types of work you are interested in and the materials used. Qualified specialists of our company will inspect the facade and carry out the necessary repairs quickly and with maximum quality.
How to avoid defects, preventive measures
Poor-quality brickwork will not cause concern and unnecessary financial investments if, when constructing an object, you pay attention to the requirements of SNiP, GOST and strictly adhere to the technology chosen for construction.
In order for the wall to be smooth, strong and durable, when constructing it you need to take into account a few simple recommendations:
- sand added to the concrete mixture must first be cleaned of foreign objects and dried;
- To obtain strong, wear-resistant masonry, it is advisable to use the “bandaging” technique. This will allow the load stress to be evenly distributed across the masonry rows and prevent the occurrence of defects during operation of the facility;
- when the construction of a building is carried out in the winter season, its volume should be calculated when preparing the solution. The mixture should be enough for 4 hours of work and no more;
- To prevent the wall from turning out uneven, you can level the masonry using a cord stretched at a distance of approximately 2-3 mm from the wall being built;
- It is imperative to smooth out the mortar that flows out from under the brick during masonry work;
- you need to control the thickness of the seams between the rows and the horizontalness of the surface using a building level.
In order to preserve the original technical characteristics of the building, it is necessary to carry out its technical inspection and promptly eliminate even the smallest defects, without waiting for large-scale destruction of the walls and the construction site as a whole.
Stages of work
The list of works for cosmetic and major repairs is slightly different, but in general the workflow looks like this:
- Determining the nature of damage to the building. Based on the degree of wear and tear, it is clear whether to involve specialists or do the repairs yourself. At the same stage, if necessary, the drainage systems and ebbs are repaired, the cornices are repaired and the walls are tapped with a hammer for voids and cracks.
- Preparing the façade surface for repairs. This stage includes:
- cleaning walls from old finishes, sealing cracks in bricks and gaps in seams, eliminating unevenness. This is done with a hammer, chisel, spatula, or ax;
- Old plaster or paint must be cleaned until all loose material is removed. If there are cracks in the main wall, use a cutter to increase their width to remove excess deposits, glue them with reinforced mesh and seal them either first with polyurethane foam, then with plaster, or with the plaster itself;
- surface leveling. All existing protrusions are removed with a spatula, ax or cutter. We plaster the cracks and depressions and level the wall at the same level. Then, when the walls are dry, you can wash off the untouched areas with water from a hose to remove all dirt and dust.
- The next step is to apply the primer. Primers need to be applied a lot, with a wide brush and into all the cracks and holes. It ensures good adhesion of the finishing material.
- Plaster the walls over the entire surface with the first layer. Drying and plastering with a second, finishing layer. At the same time, at this stage, the window slopes and corners are leveled.
- If a large part of the facade requires repairs, then use a reinforcing mesh, which is then plastered.
- For the finishing layer, you can use ceramic tile adhesive; it is specifically designed for outdoor work and can withstand high temperatures. You can apply decorative plaster to such a solution or just paint it.
- It is also advisable to prime the surface before painting. Then the paint will last longer and its consumption will be less.
- Painting the facade. This job may seem easy, but for everything to come out beautifully, you need to use the right tool and paint in stages. You need to choose the right combination and mix the colors correctly. You will have to paint the facade several times, because the first layer will be pale. Therefore, you need to calculate the amount of paint when mixing colors.
Repainting the walls a different color is one of the ways to quickly repair the facade and give the house a new look
That's it, theoretically the façade of the house has been repaired. But in practice, when finishing the facade, different types of materials, insulating and soundproofing panels are used, depending on this the number of repairs changes.
Stages of breaching the integrity of walls
When cracks or deformation occur, the first step is to find and eliminate the cause that is negatively affecting the building.
After this, monitor the building. Beacons are installed at the locations of cracks and the dynamics are monitored.
Repair work is carried out after eliminating the causes leading to destruction.
Connected cracks lead to masonry collapse
The destruction of masonry takes place in several stages:
- under the influence of negative factors in the building, tension arises that is invisible to a layman;
- microcracks form in individual bricks, then they expand to the width of a hair;
- cracks in the brickwork unite with each other and capture vertical seams, this leads to a serious violation of the integrity of the building.
Deformation can be determined using measurements, visually, by calculating the permissible load on the brickwork.
If you start repairs without understanding the reasons leading to destruction, then the violation of the integrity of the brickwork will continue.
Restoration and restoration of the facade
Restoration of building facades
in goes according to a certain plan. The procedure begins with sanitation and cleaning of surfaces, and the first step is to remove old paint. Modern technology offers a variety of methods to perform this labor-intensive process. Thus, it is very popular to apply a special composition that destroys old paint, and in the future it can be easily removed mechanically.
Removing street pollution is an absolutely necessary step when carrying out work such as facade reconstruction
. Thorough cleaning of the walls guarantees good adhesion of subsequently applied repair and preservative materials. To perform this technological cycle, various chemical cleaners are used, which, after application and exposure for a certain time, are also thoroughly washed off with water under pressure. At the same time, the remains of cement mortar, lime deposits and efflorescence from the surface of the facade are also removed, and the next stage will be the destruction of fungus, moss, lichens, and mold. If necessary, specialists will perform mechanical cleaning of the surface followed by treating it with special chemical compounds.
After cleaning the surface, the craftsmen begin to strengthen the masonry. High-quality restoration of the facade
made of brick requires mandatory such work. After thoroughly cleaning the surface, a special stone hardener is applied to it.
Only after these preparatory works have been carried out can restoration measures begin, which include:
- filling voids, cracks and interpanel seams with a special suspension;
- removal of chips;
- puttying;
- restoration, if necessary, of destroyed façade elements (including architectural stucco decoration).
Often, the reconstruction of a facade also includes its additional insulation using the wet method, which significantly increases the thermal protection of the building; for this, special thermal insulation panels can be used, for example. And conservation of the facade is the final stage of the entire restoration procedure. The use of modern protective equipment can significantly reduce the impact of adverse natural factors on building facades.
carries out work on the restoration of the facades of any buildings in a manner clearly specified by technology.
Contact our specialists by phone for consultation and preliminary calculation of the cost of repair and restoration of the facade
Discount on all types of work!
Technology for eliminating defects in brick rows from the outside
The volume and complexity of restoration work depend solely on the nature of the damage. The following types of repairs are distinguished:
- Puttying cracks begins with cleaning the damaged area from dirt, dust, rusty and greasy stains, followed by treating it with a deep-penetrating construction primer. To eliminate damage, you will need a solution of a cement-sand mixture in a ratio of 1:3 (cement + sand), which fills the defect as much as possible.
- Restoring the integrity of the seams. Before performing this procedure, you should clean the spaces between the bricks as much as possible from the old mortar. After this, clean the repair area well with a brush and moisten it generously with water. Next we move on to the restoration of the seam.
- Brick destruction is one of the most difficult and serious restoration procedures, since in this case a complete replacement of the damaged elements will be required. The ideal repair option would be to completely dismantle the masonry and then build a new wall.
Methods for repairing brickwork
There are various ways to repair masonry. Over time, defects appear on the outer brick wall of the house, which look like small cracks up to 5 mm in size or seams between bricks that begin to crumble. All these troubles lead to weakening of the load-bearing walls of your home, deterioration of the thermal insulation of the walls, and if they are not eliminated in time, moisture will enter the weakened areas, which will further aggravate the situation.
The main reasons for the slow destruction of walls can be identified as follows:
- Initially incorrect brick laying. The brick bonding technology was poorly followed and the mortar was of insufficient quality.
- The foundation of the house was not made in compliance with the basic rules, which led to its shrinkage. In this case, cracks in the brickwork appear under the roof of the building.
- Excessive load on the walls of concrete ceilings, as a result of which cracks appear below, closer to the foundation.
Let's consider two cases:
- Restoration of brickwork joints.
- Repairing cracks in a brick wall.
Restoration of brickwork joints
Sealing joints with lime mortar
To stop the seams between the bricks from spilling out, first of all, with a metal brush, we remove all the rotten mortar, reaching its solid state. Then, using an ordinary sweeping brush, we remove all the dust that remains in the seams between the bricks.
Prepare a solution of slaked lime. When quicklime hardens, it will swell and try to crawl out without giving a binding effect. Add sand to lime in the following proportion: 1 part lime + 3 parts sand, mixing with water. It is better to take washed river sand, since gully sand contains particles of clay, which will give the seams a yellow color.
Before the process of filling with lime mortar, problem areas are moistened with water and, using jointing, the solution is pushed into the damaged areas. After the lime mortar has hardened, the seams are cleaned with sandpaper.
Repairing cracks in a brick wall
If cracks up to 5–8 mm in size appear in the brick wall of your house, you need to do the following. Clean the seams in places where the destruction spreads perpendicular to the cracks so that it is possible to insert reinforcing bars with a diameter of 6 - 8 mm into these places of the seams, and in some cases it can be thicker, depending on the width of the seam. Then the places where the reinforcement is laid are sealed with concrete mortar.
Metal screed around the perimeter of the wall
It happens that this method does not give positive results, then they resort to the method of repairing the brickwork, using a wall screed around the perimeter using metal profiles. In other words, depending on the size of the entire wall, using electric welding, a frame is constructed from a large metal corner ranging in size from 63 to 110 mm, which is adjacent to the corners of the house and is pulled together (welded) together in several places along the perimeter of the wall with a metal strip. In “several places” – this is at the top, in the middle and at the bottom. After the screed is installed, you need to repeat eliminating the cracks using reinforcement.
If the size of the cracks reaches more than 10 mm, experienced craftsmen recommend dismantling the old masonry in these places and laying out new ones.
Note: all work to eliminate defects must be carried out after the cracks reach their maximum size and stop growing.
Crack repair
To seal cracks with an opening of no more than 5 millimeters, cement mortar is used. Before carrying out repair work, the section of the wall with a crack is cleared of debris and moistened with water. To clean the surface, you can use a brush, a hand sander, or compressed air. In order for the brick to adhere well to the cement mortar, its edges are slightly knocked down with a hammer.
Cracks in a brick wall with a width of 5 to 10 millimeters can be repaired using the method described above, replacing the cement mortar for sealing cracks with a sand-cement mixture.
Brick cracks with an opening of 10 millimeters or more require special attention. Do-it-yourself brickwork repair can be done in the following ways:
- using polyurethane foam - vertical cracks can be restored using this method. The foam is blown into the gap, after hardening the material is cut to a depth of about two centimeters, the resulting gap is sealed with cement mortar;
- using metal anchors and cement mortar - metal anchors are installed in several places along the length of the crack; the anchors are fastened to the wall using dowels. Seal the crack with cement mortar;
- by replacing the damaged area with new masonry - the area of masonry that has become unusable is dismantled, moving from top to bottom. To seal the resulting opening, restoration bricks are used, which are laid according to the “brick castle” principle.
Relaying brickwork, removing weak areas
Often the repair measure is to replace the brick in the damaged area with a new one. Here the order of work will be as follows:
- The surface areas selected for replacement must be strengthened with metal bolts (you can additionally support them with racks).
- The replacement will take place in turn: first of all, the edge is attached, then the middle and intermediate ones.
- After completing the masonry work, these temporary fasteners must be dismantled and the holes created by them must be sealed. The resulting gap itself, which runs between the bottom of the beam and the new masonry, must be wedged with cement mortar in a semi-dry state.
Technology for repairing a damaged brick wall inside
The technology for restoring the integrity of internal brick walls is practically no different from repairing external masonry. The simplest and most cost-effective repair option is the counter-drilling method. Its essence lies in the fact that holes are drilled in certain places of damaged walls, which are completely filled with cement mortar to restore the integrity of the masonry.
One of the most effective ways to repair brickwork is to dismantle it, then re-build the wall and replace damaged bricks. The only disadvantage of this method is the cost and complexity of its implementation.
Preparing the wall in the apartment
To restore the integrity of the masonry, you will need the following tools:
- Master OK.
- Trowel.
- Hard wire brush.
- Chisel.
- Hammer.
- Hammer.
- Joining.
- Level.
- Container for preparing mortar mixture.
After identifying and eliminating the cause of the destruction of the wall, restoration work can begin, which will be aimed at restoring integrity.
Repair begins with cleaning the damaged area from dirt and dust, removing old mortar and damaged bricks. This can be done using a hammer and chisel, or a hammer drill. At the same time, work with these tools so as not to damage the bricks.
How to repair a brick wall?
After completing the preparatory stage, we proceed directly to the repair using the methods described above. The following types of solutions are used for this:
- cement-sand;
- gypsum;
- limestone;
- acrylic.
After preparing the solution, a special additive is added to it, which will improve its properties. The repair area should be moistened generously with water. Apply the prepared mortar mixture so that it fills the defective areas. In case of significant damage to the walls, special supports are used that will not allow the solution to fall out.
Repairing a damaged wall
Replacing bricks
Remove any mortar from around the damaged bricks and use a chisel to break up any damaged or cracked bricks. If the damaged section of the wall consists of several bricks, remove the top ones first, then the bottom ones.
Use a brush to remove any remaining mortar and broken bricks. Wet the damaged area of the wall, as well as the new bricks, with water and lay them in the same way as if you were laying a new wall. Apply the mortar to the side faces of the bricks and lay them on the mortar, not forgetting to make a groove in it. When the mortar has set, unstitch the seams using the same method as used in the remaining seams of the wall. Keep the solution wet for three to four days.
Stages of destruction of the facade of a brick building
Brick walls do not collapse in one day. This process is quite lengthy and can last for several months or even years (in case of shrinkage). Its main stages are:
- Emergence of masonry stress. At this stage, visual signs of deformation are not yet observed, so this process cannot be somehow influenced or prevented.
- Formation of microcracks directly on building materials or finishing materials. If they are detected, corrective measures should be taken immediately.
- The appearance of deep cracks in the masonry. If this sign does not force you to immediately begin repair measures, then after some time the destruction of the brick itself will begin and a significant decrease in the thermal insulation properties of the walls.
- Deformation of masonry with loss of individual elements.
How to split a brick
Splitting across
When working with brick, you often need to break the brick into small pieces. Using a pencil and ruler, draw a split line around the brick. If necessary, apply a slant line (inset below), but remember that a slant line is more difficult to split the brick. Wear goggles to protect your eyes from debris. Place the brick on the sand layer with the part you want to use facing you. Place the blade of a wide chisel on the split line and hit it with a hammer. Gradually deepen the groove around the brick. Listen to the sound of impacts. When the brick starts to crack, the sound will become dull and you may end the job with a sharp blow. Chop off any rough edges with a trowel.
Splitting along
Draw a split line along all four sides of the brick, dividing it in half. Use the square end of a pick to score the surface of the brick along the line (don't forget to wear safety glasses). For very hard bricks, use a chisel as shown above. Then grab the brick firmly with one hand and hit it sharply with the flat end of the hammer near the center of the chipped line. (You may need to practice a little before you can gently break a brick in half with one blow.) Use a thin hammer blade to level the surface of the brick.
It is more difficult to split bricks lengthwise than crosswise. If you have a power tool, you can use an abrasive disc instead of a hammer and chisel to make a groove, and then split the brick with a sharp blow of a hammer and a wide chisel.
Prevention
Preventing deformations is easier than eliminating them. In order for brickwork to serve for many decades, you should adhere to a number of rules for working with bricks:
- The working mixture should be made only from sand that has been pre-cleaned and dried. Next, you need to mix it with cement, and then pour water into the mixture.
- It is better to lay bricks according to the “bandaging” scheme. It allows you to evenly distribute the load across all laid rows, preventing the occurrence of defects associated with overload.
- At low temperatures, the mortar for laying bricks can be prepared for 4 hours of work.
- To obtain a smooth wall, stretch the cord so that the edge and top surface of the brick block are at the same level. There should be a distance of 2 millimeters between the masonry and the rope.
- During the hot period during construction, the brick should be periodically moistened with water (already laid and laid). This prevents unwanted hardening and improves the adhesion of the mortar to the stone base.
- The mortar leaking from the seams should be smoothed down.
- For constant control it is necessary to use a level and a rule.
- The thickness of the seams should also be kept under control, which should be in the range from 8 to 15 mm. This parameter must be checked every 5 rows.
The occurrence of defects in brickwork requires immediate action to eliminate them. Otherwise, the identified flaw will progress and gradually lead to devastating consequences. Timely reconstruction will extend the life of the building.
Large cracks in external walls
- If the crack has a significant width, then anchors or beams (metal bond) are often used to secure the masonry.
- Masonry seams that have crumbled are sealed with a clay mortar with the addition of brick chips.
- Repair of cracks on wooden partitions, the surface of which is plastered and located near the stove, is carried out by jointing or applying plaster over a broken metal mesh.
- Cracks between partitions and walls or ceilings are sealed with plaster, having previously filled a metal mesh (chain-link type) over the area to be repaired.
- If there is a deviation of the partition on load-bearing walls and ceilings, then repairs begin by marking the vertical position of the partition and filling slats for support. Then wedges are driven between the partitions, walls and ceiling, and the cracks are widened. After the wedges are loosened, the partition is moved to the deviation distance to the thrust rail. Then the partition is fixed to the wall.
- Repair of cracks and cracks formed between partitions, walls and ceilings is done with limestone mortar, with the addition of alabaster.
- Partitions made of wood, in which sound insulation is compromised, are reinforced with auxiliary racks made of timber, with further cladding made of boards and plaster on the sheathing.
- Often, in rooms with high humidity that have wooden partitions, cracks appear as they rot. In this case, the rotten part must be replaced with new antiseptic or brickwork, laying it in half, hanging down the upper part of the partition in advance.
Defects in stone structures
Defects in masonry structures of buildings and structures are classified into the following main types:
- wall deformations (deflections, deviations from the vertical);
- chips, sinkholes, potholes and other violations of the continuity of masonry;
- moistening the masonry walls, weathering and washing out the mortar;
- damage to protective and finishing layers;
- destruction of the load-bearing layer of walls and pillars.
The main causes of defects in stone structures are:
- design errors (incorrect consideration of loads, unsuccessful solution of interface nodes, loss of stability due to an insufficient number of connections, unaccounted for eccentricity, incomplete information on the engineering-geological assessment of foundation soils);
- low quality of the material (curvature of stone edges, deviations in size, low strength and frost resistance);
- low quality of work (violation of horizontality, thickness and rules of ligation of seams, deviation of load-bearing walls and pillars from the vertical, violation of anchorage);
- unsatisfactory operating conditions (soaking and moistening, aggressive environmental influences);
- uneven settlements of the foundations of walls and pillars due to underestimation of engineering and geological conditions, violation of the rules for excavation work, accidents of public water supply and sewerage networks, violation of drainage from buildings and structures;
- absence or violation of waterproofing of walls;
- absence or destruction of cornices and drainpipes.
The most characteristic signs of the presence of defects in stone structures, the places and causes of their occurrence, as well as possible consequences are given below.
| No. | Type of damage and defect, location and characteristic signs of detection | Probable causes and detection methods | Possible consequences and measures to prevent further development or eliminate |
| Wall deformations | |||
| 1 | Curvature of horizontal and vertical lines | Uneven deformations of foundation soils. Characteristic cracks may appear. Identification method - inspection of foundations and foundation soils | Reduced load-bearing capacity, development of cracks. Preventing further soil settlement, repairing walls, if necessary, with reinforcement |
| 2 | Bulging walls | Lateral pressure of soil, various materials placed in bulk near the wall; action of horizontal reactions of spacer structures; increase in eccentricities of vertical loads; greater flexibility of the wall in height due to rupture or lack of connections; displacement of beams, purlins, floor slabs or coverings on supports towards the edge of the wall; transfer of unacceptable force effects to masonry that has not gained sufficient strength; one-sided thawing of masonry made using the freezing method; temperature deformations. Identification method - visual, verification calculation | Reduced load-bearing capacity of walls, appearance of cracks. Elimination of horizontal loads, restoration of connections, repair of damaged sections of walls with reinforcement required by calculation |
| 3 | Deviation of walls or their individual sections from the vertical | Uneven deformations of foundation soils; insufficient cross-links or their rupture. Detection method - visual, characteristic cracks may appear, inspection of foundations and foundation soils | The appearance and development of cracks in the masonry, reduction in load-bearing capacity. Eliminating the causes of soil deformation and repairing walls with the necessary reinforcement |
| Chips, sinkholes, potholes and other violations of the continuity of masonry | |||
| 4 | Chips of corners, holes, potholes, furrows, etc. | Construction defects, mechanical impacts during operation (impacts from vehicles, punching holes and grooves). Identification method - visual, with study of operating conditions | Possible reduction in load-bearing capacity. Repair after eliminating the causes of damage or taking protective measures against them, if necessary, strengthening structures |
| Moisturizing masonry walls | |||
| 5 | Destruction of the outer layer (plaster, cladding) | Accumulation of moisture from precipitation on damaged areas of the outer surface of walls and its capillary absorption by masonry materials into the thickness of the wall. Identification method - visual | Development of destructive processes with subsequent micro and macro destruction of stone and mortar. Repair of damaged outer layer with preliminary elimination of causes of damage and drying of areas |
| 6 | Destruction of masonry walls in areas of openly placed equipment that releases steam or moisture | Moisture condensation on the surface of the walls, splashes. Identification method - visual | Development of destructive processes in masonry followed by progressive destruction. Elimination of wall moisture by organized steam removal, installation of a protective screen against splashes, or protection of the wall surface with frost-resistant and water-resistant materials. Carrying out repairs to damaged areas |
| 7 | Destruction of masonry walls in the parapet or cornice of external walls, under windows, niches, in the area where drainpipes are located | Damage to the roof in the eaves area, poor quality of connection of the waterproofing carpet to the affected wall; damage to gutters, lack of drips, damage to drains, funnels and downpipes; insufficient or reverse slope, insufficient projection of eaves overhangs. Identification method - visual | Development of destructive processes in masonry followed by progressive destruction. Elimination of the causes of moisture, if necessary, repair of masonry with drying of wet areas |
| 8 | Destruction of masonry walls above windows, gates, doors, exhaust ventilation openings with the possible formation of frost and ice in winter | Condensation of moisture from air exfiltrating from building spaces. Identification method - visual | Compaction, repair of fillings of openings and places where they meet the wall, organization of air removal from exhaust ventilation holes from the wall surface. If necessary, repair walls with preliminary drying of wet areas |
| 9 | Destruction of masonry walls in their basement part | Damage, poor quality or lack of waterproofing; low location of waterproofing relative to the blind area, damage to the blind area or sidewalk. Identification method - visual | The development of destructive processes in masonry caused by alternating freezing and thawing, with weathering of moist areas. Restoration or installation of new waterproofing, restoration or repair of blind areas. If necessary, repair damaged areas of the base |
| 10 | Moisturizing the inner surface of walls over the entire area or in different zones | Inconsistency between the actual temperatures and humidity in the room and those adopted during the design (insufficient ventilation, changes in the technological process); discrepancy between the actual thermophysical characteristics of materials and those adopted during design, insufficient thermal insulation of individual zones. Identification method - visual-instrumental | Reduced strength characteristics of masonry. Dehumidification and bringing resistance to heat transfer and vapor penetration into compliance with regulatory requirements |
| 11 | Destruction of masonry walls in areas where sanitary equipment, pipelines, and containers with liquids are located | Equipment malfunctions, leaks from pipelines and containers, constant condensation on the surface of pipelines and liquid containers. Identification method - visual | Decrease in the strength characteristics of masonry with the development of destructive processes. Troubleshooting equipment, communications, containers, thermal insulation of cold surfaces, and, if necessary, repairs |
| 12 | Efflorescence on the outer or inner surface of the walls | Transfer of salts included in the wall material to its surface at increased dosages. Identification method - visual | It does not have a noticeable effect on the load-bearing capacity of the masonry. Clean areas of walls with efflorescence from salt deposits and dry them |
| Damage to protective and finishing layers | |||
| 13 | Peeling, cracking or flaking paintwork | Deformation or destruction of the wall material under the paintwork; deformation from alternately freezing and thawing moisture; inconsistency of the paint coating with the temperature and humidity conditions of the air or the chemical aggressiveness of the operating environment; violation of the rules for installing paintwork. Identification method - visual | The load-bearing capacity of the masonry is not affected if the integrity of the masonry is not compromised. Repair of damaged paintwork, with appropriate preparation of the base after eliminating the causes of damage |
| 14 | Cracking or peeling of plaster coatings or textured layers with loss of individual areas | Deformation or destruction of the wall material under the plaster layer; differences in shrinkage or temperature deformations of the plaster layer and the wall; manufacturing or coating defects; penetration of moisture under the plaster layer, followed by repeated cycles of freezing-thawing or moistening-drying; high-temperature heating (technological or fire). Identification method - visual and by tapping or opening the plaster layer in certain places | It has virtually no effect on the load-bearing capacity of the masonry. Elimination of the causes of damage, repair of the plaster layer with the appropriate selection of its composition and surface preparation; limitation of temperature influences |
| 15 | Loose structure of the plaster layer | Alternate freezing and thawing of the plaster layer material in a moistened state; wedging effect of moisture during alternating wetting and drying; dissolution or leaching of material components with water, chemical effects on the materials of the plaster layer. Identification method - identifying a defect by comparing the properties of the material of the plaster layer in different areas of the building | The load-bearing capacity of the masonry is not affected. Remove damaged areas of the plaster layer and apply a new plaster coating |
| Destruction of the main wall material | |||
| 16 | Cracks in the masonry, having the character of parabolic curves, the branches of which diverge downwards on both sides of the middle part of the building | Deformation of the foundation soil in the middle part of the building. Identification method - visual, observations of soil deformations and cracks, geotechnical surveys, verification calculations | Reducing the load-bearing capacity of walls in the area where cracks are located, reducing the spatial rigidity of the building. Strengthening foundation soils, strengthening foundations or increasing the spatial rigidity of a building, installing tie rods and sealing cracks after development has ceased |
| 17 | Cracks whose opening increases upward; inclined or or having the character of parabolic curves diverging downward relative to the edges of the building | Deformation of the foundation soil at the extreme parts or the presence of a solid inclusion under the middle part of the building. Identification method - visual, observations of soil deformations and cracks, geotechnical surveys, verification calculations | Reducing the load-bearing capacity of walls in the area where cracks are located, reducing the spatial rigidity of the building. Strengthening foundation soils, strengthening foundations or increasing the spatial rigidity of a building, installing tie rods and sealing cracks after development has ceased |
| 18 | A crack that is close to vertical, the opening of which increases upward | Failure of a building due to the presence of a rigid support in the ground under the crack. Identification method - visual, observations of soil deformations and cracks, geotechnical surveys, verification calculations | Reducing the load-bearing capacity of walls in the area where cracks are located, reducing the spatial rigidity of the building. Strengthening foundation soils, strengthening foundations or increasing the spatial rigidity of a building, installing tie rods and sealing cracks after development has ceased |
| 19 | A crack close to vertical with the same opening over the entire height with a vertical displacement of part of the building on one side of the crack relative to the other | Deformation of the foundation soil under part of the building. Identification method - visual, observations of soil deformations and cracks, geotechnical surveys, verification calculations | Reducing the load-bearing capacity of walls in the area where cracks are located, reducing the spatial rigidity of the building. Strengthening foundation soils, strengthening foundations or increasing the spatial rigidity of a building, installing tie rods and sealing cracks after development has ceased |
| 20 | V-shaped cracks along the line of extension of a new building to a previously existing one or in the place of height difference of one building | Different degrees of soil compaction or different pressures on both sides of the extension line or elevation difference. Identification method - visual, observations of soil deformations and cracks, geotechnical surveys, verification calculations | Reducing the load-bearing capacity of walls in the area where cracks are located, reducing the spatial rigidity of the building. Strengthening foundation soils, strengthening foundations or increasing the spatial rigidity of a building, installing tie rods and sealing cracks after development has ceased |
| 21 | Vertical cracks with an opening of 0.1-0.5 mm, crossing two or more rows of masonry, with two or more cracks in a vertically loaded wall, delamination of the masonry | Significant overload of masonry; reduced strength of materials used in the design; reduction in the strength characteristics of masonry. The detection method is visual, tapping with a hammer. verification calculation taking into account the actual strength of materials | Reduced load-bearing capacity. Reinforcement according to calculations taking into account the actual strength of materials and the Kf * |
| 22 | Horizontal and oblique cracks along the seams of masonry of ordinary, wedge or arched lintels; vertical cracks in the middle of the span, possibly with the loss of individual stones | Overloading of masonry, reduced strength of materials, insufficient reinforcement, uneven deformation of foundation soils. The detection method is visual, tapping with a hammer. verification calculation taking into account the actual strength of materials | Reduced load-bearing capacity. Reinforcement according to calculations taking into account the actual strength of materials and the Kf * |
| 23 | Horizontal cracks along the seams of masonry walls subject to horizontal loads, possibly with a shift along horizontal seams or a stepped inclined crack | Overloading of masonry, reduced strength of materials, insufficient reinforcement, uneven deformation of foundation soils. The detection method is visual, tapping with a hammer. verification calculation taking into account the actual strength of materials | Reduced masonry strength. Strengthening according to calculations taking into account the actual strength of the masonry and the eccentricity of vertical loads |
| 24 | Small cracks, possibly with chipping and crushing of masonry materials under the supports and support pads of beams, trusses, lintels, canopies, fan-shaped diverging from the location of the load | Overloading of the masonry, as well as insufficient depth of the supporting part. Absence or insufficient load-bearing capacity of the support cushion. Identification method - visual, verification calculation of masonry and support pad | Reducing the strength of masonry to an emergency condition. Reinforcement according to calculations, taking into account the actual strength of materials, masonry cross-section, eccentricity and Kf , injection of cracks with polymer cement mortar |
| 25 | Vertical and inclined cracks in the upper part of the building, at the junction of differently loaded longitudinal and transverse walls | Different deformability of differently loaded walls due to different stresses in the masonry and creep of the masonry under prolonged load. Identification method - visual, verification calculations of the actual design solution | Reduced load-bearing capacity of walls in the crack zone. Reducing the spatial rigidity of the building. Installation of strands and injection of cracks. Reinforcement (if necessary) according to calculations taking into account the actual length and height of the walls at the point of crack formation |
| 26 | Vertical and inclined cracks in the lower part of the building, at the junction of differently loaded longitudinal and transverse walls | Hanging of load-bearing walls on self-supporting ones, due to incorrect assignment of geometric characteristics to the foundations of self-supporting walls. The identification method is visual, verification calculations. | Reduced load-bearing capacity, since, by breaking the masonry at critical nodes, the walls are deprived of horizontal connections between each other, reduce the stability of the walls and reduce the overall spatial rigidity of the buildings. Strengthening foundation soils. Installation of strands and injection of cracks. |
| 27 | Vertical cracks in the upper part of the pilasters, which serve as supports for beams and trusses, in the places where the pilasters meet the masonry of the wall | Different deformability of differently loaded walls and pilasters; horizontal forces arising in trusses and beams during temperature fluctuations and settlement of foundations. Identification method - visual, verification calculations | Reduced load-bearing capacity. The need for reinforcement is determined by calculation taking into account the Kts |
| 28 | V-shaped cracks at the top of the building | Expansion due to disruption of the roofing truss system of the building. Identification method - visual | Reduced load-bearing capacity. Restoration of rafter system tightenings. Repairing cracks, if necessary, with repositioning of deformed areas, installation of tie rods and injection of cracks |
| 29 | Vertical cracks with an opening of 0.1-0.3 mm in the masonry of the longitudinal walls of the lower floors, at the ends of lintels, beams, slabs, reinforced belts, separation of longitudinal walls from end and transverse ones | Longitudinal temperature and humidity deformations of walls or ceilings when the average temperature of the section changes. Detection method - visual, observation of crack opening, verification calculations | Reduced strength of masonry in the crack zone. Sealing cracks, the need for reinforcement is determined by calculation, taking into account the actual strength of materials and wall sections |
| 30 | Cracks with an opening of up to 10 mm, a gap in the masonry of the middle part of the building along its entire height | The absence of temperature-sedimentation seams or the absence of reinforced belts to accommodate temperature and humidity deformations. Identification method - visual | Reduced strength of masonry in the crack zone. The sealing of cracks and the need for reinforcement is determined by calculation, taking into account the actual strength of the materials and sections of the wall. Strengthening the soil base and foundations, installing tie rods, injecting cracks |
| 31 | Oblique cracks in the nodes of the outer openings of the first floors | The absence of temperature-sedimentation seams or the absence of reinforced belts to accommodate temperature and humidity deformations. Identification method - visual | Reduced strength of masonry in the crack zone. The sealing of cracks and the need for reinforcement is determined by calculation, taking into account the actual strength of the materials and sections of the wall. Strengthening the soil base and foundations, installing tie rods, injecting cracks |
| 32 | Cracks at the junction of the walls with the sill parts of the masonry | Temperature stresses; deplanation (curvature) of masonry sections caused by uneven stresses. Identification method - visual | Reduced strength of masonry in the crack zone. The development of cracks can be restrained by installing reinforcement across the expected cracks in the upper rows of the window sill masonry. It should be remembered that the reinforcement must be securely anchored on both sides of the cracks |
| 33 | Vertical cracks in the middle of the length of the window sill of the masonry on the first floors of basement-free buildings | The absence of horizontal reinforcement in the masonry capable of restraining significant bending moments in the masonry of the window sill. Identification method - visual-instrumental | Reduced strength of masonry in the crack zone. The development of cracks can be restrained by installing reinforcement across the expected cracks in the upper rows of the window sill masonry. It should be remembered that the reinforcement must be securely anchored on both sides of the cracks |
| 34 | Peeling of surfaces, weathering of outer layers, increased porosity, reduced density, loose structure, spalling, loss of individual particles of material | Exposure to chemically aggressive chemical environments; high-temperature heating from technological sources or fire exposure in a fire; humidification, alternating freezing and thawing in a moistened state with insufficient frost resistance; alternate wetting and drying; biochemical effects of microorganisms, fungi, mosses, as well as trees and shrubs. Detection method - visual, if necessary - with laboratory analysis of the aggressive environment and material samples | Reduced load-bearing capacity. The need for reinforcement is determined by calculation. Repair is carried out after eliminating the causes of damage, cleaning and treating damaged areas |
Prices for facade work
| 1 | sq. m | 750 | |
| List of facade works: installation of scaffolding, cleaning the facade surface from dust and peeling paint, jointing and sealing cracks in the walls, puttying the walls, priming the walls, painting the facade twice with water-dispersion paint | |||
| 2 | sq. m | 950 | |
| List of facade works: installation of scaffolding, cleaning the facade surface from dust and peeling paint, partial repair of plaster walls and slopes (up to 20%), jointing and sealing cracks in the walls, puttying the walls, priming the walls, painting the facade twice with water-dispersion paint | |||
| 3 | sq. m | 1250 | |
| List of facade works: installation of scaffolding, cleaning the facade surface from dust and peeling paint, partial repair of plaster walls and slopes (up to 40%), jointing and sealing cracks in the walls, puttying the walls using a grid, priming the walls, painting the facade twice with water-dispersion paint | |||
| 4 | Major repairs of the plaster facade (with complete plastering) | sq. m | 1600 |
| List of facade works: installation of scaffolding, beating off old plaster, plastering walls and slopes with cement-lime mortar, puttying walls, priming walls, painting the facade twice with water-dispersion paint | |||
| 5 | sq. m | 1450 | |
| List of facade works: installation of scaffolding, fastening of plaster steel mesh, plastering of surfaces with cement-lime mortar, puttying of walls, priming of walls, painting of the facade twice with water-dispersion paint | |||
| 6 | sq. m | 1250 | |
| List of facade works: installation of scaffolding, preparation of wall surfaces, step-by-step priming of surfaces, fastening of slab insulation with glue and dowels, installation of an adhesive layer in two times with a reinforced fiberglass mesh, installation of architectural forms, application of colored decorative plaster, painting with acrylic paint in two layer, installation of flashings, sealing of junctions of openings and communications input | |||
| Facade insulation, price - when using polystyrene foam (thickness 50 mm) | sq. m | from 80 | |
| Facade insulation, price - when using façade mineral wool board (50 mm thick) | sq. m | from 260 | |
| 7 | sq. m | 1550 | |
| List of facade works: installation of scaffolding, installation of a galvanized steel frame, fastening of slab insulation with installation of windproof foam, installation of facade fiber cement boards | |||
| 8 | sq. m | 1600 | |
| List of facade works: installation of scaffolding, installation of an aluminum subsystem, fastening of slab insulation, installation of porcelain tiles | |||
| 9 | sq. m | 1520 | |
| List of facade works: installation of scaffolding, installation of an aluminum subsystem, fastening of slab insulation, production and installation of composite facade panels | |||
| 10 | sq. m | 1520 | |
| List of facade works: installation of scaffolding, installation of a steel frame, installation of profiled steel sheets | |||
| 11 | sq. m | 600 | |
| 12 | |||
| 12.1 | Sealing seams without opening | p.m. | 128 |
| 12.2 | Sealing of seams with opening, without replacement of insulation | p.m. | 153 |
| 12.3 | Sealing of seams with opening and replacement of insulation | p.m. | 214 |
| 13 | |||
| 13.1 | Increase in the total cost of installation and repair of complex (rich in architectural details) and rusticated facades | % | 5…30 |
| 13.2 | Installation of small coatings on facades with a sweep width of up to 300 mm made of galvanized steel | p.m. | 180 |
| 13.3 | Installation of parapets made of galvanized steel with a sweep width of up to 600 mm | p.m. | 270 |
| 13.4 | Installation of window sills made of galvanized steel | p.m. | 225 |
| 13.5 | Hangment of drain pipes made of galvanized steel of round section with a diameter of 100 mm | p.m. | 300 |
| 13.6 | Protective covering of window openings with polyethylene film | sq. m | 30 |
| 13.7 | Painting window fillings | sq. m | 180 |
| 13.8 | Installation of decorative elements made of polystyrene foam (cornices, rods, platbands, etc.) on dowels finished with reinforced adhesive composition | sq. m projection | 1500 |
Construction - facade work in Moscow and the Moscow region. Inexpensive, high quality, with a guarantee!
Causes of cracks
Diagram of possible defects and their causes.
Measures taken to eliminate various types of defects in brickwork will be most effective provided that the cause of their occurrence is accurately determined. After this, you can proceed to eliminating the resulting defects.
The reason why “efflorescence” appears on the facing masonry may be poor-quality mortar or the poor quality of the finishing brick itself. Many manufacturers of finishing bricks recommend using a special polymer-cement mortar for facing brickwork, rather than traditional building mortar.
In most cases, the destruction of the finishing layer of brickwork indicates a constant flow of water onto the wall in this very deteriorating place, which may be due to improper installation of ebbs, canopies or gutters. In this case, when eliminating defects in brickwork, defects in roofing structures and structures should also be eliminated.
Cracking of masonry mortar can occur for a number of reasons: construction and masonry work is carried out in winter, failure to comply with the required proportions in the process of preparing mortar and standard volumes, errors in bricklaying. The set of measures taken to strengthen the brickwork can only be determined after a thorough construction examination. But such gross violations of building codes and technologies are, as a rule, quite rare.
Cracks in the walls of a building arise as a result of the construction of the building without taking into account geodetic research, incorrect dressing of brickwork in the corners of the building, or in the event of a discrepancy between the parameters of the constructed building and the parameters and type of foundation.
Required Tools
Brickwork sequence diagram.
- Roulette.
- Building level.
- Spatula (4-8 cm).
- Master OK.
- Chisel.
- Hammer.
- Container (trough) for mixing the solution.
- Chopper (for mixing the solution).
- Rotary hammer (drill with impact mechanism).
- Victory-tipped drill.
Replacing bricks in masonry
Removing one damaged brick
Remove the solution using a special crowbar if you can find one. If not, do it with a chisel. The crowbar is also good because it allows you to work with two hands, and this speeds up the work. Remove the required brick and clear the area of any remaining mortar.
Brick replacement
Choose a suitable brick or chip off a part of it. Wet the hole and apply a thick layer of solution. Place the brick on a falcon or mortar board, placing its edge 15 mm above the row in which the brick will be located. Hammer the brick into the socket and trim off any remaining mortar.
Repairing minor damage
Home coating and grouting
Old walls are often built with lime mortar, so this is what is used when restoring brick walls.
Other reasons to use lime mortar:
- high ductility.
- good adhesion to old masonry elements.
- slow hardening.
- no cracks during operation.
To restore seams and seal cracks in brickwork, restorers recommend MM-01 masonry lime mortar.
It is necessary to re-process all external joints to avoid differences in the color and structure of the old and new mortar.
Replacing individual bricks
At the preparation stage, old bricks were removed and the site was cleared of mortar residues and dust. It remains to install new bricks:
- lay the solution at the bottom of the niche in a layer of 10-12 mm;
- dip the brick in water;
- apply the solution to all faces except the bottom and front;
- install a brick in a niche;
- level the position of the brick using a mallet;
- remove excess mortar and rub the seams.
Aging brick
The new brick will look foreign in the old masonry.
Here are a few techniques to quickly age brick:
- processing with coarse sandpaper will make the surface less smooth;
- using a chisel you can add a few chips and chips;
- firing with a blowtorch “smudges” the surface - adds natural dark spots and stripes that do not contaminate hands and clothes when touched and are not washed off.
Recommended for use
Lime masonry mortar M50
Injection solution for strengthening masonry
Sealing cracks
After the reasons for the formation of cracks in the masonry have been eliminated and the deformation has stabilized, you can begin to repair the cracks. Cracks up to 10 mm are filled with a solution with a filler fraction of up to 1.25 mm, up to 5 mm with a fraction of no more than 0.1 mm.
Cracks with an opening of more than 10 mm require re-lining the wall or installing cross ties between the edges of the crack, followed by filling with mortar.
Features of renovation of residential buildings
Reconstruction of the facades of residential buildings allows you to improve performance characteristics, eliminate faults, and replace building elements. Reconstruction of an apartment building can be comprehensive or selective. A comprehensive reconstruction of a house involves the replacement of engineering equipment and structural elements of the building. In this case, work can be carried out both in the entire building and in its individual parts. Selective reconstruction involves partial replacement of structural elements.
In the process of repair work, only those building materials are used that ensure the proper level of functioning of all systems and structural elements.
Causes of defects in brickwork
If, during inspections of the technical condition of buildings and structures, defects are identified on wall structures, then the first thing that needs to be done is to determine the factors of their occurrence.
There are different reasons for the appearance of defects on wall brick structures. The most common are:
- non-compliance with the technology for preparing concrete mortar, the use of low-quality components or violation of their proportions;
- execution of additional extensions to superstructures or openings in the building, the presence of which is not provided for by the project. This increases the load on the masonry;
- cyclical processes of freezing and thawing of the earth or the negative impact of groundwater;
- frequent sudden changes in humidity and temperature conditions lead to the destruction of the binder solution;
- incorrect execution of design work: inaccurate determination of the loads that load-bearing walls must withstand, insufficient soil research and other inaccuracies;
- no ligation of sutures;
- natural aging of masonry, damage to brick by erosion and the influence of other unfavorable factors.
Regardless of the reasons for the formation of brick defects, if they are detected they must be eliminated. Otherwise, the destruction will only increase and as a result the building will become unsafe.