Wooden wall decoration is not a cheap pleasure. But you can solve the problem if you choose plywood instead of wood. The texture of the material accurately depicts wood; these are ready-made sheets, which are easy to work with. Therefore, decorating walls with plywood in private homes is not uncommon. Although city apartments get rid of them too.
Bedroom covered with plywood
Types, varieties of plywood sheets
There are several grades of plywood, which are divided into five classes. The best and most expensive is “E” class, also known as elite. It is this and the first grade that is used for interior decoration of the walls of houses and apartments. All other varieties are rough material. If there is a need to sheathe the walls of a garage or non-residential attic, then you should not buy expensive material. Let us add that plywood of grades 2 and 3 is also used for finishing walls, but with an additional finishing coating: paint, wallpaper, ceramic tiles, etc.
Plywood varieties
Regarding the types, here the division is carried out according to the qualitative state of the surface of the sheets. The classification is as follows:
- unsanded plywood (NSh),
- polished one side (Ш1),
- polished two sides (Ш2),
- laminated.
The last three types are used for decorative wall decoration and in furniture production.
Laminated plywood
Another type of classification of plywood sheets is based on the glue used for gluing veneer.
- FSF - phenol-formaldehyde glue.
- FKM – melamine.
- FC – carbide.
- FBA – albumin casein.
The last two have less resistance to moisture, but the materials are environmentally friendly. Therefore, you need to choose them if the task is to decorate the walls with plywood in a house or apartment.
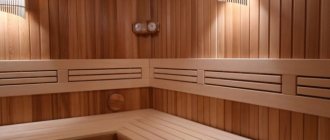
Separately, it is necessary to say about sheets of bakelite plywood, as a material with the best technical characteristics. This is an environmentally friendly material, quite expensive. It is suitable for carrying out work on the interior decoration of a house.
Watch a video about this wonderful material:
Advantages of plywood finishing
Plywood wall covering has many advantages:
- convenient format of sheets of material: square and rectangular, which allows you to cover walls neatly and without patches;
- the material has good flexibility, which allows you to make smooth transitions and build decorative arches;
- strength and durability;
- sound insulation and heat retention indoors;
- low cost of coating compared to wood;
- the material is easy to cut, saw, bend and drill;
- To finish with plywood, it is not necessary to resort to the help of specialists, because the material is light in weight and can be attached with your own hands without any problems.
The material is very convenient to work with.
In addition, if you plan to sheathe the attic of a house, garage or other room of secondary importance, you can use fairly low-grade, thin 5 mm plywood.
Ultimately, this will not affect the quality of the finish too much.
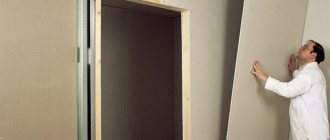
Rules for installing plywood sheets
Installation is carried out on a frame, the elements of which are ordinary wooden slats. The dimensions are selected based on whether insulation will be placed under the sheets or not. If “YES”, then the height of the slats is selected taking into account the thickness of the heat-insulating material. They should be 1 cm larger. Although this parameter can be beat with direct hangers used for installing and fastening frame elements. If “NO”, it is better to choose slats that are not the largest in height, so as not to reduce the distance between the walls.
Frame assembly
Regarding the installation of slats, direct hangers used for installing drywall are used for this. The slats are set vertically, the distance between them is determined by the size of the plywood sheets. There are several positions here, common sizes: 1500x1500, 2500x1250, 3000x1500 mm.
Frame for plywood cladding
For example, if the first position is used, then the distance should be 750 mm - this is the maximum, because the sheet material must lie on at least three slats: one in the middle, two at the edges. Two more recommendations:
- Two adjacent sheets must be joined on one strip.
- A gap of 0.3-0.5 mm is left between the sheets of plywood in case of thermal expansion of the material.
First, vertical lines are drawn on the wall, defining the installation locations of the frame elements. Straight hangers are mounted along them every 40-60 cm, secured to the wall with self-tapping screws and dowels. You will have to turn on the hammer drill.
- The two outermost slats on the wall are installed.
- They are placed in the same plane using a thread and a level.
- Both elements are immediately attached to the hangers.
- 3-5 threads are stretched between them, defining the plane of the future plywood wall.
- Intermediate slats are installed along them.
The frame is ready, all that remains is to treat it with an antiseptic composition that prevents the formation of fungi and mold.
Insulation between frame elements, covered with a waterproofing membrane
A few words about the thermal insulation material and its installation. Most often, mineral wool in mats is laid under plywood. This is a hygroscopic material, so it must be covered on both sides with protective films: against the vapor barrier wall, against the waterproofing plywood.
If the wall is wooden, then the vapor barrier is applied to it in strips with an overlap of 10-15 cm. If the wall is brick or block, then the frame is first mounted, then the vapor barrier layer is laid so that the membrane forms cells between the slats. Next, thermal insulation material is laid, and a waterproofing film is placed on top of the slats.
The insulation is cut so that it fits tightly between the slats, pressing tightly against the frame elements. This solves the problem of the absence of cold bridges.
If the walls of the house are smooth, the sheathing can be installed without hangers. The slats are attached directly to the wall with self-tapping screws and dowels. In this case, you can use a vapor barrier laid directly along the wall, which will adhere to the surface with slats. Most often they use penofol (foamed polyethylene with a foil side), which is two in one: insulation, insulation.
Wall covered with foil insulation
Installation of plywood panels
We move on to the final stage of finishing the wall with plywood sheets - installing the sheet material itself. There are no strict requirements here. Simply, each sheet is laid on the sheathing and attached to it with self-tapping screws: along the edges every 15-20 cm, in the middle every 30-35 cm. A distance of 1.5-2 cm should be maintained from the edge of the sheet to the place where the screw is screwed in. In this case, all fasteners must be located on the same line, so these lines are first applied to the plywood. To increase the aesthetics of the cladding, it is recommended to widen the outer edges of the hole for fasteners with a drill with a diameter equal to the diameter of the screw head. Thus, the latter will not protrude beyond the finishing.
If the plywood is not finished with finishing materials, then you need to adjust their sizes and shapes strictly to the place where they are laid in even rows. Everything should turn out symmetrical. As for the seams between the sheets. They should not be filled with putty, which, under the influence of thermal expansion of the plywood, will begin to crack and peel. The best option: sealant, decorative strips (wooden, metal). The plywood joints near the floor are covered with skirting boards, and at the ceiling with cornices. The screw caps are covered with plastic decorative caps.
Installation of plywood sheets is a simple process
The only drawback of plywood
The main disadvantage of plywood, which can negate all the advantages, is its carcinogenicity. The fact is that plywood is produced by gluing layers of veneer, and the glue may contain formaldehyde, phenol and resorcinol, which are hazardous to health. In the future, plywood products in the interior of the apartment will emit dangerous gases that can cause a person to cough, headache or nausea.
There are several classes of formaldehyde emissions, differing in the rate and amount of free gas released. Thus, the most stringent requirements are in Japan: without restrictions, plywood can be used there, the formaldehyde emission rate of which does not exceed 0.005 mg per cubic meter of air.
European standards:
- E0 (formaldehyde release tends to zero);
- E1 (contains up to 8 mg of formaldehyde inclusive per 100 grams of slab, released at a rate of up to 0.124 mg per cubic meter of air);
- E2 (contains from 8 to 30 mg of formaldehyde inclusive per 100 grams of slab, released at a rate of up to 0.124 mg per cubic meter of air).
In Russia, plywood of classes E1 and E2 is produced. For finishing inside residential premises, only plywood of emission class E1 is allowed.
There are some brands of plywood that are produced without harmful substances:
- FBA brand (veneer layers are glued together using albumin casein glue of animal origin);
- FK brand (urea glue is used, which is also safe for humans).
It is not yet possible to definitively answer the question of whether it is worth using plywood indoors in residential premises. However, if you consider how widely plywood is used in American and European residential interiors, we can conclude: the right plywood, purchased from a reliable manufacturer, will not harm your health.
Frame assembly
To install the frame you will need plywood, wooden beams (galvanized profile), direct hangers, fasteners: screws, dowels. Also some tools: a hammer, a screwdriver, a jigsaw (circular saw), a tape measure, a building level and a corner.
- At the first stage, the walls are marked. Using a building level, mark vertical guides in increments of about 60-80cm - the increment depends on the size of the sheet, which must be connected horizontally to at least three points, one must be strictly in the middle. Horizontal markings are also made under the ceiling and near the floor.
- Screw vertical plumbs onto the wall in increments of 50-70cm, onto which the frame elements will be attached.
- The frame begins to be assembled with horizontal guides, after which they move on to installing vertical ones. The distance between the wall and the front side of the profile is set taking into account the goals (presence of noise and heat insulation).
Vertical posts are placed along the edges of the wall and twine is pulled between them. With its help, all other guides are set. This simple technique will help you avoid unevenness.
- After the frame is ready, it is treated with an antiseptic composition, after which it is ready for hanging sheets.
Frame for a rough plywood base
A few words about the material
Plywood for finishing ceilings or walls is a multi-layered sheet of wood. The recommended number of layers here is 3-4 units. Each of them is a thin veneer, the fibers of which are located transversely to the underlying workpieces (sometimes a diagonal arrangement). They are fastened together using an adhesive composition under the influence of a press and temperature. This technical solution provides mechanical strength to the material and helps maintain its shape even with minor changes in indoor humidity.
Source ytimg.com
The characteristics of ready-to-use sheets can be summarized as follows:
- relative humidity – 5-10%;
- bending strength – from 55 MPa;
- ultimate strength for chipping is about 1.5 MPa;
- density – close to 665 kg/cub.m;
- elastic modulus – 1400 R/sq.mm.
Plywood sheets, depending on the properties specified by certain impregnations, have different markings:
| Brand | Short description |
| FC | Such sheets have low resistance to moisture; urea glue is used in production. Therefore, this plywood is suitable for covering ceilings and walls inside dry and heated rooms. |
| FKM | The analogue of the first sample differs in the content of melamine resin in its composition. That is, under conditions of elevated temperature, the release of toxic substances is possible. Not recommended for finishing living rooms. |
| FOF | Here, the manufacturing process uses phenol-formaldehyde resin, which is characterized by toxicity. But due to the protective moisture-resistant layer, the sheets are used in extensions, utility rooms, and workshops. |
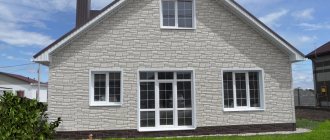
| FSF | This sample has high strength and resistance to moisture. There is also formaldehyde resin present here. But besides this, a distinctive feature is low flammability. Canvases are acceptable for both exterior and interior decoration. |
| FB | The production of this plywood involves the use of bakelite impregnation. It improves material properties such as resistance to changes in humidity and temperature. |
| FBA | Here the blanks are processed with an albumin-casein composition. The main advantage of plywood sheets is environmental safety. But there is a drawback - poor resistance to moisture. |
There is also a varietal classification of plywood for finishing walls inside the house. This looks at the number of defects, which include knots and dents. The highest grade has no more than three, the third grade has about 8. The indicator is indicated in Roman numerals through “/” for external layers. And the identifiers Ш1 and Ш2 indicate the number of sides that were polished on the factory line. NSh are simply canvases with a slightly rough surface.
Plywood by type of front surface
One of the parameters by which this material is classified is the technology used in production for processing the external surfaces of plywood. Based on this criterion, several types of plywood are distinguished.
1. Unsanded (NS) - the outer surface of the veneer is not subjected to additional processing, as a result of which it has a fairly rough structure. The risk of cracking increases. Mostly such materials are used for rough work, where the condition of the surface of the slabs is not of fundamental importance.
2. Ш1 – sanded plywood, processing of which is carried out on one side. Practically not prone to cracking.
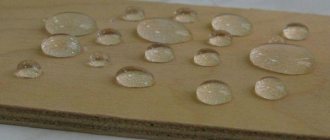
3. Ш2 – material that is subjected to grinding on both sides. The ability to absorb moisture is minimized. As in the cases with Sh1 plywood, it can be used for finishing work, as well as in the manufacture of decorative products and individual structural elements of furniture.
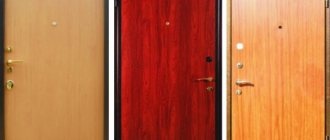
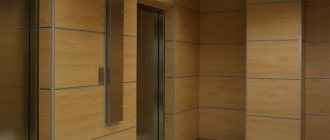
4. Laminated plywood sheets , for the processing of which special resins are used that contain phenol and melamine. It is also relevant to apply PVC film to the surface of plywood. Thus, the moisture resistance of the material improves. Lamination allows you to extend the service life of wood boards. In addition, the external surface looks quite aesthetically pleasing. This type of plywood is often used in interior design.