Best prices for plaster adhesive in Leroy Merlin
When carrying out interior finishing work, glue is widely used for installing gypsum products:
- gypsum fiber and plasterboard sheets using a frameless method;
- tongue-and-groove slabs;
- ceiling and wall decorative elements;
- small sculptural and architectural plaster structures.
A dry adhesive mixture based on gypsum with fine filler, plasticizing and modifying additives has a number of advantages:
- easily diluted to working condition and applied to the surfaces to be bonded;
- has good adhesion to most building materials;
- hardens quickly, ensuring quick completion of work.
Plaster adhesive can also be used for auxiliary operations:
- correcting unevenness and preparing the base for cladding;
- sealing cracks in walls;
- when laying hidden electrical wiring - fixing the wires in grooves, boxes for sockets and switches;
- repairing local damage to drywall, etc.
Advantages of buying plaster adhesive from Leroy Merlin
Qualified sales consultants in the sales areas of Leroy Merlin construction hypermarkets, widely represented in Moscow and other cities of the Russian Federation, will help you choose high-quality adhesive for gypsum products that is optimally suited in terms of properties and packaging to your requirements.
By receiving original products directly from the manufacturer, we ensure compliance with proper conditions for transportation and storage of dry mixtures and offer competitive prices to our customers.
If you prefer to shop online, you can buy plaster adhesive in our online store with direct delivery or pickup. Shipping costs are calculated automatically when placing an order.
Gluing drywall to a flat wall
This method of gluing plasterboard is applicable to relatively smooth concrete or brick walls, when the height of the unevenness does not exceed 5 mm.
Since the layer of glue between the wall and the plasterboard sheet will be quite thin, it will not be possible to hide the electrical wiring without grooves. Therefore, the first thing you need to do is make the appropriate markings and, using a hammer drill or other tool, hollow out recesses for the wires and make sockets for sockets. Now the wires can be laid in the grooves and secured with clamps every half meter.
When the wiring is completed, the wall surface can be primed. If the concrete wall is painted, it is not necessary to remove the paint. A special primer for painted surfaces will help avoid this long and labor-intensive process. This product costs a little more than usual, but it saves effort and time. As soon as the soil is dry, you can begin installing the gypsum board.
Experts advise starting pasting from one of the corners of the room, adjoining the gypsum panel close to the perpendicular wall. The next sheet is placed close to the first, and so they walk around the entire room around the perimeter.
The process of gluing gypsum plasterboard includes the following steps.
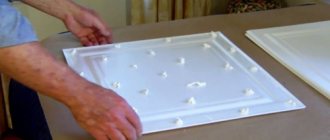
- The drywall is laid out on a flat surface and the adhesive is distributed with a notched trowel in separate piles in the middle of the sheet and in the form of a continuous strip around the perimeter. If you plan to hang furniture at the location of this panel, it is necessary to cover the entire sheet with glue for greater reliability of fastening.
- GKL trimmings are used as stands on which the sheet is installed. Gypsum does not tolerate moisture, so the open edge of the gypsum board panels should not come into contact with the ceiling or screed, from which condensation may flow. It is impossible to replace temporary underlays with permanent waterproofing supports, since drywall adhesive contains gypsum, which hardens only with the participation of air. Therefore, gypsum boards are installed on temporary substrates, which are removed at the end of the work, and the free space is filled with sealant.
The length of the plasterboard sheet should be 1.5 cm less than the height of the walls.
Despite its fragility, a plasterboard sheet weighs about 30 kg. Therefore, it is better to carry out work on leveling walls not alone, but with an assistant.
Features of the material
Gypsum cladding is used for interior decoration.
It has an attractive appearance, is lightweight, is not afraid of sunlight, and tolerates different temperatures well. The tiles do not load the base and are easily glued to the walls.
However, it also has some disadvantages. Such tiles have low strength, they are susceptible to mechanical damage and do not withstand moisture well. Gypsum is not used in industrial or unheated premises.
Work technology
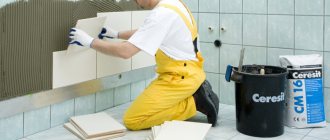
It is possible to properly stick tiles on walls if you use a high-quality adhesive solution.
Dry mixtures are diluted with clean water and kneaded with an electric drill with an attachment to the desired consistency.
Mixing glue with a device
Dilute the adhesive solution in strict order - first water, then powder, otherwise there will be a lot of lumps.
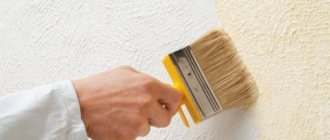
Apply to a fully prepared base with a dried primer.
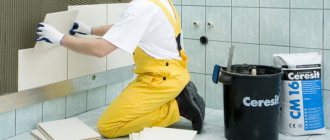
Wet installation
Wet, otherwise called wet, installation of tiles begins with applying the adhesive mixture to the workspace with a trowel. Then distribute, remove excess with a comb spatula. After this, the gypsum is covered with glue on the reverse side, also in a thin layer.
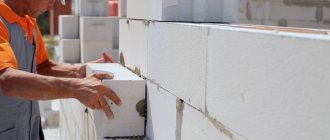
Gluing gypsum blocks
After this, the plaster product is pressed tightly against the wall, slightly leveled, pressed with emphasis, and held for some time, firmly fixing the position.
The indicated seam width is retreated, and the next block is glued using the same principle. The quality of installation is checked with a bubble level.
Laying level control
It is necessary to lay the tiles from the lowest corner towards the opposite one in a strict horizontal direction.
It is better to first lay out whole parts completely, then cut them, which saves the amount of prepared material.
First you need to lay several rows. Then take a break for 6 hours to wait for the coating to shrink. However, additional support for the bottom row is not required - there is practically no pressure there.
If all the work is completely completed, you just have to wait a day for the glue to dry before continuing finishing.
The step-by-step process of laying the coating is shown in the following video:
Dry coating
The dry masonry method involves the complete abandonment of any type of glue.
Laying is carried out from top to bottom, moving horizontally.
The first elements are laid in a slightly different way. Fasten the first vertical row of tiles with self-tapping screws, then the second, without leaving a seam.
The cut parts are placed on liquid nails or fixed with self-tapping screws.
All that remains is to treat with an adhesive solution or joint grout.
Grouting the tile joint
A special mixture or gypsum glue can be used as a grouting agent.
The gaps between the laid tiles must be densely filled with mortar, for which a rubber spatula or a narrow fugue (a type of spatula) is used.
An alternative method of filling is a construction gun, from which the mixture is evenly squeezed out into the free spaces, without touching the excess space.
An alternative method in action
The excess amount is removed immediately with a clean sponge, and pasted masking tape will help prevent the need for cleaning after drying. After all, you need to remember about the moisture intolerance of plaster.
Don't miss the moment for jointing, which comes when the laid mixture thickens.
It is possible to change the color of the grout using special pigments.
Criterias of choice
Deciding on a product that will help securely attach the material to the surface should take into account a number of factors. It is possible that the surface to be treated and the tiles will need to be pre-primed with impregnation, for example, acrylic-based. A special mixture of PVA glue with gypsum, various polymer mixtures, foam and putties of various compositions may also be suitable.
To guarantee high adhesion strength of the tiles to the surface, you need to select an adhesive composition, taking into account the following points:
- what type of work needs to be done;
- the type of surface being treated, including the degree of its porosity;
- the composition of the tile itself;
- type of masonry required.
Gluing methods
Decorative gypsum stone can be glued in several different ways. The choice of method for laying the stone depends on which surface you plan to glue the gypsum product to.
Be that as it may, the walls will need preliminary preparation. You will need to level the walls, filling holes and cracks, removing too much surface relief. If the gypsum stone and its texture are similar to natural stone, you don’t have to deal with the elimination of small and minor defects. If the wall decoration is very old, it is worth removing the plaster and removing the old wallpaper. After completing the preparatory work, the wall is coated with a liquid primer, which will ensure good adhesion. Decorative stone can be laid immediately after the surface is completely dry.
Using gypsum-based adhesive
If you decide to glue gypsum stone, it is recommended to use a special gypsum-based adhesive. This is quite simple to do: you should choose a good glue, for example, Volma or Knauf. Next you will need to do the following:
- Dilute dry glue with water in the proportion determined by the instructions. As a rule, this is a kilogram of dry mixture per half liter of water.
- Stir the mixture thoroughly so that no lumps remain.
- Treat the walls with a hydrophobic primer to ensure a high level of adhesion.
- You will need to carefully cut the coating along the contour. The design should be made a little smaller than what was originally conceived.
- Lay a guide strip of stones on the wall, then lay the remaining stones.
Using ceramic glue
This gluing method is also considered acceptable. It can only be used in rooms where there are no difficult operating conditions. This is done simply:
- The wall is coated with a hydrophobic primer. If you plan to glue stones to a metal surface, you will also need reinforcement.
- After this, a guide strip of stones is laid out.
- The way the stone is held is checked. After the glue has hardened, you need to lightly pull the stone towards you. If it does not fall off, you can continue gluing.
- If glue seeps between the joints of the stones, it must be immediately removed with a sponge before it hardens.
It is worth remembering that this type of gluing is possible, but it is difficult to call it expedient, because glue for ceramics is more expensive and takes longer to dry. Its advantage is durability, but gypsum stones are rarely intended to be used for long periods of time.
Using liquid nails
This method is appropriate to use only if you plan to finish a small section of the wall, or to spot repair an already finished surface. The operating instructions are as follows:
- If necessary, apply markings in the form of horizontal lines along the surface of the wall.
- If the rows do not fit on the wall, it is worth leaving space for trimming at the bottom of the wall - this way it can be hidden behind the baseboard.
- Apply glue to the decorative stone, then let the mixture sit for 10-15 minutes so that it has time to dry a little and does not seep between the seams.
- Place stones on the surface of the wall. Installation should begin from the corner of the building.
“Liquid nails” are a high-quality material that is completely ready for use, but it is not practical to use it for covering large areas due to its high cost.
We recommend watching a video about using sealant for installation:
Application
The issue associated with covering surfaces in any premises requires a serious approach and responsibility. There are many different finishing materials on the market, each of which is worthy of attention. However, now we should highlight decorative gypsum tiles, which are in great demand. This is the material that can imitate stone, wood or brick.
The advantages of such products include safety for human health and environmental friendliness , while the tiles cope with temperature changes and significant loads, and are quite easy to process. As for the external surface, it can resemble various natural stones or tree species, and this is best suited for modern interiors. Manufacturers often color the material to make the coating look as impressive as possible.
What are gypsum tiles
Decorative gypsum tiles are a popular material for interior decoration (gypsum masonry is used extremely rarely outside). This cladding looks original, can imitate natural stone, wood, and there are interesting examples of brick-like tiles. Gypsum is environmentally friendly and heat resistant. Another benefit of gypsum is its low cost.
Gypsum cladding has a number of advantages:
- Contaminants are easily and quickly removed,
- quite long service life (compared to wallpaper),
- hides uneven walls,
- installed on a sloping surface,
- with it it is durable and beautiful to look at.
But the material also has disadvantages:
- gypsum masonry may suffer from impact,
- not resistant to humidity.
When choosing materials for working with gypsum tiles, it is important to take into account its main disadvantage - hygroscopicity. Gypsum has the ability to quickly accumulate moisture from the environment. Therefore, it is not recommended to glue it to standard tile compounds. The glue should neutralize the shortcomings of the gypsum.
Pay attention to the surface on which the decorative gypsum stone will be mounted. It can be wood, concrete, brick, metal or drywall. The choice of adhesive depends on the type of surface. Before installation, you need to make sure that the coating is suitable: there should be no dust on it, and it is also advisable to wash off the paint from the walls if there is any.
Advice! When choosing an adhesive, consider the quality of the gypsum tile itself. It can be porous (low-grade gypsum) or high-strength. So, for the first type it is better to avoid using water-based glue. For high-density gypsum, any composition can be used.
There are several adhesive options for gypsum cladding. The first is used more often than others - this is a dry gypsum mixture. The second is a reactive two-component adhesive. If the specified materials are not available, then you can use improvised means. Construction alabaster or putty will do.
How to choose an adhesive
What you glue the gypsum tiles onto matters, because the reliability of the fixation will depend on the adhesive.
When choosing, you need to take into account the characteristics of this material and the conditions under which it will be used.
The glue must remain attractive and reliable for a long time.
Gypsum-based installation compounds are often used for small tiles. Alternative means are adhesives for selenite and ceramics.
Mastic can also be used for bonding to drywall, brick and concrete. It does not contain harmful substances, sets quickly and does not allow moisture to pass through.
Installation sealant can also be used for plaster. It is elastic, moisture-resistant, and connects different surfaces well. This composition is made on a polyurethane and polyepoxy base.
Polyurethane glue is good for gluing plaster to any substrate. It increases in volume, which allows you to hide small defects in the walls.
Another option is wallpaper glue or CMC. It acts as a plasticizer when mixed with alabaster. The higher the CMC, the slower the adhesive sets.
Craftsmen often recommend the following adhesive solutions with a gypsum base:
- Plusfix is a powder adhesive based on cement and sand, also containing cellulose. Used for small decorative bricks and tiles no larger than 25x25. Suitable bases are concrete, cement and brick.
2. Litokol X11 - on Portland cement with sand. Suitable for heavier cladding, but this only makes it better for gypsum tiles.
3. Perlfix is a well-known gypsum adhesive that has minimal consumption. Environmental friendliness will also be a plus.
4. Gypsum plaster is a fast-setting powder. During operation, it is easily removed from the surface with ordinary water.
5. Monte is an excellent adhesive for interior decoration.
The adhesive for gypsum finishing must ensure reliable and durable adhesion of the cladding to the base. Considering that the glue is used indoors, an important point will be safety and the absence of harmful components in the composition.
The quality of the product can be judged by the ratio of gypsum and water. If the latter requires a lot, this indicates a high content of fillers, which is not very good.
Specifications
Let's consider the technical characteristics of all the means that can be used to fix gypsum tiles.
- Gypsum dry mixes. It is not without reason that a special substance was developed for tiles made to resemble bricks. The fact is that due to their porous structure, such tiles absorb moisture in large quantities. And the liquid in a diluted composition is needed for the correct, rapid and uniform hardening of the cement. So it is not at all suitable for repairs with such tiles. But the gypsum mixture was developed specifically for such cases. It is characterized by a high hardening speed.
- Liquid glue or liquid nails. The main advantage of these products is that they are sold ready-made and in convenient packaging. In addition, they are no less reliable, and they are easier to apply than gypsum glue (using it makes it difficult to keep the room clean). But the cost of ready-made compounds is much higher. And they are usually sold in small quantities, so they are used in small areas.
- Reactive glue. This product consists of the glue itself and a catalyst, thanks to which the hardening process will begin. The product is suitable for application to any surface and is very convenient to use. But it hardens faster than all of the above. So it should only be used by experienced workers.
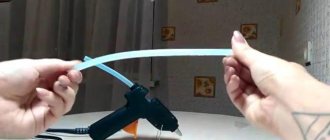
We recommend: What is a glue gun and how to use it?
On a plaster base
Gypsum composition is best used for gluing to concrete, drywall, and plaster. This is one of the most reliable options.
This adhesive for decorative bricks is presented in the form of a dry mixture, which is mixed with water immediately before work. The substance contains various additives that make it suitable for certain conditions.
When choosing such an adhesive, the following features are considered:
- Quantitative indicator of sand. The latter is added to mixtures to reduce the cost. Its high content reduces the quality. You should choose an adhesive with minimal inclusion of sand, because it has a bad effect on adhesion characteristics.
- The ratio of mixture and cooking liquid. There should be at least 300 ml per 1 kg. This indicator allows you to evaluate the level of content in the alabaster composition, which is important for good adhesion. If a smaller amount of liquid is required, this indicates a predominance of cheaper components in the composition.
- Setting period. The speed of work completion depends on this. The shorter the viability of the glue after mixing (up to half an hour), the faster the cladding will be completed. But in this case you need to cook it in small portions.
Reference! Knauf glue has proven itself well; to prepare it you need 500 ml of liquid per 1 kg of mixture, which indicates the high quality of the composition.
Preparation
Preparing a solution for plaster begins with reading the instructions. In it, the manufacturer indicates the required proportions and the time required for mixing. If you do not follow the instructions, the glue may turn out too thick or thin.
After mixing the glue, it needs to sit for about 5-7 minutes. Afterwards it is mixed well again. Now it can be used.
Reference! The finished solution has a certain shelf life - from 30 minutes to several hours. This can be found in the instructions on the package. After this period has expired, the glue cannot be used as it loses its properties. Therefore, it is recommended to mix the glue in small parts.
Manufacturers
Let's look at the main manufacturers of adhesives for decorative stones.
- PLUSFIX. One of the most inexpensive options, as it is cement mixed with sand. It can only be applied to concrete and brick walls. It is also only suitable for small tiles (with sides less than twenty-five centimeters).
- PERFLIX is a more preferable option, since the adhesive is made from gypsum and special additives that increase its elasticity and drying speed. The prepared solution must be used within half an hour. Glue is sold in bags weighing thirty kilograms. And this amount will require fifteen liters of water.
- Satyn PKG-28 is a better option for those who are laying tiles for the first time. Due to the addition of special substances, the glue is very plastic. And the solution remains useful longer than the remedy described above - as much as fifty minutes. Sold in bags weighing twenty-five kilograms.
- Gypsum is another mixture of gypsum and minerals. The finished solution should be used within half an hour, and it dries on the wall faster than the previously listed products - within a day. A package weighing thirty kilograms will require approximately eighteen liters of water.
We recommend: How to choose high-quality PVA glue and use it correctly?
Reviews of gypsum adhesives from different manufacturers
If you need gypsum adhesive for tiles, then you may prefer Volma Montazh, which contains gypsum binder, chemical impurities and modified additives. Buyers note moisture-retaining characteristics and optimal operating time as the main advantages of this mixture. That is why this mixture is chosen by consumers quite often.
It can be used at temperatures ranging from +5 to +30 °C. At the same time, optimal humidity should be maintained. Buyers like that the glue adheres well to plaster, concrete, gypsum products, aerated concrete and foam block, brickwork, gypsum fiber sheets and drywall.
According to buyers, Knauf-Perlfix glue is also quite popular. It is sold in powder form, and in this case the main binding components are additional elements and binder gypsum. Buyers emphasize that this composition can be used when carrying out interior work.
For selenite
Substances suitable for selenite as an alternative to gypsum are ceramic glue and liquid nails. They are great for plasterboard bases.
Nowadays Litokol glue is especially popular. You can work with it within 8 hours after opening the package, as hardening occurs very quickly.
Also, among all the variety, we can highlight the following good adhesives for gypsum tiles:
- Lithoacryl Plus - pasty on an acrylic base. It is moisture resistant and is considered universal. It is good to use on vertical bases; it does not drain. Dries quickly.
2. Casco Extreme Fix - sold in the form of a liquid emulsion. Convenient to use in hard-to-reach areas. The glue sets quickly.
3. Litoflor K 66 – can be used indoors and outdoors, is not afraid of sub-zero temperatures and humidity. Provides reliable grip even on uneven surfaces.
Glue consumption per 1 m2 and 1 m3
Another important thing to know when starting a renovation is how much glue you will need to apply. Calculations must be made in advance.
Firstly, this will help at the purchasing stage - no one wants to spend money on extra packaging, because if applied correctly, gypsum tiles will last you a very long time. If you buy too little product, this will also become a problem - you will have to urgently buy the missing amount, and glue of the same brand may not be available in the store. It is highly undesirable to use products from different brands together.
Secondly, calculations are also important directly during the installation process - if you choose glue that you will dilute yourself, you need to remember that the finished composition hardens quite quickly. And if you prepare a lot of solution, it will be wasted.
So, on average, 1 cubic meter of decorative stone requires 43 kilograms of dry glue. Approximately five kilograms of gypsum powder are required per 1 square meter. Moreover, the amount of substance depends on the size of the tile. The standard layer is six millimeters. But if you are gluing large tiles (the side of which is more than twenty-five centimeters), then the adhesive layer should be thicker.
What to glue decorative stone to?
So, which product is more suitable for fixing decorative stone?
- You can use classic cement mortar, which is used for other types of tiles. But due to the specific structure of the stone, cement will take a very long time to harden. It is also not particularly elastic.
- Liquid nails are also a universal remedy. But this is an expensive option. It is better to use them if you need to attach a small number of tiles.
- Reactive adhesive is suitable for all materials and surfaces. It's easy to apply. But it hardens very quickly. If this is your first time gluing tiles, then this is not a suitable remedy; any delay will ruin the work.
- Gypsum glue is the best option for beginners. Special glue for decorative stone hardens faster than cement, but allows you to work at a relaxed pace. It is suitable for almost all surfaces.
How to use it correctly
It is recommended to glue the coating after preparing the base. To do this, its surface should be cleaned of the remnants of the old finish. If necessary, it is recommended to level the wall and remove visible damage. After which the surface should be thoroughly primed. It is worth considering that the glue is applied to a completely dried coating.
To carry out the procedure, do the following:
- It is recommended to start gluing from the corners. This will help eliminate differences between rows.
- Glue should be applied in small portions to glue 4 squares.
- It is recommended to apply the solution to the tile itself. This will help achieve a stronger hold.
- The gypsum lining should be applied to the base and pressed with your hand. Then, if necessary, adjust its position.
Composition of glue with gypsum
For gluing decorative gypsum stone or brick tiles, manufacturers produce adhesive compositions that contain gypsum. The entire group of these solutions is called “gypsum mounting adhesive”. This tile adhesive is produced in dry form. The composition includes alabaster. This glue can be used on concrete surfaces, brick walls, plastered surfaces, and plasterboard products.
These mixtures not only glue gypsum tiles, but also seal cracks and fill tile seams. You can also cover up chips on a brick wall, plaster, or stone surface.
Gypsum assembly adhesive
Work order
The beauty of the finish will depend on the correct installation work. To make the composition less noticeable, it is usually distinguished by a white color, which looks advantageous against the background of imitation of any material. Installation steps include the following:
- The surface must be completely cleaned, old finishes and all types of contaminants must be removed.
- Large irregularities must be eliminated.
- The wall is divided into horizontal lines; their width should be approximately forty centimeters.
- The necessary marking lines are drawn on the wall so that the slabs are installed evenly and without distortions, and the evenness of the installation is periodically checked using a building level.
- A primer solution is applied, it will increase adhesion and reduce the consumption of the adhesive solution; it is important that the layer dries completely before installing the tile material.
The installation of slabs should begin from the corner areas, so that later it will be easier to make unnoticeable adjustments between the rows. If the solution was prepared strictly according to the manufacturer’s instructions, then the tile rows will not peel off and will be securely fixed to the surface in a short time. The manufacturer also prescribes the setting time of the glue on the packaging.
The installation of slabs should begin from the corner areas, so that later it will be easier to make unnoticeable adjustments between the rows.
Gypsum tile adhesive can create a strong bond that will make the finish last longer, while making installation easier. If you choose a high-quality composition, you can carry out the finishing work yourself. When choosing, be sure to take into account the operating conditions, the characteristics of the slabs and the type of base.
How to use adhesive for large format porcelain tiles
Let's consider an example when you need to lay 60x120 tiles on the floor.
You chose the glue for a large format, one of the brands listed above in this article.
Surface preparation
Regardless of the size of the tiles, the base on which the tiles will be laid must be level and clean. Believe me, even if the tiler hides the flaws in the base under a layer of tiles, chips and cracks will appear during the operation of the tile. Only a smooth and clean base can guarantee that the tiles will not fall off and will last a long time.
Preparation of glue
Depending on the composition of the glue, it is mixed either by hand or with a special mixer called a plaster mixer. It is necessary to knead thoroughly to obtain a homogeneous mixture without lumps, which after kneading is left to “ripen” for about 5 minutes, for some manufacturers up to 15, and then stirred again and used for styling.
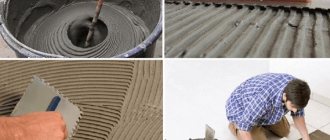
Application
The finished mixture should be applied to the surface with a smooth spatula, and then given a comb appearance with a notched spatula, usually size 4 or 5.
Please note that porcelain tiles are not wetted with water, as was previously done with tiles, which had to be saturated in order to better adhere to the surface. The installer needs to press the tiles into the mortar and tap
For large formats, all tile manufacturers recommend a laying system that prevents the tiles from floating out of place vertically and horizontally.
Features of work
When working with a 60x60 slab, manufacturers recommend working with two people. And absolutely, 60x120 tiles need to be laid with helpers, and the concern is not only about the health of the tiler, but about the reliability of the installation.
Large-format slabs must be laid using special trusses that have suction cups that allow you to hold the slab in one plane, prevent them from bending or twisting, so that excess stress does not arise in the material, which will subsequently lead to the slab cracking. laying or cutting time.
Important points in laying porcelain tiles
All large-format slabs do not like excessive stress during installation. All work must be carried out with the understanding that the laid slab itself is heavy and will sink in the adhesive solution when laid on the floor as much as this adhesive solution allows, and it must be held in one position using installation systems.
If you need to make all the gaps 1 mm, then give up this idea, because the material has physical properties, namely expansion and contraction, which means the expansion joint should be standard. Believe me, with normal seams, the space being repaired will still look monolithic. The seams do not suit the interior design, but falling out grout and a bursting slab will even spoil the entire aesthetics of the interior.
It is important not to follow the lead of customers; a professional tiler must understand that his responsibility includes compliance with the rules for laying ceramic tiles and porcelain stoneware
The most common mistakes made when installing yourself
When installing decorative stone yourself, you can make a mistake. The most common mistakes made by experts:
- A lot of waste due to improper cutting of tiles;
- An incorrect primer or a violation of the technology for applying the primer;
- Excessively wide or sloppy seams;
- Violation of row levels.
Gypsum brick is a modern and very easy-to-work material that allows you to install it yourself.
Gypsum brick is a modern and very easy-to-work material that allows you to install it yourself. If all requirements are met, you can count on excellent results and long-term operation.
Tile adhesives
On a properly prepared base, gypsum stone can be glued to conventional ceramic mixtures.
If you are working with alabaster materials, keep in mind that such slabs attract moisture. So prepare a liquid solution so that it is convenient to work with and you can have time to fix the tiles to the surface.
But it is not always rational to use ceramic adhesives:
- When using adhesives, the back side of the gypsum stone must be primed to reduce moisture absorption.
- The price for solutions for gluing ceramics is higher than for gypsum assembly adhesives. Not everyone agrees to overpay.
What you need to know when choosing glue
In order to choose the right adhesive for a decorative gypsum stone or other type of finishing material for certain operating conditions, you need to take a number of parameters into account. Since internal work is usually carried out, there are no requirements for enhanced resistance to external factors. But there are other important points, the presence of which will ensure the strength of adhesion to the surface. When choosing, they are guided by the following criteria:
- Place of operation indoors or outdoors (rare);
- Type of base – water resistance, porosity, increased density;
- Features of the tile material itself;
- Type of installation, a seamless technique will be used, or a suture connection will be made;
- Master's experience.
When working with porous coatings or fresh concrete, products with additional elements to increase adhesion are suitable. For densely processed and high-quality plastered bases, you can use conventional mixtures without additional reinforcements. If the surface is problematic, with unevenness, then you can opt for mixtures with quartz sand. Thus, the consumption is affected by the quality of the base and how well it was leveled before work.
For beginners, mixtures that do not harden quickly and can be stored diluted for a long time are better suited. The last indicator can be equal to 80 minutes. If you will be working in a room with high humidity, then it is advisable to use products with a polyurethane base or epoxy resin, which are resistant to humidity.
Tools and accessories for installation
Having decided to use gypsum bricks in the interior of your home, you need to prepare the following tools and materials:
- plastic container;
- pallet;
- hacksaw or grinder;
- plain and notched spatula;
- building level;
- roulette;
- paint brushes;
- file;
- pencil;
- primer;
- electric drill.
Now you can proceed directly to preparing the surfaces to be treated.
Available materials and tools
You don’t always have specialized materials at hand, you have to dodge.
Alabaster
Spot gluing can be done using alabaster. Alabaster will adhere gypsum stone to brick, plaster or concrete surfaces. Alabaster is known for hardening quickly. To extend the working time of the solution, add liquid soap or glue to the solution, which will slow down the hardening.
Finishing or starting putty
The putty is diluted according to the instructions and then applied to the back of the tile. Tile adhesive for drywall is also suitable.
How to care for stone
Caring for gypsum stone will not require much effort on the part of the housewife. All that is required is to periodically wipe off the dust from the varnish base. It is worth noting that if bricks with an aging effect were used in the interior, then the dust on them is not visible as on dark varnished bricks. The varnish, in turn, protects the plaster from moisture.
Gypsum bricks for decorating a room are the best budget solution. With the help of such inexpensive materials, you can create a cozy interior in any corner of the house, and all that is required to design an interior solution is imagination, time and compliance with installation technology.
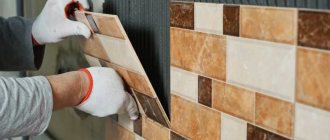
Laying
Many experts emphasize that before applying glue, it is better to impregnate the inside of the facing material with acrylic, which will improve the quality of gluing. A thin layer of adhesive is then applied to a small area of the wall or floor to help improve adhesion. The back side of the tile is covered with the mixture, which is then leveled over the entire surface using a notched trowel. Make sure the thickness is optimal. The facing material is then pressed and held for five or seven seconds.
If you decide to change the finish in a room where there is wallpaper on plywood, you must first prepare the surface by removing the remnants of the old material. It is recommended to use special tools and take into account the rules.
From this article you learned about the different types of adhesives that are used for gypsum tiles. Taking into account the recommendations of specialists and the instructions of material manufacturers, you can choose the best option that is suitable for finishing work. In this case, you need to take into account the type of surface, impurities that may be in the tile itself. If the adhesive material must be pre-prepared, remember that the proportions must be accurate.
After finishing the work, you will be satisfied with the result. The coating will look very aesthetically pleasing and will last for many years.
To learn how to lay gypsum stone, see the following video.
Surface preparation
If ordinary tiles are laid evenly using a level, then in the case of decorative stone this option is not suitable. Since its outer sides are uneven, finishing is carried out on a flat surface. The best way to level the surface is to apply plasterboard. This is the first important step in starting your work.
If this is not the first renovation and there was previously wallpaper, paint or whitewash on the drywall, everything is removed so that the adhesion of the stone and the surface is as strong as possible. Walls that need putty are processed. A primer is applied on top, which brings the wall particles closer together, which leads to better adhesion of the finish.
Basic rules for laying stone on drywall
- Drywall is strong, but cannot withstand a huge load, so only light grades of stone are used.
- If the drywall is located outside, in the open air, the cladding with decorative stone will not last long, the possibility of completely replacing it every 3-4 months (at best) is being considered, which is irrational.
- A moisture-resistant plasterboard sheet must be treated with a primer; after drying, it is ready for further finishing.