How to extend the life of shelves
The first thing you need to consider when arranging a cellar is a ventilation system. You can set the desired humidity level and minimize the risk of fungus and corrosion using natural air exchange. To do this, 2 pipes are removed from the room:
- one is mounted under the ceiling surface (with a protrusion of 25-30 cm);
- the other should go almost to the floor (not reaching 25-30 cm).
You can also ensure the flow of fresh air by installing a forced-air system.
The following recommendations will help extend the service life of shelves:
in the summer, regularly ventilate the cellar (except in rainy weather); wooden and metal surfaces must be taken outside, cleaned, dried and coated with a protective agent (except galvanized and corrugated sheets with a decorative coating); when filling shelves with canned goods and products, it is important to take into account the load-bearing capacity of a particular material; Cans should be distributed evenly across shelves; If there is damage to a section of the rack, promptly replace the worn part.
What to process
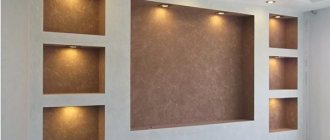
The walls of the cellar must be treated with lime mortar. This kills pathogenic microflora and prevents the development of fungus and mold. The shelves themselves are also subject to disinfection. After thorough drying, they are cleaned of contamination.
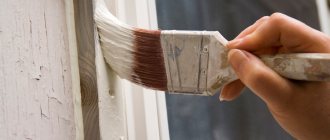
Further work depends on the type of material. The wood is first impregnated with an antiseptic and then covered with paint. Corrosive formations are removed from the metal, degreased and painted. Steel parts are covered with cardboard or self-adhesive tape.
If during cleaning the cellar signs of insects or rodents were found, treatment should be carried out in the following ways:
- smoke bombs;
- dust;
- traps;
- insecticidal solutions (copper sulfate, primers with antifungal effect, etc.).
All chemicals used must be suitable for residential use!
Video guide for creating shelves with your own hands:
What to do
The cellar should be prepared for use in the summer, in dry weather. Basic steps:
- Empty the basement from last year's products, cans, barrels, boxes, and if possible, disassemble racks and shelves.
- Leave the cellar open to thoroughly ventilate the room using natural ventilation.
- It is recommended to wash all wooden boards with warm soapy water and dry thoroughly in the sun until completely dry.
- Compact the bottom of the basement, having previously cleared it of debris, old sand, and crumbled whitewash.
- Dried boards must be coated with a disinfectant compound. To do this, you can use copper sulfate or lime or a combination of these substances.
- Carefully treat the walls, ceiling and base of the basement using the same composition as for the boards.
- Dry the cellar for two to four weeks after disinfection, and only then place food in it for storage.
Priming of walls and ceilings is usually carried out at the stage of construction of houses with cellars. For this purpose, deep-penetrating compounds are used, which form microscopic crystals in the pores that prevent the harmful development of mold microflora.
But even such powerful and reliable means lose their effectiveness over time. Therefore, the walls, ceiling, metal and wooden elements of the cellar should be treated annually.
Secrets of preserving shelves in the cellar
Cellar construction.
There are a few simple secrets and tips that will help preserve your shelves for a long time. You need to strictly follow them, and the shelves will serve for decades.
- It is necessary to ensure good ventilation in the room. Moreover, we may not be talking about artificial ventilation, but about natural ventilation. In this case, the humidity will always be at the proper level. The boards will not rot; therefore, the shelves will be reliably protected from high air humidity.
- All shelves must be taken outside to dry every summer. This will allow all excess moisture to evaporate, which is an excellent environment for the development of fungus and bacteria.
- It is necessary to regularly check the shelves for rot. All cracks must be eliminated as soon as possible.
- When installing shelves, it is worth calculating in advance the load that will act on them. All shelves in the cellar can be of different thicknesses. You should not place heavy barrels of honey on shelves where small jars should be stored. It is logical to first make a simple layout, which will indicate where and how many different cans will be stored.
To store liter jars, a height of 25 cm will be enough, for storing two-liter jars - a height of 30 cm, and for three-liter jars it is better to make the shelves higher. The width of a standard shelf is approximately 50-80 cm, but everything will depend on the size of the cellar. As for the length of the shelves, experts advise making them no more than 75 cm. Otherwise, a deflection may form, and this leads to failure of the shelves.
If the cellar is constantly damp and humid and no precautions or preventive measures help, it is necessary to cover the walls with lime several times a year. If the shelves are made of steel, they need to be covered with old oilcloth. It is better to use self-adhesive tape
This will protect the jars from the appearance of rust, which will then be quite difficult to wash. Rust cannot be avoided when it comes to steel shelves, since high air humidity constantly prevails in the cellar. Metal corrosion will definitely occur. All wooden boards from which shelves are made must be impregnated with drying oil. You can use other means that have a similar purpose. The most important thing is to make sure that the jar is marked “for residential premises”. The cellar stores products that will absorb all foreign odors. Chemicals can also affect taste, so you should only choose those that are marked accordingly.
Mold in the house and limescale - expert opinion
Gypsum and lime plasters are electrically neutral, and their pH level is a natural protection against fungi and mold.
From archaeological research, it is known that lime in various forms has been used for interior decoration for more than 4,000 years. Due to the high pH level, lime has antiseptic properties and partially destroys bacteria and viruses. It has virtually no odor, but perfectly absorbs and neutralizes other odors.
Lime bleaching of barns, stables and other premises in rural areas is still used in rural areas to this day. None of the modern materials are suitable for such extreme conditions. The use of lime in agriculture and gardening reduces soil acidity. An acidic environment promotes the development of all types of fungi and mold, to which almost all natural materials are exposed.
Materials for binder lime plasters are also more diffuse than cement plasters, and even more so those produced on the basis of acrylic resin. The diffusion coefficient promotes the passage of moisture, which allows the wet surface to dry faster.
With an appropriate thickness, at least 10-20 mm, lime plasters can regulate the humidity in the room. In essence, such adjustment is protection against excessive humidity, which promotes the development of microorganisms. By using natural materials proven over many centuries for interior decoration, you avoid many modern diseases.
Materials
When creating shelving for the cellar, different materials are used. Craftsmen who prefer to do everything themselves can construct them from polypropylene pipes, flat slate or boards.
Based on materials, the most popular are 3 types of shelving.
Metal
Products made from metal profiles are considered the most reliable. Its only drawback is that it is susceptible to corrosion.
But here it is worth paying attention to the fact that this problem becomes relevant only after many years
Therefore, you can safely install metal shelving in your basement, counting on the fact that you won’t have to make any repairs for 10-20 years. To extend its service life, the material can be additionally treated with special means.
Wooden
In addition to metal products and profile pipes, wooden racks are also popular. The advantage of this material is that the wood is inexpensive and very easy to process. But it is worth remembering that wood can quickly become unusable in conditions of high humidity. Therefore, the material also needs to be processed both during the installation of shelves and after. Experts recommend repeating this procedure regularly, in spring or summer. Wooden structures are useful both in a wine cellar and in the basement where winter supplies are stored.
But not only boards can be used to build such racks. Very often they are made from plywood or chipboard. This is an even more affordable and easy-to-use option. But it is worth remembering that, unlike durable wooden structures, chipboard products are not able to withstand heavy weight. They are suitable for storing lightweight cans or bottles up to 1 liter.
Plastic
Plastic structures are very easy to construct. But despite the fact that plastic shelving is easy to clean, they still remain vulnerable to high humidity and sudden temperature changes. Therefore, such models have to be replaced every few years.
Mold prevention
One of the most important criteria for determining where mold and mildew appears is moisture. In a damp room, there will always be favorable conditions for the development of fungal spores, while a well-ventilated room will be reliably protected from their appearance.
To ensure the necessary dryness and ventilation of the room from dampness and fungus, it is necessary to leave the cellar door open every day for at least twenty to twenty-five minutes. In the absence of the opportunity to repeat this procedure every day, two pipes should be installed in the cellar: one from the floor, and the other from the ceiling. Thanks to them, fresh air will be able to constantly enter the room, and its owner will finally have no reason to fear. So, how to get rid of mold in the cellar?
- To get rid of moisture, you must also move all furniture away from the walls. This will prevent condensation from forming.
- Heaters will help get rid of damp, humid air in the cellar.
- For the same purpose, you can use heated ceramic bricks, white moss or vessels filled with quicklime. They absorb moisture perfectly.
- All containers containing liquids or products must be tightly closed..
- Good waterproofing will help protect the cellar from moisture from the outside. It is recommended to protect the floor, walls and ceiling from moisture using moisture-proof material.
This is also interesting: Mold on clothes: removal methods and preventive measures
The favorite habitat of mold is food. Once the fungus appears on them, you can no longer eat them: this is fraught with serious, severe forms of poisoning. However, even irreversible spoilage of food cannot be compared with the main danger of the appearance of mold fungi.
These tiny organisms release the products of their vital activity in the form of gas and spores - microscopic particles that fill the air in quantities of about two to three million per twenty grams of dust. These particles enter the human body through the respiratory tract and skin, causing coughing, allergic reactions, chronic runny nose, conjunctivitis, hair and nail damage, bronchial asthma and intoxication. Mold is very tenacious: it does not require any special conditions for germination.
The only condition is air humidity and access to water, which allows the fungus to form mycelium (a kind of mycelium) anywhere: on concrete, wood, fabric (clothing), soil, food. Therefore, you should not think that fungus that appears in a cellar or basement will remain there and will not become a problem for the owner of the premises. These simple organisms multiply incredibly quickly and can go beyond the cellar, settling directly in the owner’s house, jeopardizing the health of himself and his family.
Types of structures
The manufactured structure can be of several types, each of which should be considered separately.
Team
The “constructor” principle works here, that is, the shelves are assembled according to parts. They are easy to install, functional and mobile, but they are not able to withstand heavy weight. The material for such a structure can be anything - wood, plastic, slate or plywood, but most often a metal profile or square pipe is used. The material is cut into pieces of the required length to prepare the shelf parts, namely:
- columns;
- cross jumpers;
- connecting supports;
- slats for shelving.
The resulting parts are attached to each other by welding. They can also be connected using corners, but in this case the structure will already be collapsible (the next type).
Collapsible
These structures resemble prefabricated ones, but differ in that they require the possibility of disassembling and reassembling the racks. For example, they can be disassembled for drying, disinfection and preparation of storage for storing vegetables.
The collapsible model can be made from any materials, but plastic is most often used. As a rule, parts are sold unassembled. So, a home craftsman will only need to select a structure of the desired size and shape, and then assemble it in the cellar, securely fastening all the parts together using hinges, corners and bolts. This design will also be durable and reliable.
Monolithic
Such shelves cannot be disassembled and, unlike prefabricated structures, are not mobile, that is, they cannot be rearranged. Most often they are made of brick or concrete. In this case, the entire structure is mounted immediately in the place where it will stand in the future.
Choosing an anti-mold product
To remove mold in the cellar, it is necessary to treat all mold-affected surfaces with a special product.
- In any hardware store you can easily purchase specialized antiseptics that have an antibacterial or antifungal effect. Such drugs must be handled with extreme caution, strictly following the instructions.
- Plain whitewash is widely used as one of the most effective ways to remove fungus in the cellar. It contains a number of chemical components that destroy mold.
- If mold appears in the cellar, most seasoned “fungus fighters” recommend using ammonia.
- An effective assistant in destroying fungus in the cellar is a concentrated solution of citric acid. Two hundred grams of lemon powder must be dissolved in two liters of water, and then treat the areas where mold may appear or has already appeared with the resulting mixture.
- Two kilograms of quicklime and two hundred to three hundred grams of copper sulfate, dissolved in thirty to forty liters of water, will help quickly get rid of mold in the garage cellar.
- The most common answer to the question - how to get rid of mold in the cellar effectively and quickly - is a sulfur bomb . Set on fire and left for several hours or overnight in a stable metal container, it will help to quickly destroy the fungus in the cellar.
- One kilogram of salt and one hundred milliliters of boric acid, dissolved in five liters of water, are very toxic to the fungus and will help to remove it easily.
- Formalin and bleach in an amount of fifty grams of each chemical, dissolved in two liters of water, are effective in combating white mold.
- One of the simplest ways to get rid of mold is to treat the areas where it accumulates with an ordinary burner . However, you should not try to get rid of mold on wood in this way - there is a risk of not only killing the mold, but also spoiling the material.
This is also interesting: Mold stains on a baby stroller: what to do?
Adviсe
To ensure that the finished cellar does not disappoint its owners, you need to know exactly what the temperature should be there and how to maintain it in a given range. Whatever the temperature conditions “outside” and in heated rooms, the air temperature in the storage facility must be maintained year-round from +2 to +4. Only in the hottest moments is an exception to this rule allowed, but even then the temperature increase should not be more than +5 - +7. It is recommended to take into account many factors:
- soil thermal conductivity level;
- instrumentation of the cellar;
- humidity level;
- quality of ventilation;
- depth;
- wall material and thickness.
The convenience of using the cellar largely depends on the stairs. A stationary structure is much more convenient than an attached one, and only with periodic use of the storage facility can you install homemade wooden structures. A width of 0.5-0.6 m is much more practical than 0.3-0.4 m; the ascent and descent are easier. When you have to lower and lift large things or heavy loads, you should not make stairs less than 800 mm. Recommended step heights are 150-200 and width 250-300 mm.
Plastering brick walls from the outside is done with cement mortars. Then the coating is lubricated with bitumen-based mastic and covered with roofing felt. Only after this can the soil be filled in. If there is insufficient ventilation, it is worth considering the placement of boxes that absorb moisture from the air. Experts warn that it is unacceptable to accumulate fuel, lubricants, paint and other substances with strong odors in cellars.
Before storing food in the cellar during the summer months, it is always dried and ventilated. Only then can you avoid the unpleasant musty smell. If you need to punch “windows” in concrete to organize a storage facility and strengthen the floors with massive channels, it is better to consult with specialists. High-quality alteration implies the formation of structures with a double reserve of strength. When removing the floor boards before preparing the cellar, the remaining logs should be reinforced with a beam running transversely; it will prevent the structure from falling apart.
To learn how to build a cellar with your own hands, see the following video.
Video instructions
The author of the channel “Gatall GTL” talks in detail about how to treat walls against mold and mildew. According to him, any component, be it ordinary household “Whiteness”, detergent, pesticide or antiseptic, will be effective if it contains chlorine, a substance destructive to fungus. A highly concentrated chlorine solution will completely remove the fungus within a few weeks. Moreover, the result will be noticeable after twelve hours.
The authors of the MIX channel, in turn, offer an alternative solution to the problem of mold.
These spores can be easily gotten rid of using ordinary wax candle scents . By lighting one such candle every day for ten to fifteen minutes, you can protect a room of up to twenty square meters from harmful gases and spores.
The author of the channel “Roman Rostovchanin” has his own, practice-tested opinion on how to deal with mold in the basement. Thinking about how to treat walls against mold and mildew, he started from a well-known fact: an environment with pH = 8 (acidic) is destructive for mold. Having dissolved eighty grams of citric acid in five liters of water, he obtained a solution with the above-mentioned indicator, treated the mold areas with it, and after a fairly short time he was completely satisfied with the result.
After finally getting rid of mold and mildew, an equally important step is to take a number of precautions to prevent the dangerous pest from reappearing.
Assembling a rack made of wood (larch)
Wood is the most popular material due to its strength and low cost. To make a rack, beams with a cross section of 100x100 mm are taken, which are cut to the planned size of the shelves. To complete all work you will need the following tools:
- jigsaw;
- screwdriver;
- square;
- marker or pencil;
- roulette;
- hammer;
- hacksaw.
The installation instructions for wooden shelves are as follows:
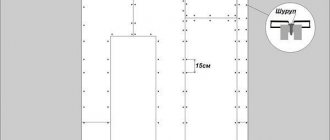
- Construct cross frames. To do this, you need to take two racks and cut them to the intended height based on the height of the basement walls. Make notches on the cut racks where future shelves will be located.
- Make longitudinal and transverse connections. First of all, you need to prepare a board 3-4 cm thick. For longitudinal connections, take bars from this board 8-10 cm wide and a length equal to the entire length of the rack. For cross braces, take beams of the same width, but their length should be equal to the depth of the rack.
- Make marks on the racks for the tie bars. Cut the nests with a thickness equal to the thickness of the bars. These nests are needed so that beams are attached to them during assembly of the structure.
- Assemble the rack since all structural elements are ready. So, all that remains is to fix the shelves on the racks.
In order for the rack to last as long as possible, the wood must be treated with an anti-fungal and anti-corrosion compound before installation.
When choosing a drug, it is important to ensure that its wrapper bears the inscription “for residential premises.” The fact is that food will be stored in the cellar, and it can absorb odors of various chemicals
To prevent this, it is important to choose products suitable for use in a residential area.
You can assemble wooden shelves according to the following scheme:
Types of cellars
Storage for supplies is organized taking into account the conditions of the site. The main task during construction is to protect the structure from groundwater and high water, so it is recommended to choose the highest place and use a construction option that provides better insulation from soil moisture.
Ground
Building a cellar on the surface of the ground is the best choice for a summer house located near a reservoir or on clay soils. As a rule, there is a high groundwater level and accumulation of water when snow melts.
Types of above-ground cellars:
- free-standing bulk;
- wall-mounted, adjacent to an existing building.
Features of the construction of above-ground storage:
- The pit is deepened no more than 50 cm.
- To prevent moisture from penetrating through the floor, a crushed stone-sand mixture is laid on the bottom, compacted, filled with bitumen, or rolled waterproofing materials are laid.
- The walls are erected from materials that can resist rotting - bricks, blocks, wood treated with antiseptics.
- The structures are protected with waterproofing from the outside and inside, gluing it in 2 layers.
- The necessary thermal insulation is provided by multi-layer insulation with clay, expanded polystyrene, expanded clay and a layer of earth 0.7-1.2 m thick.
- The structure is given the shape of a hill, which is most resistant to erosion during rains and floods.
- To enter the storage room, an insulated door is installed on the north side for minimal heating in summer.
Wall-mounted
This is the most economical and simple solution for high groundwater levels in the country. The cellar does not need to be deepened, and the walls of the house or barn act as a ready-made external structure.
Features of the technology for constructing wall storage:
- The pit is dug to a depth of no more than 0.5 m. In the immediate vicinity of the building, the soil near the foundation of the main building must not be weakened or loosened. This causes uneven deformation of the soil under the sole and provokes the formation of cracks in the structures of the house.
- Floors are made on a preparation made of sand, crushed stone, broken brick, which provides drainage and reduces the level of melt or rain water.
- The walls are laid out from rot-resistant foam blocks, bricks, or a wooden frame is constructed, filling the internal space between the sheathing with a heat insulator.
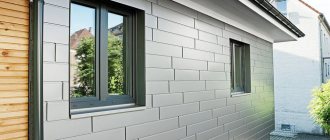
- The wall building is insulated with synthetic materials with additional earthen embankment. If you line the outside of the cellar with decorative finishing, it will not spoil the modern appearance of the country house.
Zemlyanoy
It is advisable to build a cellar completely buried in the ground at a low ground level, when the water does not rise above -3 m.
Features of underground structures:
- During construction, you need to select a sufficiently large volume of land.
- It is necessary to reinforce the masonry walls from blocks or bricks so that the structures do not lose stability under lateral soil pressure.
- Reliable thermal insulation of a buried building is created by a layer of earth.
- Even with low groundwater levels, it is advisable to provide drainage to protect against seasonal precipitation and melt water.
- To enter the basement, an insulated hatch and ladder are installed.
- Particular attention is required to the organization of a ventilation system, which, in addition to reducing air humidity, cleans it of harmful gases.
Semi-recessed
This type of storage differs from the above-ground storage depth - the structure is immersed in the ground to half or a third of its height. Free-standing cellars are covered with earth, built-in undergrounds are placed under the house or in the basement.
The semi-buried building combines two types of cellars—ground and earthen. Characterized by features:
- Unlike a completely buried basement, the volume of excavation work is smaller, but reliable insulation of the upper part is required.
- When laying a pit, the groundwater level should not be closer than 0.5 m to prevent the penetration of water due to capillary suction from the soil.
- To protect against accidental runoff, install drainage
- To enter, a door is installed at ground level and a staircase is installed.
Caisson
The most reliable cellar at high groundwater levels is a caisson. The design of the metal or plastic box has no joints from where water could leak inside.
The caisson is immersed in a pit and secured with anchors that prevent it from floating up when the groundwater level rises. A pump is installed to pump out excess liquid from under the bottom. The construction of such a storage facility is more expensive than traditional methods of constructing cellars, but the design has a very high degree of protection from moisture.
Peculiarities
Regardless of the size of the basement, the racks that are located in it must meet the main requirements and be:
- roomy;
- reliable and stable;
- protected from negative environmental influences.
When arranging a cellar, it is very important to properly think through its layout. In this case, the owners will be able to place all the necessary products there and save enough space for free movement between shelves
The distance between the shelves is determined depending on the preferences of the owners.
As a rule, separate racks are allocated for storing vegetables. The rest are intended for cans of preserves. The first should be more spacious so that containers in the form of wooden boxes can be safely placed there. The latter can be narrow and located right next to the wall. In a round cellar, shelving can be used to divide the space into two main zones.
Choosing material for shelving in the basement
Shelves can be made from a variety of materials, be it metal basement shelving, plastic shelving, or even concrete shelves. The rest of the article will discuss the most popular materials for manufacturing, as well as how to create the required basement microclimate.
Wood
Coniferous wood, kept in good conditions, can last a long time. Since cellars have high humidity, and any type of wood swells easily, after a certain time they can rot and collapse.
If you watch a lot of useful videos about the basement and the necessary materials, you can understand that deciduous tree species will last much longer than others. However, not a single species for making shelves in the basement will last the required time without being treated with special solutions to combat mold and mildew.
Chipboard or plywood
Basement equipment made from this material, unfortunately, will not be able to withstand too much load. The manufacturing features of such shelves come down to the load that they can withstand, so you should use material such as plywood or chipboard sheets only for small containers.
Metallic profile
This design option is the most practical and reliable, despite the fact that the metal is highly susceptible to corrosion. Theoretically, corrosion of each shelf should ultimately lead to its unusability, however, practice shows that this happens for a very long time, so much so that you don’t even have to worry and safely choose a metal corner for mounting racks and shelves made of steel. For durability, the shelves can be treated with some kind of anti-corrosion coating.
Durable plastic
When making shelves in the cellar, some people choose plastic ones instead of wooden ones, which have good accessibility and ease of installation.
The low weight and strength of the structure attracts many, but it is important to understand that temperature changes together with excess humidity will ultimately lead to loss of strength of the material and final unusability
Shelves can be made of plastic
Mechanical processing methods
If mold has already affected the walls, boards or ceiling, you need to take immediate measures to eliminate it. To do this, in addition to vitriol and lime, you can use the following means:
- Chlorine powder or bleach, which is dissolved in water. You can apply the product with a brush or spray.
- Soda with vinegar. The surface is sprinkled with dry powder and then watered with vinegar. The resulting reaction destroys microorganism spores.
- Table salt with boric acid. To prepare, take 1 kg of salt and 50 g of acid, combine with a liter of water and treat the moldy areas.
- Potassium permanganate solution. The composition is saturated, after which all surfaces of walls, racks and shelves are treated.
- Tobacco decoction. You will need 50 g of dry shag, from which a concentrated decoction is made.
- Iodine solution. To prepare, take 10 ml of five percent iodine per one and a half liters of water. The mold is removed, then the surfaces are sprayed with iodine.
- Sulfur fumigation. An effective but highly toxic disinfection method. Containers with sulfur are placed in the cellars and set on fire, the basements are hermetically sealed. Gas kills mold and destroys fungus.
When using toxic substances, you need to wear protective equipment - gloves, special clothing, respirators. It is believed that once microorganisms appear on wood, it is no longer possible to get rid of them, and all that remains is to burn the tree completely.
Features and subtleties
You can make do with what you have on hand. There are many different options. You shouldn’t limit yourself to just the usual wooden or iron ones.
Tools needed for work: tape measure, hammer, screwdriver, square, marker or pencil, jigsaw.
You can use plastic, which has become increasingly popular in recent years. This material is not affected by moisture, and for a cellar this is just what you need.
To make the installation process more efficient, prepare in advance:
- jigsaw;
- screwdriver;
- square;
- marker or pencil;
- roulette;
- hammer;
- hacksaw
By following all the recommendations of the construction process, you can easily make shelves with your own hands. Good luck!
Wood shelving production process
Racks are produced in the form of separate sections that must be mounted on the walls of the cellar. This rack can be made quite quickly and easily. You choose the width of the product yourself, based on the volume of the cans that will stand there.
When installing and producing shelves, remember that there must be access to the wall part. This is done in order to dry it out in the summer. To produce vertical shelf supports, bars are used, the cross-section of which is 100x100 millimeters. Based on the height of the basement, determine how tall the shelving should be. Initially, horizontal transverse frames are produced. On the racks you need to mark at what height the shelves will be located. The thickness of your board should be about 40-50 millimeters. It is worth sawing off bars from it, the width of which will be from 6 centimeters. The length must correspond to the dimensions of the shelves. The grooves must be cut in the racks so that they are identical to the dimensions of the bars. As a result, the structure is assembled and secured. Then you need to put shelves on the timber frame. Previously, before the production process of the rack, it must be treated with an antiseptic.
Selection of racks for shelves
High-quality material is the key to a long service life
Wooden shelves in the basement are a very common occurrence; many cellar owners prefer to use edged boards as a material.
Watch this video on YouTube
- When making racks with their own hands, craftsmen pre-treat the material with an antiseptic and paint the surfaces. And after all the preparatory stages have been completed, the installation of the shelving assembly begins, followed by attaching the shelves to them.
- Very convenient to use are racks made from a metal corner, which, after processing, are assembled indoors. Assembling the frame is not a difficult task and does not require special skills.
If shelves are fixed to wooden frames using self-tapping screws, which strengthen the structure of the racks due to additional fastening of the shelves to the beams, then metal corners are a very stable and durable structure.
A tool that will help in the manufacture of shelves and racks
Schematic drawing of a wooden rack
Depending on the choice of material that will be used in the manufacture of shelves and racks, the list may have significant differences:
- Wood requires one set of tools, metal another, although there are no serious differences for attaching shelves to the shelving frame.
- The boards that are used as material for shelves on racks, of course, do not always correspond to the type in which they will be installed. The surface, if it is not treated, must be brought to the required smoothness using a plane or grinding machine.
- Cutting boards and timber is done using a regular hacksaw, but you can use small woodworking machines that can also perform wood cutting and planing.
- For installation you will need screws, bolts and nails.
To make shelves from plywood you need a minimum amount of tools:
- Nice hacksaw.
- Brush for surface treatment.
- Sandpaper for finishing edges.
- Construction tape for marking.
- The same applies to fiberboard, chipboard, laminated boards.
To make shelves from flat slate or metal you need to have:
- An angle grinder, popularly known as an angle grinder.
- Marking tape with a metal core or regular chalk.
- If the shelves will be additionally attached to a corner or wood, you will need a drill of the required size and an electric drill.
We make shelves from wood or chipboard
Wood is the easiest to process and malleable material. In addition, during any construction there are always unused boards that can be used for shelving for your basement.
Wooden shelving assembly diagram.
- We make supports. To make the support posts, you will need to prepare thick wooden beams. Their thickness must be at least 7 centimeters. The number of supports is calculated depending on the size of the future structure.
- We nail the crossbars. The supports are attached to the basement wall, and horizontal crossbars are mounted on them, which will later support the shelves themselves. These crossbars can be made from thinner boards. A thickness of 4–5 centimeters is quite sufficient.
- We attach the shelves. The shelves themselves are made of wide, durable boards or chipboard sheets. The shelf is attached to the crossbar. Don’t forget to first cut out special grooves into which the vertical beams will partially fit.
Before assembling and securing the wooden shelving unit, treat all parts with a safe and non-toxic antiseptic.