Requirements for the base for cladding
As professional tilers say, the quality of cladding depends 90% on the preparation of the base.
According to our expert Alexander Pleshkin, we can consider that the foundation is well prepared if it:
- “Doesn’t walk”;
- Durable;
- Rovnoe. The larger the tile, the smoother the base. A deviation of more than 2mm x 1m is unacceptable; the tiles will be more difficult to stick and will not adhere well.
- Clean.
For example, let's look at the preparation of the foundation both in a newly built room and in an old bathroom that is about to be renovated.
Tiled cladding: main advantages
If the bathtub is installed on a frame, then a small space remains under it. It doesn’t look the most attractive, and sometimes even hurts the eyes. It's a shame when a large amount of money was paid for repairs, but the shortcomings still remain. It is in this situation that tiled cladding is used. The decorative screen perfectly hides defects, and the bath takes on a completely different look.
The main advantages of the presented cladding method:
- The tiles are incredibly easy to care for;
- the material is absolutely safe from an environmental point of view;
- looks neat;
- tiles are practical and durable.
Nuances that are important to know:
- the tile must be attached to some kind of base (foam blocks, drywall, brick);
- be sure to provide ventilation and an inspection hatch;
- It is advisable to make the screen from the same material from which the walls were made.
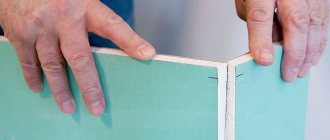
Preliminary preparation
Before you begin tiling the bathroom, you must carefully prepare the surface on which the tiles will soon be attached. The most common screen is made of brick, but plasterboard is sometimes used. This material is also durable, but costs a little less.
Installation of metal profiles
At the initial stage there are no special nuances. The bathroom is installed in the prepared place, then connected to the sewer. Be sure to install it level so that there is no slope towards the drain.
Advice! All models of modern bathtubs already have a slope, so there is no need to do this additionally. It should only be installed horizontally.
Floor in a new room. Stage one: screed
Floor tiles are always laid on a screed. It levels the base, which means it saves glue, and laying the tiles on a level screed will go faster. The smoother the screed, the better the quality of the finishing coating, and the longer it will last.
BoraffFORUMHOUSE Member
For me, laying tiles on an uneven base is a complete pain. It’s easier for me to first drive the screed to zero, and then just put the tile on it under the comb. Although there is more labor involved, the nerves are intact.
Our expert recommends making a cement-sand screed from a ready-made dry mixture based on sand concrete with additives and plasticizers: this is the easiest way to get a reliable and even base for tiles.
The most important thing here is to make sure that the screed is:
- equally dense over the entire floor area,
- without voids,
- no cracks or chips
- flat (permissible slope - no more than 0.2%).
Recommendations for the minimum thickness of the screed are collected in the table.
Recommended screed thickness
| Purpose of the screed | Screed thickness |
| Screed made from self-leveling mixtures for subfloors | 20 mm |
| Screed over heat and sound insulation | 40 mm |
| Screed on water heated floor | 45 mm exceed the diameter of the pipes. |
| Screed for electric heated floors | There are no special requirements: the mats are not laid in a screed, but in a layer of tile adhesive. This floor should not be used earlier than a week after installation. The temperature must be raised slowly and gradually. |
Alexander Pleshkin, dry mix specialist
At the stage of calculating the thickness of the screed, it is necessary to take into account the features of the cladding: it is possible that it will be made of tiles of different thicknesses or combined with another finishing finish. That is, in areas with different cladding, the thickness of the screed may differ.
The screed can also be laid on a wooden surface, but before doing this, the wood must be soaked with an antiseptic, dried well, the structure strengthened, for example, using sheet material, and the surface must be waterproofed.
Floor works
Laying floor tiles with your own hands is doable. To do this, you should carefully study the specifics of the work. And do it without haste and carefully.
The options for laying tiles on a horizontal plane can be different: in a straight line, diagonally, or in combination with another size range, for example, with mosaics. The main thing is to start the first row correctly. To do this, calculate the center of the opening and start the first row symmetrically. Markings should be made on both the material and the base.
Consideration should be given to how to lay tiles as flooring. A layer of glue is evenly distributed over the prepared surface with a notched trowel. It is necessary to treat no more than 1 square meter in this way. m. Next, take the floor tiles and apply the solution evenly to them. Its surface coverage must be at least 95%. Excess glue should be removed. The tiles are pressed to the floor according to the markings made and leveled with a gentle driving motion. Remove excess mortar from sides. The next tile must be glued identically and adjusted in level relative to the first. Don't forget about the seams, they must be the same. The size is adjusted with crosses and pegs. Using this method, lay tiles in the bathroom over the entire floor plane.
Important! It will be easier to clean the seams during the laying process than after the mortar has hardened, so this should be done in a timely manner.
Laying floor tiles with your own hands is done in two days. Since with an increase in the worked area, the ability to move without stepping on a dry surface disappears.
Stage two: waterproofing
On our portal quite often there are discussions about the place of waterproofing in the “facing cake” of the bathroom: under the screed or on top of it?
Alexander PleshkinSpecialist in dry mixes
In 99% of cases, waterproofing is done under the screed.
The exception is a very uneven base. In this case, to level the surface, first make a thin leveling layer of screed, then apply waterproofing, after which the main layer of screed is poured under the finishing coating.
Alexander PleshkinSpecialist in dry mixes
For waterproofing, you can use bitumen roll materials or coating materials - cement and acrylic compositions, bitumen water-based mastic.
Now the bathroom floor is ready for tiling.
Steps, boxes and podiums
With a combined bathroom size of 9 sq. m, bathroom from 6 sq. m, steps, podiums can be attached to the plumbing fixtures, horizontally oriented boxes with water supply and sewer pipes can be adjacent, transiting to the kitchen or connecting the bathtub with risers.
Steps are used to increase user comfort, making it easier for elderly people and children to step over the side of the bathtub. Usually one or two steps from the floor level are enough.
One step for easy entry into the sanitary bowl.
Or the level of the upper stage of the structure reaches the side of the bowl. This option is only suitable for large spacious rooms.
Operating the bathtub in pool mode.
In this case, the structures near the sanitary ware should be covered by analogy with the cladding of the stairs. The width of the horizontal box should be less than the same size of the ceramic cladding to ensure that the vertical joints between the tiles match.
The width of the box is less than the size of the tile.
The bowl of the sanitary ware can be partially built into the podium, as in the bottom photo.
Bathtub half built into the podium.
In any case, knowledge of standard layouts of tiles on walls/floors will allow you to ensure acceptable quality of interiors when decorating with your own hands.
Walls in a new room. Stage one. Alignment.
The task is the same, to prepare strong and even walls. There are two options here:
- Build walls from scratch using blocks or sheet material according to the profile.
- Level the base with cement plaster, which has high strength and is not afraid of moisture.
The main option that is used in most cases is plaster. GVL sheathing is labor-intensive and time-consuming.
Alexander PleshkinSpecialist in dry mixes
Typically, the walls are plastered using cement plaster, and the boxes are covered with gypsum fiber board, which is mounted on a metal frame.
The base should not “walk”, it should be non-deformable.
Alexander PleshkinSpecialist in dry mixes
This is achieved by a more frequent step of the supporting metal profile to which the gypsum boards are attached. For a heated towel rail box, this condition is met: the profile pitch will be 100-150 mm.
The material for sealing depends on the depth of the unevenness in the wall.
Alexander PleshkinSpecialist in dry mixes
If it is less than 5 mm, tile adhesive is used, if more, cement plaster is used.
Cement and gypsum plaster are not used in wet rooms.
EsKor
According to the rules, gypsum plasters are not used in wet rooms - gypsum is hygroscopic.
Characteristics of ceramic tiles
Ceramic tiles for the bathroom have the following characteristics:
- Has a high wear resistance. This means that if you cover surfaces with it using all technologies, you can get repairs that won’t have to be redone for decades. At the same time, bathroom tiles do not fade or lose their pattern.
- It is resistant to water and moisture. It will not suffer from drops of water falling on it or from the vapors that are inherent in bathrooms.
- Ceramic tiles can always be washed or wiped down. If you do not use harsh abrasive substances, the risk of damaging it is minimal.
- Ceramic tiles come in a ton of variations in color, pattern, style, size and even shape. Everyone can find a tile for themselves. Creating a unique bathroom decor becomes easier with ceramic tiles.
Stage two. Primer
Primer is a mandatory step before tiling the bathroom walls. How many layers to apply depends on the wall material.
Alexander PleshkinSpecialist in dry mixes
Highly absorbent substrates (for example, foam, aerated concrete, silicate blocks) are primed in several layers. This way we will reduce the absorbency of the base, and the glue will be able to gain the necessary adhesion strength to it.
According to our expert, in some cases it will be necessary to waterproof the walls.
Alexander PleshkinSpecialist in dry mixes
For gypsum bases this is a mandatory condition - for example, for PGP. Cellular blocks absorb moisture strongly - it is also recommended to waterproof them. For walls, it is better to choose coating waterproofing, cement or acrylic.
You can safely apply tile adhesive to a gypsum base treated with a layer of coating waterproofing.
GanfayterFORUMHOUSE Member
I screwed down sheets of moisture-resistant drywall, treated it with waterproofing and mildew-proofing compound, and then laid the tiles. Three years have passed since then, and it hangs like nailed down.
Types of installation
The calculation of the required amount of tiles depends on the layout of the bathtub tiling. The classic method of laying, “seam to seam”, forms even horizontal or vertical rows. In this case, vertical seams are plumb, and horizontal seams are level.
The “bonded” cladding method is a laying in which each ceramic tile is located in the middle of the seam separating the two tiles of the bottom row. Finishing with tiles diagonally, the seams between the tiles are perpendicular to each other, and the tiles are laid at an angle of 45 degrees. This is a more complex way of tiling surfaces because many well-calibrated tiles are required.
The combined technology of wall cladding with ceramic tiles combines several types of cladding. This method is suitable for spacious bathrooms, and you can combine mosaic tiles with regular ones, smooth ones with embossed ones in various color combinations, it is important to maintain the harmony of the ornament and thoughtfulness of the combination.
Tile laying options
Renovating an old bathroom: preparing the floor and walls
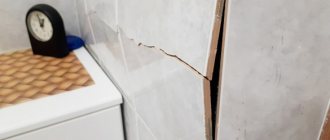
To begin preparing the floor and walls in a bathroom that has been in use for more than one year, you need to break, peel, clean off all old materials from the walls and floor and take them to a landfill. Our task is to get to the strong load-bearing layers. Based on them, we will create an even base for cladding.
Alexander Pleshkin
To do this, we either build new walls from blocks or sheet material according to the profile, or level the old ones with cement plaster: it is durable and moisture-resistant.
To prevent the base from deforming, especially next to the door, you need to monitor the width of the profile step - it should be small.
Smooth walls are leveled with cement plaster, or, if the depth of unevenness is less than 5 mm, with tile adhesive.
Then we prime the walls and wait for the primer to dry.
We prepare the floor for tiling in the same way as in the bathroom of a new room: we make a screed of the required thickness (checking our table).
Alexander PleshkinSpecialist in dry mixes
If the floor needs to be raised significantly, then it is advisable to make it from a light layer of expanded clay, on top of which a screed is placed, or to make it using wooden joists, and then a moisture-resistant sheet material such as ACL or DSP.
Choosing tiles for the bathroom
Before purchasing facing and auxiliary materials, you should determine the area of the bathroom walls and floors in order to know their required volume. The unit for calculating the volume of ordinary tiles is a square meter, and decorative products are purchased individually or by linear meters, but in any case, taking into account a 5-10% reserve.
There are many calculation calculators on the Internet that make this task easier, but manual calculation is not so difficult.
The retail network is replete with many varieties of tiles from different manufacturers, so the choice for every taste is quite extensive, but first of all you need to decide on the color of the material. For example, light colors visually expand the space of the room, and warm shades allow you to completely relax and create a cozy atmosphere.
Traditional colors are considered blue and green, which are cool shades, but their use is associated with the risk of an ordinary interior. Therefore, when tiling a bathroom, special attention is paid to ornaments and details, but it is also important that it is easier to install tiles of the same tone, or, in extreme cases, with a discreet pattern or streaks.
Saturated and active shades include bright colors that can lead to eye fatigue, and too bright ones contribute to psychological discomfort. It will be difficult to completely relax and unwind in such a bathroom, so they should be used in limited quantities, especially in a small room.
The second problem arises with the choice of tile sizes:
- with a small area of ceramic tiles, it takes longer to lay them with your own hands and it is not easy to achieve an even plane;
- laying large-area tiles requires professional skill, because incorrect operations increase the risk of their destruction and costs, respectively.
It follows that it is advantageous to focus on the average area of one element, for example, 400x600 cm for walls and 600x600 cm for floors, the carrying and installation of which does not cause any particular difficulties.
Tile with a glossy surface is easier to clean, but it is more slippery, so it is better to choose rough ceramics for the floor, which reduces the risk of falling when you have to move with wet bare feet.
When choosing tiles to decorate a bathroom, special attention should be paid to its quality and properties, which include:
- The surface is smooth and uniform in color, there are no streaks, bubbles, cracks, chips or other defects.
- Tiles in a batch are of the same shade and their sizes do not differ significantly, although among domestic manufacturers their spread varies within 2 mm or more, which is significant.
- In relation to high humidity, tiles are divided into 4 classes, among which the following are more acceptable: Ia, IIa, Ib, IIb, where the letter determines the manufacturing method (a - extrusion, b - pressing).
- In terms of wear resistance, tiles have 5 classes: the first is the lowest, and the last is the highest. For the purpose of covering bathroom walls, class 2 is most suitable, because they experience low load, and for the floor it is better to choose class 4.
The quality of ceramic tiles, the area of their use and manufacture are usually indicated on the packaging in the form of icons, for example, like this:
Finally, the culminating point of choosing tiles is purchasing them, so it is recommended to buy the material from one batch at once with a small reserve, without hoping that you can buy more later.
This decision is made due to the fact that even in the same batch, some products may differ in slight shade.
Stage three. How to prepare tile adhesive
For tiling a bathroom, our expert recommends choosing a universal adhesive that can be used to attach tiles to different types of bases: aerated concrete, ceramic and silicone blocks, cement and cement-lime plaster.
A good universal adhesive does not slip, it sets quickly and firmly holds all types of tiles, porcelain tiles, artificial and natural stone.
Dry mixtures of cement with mineral fillers and other additives are considered the easiest to work with.
Alexander PleshkinSpecialist in dry mixes
Before use, a bag of the mixture is diluted with five liters of clean water at room temperature (+15-+20 degrees): not water is poured into the powder, but the powder is carefully poured into the water, stirring the mixture continuously. Then everything needs to be mixed well. Mix for about two minutes, with a mixer or drill with an attachment at a speed of 400 - 800 rpm. You should get a perfectly homogeneous mixture without lumps. In five minutes it will be ripe and will need to be stirred again.
On the prepared base, leveled, primed and dry (if the walls were leveled with tile adhesive, it needs to dry for a day, if with cement plaster - from 3 days to a week), apply glue with a trowel or spatula and level it with a notched trowel.
Life hack: the size of the spatula tooth depends on the size of the tile.
Recommendations from our expert are collected in a table.
How to choose a spatula tooth
| Tile size, mm | Spatula tooth size, mm |
| Up to 100 | 4 |
| 100-200 | 6 |
| 200-250 | 8 |
| 250-300 | 10 |
| 300-500 | 12 |
An important point: you cannot immediately spread glue over a large area of the base. Only the kind that you can cover in 20 minutes. This is the glue consumption recommended by the manufacturer.
Recommended glue consumption
| Tile size, mm | Spatula tooth size, mm | Consumption, kg |
| Up to 100 | 4 | 2 |
| 100-200 | 6 | 2,7 |
| 200-250 | 8 | 3,6 |
| 250-300 | 10 | 4,2 |
| 300-500 | 12 | 6 |
When tiling walls and floors, plastic crosses or SVPs are used. If the tile is very large, then the glue is applied to it too, and not just to the wall. On the wall - as indicated in the table, on the tiles - in a very thin and even layer. If any tiles protrude, they are leveled by pressing and tapping with a rubber hammer. And you need to immediately remove excess glue with water.
When all the tiles are glued, you need to carefully remove excess glue from the seams and leave it for a day. It is important to remove the crosses before the glue gains strength. A day later, you can proceed to grouting the joints. The seams are rubbed with a special mixture; a special rubber slab is used for this. If the base is gypsum, then the seams must be rubbed with a special moisture-resistant mixture.
Tiling the screen
The tiles around the bathtub are laid taking into account the horizontal and vertical joints on the wall cladding. Ideally, the horizontal joints should coincide with each other, and the width of the wall tile adjacent to the screen should be more than ½ of its entire size.
Matching tile joints on walls and screen.
Therefore, before laying the finishing material, a layout is required in a special program or on three sheets of paper to scale. If there are shelves along the sides, the horizontal tiles on their surfaces should always overlap the cladding on the vertical surface of the screen so that water cannot flow into the seam.
The most difficult areas in finishing are considered to be radius, curved sections, places where three or more structures meet. For example, connecting a screen to a wall with a horizontal box.
Hatches
Depending on the relative size of the hatch and the tile, one or more cladding elements are glued to its outer surface. The range of manufacturers allows you to select a hatch for any tile format and its orientation on the screen.
For repairs, maintenance of the siphon, and overflow system, one medium-sized hatch in the front of the bowl is sufficient for manual access.
However, there is a lot of free space under the bathroom, which can be used, for example, to store detergents. The algorithm for choosing the hatch size, taking into account the tile format and the location of its installation on the screen, is as follows:
- choosing an even number of tiles in the existing layout, for example, 6 pieces or 2x3 rows with a tile format of 20x25 cm and its horizontal orientation, as in the bottom photo;
Determining the number of rows of tiles horizontally and vertically. - calculating the dimensions of the opening inside the cladding, for the top example 2 x 25 cm = 50 cm (width) and 3 x 20 cm = 60 cm (height);
Calculation of opening dimensions. - determination of the maximum dimensions of the hatch, which is to be covered with the specified amount of tiles according to a given pattern, a minimum extension of the cladding beyond the edge of 5 mm on each side is allowed, for our example the size will be 49x59 cm;
Maximum dimensions of the inspection hatch. - calculation of the minimum dimensions of the hatch for the same case, the lining can protrude beyond the edge by 7 cm, from the side of the hinges by 5 cm, which gives 50 – 7 – 5 = 38 cm horizontally, 60 – 7 – 7 = 46 cm vertically.
Minimum size of a plumbing hatch.
After which, you can buy an inspection hatch of the required dimensions, taking into account a small error, by choosing from the assortment available in the store. For the example under consideration, a product with a width of 38–49 cm and a height of 46–59 cm is suitable. Taking into account these properties, adjustments horizontally and vertically in a wide range are possible. Therefore, when installing it yourself, you don’t need to worry about millimeters.
The invisibility effect is achieved by filling the seam with sealant. To ensure that the mixture sticks to the tile only on the door side, the perimeter of the tile on the screen opening is completely covered with masking tape or electrical tape. The sealant is applied to the end of the tile of the open door.
Treating the tile seam around the hatch with sealant.
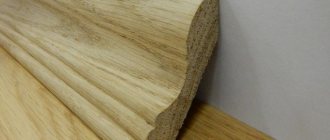
Boards
Depending on the configuration of the bathroom and the method of installing the bathtub, its sides may be adjacent to the walls or shelves, which close the wide gap between the bowl and the wall, or which are formed when making a screen with a protrusion.
Screen with three wide sides.
When decorating the sides with tiles yourself, you should take into account the following nuances:
- the width of the top shelf is calculated taking into account the size of the tiles, mosaics and the thickness of the tiles on the vertical surface of the screen along with tile adhesive, which must be completely covered with the top facing material;
- The correct option is when tiles of the same color and size are laid on all structures inside one bathroom, at least on one level;
- even radius walls can be tiled with medium-sized rectangular tiles, as in the photo below;
Covering a curved screen with medium-sized tiles. - although the standard method for semicircular walls is mosaic;
Finishing the corner bowl screen with mosaics.
When used to decorate a mosaic screen, the same facing material is usually used as decoration on walls.
conclusions
The most important thing in tiling bathrooms and other wet rooms is careful preparation of the base and the choice of tile adhesive. If all this is done correctly and all technical requirements are met when performing the work, the most large-format and capricious tiles will last for many years, and moisture will never penetrate inside the structure.
At FORUMHOUSE you can learn about other methods of wall cladding. Read how to work with fashionable seamless tiles, and how not to make mistakes when tiling yourself. Watch our instructional video on how to waterproof a bathroom.
Subscribe to our Telegram channelExclusive posts every week
Laying tiles in the toilet
Finishing the bathroom rooms is not a day's work, and it is also dirty, so everyone is trying to combine the renovation of these rooms. We figured out how to tile a bathtub, now it’s the turn of the toilet. The cladding technology itself is no different, as are the stages of work.
A very relevant question is: “how to lay tiles in the toilet, after renovating the bathroom, or in parallel?” If possible, at the same time. This will reduce the time for general repairs. And there is an opportunity to work in parallel. Since laying tiles correctly means taking your time and letting the lining dry. You cannot lay out more than two rows in one day. This may result in the lower tiles sliding down and the level being compromised.
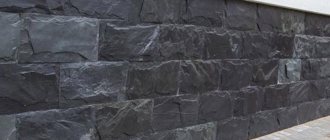
Brickwork for bathtub cladding: what you need to know ↑
It is important not only to know how to tile a bathtub, but also to properly prepare the surface. Craftsmen take into account that the working area is limited in width and height. It will not be possible to perform standard half-brick masonry. The side of the bath is too narrow for such experiments and is not designed to fit the dimensions of a serial product.
Therefore, the brick is cut into two parts. For this, an angle grinder with a diamond disc is used. The work is carried out carefully in order to obtain the thinnest bricks as intact as possible. The partition is laid out, paying special attention to the vertical level - it is checked using a plumb line. The top row of masonry is glued directly to the bathtub with a special glue - this ensures a reliable connection between the building material and the tank.
Ideally, the thickness of the brick is calculated so that there is room left for applying a thin layer of plaster. With its help, all errors are leveled out. It is much easier to stick tiles onto such a surface. This option is possible if the protrusion of the side of the bathtub is more than 2 cm.
After drying, the plaster is treated with a fungicidal compound, primed and ceramic tiles are glued.
Instead of brick, foam concrete and similar materials are sometimes used. However, this is advisable if the slabs are used for other repair work and there are unused residues. It is irrational to buy bulk building materials specifically for a small project.
Brick is a material not intended for penetrating waterproofing. Cement plaster will serve as a moisture-protective layer.
Quite often, not only the facade of the bathtub is tiled, but also the horizontal section between the tank and the wall