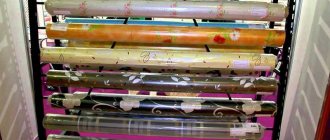
Quite often, during renovations, property owners decide to paint the walls in the bathroom. Construction stores offer a wide selection of waterproof bathroom paints for walls in various colors, which will make the interior of this room cozy. Below you can familiarize yourself with the types of paints that need to be used to decorate the walls in the bathroom and the features of painting surfaces with your own hands.
Sherwin Williams is a popular paint among compatriots
How to paint a bathroom
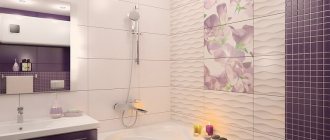
You can paint the walls in the bathroom in different ways. Some choose a combined finishing option - the shower stall or part of the wall near the bathtub is tiled, the rest is painted. In this case, the choice of paints is greater, since many can easily tolerate high humidity, but not all can withstand exposure to hot chlorinated water.
Only part of the walls can be painted in the bathroom
If you categorically do not like tiles, even in limited quantities, you can cheat - decorate the painted walls in the splash zone with glass or transparent polycarbonate sheets.
Painted bathroom walls can be protected with glass or polycarbonate panels
It is not necessary to cover all the walls completely
Designer approach))
Many people still have concerns about whether it is possible to hang a heated towel rail on a painted wall. The answer is yes, there are no restrictions and there will be no consequences either. Read more about what paints you can use to paint bathroom walls.
Which is better
When choosing what paint to paint a bathtub and the entire bathroom, people often face a problem, since there are many types of paints with significant differences. Choosing the best option is quite difficult, so the recommendations of experts are taken into account:
- if the room has metal elements on the walls, then water-based paint is not used for painting, since it does not protect the metal from corrosion;
- acrylic and latex compositions that have the necessary parameters and reasonable cost are considered a good choice;
- if in the bathroom you plan to regularly expose the walls to various mechanical factors, then it is advisable to choose silicate or silicone paint to form the coating;
- It is recommended to study the composition during the selection process to make sure that the solution contains special antifungal additives;
- The manufacturer of the material is taken into account, since it must be proven, reliable and have been operating on the market for a long time.
The color of the paint depends entirely on the theme and color scheme of the room.
What paint can be used in the bathroom
Not all paints can be used for wet rooms, and in the case of a bathroom, high cleaning power is still required. The following types are suitable:
- Latex. One of the types of water-based paint. It forms a dense film on the surface, applies well, lasts a long time, but has a high price and requires ideal surface preparation.
- Water-based silicone or acrylic emulsion. These paints are a good choice for painting a bathroom. Medium price range, good resistance to water.
Waterproof bathroom paint can vary - Alkyd enamel. It has a low price, good resistance to water, but is produced on the basis of organic solvents, and therefore has a strong odor. Another disadvantage is that a wall painted with alkyd enamel does not allow air to pass through.
- Oily. Everyone has long known bathroom paint, which is becoming less and less popular - it has a strong smell, does not last long (it begins to peel or swell).
Chlorinated rubber paint is often also recommended. Yes, it creates a waterproof coating, as it was developed for swimming pools. But it can only be used at temperatures not exceeding +27°C. It makes sense to use it in areas exposed to water splashes, since after drying the resulting film is more like rubber than paint and does not allow either water or air to pass through. But there is a high probability that the water will get warmer than necessary. It is not stated how this paint will behave or what it will begin to emit, but it is hardly worth the risk, since its cost is high and the results of application are doubtful.
The combination of tiles and paint in the bathroom is beautiful and practical
As you can see, there is a choice, but there is no ideal option. Every place has its downsides. In general, any serious manufacturer has bathroom paint, and often more than one. If there is no direct indication that it is intended for the bathroom and kitchen, then it is written “washable” and “waterproof” or “moisture resistant.” When choosing, pay attention to the number of brush passes (should also be written). This figure is measured in thousands and the larger it is, the better. The minimum for walls is 3000 passes, but most good compositions exceed this figure many times over. For example, Livna “PS-285” can withstand 20,000 passes with a soft brush. That is, in terms of characteristics it is close to Tikkurila, but costs several times less.
Top 8 manufacturers
Various manufacturers offer a wide selection of paints and varnishes for walls in bathrooms. The most famous of them:
- Finnish has proven itself well in the market over 20 years of existence. A good selection and time-tested quality of goods make this manufacturer one of the best in the world. The company is constantly improving the product manufacturing process. Recently, a new paint, Oasis, has appeared on the market, which is recommended for painting walls in bathrooms. A special coating protects surfaces from the formation of mold and the accumulation of bacteria in places of high humidity. In order to ensure a lasting result, it is recommended to apply the paint in several layers at intervals of 2-3 hours.
- Tikkurila is rightfully considered the most popular company among consumers on the Russian market. The manufacturer is working to improve the quality of the product. A large selection and good price range allow us to attract customers with different ability to pay. A specially developed multi-stage system is used for surface treatment. The wall is first primed and then a moisture-resistant layer of paint is applied.
- The German brand Alpina produces high-quality paint for bathroom walls. The treated surface has a pleasant velvet-matte base, which sets the manufacturer apart from its competitors. The only drawback of the material is its long drying time.
- The American manufacturer Sherwin Williams has the best recommendations on the market, thanks to the use of high-tech raw materials in the production of paint. The product is environmentally friendly and fade resistant.
- The French company Vincent offers a large selection of textures, shades and types of finish. A paint has recently been released that provides a velvety finish to surfaces.
- The brand from Slovenia “Belinka” has proven itself to be of reasonable price and good quality. The company produces an unusual paint for bathroom walls, which changes color after applying special colors. Initially it turns out to be a pleasant snow-white shade. It can be transformed at will into the pastel color you like.
- Turkish offers quality products at low prices. Latex wall paints are resistant to stains and withstand mechanical stress well. The paint dries quickly, leaving no stains or smudges.
- The Russian brand "Tex" creates products that can compete with European analogues. The company produces white, moisture-resistant paint, the color of which can be diluted with color and obtain shades for every taste.
In order to remain competitive in the market, manufacturers are constantly working to improve product quality. By choosing products from any of the listed companies, the consumer can be sure of a good result.
Latex paint: characteristics
Latex can be natural or synthetic. Latex paints are made on the basis of natural latex - the juice of rubber plants. These particles are dissolved in water and do not form rigid bonds. As the water dries, an elastic, waterproof film forms on the surface. Its advantages are:
- Easy to apply.
- Dries quickly.
- Almost odorless.
- Abrasion resistant coating.
- Durable.
- Easy to clean.
- Can be tinted with various pigments.
The paint is applied with a roller or brush. For normal staining, it is advisable to apply 2 layers. To reduce paint consumption, it is advisable to pre-prime the surface.
Some brands of latex bathroom paint
There are also disadvantages:
- In order for the paint to look good, the walls need to be perfectly prepared - a thin film will highlight all the imperfections.
- Not suitable for unheated rooms. Lower temperature threshold +10°C.
- Before painting, the walls must be treated with antifungal compounds.
- High price.
Mostly, latex bathroom paint is not purchased because of the high price. If you look at the price per liter, it is. But we must take into account that the consumption of this paint is very small, so you will need to buy a small amount. The second point that must be taken into account is that the painted surface does not change its appearance for a long time. Literally nothing has happened to her for years. So “expensive” is relative.
One more thing: if you want to have a “silky” shine on your bathroom walls, you need latex paint. No other product gives this effect.
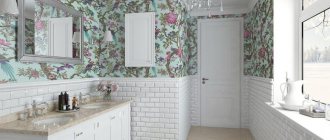
Decorative painting methods
Unfortunately, not everyone knows how to draw, so only a few can decorate bathroom walls with hand-painted paintings. Hiring a specialist for this is too expensive, which means you need to look for simpler ways. A wide palette of modern colors provides a wonderful opportunity to decorate the interior without much effort.
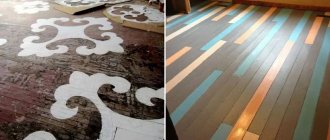
Using stencils
This is one of the most popular methods. Nowadays there are many ready-made stencils for painting that are inexpensive and easy to use. Disposable stencils are made of vinyl film on an adhesive base; acrylic and durable plastic are used to make reusable templates. Such stencils are tightly fixed to the wall, which makes applying the design as simple as possible.
Step 1. Paint the walls as described above, wait until completely dry. Select a suitable pattern and determine its location.
Step 2 . Remove the protective film from the stencil and carefully attach it to the wall surface. If there is no self-adhesive layer, the stencil is secured with masking tape on all sides.
Attach the stencil to the wall
Step 3. The roller is dipped in paint, rolled first over the tray to remove excess, then over the surface of the stencil. All cutouts must be evenly covered with paint, otherwise the pattern will not be clear.
Paint over the stencil. Use a roller or brush
Move the stencil and continue applying the design to the walls
Step 4. Carefully unfasten the template from the wall and allow the pattern to dry.
Stencil painting
The color of the pattern should go well with the main color and stand out against the background of the walls. Incorrectly selected shades can ruin everything, and the original idea will lose all its charm.
Video: Drawings on walls using stencils
Striped walls
With the help of a simple multi-colored strip on the walls, you can give the bathroom a special charm and visually expand the boundaries of the interior. There are a huge number of options here, so it all depends on your imagination. You can experiment with the width and location of the stripes, the number of colors and shades. Stripes of the same color, but with different surfaces - matte and glossy - look interesting.
Paint the walls striped
Bathroom interior with striped walls
Design project for a bathroom with striped walls
To choose the best option, it is best to draw a diagram of the stripes on paper and color them to your liking.
Next, all that remains is to buy the paint of the desired color and several rolls of masking tape. The walls should already be painted in the base color.
Step 1. Work begins from one of the corners of the bathroom. Using a building level, draw a vertical line along the wall from ceiling to floor with a simple pencil. Measure the selected strip width and draw a second line. The remaining stripes are marked in the same way up to the corner.
Step 2. Apply masking tape strictly along the lines. In this case, the tape should be inside those stripes that will remain in the base color. Lines drawn with a pencil cannot be glued, because this way they will be visible on the painted surface.
The adhesive tape is smoothed well so that there is no air left under it, otherwise the paint will get inside and the stripes will be sloppy. Additionally, the joints between the ceiling and walls are covered.
Step 3. Pour paint into the tray, dip the roller into it and begin to roll it along the first stripe. The layer should be applied evenly, without smudges. Having painted one strip, move on to the next, observing the alternation of stripes by color. If necessary, apply a second coat of paint, waiting for the first to dry.
Apply masking tape
Striped wall painting scheme
Painting a wall with a roller
Step 4 . After painting is completed, carefully remove the tape from the wall. This should be done slowly, with smooth movements, as a sharp tear can lead to peeling of the paint.
Peel off the tape
In the same way, you can make horizontal and diagonal stripes, as well as more complex patterns. If you apply masking tape in perpendicular lines and then paint over individual areas, you will get colored squares.
Creative on the walls
The most important thing in this type of painting is extreme accuracy at every stage. Paint easily penetrates under poorly secured tape, smears lines, and leaves smudges. All this will have to be wiped off and re-painted.
Rollers for applications
This is probably the fastest and most convenient way to decorate. A special patterned roller has two attachments - a foam rubber one, which absorbs paint, and a rubber one, with an embossed pattern for imprinting.
Patterned roller with animal images
First, the walls are prepared in the standard way and painted in the base color. To apply the pattern, choose a paint that is contrasting in color and harmonizes with the main one. Next, paint is poured, the roller is dipped so that the foam nozzle is well saturated, and both nozzles are rolled out together over the tray.
How to paint a wall with a pattern roller
The most crucial moment here is applying the pattern. The roller must be guided evenly, from top to bottom, strictly vertically. The next strip should run parallel to the first, exactly along the border of the pattern. If the edges of the strips overlap each other, it will look sloppy, and to fix this, you need to completely repaint the wall.
Acrylate (acrylic or polyacrylic)
Acrylate is one of the types of latex paint. One of the types of synthetic rubbers is used as a base - acrylate, which is why the composition got its name. The properties of acrylic paint for the bathroom can be called optimal:
- A weak and unstable odor when drying and its complete absence after.
- Moisture resistance. When water hits a dry surface, nothing happens. Dried acrylic does not dissolve and does not enter into any reactions.
- Vapor permeability. The dried composition does not interfere with gas exchange.
- Good adhesion (adhesion to the surface to be painted).
- Can be used at high and low temperatures. If you are looking for waterproof bath paint, this is a good choice.
- Does not fade when exposed to ultraviolet light.
- High abrasion resistance. Anti-vandal coatings are made from acrylic paints.
- Safety. Does not contain heavy metal salts or organic solvents.
- No noticeable odor.
If you need a bright and deep color, acrylic paint for the bathroom is your choice. Moreover, this color lasts for a very long period of time. An additional bonus is the versatility of the composition: it can be applied to concrete, metal, glass, stone, plastic, brick, plaster.
Acrylic paint for the bathroom is a wonderful solution to the problem
The disadvantages of acrylic paint are also worth knowing:
- Long drying time.
- Low dry residue (about 30%), which means that the film is thin and requires good surface preparation.
- Only acrylic paint goes on top of acrylic paint. If you want to change it, you will have to completely remove it.
Overall, acrylic bathroom paint is a good choice. Painted bathroom walls will retain their color for a long time.
How much is needed
You not only need to figure out what kind of paint you can use to paint the bathtub, but also how much material you will need to complete this job. The calculation is considered a rather complex task, since specialized formulas must be used. You can simplify the process by using special online calculators.
On each package of paint, the manufacturer indicates the average consumption of material for a certain area. However, this information is only an estimate, so actual consumption may differ significantly from the available figure. This is due to the fact that the solution is applied to different substrates, and the thickness of the layer can always be different.
Paint consumption table
In the process of calculating the required amount of paint, the following data are taken into account:
- the length and width of the bathroom, and you can use information from the technical passport of the property or take measurements yourself;
- height of walls that need painting;
- the area of windows and doors, as well as their number, and in the bathroom most often there are no windows and there is only one door;
- It is additionally important to know the type of paint and its approximate consumption indicated by the manufacturer.
The entire calculation process is divided into stages:
- using a tape or other similar measuring equipment, the width of two walls of the room adjacent to each other is determined, and this information is sufficient, since the height of the walls is the same throughout the room, and also the opposite walls have the same width;
- difficulties arise when working in non-standard rooms, since here you will have to measure each wall separately;
- The area of two walls is determined, for which the height is multiplied by the width, for example, with a width of one surface of 6 m and the second of 3 m, as well as with a height of 2.5 m, the area will be equal to: 2.5 * 6 = 12 sq m and 2.5*3=7.5 sq m, and the area of the entire room is: 12*2+7.5*2=39 sq m;
- the dimensions of windows and doors are removed from the obtained value, for which the width and height of the openings are measured from the box, and then the indicators are multiplied, for example, there are three windows with an area of 1.3 sq. m, as well as a door with an area of 2.5 sq. m , therefore the total area to be painted will be equal to: 39-1.3*3-2.5=32.6 sq m;
- if you plan to paint additional elements in the room, then their area is determined, added to 32.6 sq. m.
If you use online calculators, after entering all the necessary information, a quick calculation will be carried out, after which you will receive the amount of paint needed for painting. Typically, program data is accurate and up to date, so the figure will be correct, but slight deviations are allowed.
Calculation of the area to be painted
Thus, paint is often chosen for the bathroom in the process of creating a high-quality and durable wall covering. It is presented in many types with numerous differences. Therefore, the choice is difficult for many people who do not understand these solutions. Before purchasing, it is recommended to carefully study the parameters and characteristics of each variety, after which the most suitable composition is selected. It is advisable to perform calculations in advance in order to immediately purchase the required amount of material.
Silicone water dispersion
Silicone paint, as well as latex and acrylic, are water-based compositions. This means that it is also odorless and applies well. However, it has its own characteristics. Here are its advantages:
- Good adhesion. Can be applied to concrete, putty, brick, wood, stone, etc.
- Does not require an ideal surface, hides roughness and small cracks.
- Can be used at high and low temperatures.
- The film repels water, but allows steam and gas to pass through. That is, walls or ceilings coated with silicone paint “breathe.”
- Prevents the development of fungi and microorganisms.
- Easy to clean.
- Tolerates exposure to sunlight well.
- Long service life (up to 25 years).
If you need paint for your bathroom so that the walls and ceiling “breathe”, choose silicone paint. It is good in problem areas where there is mold or mildew.
Silicone bathroom paints are a good choice
There are also disadvantages:
- Price. Not the cheapest paint. But looking at the service life, you understand that the costs are justified.
- It is not advisable to use this paint on metal: it is vapor-permeable, which causes the metal to quickly rust. When painting reinforced concrete, measures are required to protect the reinforcement - impregnation with anti-corrosion compounds.
Silicone paint is applied like any water-based paint, with a roller or brush. To reduce the consumption of an expensive composition, it is advisable to pre-prime the surface. The primer should also be silicone based. Work begins at above-zero temperatures (usually above +5°C) and normal humidity. The composition must be applied to clean, dry walls or ceilings.
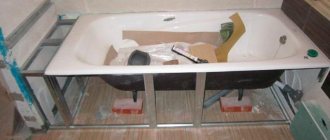
Preparing the bathroom for painting
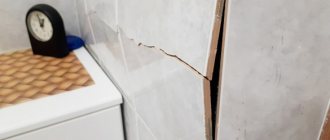
The preparatory process includes two stages - removing the old finish and leveling the surfaces. In some cases, it is not necessary to remove the coating to the base, for example, if the walls have already been painted and have no defects. Then the surface is simply cleaned of dust and dirt, primed and dried before applying new paint. But this happens very rarely, and you can almost always find peeling areas, cracks, potholes, and areas infected with fungus.
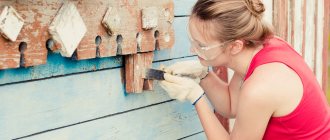
Step 1. First, take out everything unnecessary from the bathroom, remove the baseboards and old lining (if any). Peeled paint can be easily removed with a scraper or spatula by prying up its edges. Where the paint sits tightly, it is best to use a grinder with a flexible disc for sanding.
How to remove paint from a wall
Video: Removing, removing old paint from walls.
Step 2. Small potholes and cracks are rubbed with sandpaper.
Sanding walls
Large cracks are expanded for subsequent sealing with mortar.
Joining cracks
The whitewash is simply washed off with water to a solid base.
You can wash off whitewash from walls using a regular sponge and water.
Step 3. Areas blackened by mold are treated separately: thoroughly cleaned with a scraper, wiped and any antiseptic composition is applied. Particularly carefully inspect the places behind the pipes, where dirt most often accumulates and fungus develops.
Means for eliminating fungus and mold
Step 4. After the walls are cleaned, you need to remove all debris, dust and dirt. Large cracks in the walls are filled with plaster mortar and allowed to dry.
Sealing cracks and crevices in walls
Step 5. Next, prime the surfaces, starting from the top. In dry rooms, you can prime it once, directly before painting, but for the bathroom more reliable protection is needed. Be sure to use a deep-penetrating, water-resistant primer. To apply the primer, use a fine-nap roller. Foam rubber is not quite a suitable option for these purposes.
Deep penetration primer
The primer composition is poured into a paint bath, the roller is dipped and rolled evenly over the surface. Where the roller does not reach, prime with a brush. Make sure there are no dry areas or drips. Depending on the composition, the primer dries from 4 to 12 hours. If the base of the walls is quite porous, it is advisable to prime again after the first layer has completely dried. For a strong concrete surface, once is enough.
Wall primer
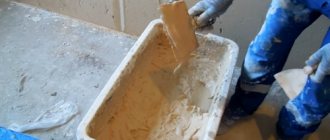
Step 6. According to the instructions indicated on the package, dilute the putty mixture with water and fill all the uneven areas. The mixture is applied with a spatula and excess putty is removed with it. If you need to level the surface with a continuous layer, take a wide spatula, apply the solution along the entire length of the blade and, holding the spatula at an angle to the wall, apply the putty with an even movement. There is no need to press hard on the spatula, the main thing is that the blade fits snugly to the surface. Movements are performed from the bottom up, making sure that there are no sagging or voids left.
Wall putty - photo
Step 7. When the putty has dried, the walls are thoroughly sanded with fine-grained sandpaper. This will help give the surface the required smoothness. Since a lot of dust is generated during the grinding process, upon completion of the work, wipe everything with a damp, clean cloth.
Step 8. The prepared surface is primed a second time, again starting from the top. After this, all that remains is to wait for the composition to dry.
Alkyd enamel
This type of paint can be used not only for the bathroom, but also for exterior or interior work. The main disadvantage is the strong odor during application and drying, since the solvent is white spirit. Domestic alkyd enamels are often toxic, so you need to work in a ventilated area and, better yet, wear a gas mask. The composition may also include a filler (very finely ground stone chips or sand), a pigment to give color, and there may be antibacterial or antiseptic additives.
Advantages of alkyd enamels:
- High film strength.
- Resistance to aggressive environments.
- Short drying time.
- Low price.
- Good adhesion.
- Does not turn yellow or crack.
- Wide temperature range of application.
When choosing, it is better to opt for imported products. The price differs significantly, but so does the quality. The most important thing is that imported alkyd enamel smells much less and is definitely non-toxic.
Alkyd enamel - not bad for everyone, but has a strong “smell”
The disadvantages have mostly already been stated: odor and toxicity, but there are also some unpleasant aspects:
- The surface coated with alkyd paint does not allow air and steam to pass through, so the ventilation system in the bathroom must be effective.
- To prevent fungus from appearing in the bathroom, preliminary protection of the base is necessary.
Alkyd enamel has two forms of release: standard - in cans, and also in aerosols. Aerosols are more versatile - they can be applied to any surface, they are also easier to paint hard-to-reach places, but they are more expensive.
Color selection
When choosing a coating, you need to pay attention to the shade of the material. The harmony of the interior in color scheme should be maintained. The atmosphere should be soothing and relaxing after a hard day at work. It is better not to use aggressive shades.
In a room with daylight, you can opt for cool colors - blue or blue. It is better to make small rooms without windows warmer, for example, using pastel colors. Some specialty stores use a tinting machine—the buyer adds the desired pigment to the paint. Due to this, it is possible to expand the choice.
Automatic paint tinting machine
In addition to the quality of the material, it is necessary to dwell on its aesthetic properties. Which type to choose – a glossy sheen of the walls or a matte surface depends on everyone’s taste. But you should be guided by the smoothness of the surface:
- gloss looks perfect on a perfectly flat wall;
- small irregularities can be hidden by matte paint;
- For a better result, you can use various relief paints that create a slight structure.
Matte paint is less resistant to mechanical damage than glossy paint. But it creates an unusual atmosphere in the room.
Oil paint
Oil paints are made from drying oil or synthetic oils. Compositions based on drying oil are considered the best, but they are more expensive. Minerals ground into flour are added to the base, which are responsible for the color of the coating. These particles are insoluble, and since they are heavier than oils, they settle to the bottom. Therefore, before use and during operation, the paint must be mixed. Advantages of this type of paint:
- Low price.
- Waterproof coating.
- Fits well on a properly prepared surface.
- Good adhesion.
- Can be used to color metal and wood.
If you need inexpensive paint for your bathroom, this is your option. One has only to take into account that the service life of such coatings is very short: bubbles quickly form in places of direct contact with water, the paint begins to crack and peel.
Oil paints are the cheapest, but not the best option.
Disadvantages of oil paint:
- The composition contains organic solvents, so the smell is strong and persistent until drying.
- Vapors may be toxic.
- Fewer colors due to the use of only mineral pigments.
- Long drying time - at least 6 hours. Throughout this time, the paint “smells.”
- After some time, the paint changes color (a yellow tint is added). It fades quickly in the sun.
- In humid areas it cracks and peels.
The combination of these qualities leads to the fact that oil paints are used less and less. Even the low price does not help, so you have to update the coating almost every year. In this case, the normal appearance is maintained for a few months. In general, this is the most unsuccessful paint for the bathroom of all those described.
Common mistakes when painting walls
Anyone can make a mistake when working with paint, but the risk increases if a beginner takes up the brush. Among the mistakes that can ruin the process of decorating a bathroom:
- It is recommended to replace a roller previously used for another paint with a new one. If the remnants of the old water emulsion mix with the new solution, streaks or changes in tone will appear.
- If a brush is used for painting, it is recommended to apply the substance using the same movements. A change in the direction or amplitude of the swing can affect the appearance of the wall after drying.
- The instructions on the back of the can will tell you how to dilute the paint. Before diluting, it is important to consult with those who have already used products from the same manufacturer.
Turquoise tone of the walls Source vanna-prosto.ru
What paint can I recommend?
Even after choosing the type of paint you want to use in your bathroom, choosing a specific brand is not easy: there are so many different offers. Therefore, it is easier to navigate if there are recommendations from those who already have some experience in using painted walls in the bathroom. Here are the paints that have good reviews:
- Caparol Capamix Samtex 20 (latex paint).
- Livna PS 285. Washable paint for heavily loaded walls (use not in areas exposed to water).
- Dulux Ultra Resist (acrylic).
- Benjamin Moor (Benjamin Moore) Kitchen & Bath Satin Finish (acrylic); Aura Interior Matte Finish (silicone).
- Rainbow Extra (acrylic).
- Tikkurila (Tikkurila). There are several options: Luya 40 (acrylate for wet rooms), Luya 7 (washable acrylate for areas with high loads), Euro Extra 20 (semi-matte),
- VGT Kitchen and Bathroom IQ130 (acrylic).
There are many other paints, but these have already been used in bathrooms, so they are already tested. These are mainly acrylic paints; others are apparently used less often, since they are more expensive. All of them provide a matte or semi-matte finish - this is the latest trend in decoration. The advantage of this choice is that surface defects (if any) are not as noticeable as on those painted with glossy and semi-gloss paints.
A few final photos of how you can paint a bathroom - for inspiration.
Blue tones are often found in the bathroom
Beige bathroom paint is a classic choice.
Lighter shades require less light
It is not necessary to paint the walls the same color. Use your imagination
The combination of tiles and painted walls is the most practical option
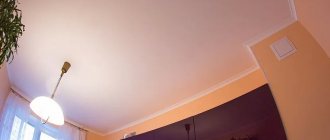
Sunny orange color of bathroom walls
Cheerful green in two shades in the bathroom
Even if the interior is not luxurious, painted walls in the bathroom look good
How to combine colors correctly
A monochromatic interior looks quite boring. Therefore, it is better to paint it in 2 or several shades. You can focus attention on certain areas of the room, for example, on a mirror or cabinet. To do this, the area around the selected segment needs to be painted a different color. The ratio of areas to be painted should be at least 70% / 30%, otherwise the room will be ugly and tasteless.
A color scheme
To select 2 suitable shades for the bathroom, you can use the table. The main color is located vertically, which should make up approximately 70% of the area to be painted. Horizontally - combining additional ones (one of them should be selected). To create contrast, you can combine the main one and the accent one.
Combination of basic bathroom paint shades with each other.
| Main trend shades | Combining additional shades | Shade to create an accent | |
| Cobalt blue | Blue-green | Light green | Grey |
| Turquoise | Light gray | Pink | Ripe cherry |
| Peach | Lilac | Yellow-peach | Dark brown |
| Coral | Mint green | Violet | Cream |
| Yellow | Pale pink | Pale brick | Chocolate |
| Mustard | Light beige | Olive | Light chestnut |
| Lime | Fuchsia | Emerald | Cream |
| Red | Thistle | Blue | Peach |
| Cherry | Gray blue | Ginger | Fuchsia |
Pros and cons of water-dispersion paints
Like any other finishing material, water-dispersion paints have their distinct advantages and some disadvantages.
pros
- Ease of operation. In order to dilute this type of paint to the desired consistency, you do not need to use special solvents; the paint is diluted with ordinary water.
- Due to its composition, the paint is completely safe for health, as it does not contain toxins.
- Completely odorless. The bathroom will not have to be ventilated for a long time after renovation.
- Fast drying. When applying this type of paint in several layers, you do not have to wait several days for the paint to dry. Therefore, repairs can be completed faster.
- A variety of colors and the ability to easily change color saturation. Water-dispersion paints are tinted to obtain the desired shade, so it is possible to produce material with any degree of tone saturation.
- Versatility. Walls painted with water-dispersion paint will fit perfectly into any interior.
Minuses
- Inability to use with some materials. These types of paint are not used for painting metal surfaces.
- Low degree of resistance to mechanical damage. The paint coating is quite easy to accidentally damage.
- Walls painted with this type of paint cannot be washed with a brush or detergents.
Advice! When choosing paint for finishing a bathroom, you should consult with store employees and look at quality certificates. Preference should be given to materials with antibacterial additives, since in a humid bathroom atmosphere there is a high risk of mold development.
So, how to choose the paint that is best suited for finishing the walls in the bathroom? Firstly, the material must be moisture resistant, secondly, it must have antibacterial additives that prevent the growth of mold, and thirdly, it could be used to create a durable and beautiful coating.
If all of the above conditions are met, then the chosen paint will create a beautiful coating that will decorate your bathroom. But do not forget that the use of any type of paint requires careful preparation of the walls.
Using stencils for an unusual design
You can also use different patterns to create 2 additional colors. An excellent solution is to use stencils. They are able to highlight the unusual style of a room without requiring much effort.
There are several types of stencils:
- reverse - the wall can be painted around the picture;
- sample - a monochromatic pattern inside a pattern is obtained;
- combined - applied in several separate layers;
- volumetric - obtaining textured patterns using putty in the stencil slot.
Special stencils can be purchased in a store or made by hand. It doesn’t matter what type to choose, the main thing is to adhere to the general style of the room. No additional effort is required to make them. You can take plain paper, draw a picture or find it on the Internet and print and cut it out. Then take the vinyl film, apply the cut out design and outline it with a marker. Cut with any sharp knife.
When the stencil is ready, the design is attached to the painted wall with special glue, around which masking tape is applied. Then paint is applied with a roller, brush or spray can. Using a special glue to secure the stencil will make it easy to peel off after painting. Due to this, there will be no damage to the wall.
In addition to paint designs, vinyl stickers are used that are resistant to moisture. They can be peeled off at any time without leaving scratches on the wall.
DIY painting instructions
Let's assume that we have already chosen the paint. All that remains is to prepare a simple tool:
- roller (fur or foam);
- several brushes of different widths with securely fastened bristles;
- masking tape - to protect surfaces not intended for painting;
- a cuvette that saves paint and allows you to remove excess material;
- spatula - for occasional cleaning.
A spatula will not be needed if the walls are initially ready to be painted. This means that they must be plastered, perfectly smooth, without traces of old paint or glue, without cracks or depressions
It is better to remove shelves, mirrors, hangers, hooks and other devices from the walls that interfere with the uniform application of paint.
Some experts insist on observing the temperature regime. Optimal indicators are from +10ºС to +20ºС. It is also important to adjust the humidity, which should be within 50-70%.
To increase this indicator in winter, use humidifiers, and if they are not available, use buckets of hot water.
Procedure:
- Prime the clean surface with a special solution. There are many types of universal-type interior primers, but it is better to choose one labeled “for paint.”
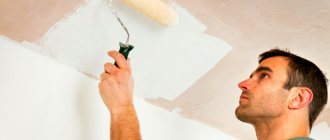
- After the primer has completely dried, we begin to apply paint with a brush in the corners, starting from the light source (window or wall lamp). We also use a brush to paint skirting boards, narrow parts, and interior elements (for example, panels).
- We paint wide surfaces last, using a roller. To ensure quality work, follow the movements - from top to bottom, then from left to right, then from top to bottom again. The technique is quite simple.
Don’t forget about the subtleties of painting: remove excess paint on a ditch or a special mesh so that there are no streaks or smudges.
To achieve a rich color, you will need to apply 2-3 layers of paint, each subsequent repetition should be done after the previous layer has completely dried
Drying time is indicated in the instructions: from 3 to 6 hours. Usually the first layer dries 2-3 hours before the rest.
Some tips from professionals - representatives of Tikkurila: